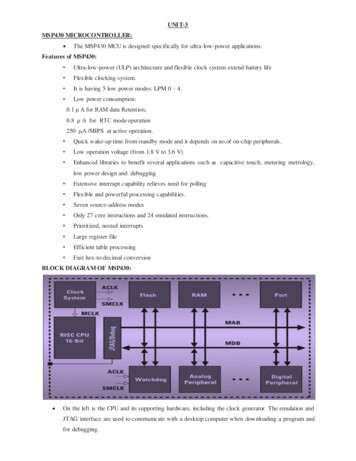
Transcription
Freescale SemiconductorApplication NoteAN3506Rev. 0, 12/2007Migration from TI MSP430 to9S08QE128 or MCF51QE128Flexis MicrocontrollersEnhancing Low-Power Performanceby: Inga Harris8-bit Microcontroller Applications EngineerEast Kilbride, Scotland1IntroductionFrom the RS08 to our highest-performance ColdFire V4 devices, the Controller Continuum providescompatibility for an easy migration path up or down theperformance spectrum. The connection point on theController Continuum is where complimentary familiesof S08 and ColdFire V1 microcontrollers share acommon set of peripherals and development tools todeliver the ultimate in migration flexibility. Pin-for-pincompatibility between many devices allows controllerexchanges without redesigning the board. Developmenttool compaitibility enables seamless porting with onesimple recompilation step. The MC9S08QE128 and theMCF51QE128 are the first products in the Flexis series.Flexis is a single development tool that eases migrationbetween 8-bit (S08) and 32-bit (CFV1). Also, it is acommon peripheral set to preserve software investmentbetween 8-bit and 32-bit and pin compatibility whereverpractical to maximize hardware reuse when movingbetween 8-bit and 32-bit. Freescale Semiconductor, Inc., 2007. All rights reserved.Contents12Introduction . . . . . . . . . . . . . . . . . . . . . . . . . . . . . . . . . . . 1Application Example . . . . . . . . . . . . . . . . . . . . . . . . . . . . 32.1 Ultra Low Power Thermostat with 12-bit A/D Conversion . . . . . . . . . . . . . . . . . . . . . . . . . . . . . . . . . . . . . 33Design Conversion . . . . . . . . . . . . . . . . . . . . . . . . . . . . . 83.1 Hardware . . . . . . . . . . . . . . . . . . . . . . . . . . . . . . . . . 83.2 Software . . . . . . . . . . . . . . . . . . . . . . . . . . . . . . . . . 84Power Comparison . . . . . . . . . . . . . . . . . . . . . . . . . . . . 265Conclusion. . . . . . . . . . . . . . . . . . . . . . . . . . . . . . . . . . . 28Appendix ACode Listing. . . . . . . . . . . . . . . . . . . . . . . . . . . . . . . . . . . . . . 29A.1 MSP430FG4619 Code . . . . . . . . . . . . . . . . . . . . . 29A.2 QE128 Code . . . . . . . . . . . . . . . . . . . . . . . . . . . . . 35
This application note shows how to convert a typical MSP430FG4619 application into a QE128application. The software conversion was written using IAR Embedded WorkBench Kickstart for MSP430V3 and Freescale CodeWarrior for Microcontrollers V6.0.The hardware tool used to develop the application code is the MSP430 USB-Debug-InterfaceMSP-FET430UIF with a custom target board for the MSP430FG4619 as shown in Figure 1. The QE128hardware tool used is the SofTec Microsystems EVBQE128 Starter Kit, shown in Figure 2, can operatewith the MC9S08QE128 or the MCF51QE128 in 80-Pin package. The image sizes are approximatelyrelative.Figure 1. Custom MSP430FG4619 board using MSP-FET430UIFMigration from TI MSP430 to 9S08QE128 or MCF51QE128 Flexis Microcontrollers, Rev. 02Freescale Semiconductor
Figure 2. EVBQE128 Starter KitNOTEWhen QE128 is referenced in this document, this statement is applicable toMC9S08QE128 and MCF51QE128. If the statement is only applicable toone of the devices, the full part number is used.NOTEThe details on the MSP430 are based on publicly available data and formthe basis of a comparative analysis to the QE128 devices on a number offeatures. For an in depth analysis of the MSP430 itself, TexasInstruments (TI) should be contacted directly.2Application Example2.1Ultra Low Power Thermostat with 12-bit A/D ConversionThe block diagram shown in Figure 3 shows the application hardware configuration for theMSP430FG4619 and the QE128 thermostat system. The application features the real time clock, 12-bitanalog-to-digital convertor, SPI, GPIO, timer, and pushbuttons for state and setpoint inputs. The main loopfor this implementation runs once every second, prompted by an interrupt from the RTC module. Betweeninterrupts, the device is in Stop3/LPM3 resulting in low power operation.Migration from TI MSP430 to 9S08QE128 or MCF51QE128 Flexis Microcontrollers, Rev. 0Freescale Semiconductor3
Set1k1k1k90.1uFHeatFigure 3. Thermostat Block DiagramThe pins in the above block diagram have been numbered 1 to 11 because the actual pin functions andlabels for the two devices are detailed in Table 1. Pins 10 and 11 are optional and only needed to aiddebugging because you can see on the board what status the code is currently in.Table 1. Thermostat Pin Function and AssignmentPin No.Application FunctionMSP430FG4619 PinQE128 Pin13V SupplyVCCVDD2External CrystalXINXTAL3External CrystalXOUTEXTAL4AD InputAD0/P6.0PTA0/ADP05LCD ControlUSCI A0 pinsSPI2 VSSVSS10Mode Indicator LEDP1.7PTE611Mode Indicator LEDP1.8PTE7Migration from TI MSP430 to 9S08QE128 or MCF51QE128 Flexis Microcontrollers, Rev. 04Freescale Semiconductor
2.1.1Design DescriptionThe RTC interrupt flag is set every second and the clock function is executed imediately to ensure it isalways done and no seconds are lost. To minimise time spent in the main software loop, the maximum busfrequency possible with the 32 kHz crystal is used. Because the application relies on seconds and notminutes, which means the shortest interrupt period is one minute, the real time clock function available onthe MSP430FG4619 is not be used .The ADC takes a voltage reading from the application's thermistor (Rtherm) every 30 seconds andcompares it to a target value set by the user. The CPU then decides if the room temperature needs adjusting,indicated by the heat LED.The SPI transmits three parameters (one at a time): current room temperature, temperature setpoint andtime, controlled by the state variable.The target temperature is adjusted by the user using the set button while in set state. When the device is inthe set state, pressing the set button repeatedly cycles around the temperature range 10 to 40 degreescelcius. After the correct temperature is reached, the mode is exited via the state button.The time is updated by the set button when the device is in the time state. Each button press adds oneminute to the time (24-hour clock). Time state is only enabled for 10 seconds and automatically moves totemp state.Because the MSP430FG4619 has an LCD driver on chip, this module could control the LCD displaydirectly. However, for a fair power comparison between the two devices in this example, the SPI is usedto send out the data on the QE128 and the MSP430FG4619. Where the MSP430FG4619 code usesUSCI A0, the QE128 version of the application uses SPI2 to send out the equivalent messages to an SPIenabled peripheral.NOTEMany applications no longer use on chip LCD modules because the ribboncable connecting the chip to the display can break and show the wronginformation (missing segments) on the screen. If a serial comm link is used,cable breakages cause the whole screen to go blank, which indicates anissue. An external I2C enabled, 128 segment LCD controller, such as theNXP PCF8562, can be used with the QE128 devices for a display solution.The CPU code flow is almost identical for the MSP430FG4619, the MC9S08QE128, and MCF51QE128devices, with only peripheral code changes between the devices.2.1.2Application Flow ChartsThe application code has two sections: the Main loop (including subroutines) and the Interrupt ServiceRoutines (ISRs). In this thermostat implementation, the MCU wakes up every second by the RTC interruptfrom Stop3/LPM3 mode to:1. Check for a button press, and attend to is necessary2. Adjust the state if necessary,3. Take a new temp reading (if 30 seconds passed),Migration from TI MSP430 to 9S08QE128 or MCF51QE128 Flexis Microcontrollers, Rev. 0Freescale Semiconductor5
4. Update the display - always2.1.2.1Main LoopFigure 4 shows the main program flow chart, including all sub routines.NOTETwo buttons should not be pressed at the same time because only one isactive per cycle and the STATE button has precedence.The routine always checks that the cycle flag has been set, which it should be during error free execution.Depending on the mode, follow a path through to the display function.The MCU then enters a low-power mode: Stop3 or LPM3 depending on the MCU.Migration from TI MSP430 to 9S08QE128 or MCF51QE128 Flexis Microcontrollers, Rev. 06Freescale Semiconductor
StartInitialiseIf previous statewas setpoint, writevalue to RAMstate ButtonPressed?YesYesIf state is setpoint,incrementsetTempNoSet ButtonPressed?Change statePause before re-enablingport interrupts, to preventsubsequent detectionsresulting from switchbounceIf state is time,add a minute tothe clockPause before re-enablingport interrupts, to preventsubsequent detectionsresulting from switchbounceClear state TimerClear state TimerIf Time stateIncrementstateTime andchange back totemperature stateif it has expiredYesHas 1 secexpired30 secondsexpiredYesConvert thermistorreading if 30seconds havepassedNoTranslate totemperatureCompare setpointand reading, lightLED is heating,clear otherwiseUpdate displayEnter Low PowerModeFigure 4. Main Program Flow Chart (including sub-functions)Migration from TI MSP430 to 9S08QE128 or MCF51QE128 Flexis Microcontrollers, Rev. 0Freescale Semiconductor7
2.1.2.2Interrupt Service RoutinesFigure 5 shows the three interrupt service routines (ISRs) flow charts.The debounce routine clears the timer overflow flag and takes it back to the run mode.The real time clock routine manages the clock functions, sets the SecCycleFlag, and stops a KBI fromdisturbing the program flow back to main.The SPI rouitine clears any flags that may be set as errors and received messages are not supported in thistransmission only application.DebounceInterrupt StartReal Time ClockInterrupt StartSPI Interrupt StartClear InterruptFlagUpdate the RealTime ClockClear InterruptFlagsReturnSet 1sec Flag andprevent a KBIinterruptReturnReturnFigure 5. Interrupt Service Routine Flow Charts3Design Conversion3.1HardwareFreescale Semiconductor and Texas Instruments devices operate at the same voltage. Because of this, theonly hardware changes required are adjusting the pin out, as shown in Table 1, and swapping hardwaredebugging tools.3.2SoftwareThe easiest way to transfer a project from one device to another, when the tool suites are not compatible,is to create a blank template in the new environment and start copying in defines and functions, startingwith main, and following the flow chart paths. Inevitably, some conversions of register names areerroneous and following the flow chart enables easier debugging. Some functions require major reworkingbecause the modules used operate differently. Historically, differences between the S08, Coldfire V1devices, and linkers means that vector tables and ISRs should be references in a specific, compatible way,as described in section 7 of AN3465, Migrating within the Controller Continuum.Migration from TI MSP430 to 9S08QE128 or MCF51QE128 Flexis Microcontrollers, Rev. 08Freescale Semiconductor
NOTEThe following proceedure is one of many ways to convert a project andpreferences vary between engineers depend on tool capailities.3.2.1Project Clean-UpThe key to a successful transfer is to start with a project that has redundant code removed and a solidunderstanding of what the code and modules do in the application. Order and timing knowledge is also anadvantage, especially if the projects success is to be measured in real terms, e.g. power consumptionsavings.Unfortunately, many inheritted programs are not well documented, but it is worthwhile to spend time tounderstand what the code does and add comments to help conversion to the other device for futuremodifications.After the application and code is understood and any code improvements have been made, the conversioncan start.3.2.2Create New Project using CodeWarrior for Microcontrollers V6.0Start Codewarrior for Microcontrollers V6.0 by double clicking on the desktop icon or the program in theprogram list.If Start-Up Dialog Box does not appear, you can go to the File menu and open the dialog box or go straightto New Project.Click on Create New Project.Figure 6. CodeWarrior Start-Up Dialog BoxMigration from TI MSP430 to 9S08QE128 or MCF51QE128 Flexis Microcontrollers, Rev. 0Freescale Semiconductor9
Next, you must select the MCU derivative and the connection type then appears. This application note usesthe DEMOQE128 board from Softec. Click Next.Figure 7. Device And Connection TypeThe following screen is the final step required to create the project. The Project Wizard prompts for youto select the language create the project with the given name and location. Click Finish.Figure 8. Language and Project NameThe project is built and the project window opened, which appears similar to the below image.Migration from TI MSP430 to 9S08QE128 or MCF51QE128 Flexis Microcontrollers, Rev. 010Freescale Semiconductor
Figure 9. Codewarrior Project WindowIf this is the first time that CodeWarrior has been used as a development environment, studying theQuickStart and AN2616, although it is written for an older CodeWarrior version, could be beneficial.3.2.3Move and Translate Code Following Flow ChartsAN3502 complements this application note because it describes the differences between theMSP430FG4619 and the QE128 Flexis devices on a modular and core level. In response, this sectiondescribes a method to aid conversion rather than a detailed description of all the changes. The full code forthe MSP430FG4619 and the MC9S08QE128 is enclosed in Appendix A.In the CodeWarrior environment, expressions that it does not recognise remain in black text, whereasothers that are understood turn blue or green after the first compile (standard settings).3.2.3.1Header FilesCodeWarrior includes a MC9S08QE128.h file with definitions for all the registers, bits and masks neededfor the MC9S08QE128, using unions to define all of the registers. The ADCCFG register is shown fordemostration purposes in Example 1.Migration from TI MSP430 to 9S08QE128 or MCF51QE128 Flexis Microcontrollers, Rev. 0Freescale Semiconductor11
Example 1. ADCCFG definition from MC9S08QE128.h/*** ADCCFG - Configuration Register; 0x00000016 ***/typedef union {byte Byte;struct {byte ADICLK0:1;/* Input Clock Select Bit 0 */byte ADICLK1:1;/* Input Clock Select Bit 1 */byte MODE0:1;/* Conversion Mode Selection Bit 0 */byte MODE1:1;/* Conversion Mode Selection Bit 1 */byte ADLSMP:1;/* Long Sample Time Configuration */byte ADIV0:1;/* Clock Divide Select Bit 0 */byte ADIV1:1;/* Clock Divide Select Bit 1 */byte ADLPC:1;/* Low Power Configuration */} Bits;struct {byte grpADICLK :2;byte grpMODE :2;byte:1;byte grpADIV :2;byte:1;} MergedBits;} ADCCFGSTR;extern volatile ADCCFGSTR ADCCFG @0x00000016;#define ADCCFGADCCFG.Byte#define ADCCFG ADICLK0ADCCFG.Bits.ADICLK0#define ADCCFG ADICLK1ADCCFG.Bits.ADICLK1#define ADCCFG MODE0ADCCFG.Bits.MODE0#define ADCCFG MODE1ADCCFG.Bits.MODE1#define ADCCFG ADLSMPADCCFG.Bits.ADLSMP#define ADCCFG ADIV0ADCCFG.Bits.ADIV0#define ADCCFG ADIV1ADCCFG.Bits.ADIV1#define ADCCFG ADLPCADCCFG.Bits.ADLPC#define ADCCFG ADICLKADCCFG.MergedBits.grpADICLK#define ADCCFG MODEADCCFG.MergedBits.grpMODE#define ADCCFG define#define#define#defineADCCFG ADICLK0 MASKADCCFG ADICLK1 MASKADCCFG MODE0 MASKADCCFG MODE1 MASKADCCFG ADLSMP MASKADCCFG ADIV0 MASKADCCFG ADIV1 MASKADCCFG ADLPC MASKADCCFG ADICLK MASKADCCFG ADICLK BITNUMADCCFG MODE MASKADCCFG MODE BITNUMADCCFG ADIV MASKADCCFG ADIV BITNUM124816326412830122965This register declaration makes the implementation very easy by using instructions like:ADCCFG 0x05;// 8-bit Access to registerMigration from TI MSP430 to 9S08QE128 or MCF51QE128 Flexis Microcontrollers, Rev. 012Freescale Semiconductor
ADCCFG ADLSMP 1; // Bit access to registerADCCFG MODE 2; // Group access to register (2-bit in example)ADCCFG ADCCFG ADLSMP MASK ADCCFG ADICLK0 MASK; // Use of masks for clearer codeThe IAR Workbench development environment for the MSP430FG4619 uses the MSP420xG46x.h file.The ADC12CTL0 register is shown for demostration purposes in Example 2.Example 2. ADC12CTL0 definition in MSP430xG46X.h#define ADC12CTL0DEFW(ADC12CTL0(0x01A0) /* ADC12 Control 0 */, ADC12CTL0 )/* ADC12CTL0 */#define ADC12SC#define ENC#define ADC12TOVIE#define ADC12OVIE#define ADC12ON#define REFON#define REF2 5V#define MSC#define SHT00#define SHT01#define SHT02#define SHT03#define SHT10#define SHT11#define SHT12#define SHT13#define #define#define#define#define#define#defineSHT0 0SHT0 1SHT0 2SHT0 3SHT0 4SHT0 5SHT0 6SHT0 7SHT0 8SHT0 9SHT0 10SHT0 11SHT0 12SHT0 13SHT0 14SHT0 ine#define#define#define#defineSHT1 0SHT1 1SHT1 2SHT1 3SHT1 4SHT1 5SHT1 6SHT1 7SHT1 C12ADC12ADC12Start Conversion */Enable Conversion */Timer Overflow interrupt enable */Overflow interrupt enable */On/enable */Reference on */Ref 0:1.5V / 1:2.5V */Multiple SampleConversion */Sample Hold 0 Select 0 */Sample Hold 0 Select 1 */Sample Hold 0 Select 2 */Sample Hold 0 Select 3 */Sample Hold 0 Select 0 */Sample Hold 1 Select 1 */Sample Hold 2 Select 2 */Sample Hold 3 Select 3 )Migration from TI MSP430 to 9S08QE128 or MCF51QE128 Flexis Microcontrollers, Rev. 0Freescale Semiconductor13
HT1 9SHT1 10SHT1 11SHT1 12SHT1 13SHT1 14SHT1 13*0x1000u)(14*0x1000u)(15*0x1000u)This register declaration makes the implementation possible by using instructions like:ADC12CTL0ADC12CTL0ADC12CTL0ADC12CTL0 0x0000; // 16-bit Access to registerADC12CTL0 SHT01 // Bit access to registerADC12CTL0 SHT0 1// "Group" access to register (2-bit in example)ADC12CTL0 ENC ADC12SC; // Use of masks for clearer codebut not quite as easy to read.3.2.3.2Definitions and DeclarationsThe first sections that should be transferred across software platforms, because they are not devicedependant, are the definitions of the constants, global variables, and functions. Then manage the placementin memory of the set point pointer.3.2.3.3Main BodyStarting at main, copy over the first chunk of device specific code, which is the the disable interrupts lineand the initialize function in this example.The BIC SR(GIE) can be replaced with the SIE instruction in the S08 core. However, for compatibilitywith the MCF51QE128 device, the DisableInterrupts macro should be used.3.2.3.3.1InitializeThe initialize routine touches on five of the main modules used by the program. Because the register namesare device specific, each line must be translated using the information in the reference manuals to find theequivalent setting.The internal clock source (ICS) module should also be configured (Example 3) to run at the highestpossible frequency. You can choose an internal or external oscillator. However, because LPR mode mustuse the external oscillator, it is better to enable it at the beginning rather than switching between the twoand loosing CPU cycles while the status flags update.Example 3. ICS configuration on QE128void configureICS(void){/* FEE @ 50.33MHz CPU Bus*2ICSC2 0x07;/*ICSC1 0x00;/*ICSSC DRST DRS 0x2;ICSSC DMX32 0;/*while (ICSSC IREFST 1); /*}*/Low Range, Low Power, BDIV 1, Ext ref selected */FLL Enabled, int osc disabled */FLL factor of 1536 */Wait for ext clock as ref indicator */Migration from TI MSP430 to 9S08QE128 or MCF51QE128 Flexis Microcontrollers, Rev. 014Freescale Semiconductor
The Basic Timer function on the MSP430FG4619 (Example 4) can be replaced with the RTC module onthe QE128. The module must function to generate a wake-up interrupt every second. The RTC moduleneeds only one register to be configured. The status and control register (RTCSC) as the counter is readonly and the modulus is used in its default condition as seen in Example 5.RTCSC controls the clock source, interrupts and the prescaler. The lowest power clock source option isthe LPO, but accuracy is an issue in temperature varing clock applications. The OSCOUT (32.768kHz)signal is the better option and allows operation in Stop3 mode. To use this source, the external clock mustbe enabled in the ICS. The prescaler can be set at 215 (RTCPS 6) to generate a 1 second period, meaningthe modulus can be left at zero. Later in the MSP430FG4619 code, the counter is written to close the timebetween Run and Display. The RTC counter cannot be written to so this feature cannot be reproduced.Example 4. Basic Timer Init on MSP430FG4619// Configure basic timer to interrupt 1 second */BTCTL BT ADLY 1000;/* 1 second */IE2 BTIE;/* Enable Basic Timer interrupts */Example 5. RTC Init on QE128/* Configure RTC to interrupt 1 second */RTCSC 0x36;/* Enable interrupts and use OSCOUT to generate a 1 second period. */The next section of the initialize routine is the SPI module. The QE128 does not need to specifically enablethe SPI module on the pin because the function is governed by the pin sharing priority rules shown in thePins and Connections chapter of the MC9S08QE128 Reference Manual. The registers in the MSP430 SPIand the QE128 SPI are not compatible. Therefore, well commented code is the key because the commentsenable the creation of the same function on the QE128 device. Example 6 and Example 7 show the twodifferent SPI initialisations.Example 6. USCI A0 SPI Init on MSP430FG4619/* Initialize SPI (using USCI A0)UCA0CTL1 0x01;UCA0CTL0 0x6B;UCA0CTL1 0x41;UCA0BR0 0x01;UCA0BR1 0x00;IFG2 0x00;P7SEL 0x0F;P7DIR 0xFF;IE2 IE2 UCA0TXIE;*//* Hold in reset state *//* Master - MSB first - 4pin idle highfor slave transmission *//* Select ACLK as USCI clock source andhold in reset state *//*/*/*/*/*Set SPI Bit Rate Module Clock */Clear all flags */Enable SPI pins */Set port to outputs */Enable Tx interrupt on USCIA0/SPI */Example 7. SPI Init on QE128/* Initialize SPI (using SPI2) */SPI2C1 0x1E;/* Master, Tx ISR enabled, MSB First, Idle Low,First Edge beginning first cycle, SPI disabled */SPI2C2 0x10;/* Normal state, Automatic SS */SPI2BR 0x00;/* Max Bus Clock */SPI2S;/* Read Status register to clear flag (dummy) */SPI2C1 SPE 1;/* Enable SPI 2 */Migration from TI MSP430 to 9S08QE128 or MCF51QE128 Flexis Microcontrollers, Rev. 0Freescale Semiconductor15
After the SPI initialization is the initialization of the pins. Follow the recommended configuration ofunused I/O. You can choose to include the KBI for the switches here or in a separate section. Next, tacklethe ADC configuration. Initialize is now converted.3.2.3.3.2Button PressesFollowing the flow chart of the main routine, the next chunk of code to be converted should be the statebutton loop.Back in the main loop, the code up to the point where the stateButtonPressed function is called should becopied to the new project.By changing the if statement to be QE128 compatible (if [P1IFG & 0x02] changed to if [KBI2SC KBF&& PTDD PTD45]), the setButtonPressed routine can then be copied into the project. Because none ofthe immediate code is MCU dependant, no other software changes are required.The handleMode Button routine calls one function, switchDelay(), which is also called in other sectionsof the code. You can choose to convert it now or convert it later. Because the next function is similar to thelines that were recently converted, it is advisable to continue with the setButtonPressed routine.By changing the setButtonPressed if statement to be QE128 compatible (if [P1IFG & 0x04] changed toif [KBI2SC KBF && PTDD PTDD5]), the setButtonPressed routine can then be copied into the project.The setButtonPressed routine calls two functions; switchDelay() and incMinute().IncMinute does not require any code conversion because it uses no MCU module function and can becopied straight across.The switchDelay uses a timer to protect against switch bounce. This places the device in to sleep mode(LPM3) for 200ms (using ACLK as a timebase) and wakes it by the TimerA compare interrupt on theMSP430FG4619 (Example 8). The RTC cannot be reused because it is keeping time. Because the timerson the QE128 cannot wake up from stop modes, a wait mode must be used instead (Example 9). Becauselow-power wait can become full-run mode and the RTC is using the OSCOUT clock source (ICSOUTindependent), this wait mode can be used. The decision to use this mode means that debugging is limitedbecause the debug modules must be off in this mode. By setting up the timer, the ICS and the systemregisters can convert the code as showin in Example 8.Example 8. MSP430FG4619 SwitchDelay Functionvoid switchDelay(void){TACCTL0 CCIE;/* Enable CCR0 interrupt */TACCR0 6550 - 1;/* Value reqiured for delay of 200mS */TACTL TASSEL 1 TACLR MC 1; /* ACLK 32kHz; TAR 0; up state and start Timer */BIS SR(LPM3 bits GIE);/* Go to sleep *//* Zzzzzzzzzzzzzz */TACTL 0;/* Disable timer */TACCR0 0;P1IFG 0x00;/* Clear Flags */BtnHandlerFlag 0;/* Allow RTC Interrupts */}Example 9. QE128 SwitchDelay Functionvoid switchDelay(void)Migration from TI MSP430 to 9S08QE128 or MCF51QE128 Flexis Microcontrollers, Rev. 016Freescale Semiconductor
{/* Delay to prevent re-run due to switch bounce */SPMSC2 LPWUI 1;/* Enable wake from wait to full run state */TPM2SC 0x48;/* Overflow int enabled and BusClk as source */TPM2MOD 0x1900;/* Mod of 6400 @ 32kHz is 200ms */enterLPR();Wait;/* Enter LPW *//* Zzzzzzzzzzzzzz */TPM2SC 0x00;/* Disable timer */TPM2MOD 0;/* Clear Modulus */configureICS();/* Get CPU back up to maximum speed */KBI2SC KBACK 1;/* Clear KBI Flag */BtnHandlerFlag 0;/* Allow RTC ISR to exit Stop3 */}void enterLPR(void){ICSC1 IREFS 0; /* select Ext ref clock */ICSC1 CLKS 2;ICSC2 LP 0;ICSC2 BDIV 0;/* Run at 32kHz CPU - BDIV / 1 */ICSC2 LP 1;/* Enter FBELP */while (ICSSC IREFST && (ICSSC CLKST ! 0x10));/* Wait for status bits to update then enter LPR */SPMSC1 0x0C;/* Clear LVDE ane LVDSE */SPMSC2 LPR 1;/* Enter LPR state */}The details on how the device mode transitions differ between the MC9S08QE128 and theMSP430FG4619, which have been included in Example 8 and Example 9, are explained inSection 3.2.3.6.1, “Mode Transitions”.Figure 11-7 in the MC9S08QE128 Reference Manual shows how to tranistion around the ICS modeslegally and, used with Figure 3-1 in the same document, is referenced in creation of the QE128 code.That completes the state and the set button loops of Figure 4.3.2.3.3.3Time Controlled Rtherm Reading, Display Update, and KBI CheckNow that the button press code is converted, the SecCycleFlag can be managed. This code section shouldbe run every iteration in fault-free operation because it is set in the RTC ISR, the only LPM3/Stop3 wakeup source. This section manages the state time and does not require any re-work.The remainder of the main loop code can be copied over and CodeWarrior highlights that the ADCfunctionality, displayState() and the KBI must be translated.The ADC has already been initialized so it only needs to be started and the Conversion Complete flagpolled.Displaystate() is a function that doesn't require any modification because it only calls further functions,displayInt, depending on the current state. To aid in debugging, two LEDs can be added (Example 10) toadd meaning to the state dependant digits being transmitted.Migration from TI MSP430 to 9S08QE128 or MCF51QE128 Flexis Microcontrollers, Rev. 0Freescale Semiconductor17
Example 10. Debugging assistance; Mode display/* Display to user the state being transmitted without affecting Heat LED */MSP430FG4619- P1OUT ((P1OUT&0x01) (state 6));MC9S08/MCF51QE128 - PTED (((char)PTED PTED0) (state 6));The displayInt function is the same, but it calls the transmit function that engages the SPI. By managingthe error flags and changing the registers to the QE128 function, the function is translated (Example 11and Example 12).Example 11. Transmit Function on MSP430FG4619void transmitSPI (signed char *textPointer){while(*textPointer ! 0)/* While not end of string */{UCA0CTL1 0x40;/* Release USCIA0 from reset state */UCA0TXBUF *textPointer;/* Write the character to the USCIA0 interface */while ((UCA0STAT&UCBUSY) 1);/* Wait until transmission is complete */UCA0RXBUF;/* Read Rx Buffer to prevent SPI error */if (UCA0STAT ! 0){UCA0TXBUF *textPointer;while ((UCA0STAT&UCBUSY) 1);}/* If an error flag is set *//* Re-transmit the message *//* Wait until re-trans is complete */UCA0CTL1 0x41;/* Place USCIA0 in reset state */textPointer 1;/* Increment to point at the next character in the string */}}Example 12. Transmit Function on QE128void transmitSPI (signed char *textPointer){while(*textPointer ! 0)/* While not end of string */{SPI2C1 SPE 1;/* Enable SPI 2 */while (SPI2S SPTEF 0);/* Wait until Transmit buffer is empty *//* write the character to the SPI2 interface */SPI2D *textPointer;while (SPI2S SPTEF 0);/* Wait until transmission is complete */if (SPI2S MODF ! 0)/* If an error flag is set */{SPI2S MODF;/* Clear SPI error flag */SPI2D *textPointer;/* Re-transmit the message */while (SPI2S SPTEF 0);/* Wait until re-transmission is complete */}/* increment to point at the next character in the string */textPointer 1;SPI2C1 SPE 0;/* Disable SPI 2 */}}The KBI check at the end of the mai
The details on the MSP430 are based on publicly available data and form the basis of a comparative analysis to the QE128 devices on a number of features. For an in depth analysis of the MSP430 itself, Texas Instruments (TI) should be contacted directly. 2 Application Example 2.1 Ultra Low Power Thermostat with 12-bit A/D Conversion