Transcription
Microsoft Dynamics GP Payment Document Management
CopyrightCopyright 2010 Microsoft. All rights reserved.Limitation of liabilityThis document is provided “as-is”. Information and views expressed in this document, includingURL and other Internet Web site references, may change without notice. You bear the risk of usingit.Some examples depicted herein are provided for illustration only and are fictitious. No realassociation or connection is intended or should be inferred.Intellectual propertyThis document does not provide you with any legal rights to any intellectual property in anyMicrosoft product.You may copy and use this document for your internal, reference purposes.TrademarksMicrosoft and Microsoft Dynamics are trademarks of the Microsoft group of companies. FairComand c-tree Plus are trademarks of FairCom Corporation and are registered in the United Statesand other countries.All other trademarks are property of their respective owners.Warranty disclaimerMicrosoft Corporation disclaims any warranty regarding the sample code contained in thisdocumentation, including the warranties of merchantability and fitness for a particular purpose.License agreementUse of this product is covered by a license agreement provided with the software product. If youhave any questions, please call the Microsoft Dynamics GP Customer Assistance Department at800-456-0025 (in the U.S. or Canada) or 1-701-281-6500.Publication dateMay 2010
ContentsIntroduction . 1What’s in this manual.1Symbols and conventions .2Resources available from the Help menu.2Send us your documentation comments .4Chapter 1: Overview . 5Understanding Payment Document Management .5Enabling Payment Document Management .5Chapter 2: Purchasing Setup . 7Setting up default accounts for purchasing .7Setting up user preferences .7Creating and defining payment documents .8Setting up a chequebook for payment documents . 9Assigning a default payment document to a creditor.10Chapter 3: Sales Setup . 13Setting up default accounts for sales.13Setting up user preferences .14Creating and defining payment documents .15Setting up a chequebook for payment documents .16Assigning a default payment document .17Chapter 4: Purchasing Transactions . 21Entering a purchasing payment document.21Settling payment documents.22Chapter 5: Sales Transactions . 25Entering a sales payment document .25Entering payment document remittances .26Chapter 6: Transaction Maintenance . 31Voiding payment documents .31Returning payment document.31Voiding a sales payment document remittance.32Chapter 7: Enquiries and Reports. 33Viewing collections made with payment documents.33Viewing restricted sales payment documents .34Viewing payments made with payment documents .35Viewing restricted purchasing payment documents.36Chapter 8: Utilities . 39Removing sales payment document history.39Removing purchasing payment document history .40Index . 41PAYMENTDOCUMENTMANAGEMENTi
iiP AY M E N TD O C U M E N TM A N AG EM E N T
IntroductionPayment Document Management allows you to enter sales and purchasingtransactions using payment methods other than cash, check or credit card. You cansubmit these documents for risk assessment, discounting and collection to yourbank or similar entity.Payment Document Management uses the information in the PayablesManagement and Receivables Management modules, and updates the GeneralLedger and Bank Reconciliation modules.Check for current instructionsThis information was current as of May 2010. The documentation may be updatedas new information becomes available. Check the Microsoft Dynamics GP onlineWeb site (http://go.microsoft.com/fwlink/?LinkID 161199) for the most currentdocumentation.This introduction is divided into the following sections: What’s in this manualSymbols and conventionsResources available from the Help menuSend us your documentation commentsWhat’s in this manualThis manual is designed to give you an understanding of how to use the features ofPayment Document Management, and how it integrates with the MicrosoftDynamics GP system.To make best use of Payment Document Management, you should be familiar withsystemwide features described in the System User’s Guide, the System SetupGuide, and the System Administrator’s Guide.Some features described in the documentation are optional and can be purchasedthrough your Microsoft Dynamics GP partner.To view information about the release of Microsoft Dynamics GP that you’re usingand which modules or features you are registered to use, choose Help AboutMicrosoft Dynamics GP.The manual is divided into the following chapters: Chapter 1, “Overview” explains how Payment Document Management works,and how you can enable it. Chapter 2, “Purchasing Setup” describes the procedure to set up paymentdocuments for purchasing transactions. Chapter 3, “Sales Setup” describes the procedure to set up payment documentsfor sales transactions. Chapter 4, “Purchasing Transactions” gives information on entering purchaisngtransactions using payment documents.PAYMENTDOCUMENTMANAGEMENT1
I N T R O D U C T I O N Chapter 5, “Sales Transactions” gives information on entering sales transactionsusing payment documents. Chapter 6, “Transaction Maintenance” provides information on voiding andreturning payment documents. Chapter 7, “Enquiries and Reports” provides information on viewing inquiriesand printing reports. Chapter 8, “Utilities” provides information on removing historical informationfor payment documents.Symbols and conventionsFor definitions of unfamiliar terms, see the glossary in the manual or refer to theglossary in Help.SymbolDescriptionThe light bulb symbol indicates helpful tips, shortcuts andsuggestions.The warning symbol indicates situations you should beespecially aware of when completing tasks.This manual uses the following conventions to refer to sections, navigation andother information.ConventionDescriptionCreating a batchItalicized type indicates the name of a section or procedure.File Print or File PrintThe ( ) or ( ) symbol indicates a sequence of actions, such asselecting items from a menu or toolbar, or pressing buttons ina window. This example directs you to go to the File menu andchoose Print.TABor ENTERAll capital letters indicate a key or a key sequence.Resources available from the Help menuThe Microsoft Dynamics GP Help menu gives you access to user assistanceresources on your computer, as well as on the Web.ContentsOpens the Help file for the active Microsoft Dynamics GP component, and displaysthe main “contents” topic. To browse a more detailed table of contents, click theContents tab above the Help navigation pane. Items in the contents topic and tabare arranged by module. If the contents for the active component includes an“Additional Help files” topic, click the links to view separate Help files thatdescribe additional components.To find information in Help by using the index or full-text search, click theappropriate tab above the navigation pane, and type the keyword to find.To save the link to a topic in the Help, select a topic and then select the Favorites tab.Click Add.2P A Y M E N TD O C U M E N TM A N A G EM E N T
IN T RO D U C T IO NIndexOpens the Help file for the active Microsoft Dynamics GP component, with theIndex tab active. To find information about a window that’s not currently displayed,type the name of the window, and click Display.About this windowDisplays overview information about the current window. To view related topicsand descriptions of the fields, buttons, and menus for the window, choose theappropriate link in the topic. You also can press F1 to display Help about the currentwindow.LookupOpens a lookup window, if a window that you are viewing has a lookup window.For example, if the Checkbook Maintenance window is open, you can choose thisitem to open the Checkbooks lookup window.Show Required FieldsHighlights fields that are required to have entries. Required fields must containinformation before you can save the record and close the window. You can changethe font color and style used to highlight required fields. On the MicrosoftDynamics GP menu, choose User Preferences, and then choose Display.Printable ManualsDisplays a list of manuals in Adobe Acrobat.pdf format, which you can print orview.What’s NewProvides information about enhancements that were added to Microsoft DynamicsGP since the last major release.Microsoft Dynamics GP OnlineOpens a Web page that provides links to a variety of Web-based user assistanceresources. Access to some items requires registration for a paid support plan.Current implementation and upgrade information The most recentrevisions of upgrade and implementation documentation, plus documentationfor service packs and payroll tax updates.User documentation and resources The most recent user guides, howto articles, and white papers for users.Developer documentation and resources The most recentdocumentation and updated information for developers.Product support information Information about the Microsoft DynamicsGP product support plans and options that are available, along withinformation about peer support and self-support resources.Services information Information about Microsoft Dynamics GP support,training, and consulting services.Microsoft Dynamics GP Community Access to newsgroups, where youcan ask questions or share your expertise with other Microsoft Dynamics GPusers.PAYMENTDOCUMENTMANAGEMENT3
I N T R O D U C T I O NCustomerSource home page A wide range of resources available tocustomers who are registered for a paid support plan. Includes access toKnowledge Base articles, software downloads, self-support, and much more.Customer Feedback OptionsProvides information about how you can join the Customer ExperienceImprovement Program to improve the quality, reliability, and performance ofMicrosoft software and services.Send us your documentation commentsWe welcome comments regarding the usefulness of the Microsoft Dynamics GPdocumentation. If you have specific suggestions or find any errors in this manual,send your comments by e-mail to the following address: bizdoc@microsoft.com.To send comments about specific topics from within Help, click the DocumentationFeedback link, which is located at the bottom of each Help topic.Note: By offering any suggestions to Microsoft, you give Microsoft full permission to usethem freely.4P A Y M E N TD O C U M E N TM A N A G EM E N T
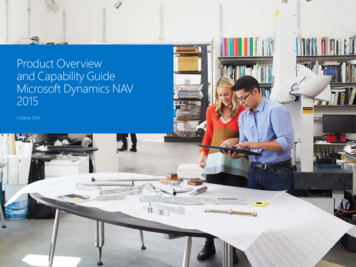
Chapter 1:OverviewPayment Document Management allows you to make and receive payments usingspecial payment documents. Use this information to enable Payment DocumentManagement and to understand how it works.When you set up Payment Document Management, you can open each setupwindow and enter information, or you can use the Setup Checklist window(Microsoft Dynamics GP menu Tools Setup Setup Checklist) to guide youthrough the setup process. See your System Setup Guide (Help Contents select Setting up the System) for more information about the Setup Checklistwindow.This information is divided into the following sections: Understanding Payment Document ManagementEnabling Payment Document ManagementUnderstanding Payment Document ManagementCertain European and Latin American countries deal in payment documents suchas bills of exchange or promissory notes, apart from making payments by cash,check and credit cards. Payment Document Management allows users to enterreceipts and payments using such payment methods. Payment documents that donot have a due date specified can be settled at any time. However, the documentsthat have specific due dates can only be settled after the due date. To receive thepayment for such documents before the due date, the creditor must submit thesedocuments to a bank or similar entity for collection. The bank then performs a riskassessment to assign a risk level to the debtors. Based on this assessment, the bankdecides which documents it will accept. The creditor is then paid the documentamount after deducting the commission or discount amount. The bank submitsthese documents to the debtor on the due date and collects the settlement.Enabling Payment Document ManagementYou must enable payment documents before you can start using them in purchasingand sales transactions.To enable Payment Document Management:1.Open the Company Payment Document Management Setup window.(Microsoft Dynamics GP menu Tools Setup Company PaymentDocument Setup)PAYMENTDOCUMENTMANAGEMENT5
C H A P T E R61P A Y M E N TO V ER V I E W2.Mark the respective options to enable Payment Document Management forpurchasing and sales. The setup windows will be available only for themodule/s for which you have marked the required option.3.Choose OK to save the changes and close the window.D O C U M E N TM A N A G EM E N T
Chapter 2:Purchasing SetupUse this information to set up default accounts required to use payment documentsin the purchasing module.This information is divided into the following sections: Setting up default accounts for purchasingSetting up user preferencesCreating and defining payment documentsSetting up a chequebook for payment documentsAssigning a default payment document to a creditorSetting up default accounts for purchasingThe Purchasing Payment Document Management Setup window allows you to setup default accounts for payment documents from the purchasing module forGeneral Ledger posting.To set up default accounts for purchasing:1.Open the Purchasing Payment Document Management Setup window.(Microsoft Dynamics GP menu Tools Setup Purchasing PaymentDocument Setup)2.Select whether to set the General Ledger Entry Level to per Settlement or perPayment Document. If you select per Settlement, all the documents will beposted as a single summary entry. If you select per Payment Document, thepayment documents will be posted as a single entry per document.3.Select the accrual accounts for Give and Pay.Setting up user preferencesThe Purchasing Payment Document User Preferences window allows the user to setthe preferences for the payment document information entry windows. You can setthe way in which you want to open the purchasing Payment Document Entrywindows in order to enter additional information relating to the paymentdocument.PAYMENTDOCUMENTMANAGEMENT7
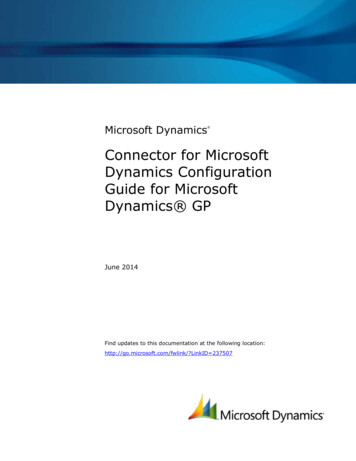
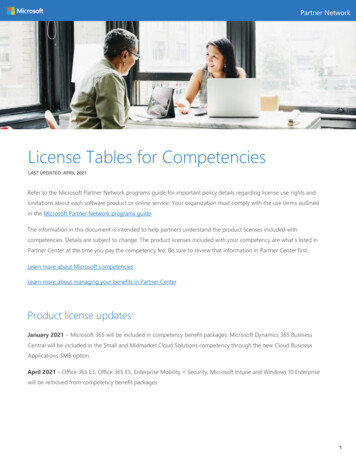
C H A P T E R2P U R C H A S I N GS E T U PTo set up user preferences:1.Open the Purchasing Payment Document User Preferences window.(Microsoft Dynamics GP menu Tools Setup Purchasing PaymentDocument User Preference)2.Select from the following options to open this window:Lock Fields This is the default view for all users.Hide Fields Only the fields in which the user can enter a value are displayedin the window.Shrink Window This option modifies the window size and field position toadjust it exclusively to the information that must be completed by the user foreach payment document.3.Choose OK to save and close the window.Creating and defining payment documentsThe Purchasing Payment Document Maintenance window allows you to create anddefine payment documents that will be used in Purchasing.To create and define payment documents:8P A Y M E N T1.Open the Purchasing Payment Document Maintenance window.(Cards Purchasing Payment Document Maintenance)2.Enter or select the payment document ID.D O C U M E N TM A N A G EM E N T
C H A P T E R2P U R C H A S I N GS E T U P3.Select the chequebook ID for the payment document. When using the paymentdocument for a creditor payment, the chequebook associated with thedocument will appear as the default value in the Payment Document ID field inthe Payment Document Entry window.4.Enter a value in the user-defined fields. The Required option will be availablefor the user defined fields for which you have entered a value. When making apayment, additional information can be stored for this specific document. Forthis purpose, the system incorporates various fields of different types andformats (text, date, amount and bank account number 0000-0000-000000000000) for entering text that will later appear for this payment document.The purpose of these fields is to store information in the system in order toestablish search conditions or to have data in the system that can be used withother tools (e.g. printing devices).5.Mark the Payable Before Due Date option for payment documents with no duedate (e.g. cheques). Leave the option unmarked for documents with due dates(Promissory Notes, Bills of Exchange, etc.).6.Choose Save to save changes and close the window.Setting up a chequebook for payment documentsYou can establish a more specific set up level by selecting the options that will betaken into account when using a chequebook with a specific payment document.You can assign the same chequebook to various payment documents.To set up a chequebook for payment documents:1.Open the Purchasing Chequebook Payment Document Setup window.(Cards Financial Chequebook Additional Purchasing Pmnt. Doc.Setup)2.Enter or select the payment document ID.3.Mark the Duplicate Payment Document Numbers option to allow duplicatepayment document numbers.4.Enter the Next Payment Doc. Num. option if you want the document number tobe generated automatically.PAYMENTDOCUMENTMANAGEMENT9
C H A P T E R2P U R C H A S I N G5.S E T U PMark the Override Payment Document Number option to indicate whether thenumber generated automatically for the payment document can be overridden.This option is available only if you’ve entered the next payment documentnumber.For example, if a value is entered in the Mark the Next Payment Doc. Num field(e.g. 020000001), marking this field will allow you to modify the automaticallygenerated number.6.In the Dest. Chequebook ID column, select the chequebooks to which the billwill be transferred once the operation from the current chequebook has beenperformed.7.In the Account column, select the accrual accounts for Give and Pay. If theaccounts are not entered, the default accounts indicated in the module setupwill be used if a properly-configured transaction is performed.8.In the Max Payment Doc. Amount field, enter the maximum amount forpayment for the document with the selected chequebook (e.g. to prevent banksfrom charging a commission for surpassing a certain amount).9.Enter a password to override the maximum amount specified in the Max.Payment Doc. Amount field.Assigning a default payment document to a creditorYou can assign a default payment document to each creditor in the CreditorPayment Document Maintenance window.To assign a default payment document to a creditor:10P AY M E N T1.Open the Creditor Payment Document Maintenance window.(Cards Purchasing Creditor Payment Document)2.Select the Creditor ID for the payment document.3.Select the default payment document ID.D O C U M E N TM A N AG EM E N T
C H A P T E R4.2P U R C H A S I N GS E T U PChoose Setup to open the Creditor Payment Document Setup window. Thiswindow allows you to set the default payment document for the selectedcreditor. If there is more than one payment document defined for the creditor,you can view their information using this window. The set up in this window isoptional. If it is not defined, the default set up in Purchasing will be used. Select the payment document in the Payment Doc. ID field. Enter a description for the payment document in the Payment Doc Namefield. In the Chequebook ID from field, select whether you want to use thechequebook ID from the payment document or the creditor by default. Thisis taken from the chequebook selected for the payment document. If it istaken from the actual creditor, select the Creditor option and enter thechequebook ID. This chequebook ID will be used in collections fromcreditors with this type of payment document. In the Payment Doc. Accounts from field, select whether the accounts usedto enter transactions for the payment document will be taken from thechequebook associated with the payment document or from the creditor. Ifyou select Creditor, enter the Give and Pay accounts.If accounts are not set in the chequebook or for the creditor, the default accountsindicated in the purchasing module set up will be used. In the Max Payment Doc Amount from field, select whether to take themaximum amount limit from the Chequebook or the Creditor.If you select Creditor, enter the maximum amount that will be allowed in acreditor payment in the payment document.Enter a password to override the a maximum amount limit specified in atransaction with the selected payment document. Choose Save to save the details and return to the Creditor PaymentDocument Maintenance window.PAYMENTDOCUMENTMANAGEMENT11
12P AY M E N TD O C U M E N TM A N AG EM E N T
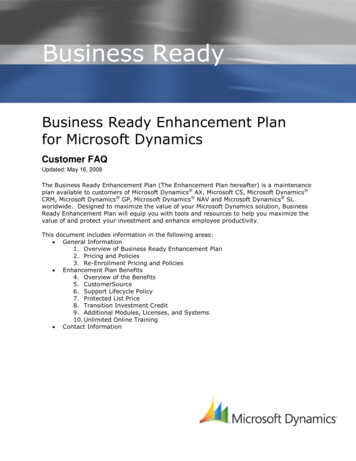
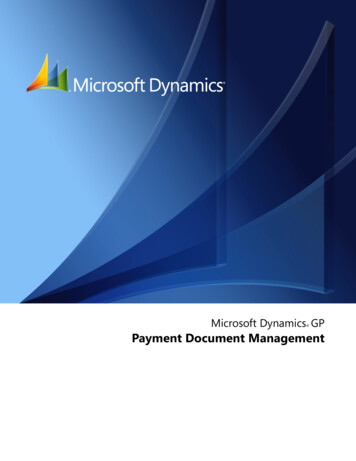
Chapter 3:Sales SetupUse this information to set up default accounts in the ledger posting of paymentdocuments.This information is divided into the following sections: Setting up default accounts for salesSetting up user preferencesCreating and defining payment documentsSetting up a chequebook for payment documentsAssigning a default payment documentSetting up default accounts for salesThe Sales Payment Document Management Setup window allows you to set updefault accounts in the Ledger posting of payment documents, as well as theGeneral Ledger Entry Level used in the payment document remittance process.To set up default accounts for sales:1.Open the Sales Payment Document Management Setup window.(Microsoft Dynamics GP menu Tools Setup Sales PaymentDocument Setup)2.Transactions with payment documents require specific accounting entries.There may be one entry per payment document, or, alternatively, one entry fora whole remittance consisting of several payment documents. You can chooseto set up each of the payment document operations (risk assessment, discount,collection, or settlement) in either way.3.Risk assessment, discount, and collection are normally posted in one entry perdocument (to improve transaction monitoring) and per settlement process, in asingle summary entry of all the documents, where a single amount appears onbank statements for total cheques transacted.PAYMENTDOCUMENTMANAGEMENT13
C H A P T E R3S AL ESS E T U P4.Enter or select the accounts for the following fields:Receive For cheques received.Risk Assessment For risk assessing cheques.Discount For discounted cheques.Collect For collecting cheques.NSF For bounced cheques.Settle For settled cheques.This payment document setup level is required, as these accounts make surethat all transactions entered are properly configured. If accounts are establishedat this higher level, there are no restrictions on the accounts to be used whenpreparing a remittance.5.Choose Save to save the changes and close the window.Setting up user preferencesYou can select the way in which you want the sales payment document entrywindows to open in order to enter additional information relating to the paymentdocument.To set up user preferences:1.Open the Sales Payment Document User Preferences window.(Microsoft Dynamics GP menu Tools Setup Sales PaymentDocument User Preference)2.You can set the way in which you want to open this window in order to enteradditional information relating to the payment document. The different optionsare as follows:Lock Fields This is the default view for all users.Hide Fields Only the fields in which the user can enter a value are displayedin the window.Shrink Window This option modifies the window size and field position toadjust it exclusively to the information that must be completed by the user foreach payment document.14P AY M E N TD O C U M E N TM A N AG EM E N T
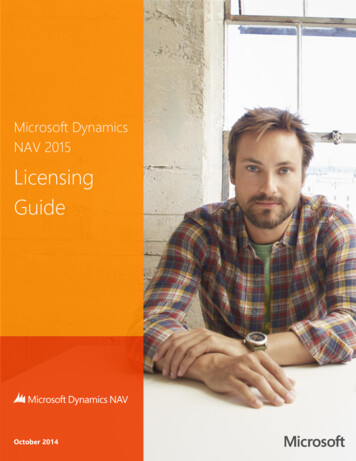
C H A P T E R3.3S A L E SS E T U PChoose OK to save the changes and close the window.Creating and defining payment documentsYou can create and define payment documents that will be used in sales in the SalesPayment Document Maintenance window.To create and define payment documents:1.Open the Sales Payment Document Maintenance window.(Cards Sales Payment Document Maintenance)2.Enter or select the payment document ID and enter a description for thedocument.3.Select the chequebook ID for the payment document.4.When using the payment document in question in a collection process, thechequebook associated with the document will be set as the default value in theChequebook ID field in the Collections window.5.When collecting an amount using a payment document, additional informationcan be stored in this document. For this purpose, the system incorporatesvarious fields of different types and formats (text, date, amount and bankaccount number 0000-0000-00-0000000000) for entering text that will laterappear linked to this payment document to allow users to complete thisinformation. Each of these fields can be selected as Required, in order to specifywhether it is compulsory for the user to complete this information. The purposeof these fields is to store information on the system in order to establish searchconditions or in the future to have data on the system that can be used withother tools (e.g. printing devices).6.Mark the Discountable option if you want the payment document to bediscounted.7.Mark whether the document can be presented as discountable or not.The Deferred Discount option will be available if you select the Discountableoption.PAYMENTDOCUMENTMANAGEMENT15
C H A P T E R3S AL ESS E T U P8.Mark the Collected option if you want the document to be collected.9.Mark whether the document is Cashable Before Due Date. This must beselected for payment documents with no due date (e.g. cheques). This must beleft unmarked for documents with due date (Promissory Notes, Bills ofExchange, etc.).10. Choose Save to save the values entered in this window.Setting up a chequebook for payment documentsThe Sales Chequebook Payment Document Setup window allows you to establish amore specific set up level by selecting the options that will be taken into accountwhen using the chequebook with a specific payment document.To set up a chequebook for payment documents:16P AY M E N T1.Open the Sales Chequebook P
The Microsoft Dynamics GP Help menu gives you access to user assistance resources on your computer, as well as on the Web. Contents Opens the Help file for the active Microsoft Dynamics GP component, and displays the main "contents" topic. To browse a more detailed table of contents, click the Contents tab above the Help navigation pane.