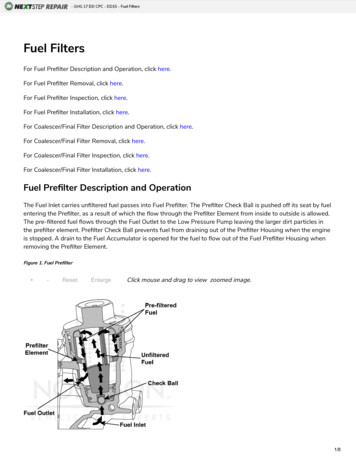
Transcription
Fault Code 64: Gen2 Electronic Clutch Actuator (ECA) Fault Isolation ProceduresTRTS0940Fault Code 64: Gen2 Electronic Clutch Actuator (ECA)J1587: MID 130J1939: SA 3PID 34SPN 788FMI 2, 7, 12FMI 2, 7, 12OverviewFallbackThe UltraShift PLUS transmission equipped with anElectronic Clutch Actuator (ECA) that controls the positionof the clutch assembly. Power and ground to the ECA areOEM-supplied through a 2-Way Gen2 ECA Connectordirectly connected to the vehicle batteries. The ECA is connected to the TECU by an 8-Way Gen2 ECA Connector thatis part of the transmission harness. The ECA communicateswith the TECU over the High Integrity Link (HIL) to changeposition, show faults or include other operation information. Fault Code 94 indicates that a failure has been detectedby the ECA, but is specific to systems that use a Gen2 ECA.Troubleshooting for this procedure is specific to the Gen2ECA and associated harnesses.All FMIsNote: The troubleshooting procedure for Fault Code 64 maydirect users to use this troubleshooting procedure if thevehicle is equipped with a Gen2 ECA, even if Fault Code 94was not set by the transmission. This is because sometransmission software versions do not set Fault Code 94.DetectionThe TECU monitors the ECA for excessive motor current,excessive motor temperature, incorrect motor position,improper battery or ignition voltage to the ECA, or variousinternal ECA malfunctions. “F” flashes in gear display. Service light flashes (if equipped). If the fault occurs at power up, engine cranks andstarts, but TECU will not engage a gear. If the fault occurs while driving, ECA maintains current clutch position or moves to the last positioncommanded by the TECU. Transmission may continue to shift until vehicle is stopped.Conditions to Set Fault Code InactiveFMI 2: No loss of battery and ground is detected for 2 seconds.FMI 7: Normal motor current is detected and ECA positionis correct for 2 seconds.FMI 12: No internal ECA failures are detected for 2 seconds.Possible CausesFMI 2, 12 - Bent, spread, corroded or loose terminals- Wiring shorted to ground, shorted to power oropenConditions to Set Fault Code ActiveFMI 2 – Data Erratic: ECA detects a loss of battery and/orground for 1 second or longer.FMI 7 – Mechanical System Not Responding: ECA detectsexcessive motor current or ECA detects incorrect clutchposition during a clutch position change for 1 second orlonger.ECA Power Harness ECA- Internal failureFMI 7 ECA Power Harness- Bent, spread corroded or loose terminalsFMI 12 – Bad Intelligent Device: ECA detects an internalfailure for 1 second or longer.- Wiring shorted to ground, shorted to power oropen Mechanical Clutch System- Lack of lubrication of clutch release shaft/bushings- Lack of lubrication of clutch- Damage to clutch release yoke or cross shaft- Internal failure ECA- Internal failure373 2018 Eaton Cummins Automated Transmission Technologies. All rights reserved2019.08.28
TRTS0940Fault Isolation Procedures Fault Code 64: Gen2 Electronic Clutch Actuator (ECA)Component Identification123545661. 38-Way Transmission Harness Connector2. Transmission Electronic Control Unit (TECU)3. ECA Shield4. Electronic Clutch Actuator (ECA)5. 8-Way ECA Connector6. 2-Way ECA Connector2019.08.28 2018 Eaton Cummins Automated Transmission Technologies. All rights reserved374
Fault Code 64: Gen2 Electronic Clutch Actuator (ECA) Fault Isolation ProceduresTRTS0940321Eaton ECA Clutch1. Clutch Wear Tab2. Release Bearing3. Release Bearing Grease Zerk375 2018 Eaton Cummins Automated Transmission Technologies. All rights reserved2019.08.28
TRTS0940Fault Isolation Procedures Fault Code 64 Troubleshooting Gen2 ECAFault Code 64 Troubleshooting Gen2 ECAAPurpose: Check for Active or Inactive fault codes.1. Record the transmission fault codes, FMIs, occurrences, and timestamps from the Service ActivityReport created during the Diagnostic Procedure.Purpose: Perform a Load Test on each vehicle battery.1. Key off.2. Set parking brake and chock wheels.3. Load test each vehicle battery per OEM specifications. Record reading(s).2. Key on with engine off.3. Connect ServiceRanger.4. Update transmission and ECA software to latestavailable level, if not completed during theDiagnostic Procedure.!BImportant: To avoid damaging the TECU, use anEaton-approved communications adapter andensure all satellite systems are disabled beforeupdating software. If Fault Code 64 is Inactive and there are otherActive fault codes, troubleshoot all Active faultcodes per Fault Code Isolation ProcedureIndex on page 13. If Fault Codes 15, 16 or 19 are Active, troubleshoot per Fault Code Isolation Procedure Indexon page 13 If Fault Code 64 is set, go to Step B. If any battery(s) does not pass the Load Test,refer to OEM guidelines for repair or replacement of battery(s). Go to Step V. If all batteries pass the Load Test, go to StepC.Battery Voltage DropLoad Test Status(Pass/Fail)123452019.08.28 2018 Eaton Cummins Automated Transmission Technologies. All rights reserved376
Fault Code 64 Troubleshooting Gen2 ECA Fault Isolation ProceduresCPurpose: Inspect power and ground supply to theECA.TRTS0940DPurpose: Verify condition of 2-Way ECA Connector.1. Key off.1. Key off.2. Inspect the ECA Power Supply Harness betweenthe batteries and the ECA for signs of rubbing orchafing to the wiring.2. Disconnect 2-Way Gen2 ECA Connector.3. Inspect the ECA 40-amp In-line Fusible Link orFuse Holder Connections for damage and bent,spread, corroded or loose terminals.Note: Some chassis use a power and ground distribution block separate from the battery or may routepower and ground to the starter. Be sure to cleanand inspect connections at this location and at thebattery.3. Verify connector is free from any corrosion; the terminals are not bent, spread or loose; and there isno damage to the connector body.4. Inspect ECA side of 2-Way Gen2 ECA Connector,verify connector is free from any corrosion, the terminals are not bent, spread or loose; and there isno damage to the connector body. If damage is found to the 2-Way Gen2 ECAConnector, refer to OEM guidelines for repairor replacement. Go to Step V.21 If damage to the ECA side of 2-Way Gen2 ECAConnector is found, replace ECA. Go to Step V. If damage is found, refer to OEM guidelines forrepair or replacement of the ECA Power SupplyHarness. Go to Step V. If no damage is found, go to Step E. If no damage is found, go to Step D.377 2018 Eaton Cummins Automated Transmission Technologies. All rights reserved2019.08.28
TRTS0940EFault Isolation Procedures Fault Code 64 Troubleshooting Gen2 ECAPurpose: Verify battery voltage at ECA.FPurpose: Verify polarity of battery voltage at ECA.1. Key off.1. Key off.2. Measure voltage between 2-Way Gen2 ECA Connector Pin 2 (Battery positive) and Pin 1 (Batterynegative). Record reading(s) in table.2. Measure voltage between 2-Way Gen2 ECA Connector Pin 2 (Battery positive) and ground. Recordreading(s) in table.1221223. Compare reading(s) in table.3. Compare reading(s) in table. If readings are out of range, refer to OEMguidelines for repair or replacement of the ECAPower Supply Harness. Go to Step V. If readings are in range, go to Step F. If readings are out of range, Pin 2 (Batterypositive) and Pin 1 (Battery negative) wires areincorrectly pinned in the 2-Way Gen2 ECAConnector. Refer to OEM requirements forrepair or replacement. Go to Step V. If readings are in range, go to Step G.2019.08.28PinsRangeReading(s)1 to 2Within 1.2 V ofBattery Positive( )PinsRange2 toGroundWithin 1.2 V ofBattery Positive( ) 2018 Eaton Cummins Automated Transmission Technologies. All rights reservedReading(s)378
Fault Code 64 Troubleshooting Gen2 ECA Fault Isolation ProceduresGPurpose: Load Test the vehicle power and groundsupply to the ECA.1. Key off.2. Load test the 2-Way Gen2 ECA Connector and ECAPower Supply Harness with an external loadsource. Use a sealed beam headlamp or blowermotor attached to Pin 2 (Battery positive) and Pin 1(Battery negative). Load Test for 5 minutes to verifythe harness will carry a load with the 40-amp fuseor fusible link installed.TRTS0940HPurpose: Check for Active or Inactive fault codes.1. Determine which FMI set for Fault Code 64 asnoted in Step A. If FMI 2 or 12 set, go to Step I. If FMI 7 set, go to Step J.3. Wiggle the ECA Power Supply Harness during theLoad Test from the vehicle batteries to ECA.2112 If the ECA Power Supply Harness does notcarry a load, refer to OEM guidelines for repairor replacement. Go to Step V. If the ECA Power Supply Harness carries aload, go to Step H.379 2018 Eaton Cummins Automated Transmission Technologies. All rights reserved2019.08.28
TRTS0940IFault Isolation Procedures Fault Code 64 Troubleshooting Gen2 ECAPurpose: Actuate the ECA and Check for Active orInactive fault codes.J1. Key off.Note: Allow 2–3 minutes for the TECU to perform acomplete power-down sequence before proceeding.2. Set parking brake and chock wheels.Purpose: Inspect for proper lubrication of ClutchRelease Bearing and Cross Shaft.1. Key off.Note: Allow 2–3 minutes for the TECU to perform acomplete power-down sequence before proceeding.3. Reconnect all connectors and verify that all components are properly installed.2. Set parking brake and chock wheels.4. Key on with engine running.3. Remove single bolt for clutch housing accesscover.5. Connect ServiceRanger.6. Depress and hold service brake.7. Select Drive Mode with the Driver Interface Deviceand wait 10 seconds.8. After waiting 10 seconds, select Neutral Mode withthe Driver Interface Device.9. Ensure the parking brake is applied.10. Key on with engine off.4. Inspect for excessive clutch dust, broken clutch orspring material or other signs of clutch failure.5. Ensure Release Bearing and Cross Shaft are adequately greased per the Heavy-Duty Clutch ServiceManual (CLSM0200). If physical signs of a failure are found, replaceHeavy-Duty ECA Clutch and Cross Shaft. Go toStep V. If no issues found and properly greased, go toStep K.11. Release service brake.12. Go To “Fault Codes”.13. Retrieve and record the transmission fault codesand FMIs, and their occurrences and timestamps. If ECA and TECU software were updated to thelatest available levels during the DiagnosticProcedure or Step A and Fault Code 64 FMI 2or 12 is Inactive, test complete. Go to Step V. If ECA and TECU software were at the latestavailable levels and Fault Code 64 FMI 2 or 12is Inactive, no problem was found. The intermittent nature of the fault makes it likely thatthe problem is in the ECA Power Supply Harness and/or battery/charging system. Refer toOEM guidelines for troubleshooting intermittent wiring and/or battery/charging systemissues. Go to Step V. If ECA and TECU software are at the latestavailable levels and Fault Code 64 FMI 2 or 12is Active and no fault was found with the ECAPower Supply Harness or battery/chargingsystem, replace the ECA. Go to Step V.2019.08.28 2018 Eaton Cummins Automated Transmission Technologies. All rights reserved380
Fault Code 64 Troubleshooting Gen2 ECA Fault Isolation ProceduresKPurpose: Verify Clutch Release Yoke and CrossShaft rotation.VPurpose: Verify repair.1. Key off.1. Key off.2. Remove ECA.2. Reconnect all connectors and verify that all components are properly installed.3. Inspect Clutch Release Yoke for excessive wear.4. Rotate Clutch Release Yoke and Cross Shaft. Verifythat they rotate freely without binding. If the Clutch Release Yoke shows excessivewear, replace Clutch Release Yoke. Go to StepV. If Clutch Release Yoke and Cross Shaft bindwhen rotated, replace Cross Shaft. Go to StepV. If no issues are found with the Clutch ReleaseYoke and the Cross Shaft rotates freely withoutbinding, and no fault was found with the ECAPower Supply Harness or battery/chargingsystem, replace the ECA. Go to Step V.381TRTS09403. Key on with engine off.4. Clear fault codes using ServiceRanger.5. Drive vehicle and attempt to reset the code orduplicate the previous complaint.6. Check for fault codes using ServiceRanger. If no fault codes set Active and the vehicleoperates properly, test complete. If Fault Code 64 sets Active during the testdrive, go to Step A. If a fault code other than 64 sets, troubleshootper Fault Code Isolation Procedure Index onpage 13. 2018 Eaton Cummins Automated Transmission Technologies. All rights reserved2019.08.28
Inspect for excessive clutch dust, broken clutch or spring material or other signs of clutch failure. 5. Ensure Release Bearing and Cross Shaft are ade-quately greased per the Heavy-Duty Clutch Service Manual (CLSM0200). † If physical signs of a failure are found, replace Heavy-Duty ECA Clutch and Cross Shaft. Go to Step V.