Transcription
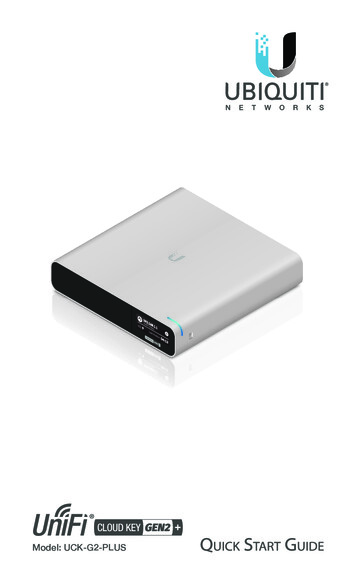
Model: UCK-G2-PLUS
IntroductionThank you for purchasing the Ubiquiti Networks UniFi CloudKey Gen2 Plus. This Quick Start Guide is designed to guide youthrough installation and also includes warranty terms.Package ContentsUniFi Cloud Key Gen2 PlusSystem RequirementWeb Browser: Google Chrome (Other browsers may havelimited functionality.)TERMS OF USE: All Ethernet cabling runs must use CAT5 (or above). It is the professionalinstaller’s responsibility to follow local country regulations, including operation within legalfrequency channels, output power, indoor cabling requirements, and Dynamic FrequencySelection (DFS) requirements.
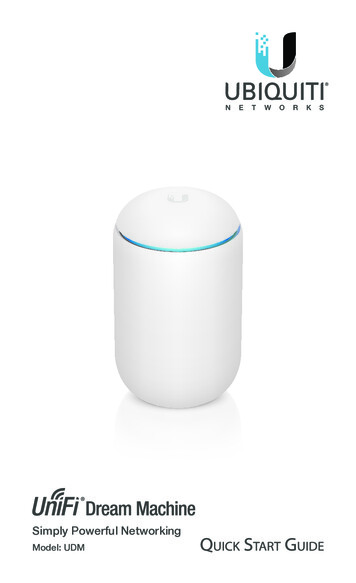
Network Topology RequirementA DHCP-enabled network (for the UniFi Cloud Key to obtainan IP address)UniFi Cloud KeyUS-16-150WLANUSG-PRO-4(DHCP Server)WANInternetSample Network Diagram
Hardware OverviewFront Panel LEDColorStateStatusWhiteSolidReady for Firmware upgrade inprogress. Device is busy; donot touch or unplug it.SolidDevice ready for useFlashingShutting downRapidFlashingDevice failure; refer to thedisplay for more information.SlowFlashingUser connected to deviceRepeatingRecovery modeBlueOff/White/Blue
Front PanelUniFi VideoLast MotionLCD Screen Displays device status information and thefollowing:UniFi SDNUniFi SDN187ActiveUniFi SDN1.4kIcon1.4kActiveDescriptionUniFi SDN Controller softwareLocal IP addressStatus of internet connectionNumber of wired client devices orthroughput of wired network trafficNumber of wireless client devices orthroughput of wireless network trafficStatus of cloud accessLCDScreen
UniFi VideoUniFi VideoLast MotionIconDescriptionUniFi Video softwareLocal IP addressStatus of internet connectionNumber of active camerasTime of last motion detectedStandby192.168.1.1UniFi Cloud KeyIconDescriptionStatus of internet connetionLocal IP addressDevice nameStatus of Bluetooth
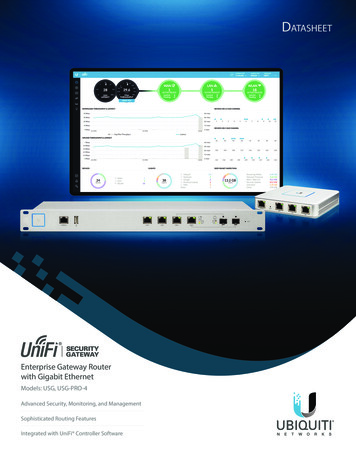
Back PanelResetButtonmicroSDSlotUSB Type CPortPowerButtonUSB Type CPower PortEthernetPortReset The Reset button serves two functions: Restart Press and release the Reset button quickly. Restore to Factory Default Settings Press and hold theReset button for more than five seconds.Power Button Press to turn the UniFi Cloud Key on or off.USB Type C Power Port Used for power if PoE is not available.Requires 9V, 2A or QuickCharge 2.0.microSD Slot (Optional) Used for external backup (microSDcard not included).Ethernet Port Connects to a DHCP server on your LAN. Powercan be provided by an 802.3af PoE switch, such as the UniFiPoE Switch.USB Type C Port Reserved for future use.
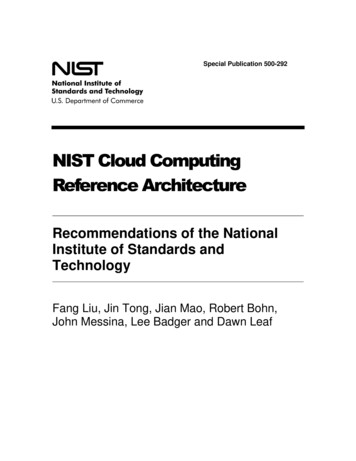
Side PanelsSecurityLock SlotRack-MountNotchRack-MountNotchSecurity Lock Slot Allows the UniFi Cloud Key to be used withan optional security cable or lock (not included).Rack-Mount Notches Lock the UniFi Cloud Key into placewhen used with the optional rack-mount accessory (notincluded).
Bottom Panel13-Pin ConnectorHDD Latch13-Pin Connector Connects to the optional rack-mountaccessory (not included).HDD Latch Releases the HDD bay tray.
Hardware Installation1. Connect an Ethernet cable (not included) to the Ethernetport.2. Connect the other end of the Ethernet Cable to a port on anetwork switch, such as a UniFi PoE SFP2
Powering the UniFi Cloud KeyUse an 802.3af-compliant switch, such as a UniFi PoE Switch, ora USB power source (not included).UniFi SwitchThe UniFi Cloud Key can be powered by a UniFi PoE Switch orother 802.3af-compliant SFP2UniFi Switch Power Connection DiagramUSB Power SourceConnect a USB cable (not included) from the UniFi Cloud Keydirectly to a USB power source: 9V, 2A or QuickCharge 2.0.USB Power Connection Diagram
Initial Setup via BluetoothUse the UniFi Mobile app to configure the UniFi Cloud Key.1. Download the UniFi Mobile app from the App Store (iOS)or Google Play (Android).2. Enable Bluetooth on your mobile device.3. Launch the app and hold your mobile device within 1.5 m(5’) of the UniFi Cloud Key.4. In the Discovered Devices section, tap the icon.TapThisIcon5. Follow the on-screen instructions.The username and password you configure in the UniFi Mobileapp will be used for the pre-installed UniFi Controller and UniFiVideo 4 software.
Software InstallationThe UniFi Controller and UniFi Video 4 software applicationsare pre-installed on the UniFi Cloud Key.Note: You can run the UniFi Controller or UniFiVideo software, or you can run both applicationssimultaneously.Go to the appropriate section for your software application.UniFi Controller SoftwareUse one of the following methods to launch the software: If you are using Chrome, go to the Chrome Instructionssection (recommended). If you are using a different web browser, go to “Instructionsfor Other Web Browsers”.Chrome Instructions1. Ensure that your host system is on the same Layer-2network as the UniFi Cloud Key.2. Launch the Chrome web browser and typehttps://unifi.ubnt.com in the address field. Press enter(PC) or return (Mac).https://unifi.ubnt.com3. Enter the username and password for your UBNT account.Click Sign In.
4. Click Discover Cloud Key.Note: The default fallback IP address of the UniFiCloud Key is 192.168.1.30.5. If the Ubiquiti Device Discovery Tool is already installed,proceed to step 7.If the tool is not installed, you will be prompted to add it.Proceed to step 6.6. To install the tool:a. Click Install.b. Click Add app to confirm.
7. The tool will search for the UniFi Cloud Key. Click Adopt inthe Cloud Key’s Actions column to continue.8. If the Cloud Key firmware is not the latest version, clickUpgrade Firmware to upgrade the firmware.9. Click Open Controller Wizard to set up the Controller onthe Cloud Key.10. The UniFi Setup Wizard appears. Follow the on-screeninstructions. For step-by-step instructions, refer to the UserGuide, which is available atwww.ubnt.com/download/unifi
11. After the UniFi Setup Wizard is finished, the browser will beredirected to the Cloud Login Credentials screen. Enter yourUbiquiti account email/username and password to enablecloud access. Alternatively, you can click Register now tocreate a Ubiquiti account. Click Enable Cloud Access.12. Wait for the UniFi Controller to be adopted, and then clickLaunch.The UniFi Controller management interface will appear. Youcan manage your UniFi devices and view network statisticsusing the UniFi Controller management interface.For information on configuring and using the UniFi Controllersoftware, refer to the User Guide located on our website:www.ubnt.com/download/unifi
Instructions for Other Web Browsers1. Ensure that your host system is on the same Layer-2network as the UniFi Cloud Key.2. The UniFi Cloud Key is set to DHCP by default, so it will tryto automatically obtain an IP address. Assign a specific IPaddress to the UniFi Cloud Key, or check the DHCP serverfor its IP address.Note: The default fallback IP address of the UniFiCloud Key is 192.168.1.30.3. Launch the web browser. In the address field, type https://followed by the appropriate IP address. Press enter (PC) orreturn (Mac).4. Click Manage to run the UniFi Setup Wizard.Note: You can click Configure to change the settingsof the UniFi Cloud Key (refer to”UniFi Cloud KeyConfiguration”). The default login is ubnt/ubnt orroot/ubnt.
5. The UniFi Setup Wizard appears. Follow the on-screeninstructions. For step-by-step instructions, refer to the UserGuide, which is available atwww.ubnt.com/download/unifiAfter the UniFi Setup Wizard is finished, the UniFi Controllermanagement interface will appear. Log in with the AdminName and Password that you created, and then you canmanage your UniFi devices and view network statistics usingthe UniFi Controller management interface.For information on configuring and using the UniFi Controllersoftware, refer to the User Guide.Firmware UpdateNote: Updating the UniFi Cloud Key firmware will alsoupdate the UniFi Controller software. We recommendthat you back up your UniFi Controller configurationbefore updating the UniFi Cloud Key firmware.To upgrade the firmware of the UniFi Cloud Key:1. Ensure that your host system is on the same Layer-2network as the UniFi Cloud Key.2. The UniFi Cloud Key is set to DHCP by default, so it will tryto automatically obtain an IP address. Assign a specific IPaddress to the UniFi Cloud Key, or check the DHCP serverfor its IP address.Note: The default fallback IP address of the UniFiCloud Key is 192.168.1.30.
3. Launch the web browser. In the address field, type https://followed by the appropriate IP address. Press enter (PC) orreturn (Mac).4. Click Configure to change the settings of the UniFi CloudKey.5. Enter the Username and Password (the default login is ubnt/ubnt). Then click Login.6. The Main screen will appear. Click Maintenance.
7. You have two options for updating the firmware: Check for Updates Click Check for Updates to see ifthere is a newer firmware version. If there is, then youcan follow the on-screen instructions to upgrade now. Update Manually Click Update Manually to updatethe firmware. The Please Confirm Update screen willappear.You have two options for a manual update: upload file If you have the firmware saved in aspecific location, then click Select File to browsefor the file. get file from URL If you know the URL of thefirmware’s location, then enter it in the URL field. Update Click Update to proceed with the update.Cancel Click Cancel to skip the update.
UniFi Cloud Key ConfigurationLogin Instructions1. Ensure that your host system is on the same Layer-2network as the UniFi Cloud Key.2. The UniFi Cloud Key is set to DHCP by default, so it will tryto automatically obtain an IP address. Assign a specific IPaddress to the UniFi Cloud Key, or check the DHCP serverfor its IP address.Note: The default fallback IP address of the UniFiCloud Key is 192.168.1.30.3. Launch the web browser. In the address field, type https://followed by the appropriate IP address. Press enter (PC) orreturn (Mac).4. Click Configure to change the settings of the UniFiCloud Key.5. Enter the Username and Password (the default login isubnt/ubnt). Then click Login.
6. The Main screen will appear.Navigation BarThe UniFi Cloud Key configuration consists of three primarypages: “Main” “Configuration” “Maintenance”UsernameAt the top right of each screen, click the Username to displaythe Change Password, Change Username, and Logout options:Change password To change the password, click.
Old password Enter the current password (the default isubnt). New password Enter the new password. Confirm password Enter the new password again. Submit Click Submit to apply changes. Cancel Click Cancel to discard changes.Change username To change the username, click New password Enter the new username. Submit Click Submit to apply changes. Cancel Click Cancel to discard changes.Logout To manually sign out of the UniFi Cloud Keyconfiguration, click.MainThe Main screen displays basic status information about theUniFi Cloud Key.
StatusDevice Name Displays the hostname or alias of the UniFiCloud Key.Uptime Displays the duration of time the UniFi Cloud Key hasbeen running.Version Displays the version number of the UniFi Cloud Keyfirmware.MAC Address Displays the MAC address or hardwareidentifier of the UniFi Cloud Key.Date Displays the current date and time.UniFiVersion Displays the version number of the UniFi Controllersoftware.Status Displays the status of the UniFi Controller software.Disk SpaceAvailable Displays the percentage of available disk space.Used Displays the amount of used disk space.Free Displays the amount of available disk space.Total Displays the total amount of disk space.SD CardAvailable Displays the percentage of available space on theSD card.Used Displays the amount of used space on the SD card.Free Displays the amount of available space on the SD card.Total Displays the total amount of space on the SD card.
ConfigurationThe Configuration screen allows you to configure the basic andnetwork settings of the UniFi Cloud Key.Basic SettingsDevice Name Enter a descriptive name or identifier for theUniFi Cloud Key. Also known as a host name.Time Zone Select the appropriate time zone.Reset Button Use of the hardware Reset button on the UniFiCloud Key is enabled by default. To prevent an accidental resetto default settings, click to toggle Off.Network SettingsConfiguration Mode Select the appropriate mode: Static forfixed settings or DHCP for automatic configuration by yourDHCP server. Static Enter the following information:-- IP Address Enter the local IP address of the UniFiCloud Key.-- Netmask Enter the subnet mask of the UniFi CloudKey.-- Gateway Enter the IP address of the network’sgateway router.-- Primary DNS Enter the IP address of the network’sprimary DNS server.-- Secondary DNS Enter the IP address of thenetwork’s secondary DNS server.
DHCP The use of the Dynamic Host Configuration Protocol(DHCP) is the default. The UniFi Cloud Key automaticallyacquires network settings from the network’s DHCP server.-- Fallback IP Address Enter the IP address for theUniFi Cloud Key to use if an external DHCP server isnot found.-- Fallback Netmask Enter the netmask for the UniFiCloud Key to use if an external DHCP server is notfound.Apply Changes Click Apply Changes to save changes.Discard Click Discard to cancel changes.
MaintenanceThe Maintenance screen contains administrative options.SecurityPassword To change the password, click Change Password. Old password Enter the current password (the default isubnt). New password Enter the new password. Confirm Password Enter the new password again. Submit Click Submit to apply changes. Cancel Click Cancel to discard changes.
Username To change the username, click Change Username. New username Enter the new username. Submit Click Submit to apply changes. Cancel Click Cancel to discard changes.MaintenanceReboot Click Reboot to powercycle the UniFi Cloud Key.Power Off Click Power Off to turn off the UniFi Cloud Key.Reset to Defaults Click Reset to Defaults to reset the UniFiCloud Key to its factory default settings. This option will rebootthe UniFi Cloud Key, and all factory default settings will berestored.Note: We recommend that you back up your UniFiController configuration before resetting the UniFi CloudKey to its defaults.RestoreService While the UniFi Controller software is running, clickStop UniFi to stop it. To restart the software, click Start UniFito restart it.Restore from file Click Choose File to restore the UniFiController from a file you specify. Follow the on-screeninstructions.Auto BackupRestore from Auto Backup Click to restore from theautomatic backup file. Follow the on-screen instructions.FirmwareVersion Displays the version number of the UniFi Cloud Keyfirmware.
Check for Updates Click Check for Updates to see if there isa newer firmware version. If there is, then you can follow theon-screen instructions to upgrade now.Note: Updating the UniFi Cloud Key firmware will alsoupdate the UniFi Controller software. We recommendthat you back up your UniFi Controller configurationbefore updating the UniFi Cloud Key firmware.Update Manually Click Update Manually to update thefirmware. The Please Confirm Update screen will appear.You have two options: upload file If you have the firmware saved in a specificlocation, then click Select File to browse for the file. get file from URL If you know the URL of the firmware’slocation, then enter it in the URL field. Update Click Update to proceed with the update. Cancel Click Cancel to skip the update.
UniFiVersion Displays the version number of the UniFi Controllersoftware.Check for Updates Click Check for Updates to see if there isa newer software version. If there is, then you can follow theon-screen instructions to upgrade now.Note: We recommend that you back up your UniFiController configuration before upgrading the UniFiController software.For information on configuring and using the UniFi Controllersoftware, refer to the User Guide located on our website:www.ubnt.com/download/unifiUniFi Video Software1. Ensure that your host system is on the same Layer-2network as the UniFi Cloud Key.2. Launch the Chrome web browser and typehttps://video.ubnt.com in the address field. Press enter(PC) or return (Mac).https://video.ubnt.com3. Click Sign In to log into your UBNT account.
4. Click Get Started and follow the on-screen instructions.For information on configuring and using the UniFi Videosoftware, refer to the User Guide on the website:www.ubnt.com/download/unifivideoHDD ReplacementA 1 TB HDD is pre-installed. If you want to replace it, you mustuse a 2.5” hard drive and then follow these instructions:1. Back up data from the UniFi Cloud Key.2. Power off the UniFi Cloud Key to prevent any softwaredisruption.3. On the bottom of the UniFi Cloud Key, slide the HDD Latchto release the HDD bay tray.
4. Pull one side of the tray away from the HDD to remove it.5. Insert the replacement HDD at an angle into the tray andthen press the HDD into place.6. Push the HDD bay tray back into the case.
Management InterfaceHard Drive CapacityeMMC MemoryNetworking InterfaceButtonsLEDs131.16 x 27.10 x 134.20 mm(5.16 x 1.07 x 5.28")582 g (1.28 lb)Anodized AluminumUniFiUniFi Video1 TB32 GB(1) 10/100/1000 Ethernet Port(1) Power(1) Reset(1) Power, White/BluePower MethodStandard 802.3af PoE or9VDC, 2APower SupplyStandard 802.3af PoE or9VDC, 2ASupported Voltage RangeStandard 802.3af PoE or9VDC, 2AMax. Power Consumption12.95W (PoE)18W (Adapter)Operating TemperatureOperating HumidityCertifications0 to 35 C(32 to 104 F)20 to 80% NoncondensingCE, FCC, IC
Safety Notices1.Read, follow, and keep these instructions.2.Heed all warnings.3.Only use attachments/accessories specified by the manufacturer.WARNING: Do not use this product in a location that canbe submerged by water.WARNING: Avoid using this product during an electricalstorm. There may be a remote risk of electric shock fromlightning.Electrical Safety Information1.Compliance is required with respect to voltage, frequency, and currentrequirements indicated on the manufacturer’s label. Connection to adifferent power source than those specified may result in improperoperation, damage to the equipment or pose a fire hazard if thelimitations are not followed.2.There are no operator serviceable parts inside this equipment. Serviceshould be provided only by a qualified service technician.
Limited WarrantyUBIQUITI NETWORKS, Inc (“UBIQUITI NETWORKS”) warrants that theproduct(s) furnished hereunder (the “Product(s)”) shall be free from defectsin material and workmanship for a period of one (1) year from the dateof shipment by UBIQUITI NETWORKS under normal use and operation.UBIQUITI NETWORKS’ sole and exclusive obligation and liability underthe foregoing warranty shall be for UBIQUITI NETWORKS, at its discretion,to repair or replace any Product that fails to conform to the abovewarranty during the above warranty period. The expense of removal andreinstallation of any Product is not included in this warranty. The warrantyperiod of any repaired or replaced Product shall not extend beyond itsoriginal term.Warranty ConditionsThe above warranty does not apply if the Product:(I)has been modified and/or altered, or an addition made thereto,except by Ubiquiti Networks, or Ubiquiti Networks’ authorizedrepresentatives, or as approved by Ubiquiti Networks in writing;(II)has been painted, rebranded or physically modified in any way;(III)has been damaged due to errors or defects in cabling;(IV)has been subjected to misuse, abuse, negligence, abnormalphysical, electromagnetic or electrical stress, including lightningstrikes, or accident;(V)has been damaged or impaired as a result of using third partyfirmware;(VI)has no original Ubiquiti MAC label, or is missing any other originalUbiquiti label(s); or(VII)has not been received by Ubiquiti within 30 days of issuance ofthe RMA.In addition, the above warranty shall apply only if: the product has beenproperly installed and used at all times in accordance, and in all materialrespects, with the applicable Product documentation; all Ethernet cablingruns use CAT5 (or above), and for outdoor installations, shielded Ethernetcabling is used, and for indoor installations, indoor cabling requirementsare followed.ReturnsNo Products will be accepted for replacement or repair without obtaininga Return Materials Authorization (RMA) number from UBIQUITI NETWORKSduring the warranty period, and the Products being received at UBIQUITINETWORKS’ facility freight prepaid in accordance with the RMA process ofUBIQUITI NETWORKS. Products returned without an RMA number will notbe processed and will be returned freight collect or subject to disposal.Information on the RMA process and obtaining an RMA number can befound at: www.ubnt.com/support/warranty
DisclaimerEXCEPT FOR ANY EXPRESS WARRANTIES PROVIDED HEREIN, UBIQUITINETWORKS, ITS AFFILIATES, AND ITS AND THEIR THIRD PARTY DATA,SERVICE, SOFTWARE AND HARDWARE PROVIDERS HEREBY DISCLAIMAND MAKE NO OTHER REPRESENTATION OR WARRANTY OF ANY KIND,EXPRESS, IMPLIED OR STATUTORY, INCLUDING, BUT NOT LIMITED TO,REPRESENTATIONS, GUARANTEES, OR WARRANTIES OF MERCHANTABILITY,ACCURACY, QUALITY OF SERVICE OR RESULTS, AVAILABILITY,SATISFACTORY QUALITY, LACK OF VIRUSES, QUIET ENJOYMENT, FITNESSFOR A PARTICULAR PURPOSE AND NON-INFRINGEMENT AND ANYWARRANTIES ARISING FROM ANY COURSE OF DEALING, USAGE ORTRADE PRACTICE IN CONNECTION WITH SUCH PRODUCTS AND SERVICES.BUYER ACKNOWLEDGES THAT NEITHER UBIQUITI NETWORKS NORITS THIRD PARTY PROVIDERS CONTROL BUYER’S EQUIPMENT OR THETRANSFER OF DATA OVER COMMUNICATIONS FACILITIES, INCLUDINGTHE INTERNET, AND THAT THE PRODUCTS AND SERVICES MAY BESUBJECT TO LIMITATIONS, INTERRUPTIONS, DELAYS, CANCELLATIONSAND OTHER PROBLEMS INHERENT IN THE USE OF COMMUNICATIONSFACILITIES. UBIQUITI NETWORKS, ITS AFFILIATES AND ITS AND THEIR THIRDPARTY PROVIDERS ARE NOT RESPONSIBLE FOR ANY INTERRUPTIONS,DELAYS, CANCELLATIONS, DELIVERY FAILURES, DATA LOSS, CONTENTCORRUPTION, PACKET LOSS, OR OTHER DAMAGE RESULTING FROM ANYOF THE FOREGOING. In addition, UBIQUITI NETWORKS does not warrantthat the operation of the Products will be error-free or that operation willbe uninterrupted. In no event shall UBIQUITI NETWORKS be responsiblefor damages or claims of any nature or description relating to systemperformance, including coverage, buyer’s selection of products (includingthe Products) for buyer’s application and/or failure of products (includingthe Products) to meet government or regulatory requirements.Limitation of LiabilityEXCEPT TO THE EXTENT PROHIBITED BY LOCAL LAW, IN NO EVENT WILLUBIQUITI OR ITS SUBSIDIARIES, AFFILIATES OR SUPPLIERS BE LIABLE FORDIRECT, SPECIAL, INCIDENTAL, CONSEQUENTIAL OR OTHER DAMAGES(INCLUDING LOST PROFIT, LOST DATA, OR DOWNTIME COSTS), ARISINGOUT OF THE USE, INABILITY TO USE, OR THE RESULTS OF USE OF THEPRODUCT, WHETHER BASED IN WARRANTY, CONTRACT, TORT OR OTHERLEGAL THEORY, AND WHETHER OR NOT ADVISED OF THE POSSIBILITY OFSUCH DAMAGES.
NoteSome countries, states and provinces do not allow exclusions of impliedwarranties or conditions, so the above exclusion may not apply to you.You may have other rights that vary from country to country, state tostate, or province to province. Some countries, states and provinces do notallow the exclusion or limitation of liability for incidental or consequentialdamages, so the above limitation may not apply to you. EXCEPT TOTHE EXTENT ALLOWED BY LOCAL LAW, THESE WARRANTY TERMS DONOT EXCLUDE, RESTRICT OR MODIFY, AND ARE IN ADDITION TO, THEMANDATORY STATUTORY RIGHTS APPLICABLE TO THE LICENSE OF ANYSOFTWARE (EMBEDDED IN THE PRODUCT) TO YOU. The United NationsConvention on Contracts for the International Sale of Goods shall not applyto any transactions regarding the sale of the Products.ComplianceFCCChanges or modifications not expressly approved by the party responsiblefor compliance could void the user’s authority to operate the equipment.This device complies with Part 15 of the FCC Rules. Operation is subject tothe following two conditions.1.This device may not cause harmful interference, and2.This device must accept any interference received, includinginterference that may cause undesired operation.This equipment has been tested and found to comply with the limits for aClass A digital device, pursuant to part 15 of the FCC Rules. These limits aredesigned to provide reasonable protection against harmful interferencewhen the equipment is operated in a commercial environment. Thisequipment generates, uses, and can radiate radio frequency energy and,if not installed and used in accordance with the instruction manual, maycause harmful interference to radio communications. Operations of thisequipment in a residential area is likely to cause harmful interference inwhich case the user will be required to correct the interference at his ownexpense.This radio transmitter (FCC: SWX-UCKG2P) has been approved by FCC.
ISED CanadaCAN ICES-3(A)/NMB-3(A)This device complies with ISED Canada licence-exempt RSS standard(s).Operation is subject to the following two conditions:1.This device may not cause interference, and2.This device must accept any interference, including interference thatmay cause undesired operation of the device.This radio transmitter (IC: 6545A-UCKG2P) has been approved by ISEDCanada.CAN ICES-3(A)/NMB-3(A)Le présent appareil est conforme aux CNR d’ISDE Canada applicables auxappareils radio exempts de licence. L’exploitation est autorisée aux deuxconditions suivantes :1.l’appareil ne doit pas produire de brouillage;2.l’appareil doit accepter tout brouillage radioélectrique subi, même si lebrouillage est susceptible d’en compromettre le fonctionnement.Le présent émetteur radio (IC : 6545A-UCKG2P) a été approuvé par ISDECanada.Battery Warning1.Do not expose cells or batteries to heat or fire. Avoid storage in directsunlight.2.Do not use any cell or battery which is not designed for use with theequipment.3.Always purchase the battery recommended by the devicemanufacturer for the equipment.4.Secondary cells and batteries need to be charged before use. Alwaysuse the correct charger and refer to the manufacturer’s instructions orequipment manual for proper charging instructions.RF Exposure WarningThe antennas used for this transmitter must be installed to provide aseparation distance of at least 20 cm from all persons and must not belocated or operating in conjunction with any other antenna or transmitter,except as listed for this product’s certification.Les antennes utilisées pour cet émetteur doit être installé pour fournir unedistance de séparation d’au moins 20 cm de toutes les personnes et ne doitpas être situé ou opérant en conjonction avec une autre antenne ou unautre émetteur, sauf dans les cas énumérés à la certification de ce produit.
Australia and New ZealandWarning: This is a Class A product. In a domestic environment thisproduct may cause radio interference in which case the user maybe required to take adequate measures.CE MarkingCE marking on this product represents the product is in compliance with alldirectives that are applicable to it.Country ListAT BE BG CY CZ DE DK EEIEITLVLTELESFILU MT NL PL PT RO SEFR HR HUSISK UKBFWA (Broadband Fixed Wireless Access) members noted in blueNote: This device meets Max. TX power limit per ETSI regulations.The following apply to products that operate in the 5 GHz frequency range:Note: This device is restricted to indoor use only when operatingin the 5150 - 5350 MHz frequency range within all member states.Note: All countries listed may operate at 30 dBm. BFWA memberstates may operate at 36 dBm.Note: Operation in the 5.8 GHz frequency band is prohibited inBFWA member states. Other countries listed may use the 5.8 GHzfrequency band.
RoHS/WEEE Compliance StatementEnglishEuropean Directive 2012/19/EU requires that the equipment bearingthis symbol on the product and/or its packaging must not be disposedof with unsorted municipal waste. The symbol indicates that thisproduct should be disposed of separately from regular household wastestreams. It is your responsibility to dispose of this and other electric andelectronic equipment via designated collection facilities appointed by thegovernment or local authorities. Correct disposal and recycling will helpprevent potential negative consequences to the environment and humanhealth. For more detailed information about the disposal of your oldequipment, please contact your local authorities, waste disposal service, orthe shop where you purchased the product.DeutschDie Europäische Richtlinie 2012/19/EU verlangt, dass technischeAusrüstung, die direkt am Gerät und/oder an der Verpackung mit diesemSymbol versehen ist, nicht zusammen mit unsortiertem Gemeindeabfallentsorgt werden darf. Das Symbol weist darauf hin, dass das Produktvon regulärem Haushaltmüll getrennt entsorgt werden sollte. Esliegt in Ihrer Verantwortung, dieses Gerät und andere elektrischeund elektronische Geräte über die dafür zuständigen und von derRegierung oder örtlichen Behörden dazu bestimmten Sammelstellen zuentsorgen. Ordnungsgemäßes Entsorgen und Recyceln trägt dazu bei,potentielle negative Folgen für Umwelt und die menschliche Gesundheitzu vermeiden. Wenn Sie weitere Informationen zur Entsorgung IhrerAltgeräte benötigen, wenden Sie sich bitte an die örtlichen Behörden oderstädtischen Entsorgungsdienste oder an den Händler, bei dem Sie dasProdukt erworben haben.
EspañolLa Directiva 2012/19/UE exige que los equipos que lleven este símbolo enel propio aparato y/o en su embalaje no deben eliminarse junto con otrosresiduos urbanos no seleccionados. El símbolo indica que el productoen cuestión debe separar
Key Gen2 Plus. This Quick Start Guide is designed to guide you through installation and also includes warranty terms. Package Contents UniFi Cloud Key Gen2 Plus . manage your UniFi devices and view network statistics using the UniFi Controller management interface. For information on confi