Transcription
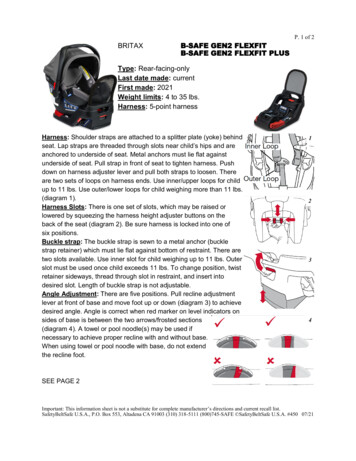
P. 1 of 2BRITAXB-SAFE GEN2 FLEXFITB-SAFE GEN2 FLEXFIT PLUSType: Rear-facing-onlyLast date made: currentFirst made: 2021Weight limits: 4 to 35 lbs.Harness: 5-point harnessHarness: Shoulder straps are attached to a splitter plate (yoke) behindseat. Lap straps are threaded through slots near child’s hips and areanchored to underside of seat. Metal anchors must lie flat againstunderside of seat. Pull strap in front of seat to tighten harness. Pushdown on harness adjuster lever and pull both straps to loosen. Thereare two sets of loops on harness ends. Use inner/upper loops for childup to 11 lbs. Use outer/lower loops for child weighing more than 11 lbs.(diagram 1).Harness Slots: There is one set of slots, which may be raised orlowered by squeezing the harness height adjuster buttons on theback of the seat (diagram 2). Be sure harness is locked into one ofsix positions.Buckle strap: The buckle strap is sewn to a metal anchor (bucklestrap retainer) which must lie flat against bottom of restraint. There aretwo slots available. Use inner slot for child weighing up to 11 lbs. Outerslot must be used once child exceeds 11 lbs. To change position, twistretainer sideways, thread through slot in restraint, and insert intodesired slot. Length of buckle strap is not adjustable.Angle Adjustment: There are five positions. Pull recline adjustmentlever at front of base and move foot up or down (diagram 3) to achievedesired angle. Angle is correct when red marker on level indicators onsides of base is between the two arrows/frosted sections(diagram 4). A towel or pool noodle(s) may be used ifnecessary to achieve proper recline with and without base.When using towel or pool noodle with base, do not extendthe recline foot.1234SEE PAGE 2Important: This information sheet is not a substitute for complete manufacturer’s directions and current recall list.SafetyBeltSafe U.S.A., P.O. Box 553, Altadena CA 91003 (310) 318-5111 (800)745-SAFE SafetyBeltSafe U.S.A. #450 07/21
P. 2 of 2Britax B-Safe Gen2 FlexFit/FlexFit PlusBelt Path: If lower connectors are not in use, store connectors in slotsprovided in front of base (diagram 5). Currently, this restraint may not beinstalled using an inflatable safety belt. See FAQs in the support sectionof the BRITAX website stions/) for the most up to date information.With base: Vehicle belt is routed through slots in base. Red lock-offsare located on sides of base. Route vehicle lap and shoulder belt throughbelt path. Pull free end of shoulder belt to tighten and slide shoulder belt intolock-off on safety belt retractor side (diagram 6). Lock-off does NOTfunction with a lap-only belt. Lap-only belt MUST be locked accordingto vehicle owner's manual.Without base: Route lap portion of lap-shoulder belt through beltguides and shoulder portion through European shoulder belt guide on backof restraint (diagram 7). Alternate method—Do not place shoulder portion ofbelt (if present) in belt guides; allow it to rest against vehicle seat back.Level line is located on side of carrier (diagram 8).LATCH: Press red release button on base, pull out lower connectors(diagram 5), and attach to lower anchors. Tighten both connector straps(diagram 9), feeding any excess webbing back into base (diagram 10).Borrowing of outboard anchors is NOT permitted for center install. Lowerconnectors may be used in center seating position only when that position isa designated LATCH position per the vehicle owner’s manual with standardanchors spaced 11 inches apart (refer to Safe Ride News LATCH manual).Handle: All four handle positions may be used in vehicle, providedhandle is locked. Do not rotate handle past “Carry” position towardchild’s feet.Other: Use infant comfort pillow (diagram 11) only for child 4-11 lbs.May be used under child as shown in diagram 11, or may be usedto provide additional head and neck support behind child(diagram 12). To use the comfort pillow behind child, rotate pillow 180degrees from shipped position and tuck behind head restraint cover.Base may be installed with up to 3 in. of overhang.Restraint expires six years after the date of manufacture.Restraint is certified for use on aircraft without base only.B-Safe Gen2 and B-Safe Gen2 FlexFit bases areinterchangeable.11Britax does not allow the use of crotch rolls.567891012Important: This information sheet is not a substitute for complete manufacturer’s directions and current recall list.SafetyBeltSafe U.S.A., P.O. Box 553, Altadena CA 91003 (310) 318-5111 (800)745-SAFE SafetyBeltSafe U.S.A. #450 07/21
B-SAFE GEN2 FLEXFIT &B-SAFE GEN2 FLEXFIT PLUSUser GuideGuía del usuario
ContentsFeatures 2Safety Information 4Important Notes 6Certification 7Registration 8Child Fit Information 9Using With the Base 10Overhang 10Adjusting the Recline Angle 10Lower Anchor Installation 12Lap-Shoulder Belt Installation 14Lap Belt Installation 16Attaching the Infant Car Seat 18Removing the Infant Car Seat 18Uninstalling the Base 19Using Without the Base 20Adjusting the Recline Angle 20Lap-Shoulder Belt Installation with European Belt Guide 22Lap-Shoulder Belt Installation 24Lap Belt Installation 26Securing Your Child 28Child Seat Functions 32Adjusting the Harness 32Adjusting the Buckle 33Handle Position 35Infant Comfort Pillow 36Britax Strollers 37Using the Lower Anchors 38Using the Lower Connectors 39Vehicle Compatibility 40Care and Maintenance 42Warranty 47B-SAFE and BRITAX are trademarks owned by Britax Child Safety, Inc. Allrights reserved. 2020 Britax Child Safety, Inc. This product and its componentsare subject to change without notice. P12971600 A:9.20
Britax Child Safety, Inc.Features1314151617181238910114561271.Canopy10. Infant Comfort Pillow2.Head Restraint3.Carry Handle11. Harness Adjuster Lever(under cover)4.Carry Handle Adjuster5.Carrier Only Belt Guide/Harness Holder6.Stroller Adapter15. Harness Straps7.Shell16. Harness Buckle8.Cover17. Buckle Strap9.Easy Remove Cover Tab18. Belly Pad212. Harness Adjuster Strap13. Comfort Pads (optional)14. Chest Clip
B-SAFE GEN2 FLEXFIT & FLEXFIT PLUS User Guide192021222627283132332334242930352526. Lower Connector Strap27. Recline Angle Indicators28.19. Release Lever from Base andStroller20. European Shoulder BeltGuide21. Harness Height Adjuster22. Serial Number & ManufactureDate Label23. Harness Slots24. Harness Straps25. Harness YokeUser Guide Storage29. Base Serial Number andManufacture Date Label(Underside of the Base)30. Shoulder Belt Lock-Off31. Anti-Rebound Bar (B-SAFEGEN2 FLEXFIT PLUS only)32. Lower Connector ReleaseButton33. Recline Adjustment Lever34. Recline Adjustment Foot35. Lower Connector3
Britax Child Safety, Inc.Safety InformationFailure to follow all warnings and instructionscould result in SERIOUS INJURY or DEATH.4Read these instructions before use of the infant carrier. Use only in a rear-facing position when using it in avehicle. Use only with children who weigh between 4 and35 pounds (1.8 and 15.8 kg) and whose height is32 inches (81.3 cm) or less. Snugly adjust the belts provided with this child restraintaround your child. Secure this child restraint with the vehicle’s childrestraint anchorage system if available or with a vehiclebelt. Using both methods is not approved and maycause the child seat not to perform as intended. Follow all instructions on this child restraint and inthe written instructions located in the base storagecompartment. Keep the instructions with the restraintfor future use. Register your child restraint with the manufacturer. In a vehicle with rear designated seating positions,vehicle owners should be alerted that, according toaccident statistics, children are safer when properlyrestrained in the rear seating positions than in the frontseating positions. To ensure your child’s safety, pleasestudy Vehicle Seating Positions on page 40 and consultyour vehicle owner’s manual. This infant car seat must not be used in boats or othernon-certified applications. NEVER leave child unattended.
B-SAFE GEN2 FLEXFIT & FLEXFIT PLUS User Guide The use of non-Britax covers, inserts, toys,accessories, or tightening devices is not approvedby Britax. Their use could cause this child seat not toperform as intended in a crash. ALWAYS check the back seat upon leaving yourvehicle to prevent leaving a child restrained in theinfant car seat alone in the vehicle. Suffocation Hazard: Infant carrier can roll over on softsurfaces and suffocate child. NEVER place carrier onbeds, sofas, or other soft surfaces. Fall Hazard: Child’s activity can move carrier.NEVER place carrier on counter tops, tables,or any other elevated surface. Fall Hazard: The carrier can fall from theshopping cart. DO NOT use on shoppingcarts. Strangulation Hazard: Children have STRANGLED inloose or partially buckled harness straps. Fully restrainthe child even when carrier is used outside the vehicle. ALWAYS lift infant car seat by both sides of handleafter installation in base to verify that it is secure. DO NOT use the infant carrier if it is damaged or broken. To prevent injury due to deterioration or hidden damage,DO NOT use this infant car seat and base if it is olderthan six (6) years or has been in a moderate or severecrash. See expiration date on the date of manufacturelabel located on the infant car seat and base. Always make sure the child restraint system is secured tothe vehicle, even when unoccupied, since in a crash anunsecured child restraint system may injure occupants.5
Britax Child Safety, Inc.Important Notes Discontinue use of this child seat if it has been in amoderate or severe crash. It is not necessary to replace acar seat after a minor crash defined by the U.S. NationalHighway Traffic Safety Administration (NHTSA) as:* The vehicle is driveable from the crash site; and* The vehicle door nearest the child seat was notdamaged; and* No vehicle occupants were injured; and* There is no visible damage to the child seat; and* The airbags (if present) did not deploy. Do not, except as described in this booklet, attempt todisassemble any part of the child seat or change the waythe harness or vehicle’s seat belts are used. Do not allow children to play with this child seat. Do not use anything to raise the child seat off vehicle seatexcept as described in these instructions. In a crash, thiscould cause the child seat not to perform as intended. Never use the adjuster strap to lift or carry this infantcar seat. Doing so could cause damage to the harnessadjuster and webbing. Always carry an infant car seat bythe handle or shell. Store the infant car seat in a safe, dry place when it willnot be used for an extended period of time. Do not placeheavy objects on top of it. Third party recommendations are subject to change, sowe recommend you visit their websites for the most up todate recommendations.6
B-SAFE GEN2 FLEXFIT & FLEXFIT PLUS User GuideCertificationThis Restraint is Certified For Use in Motor Vehicles andAircraft.Motor VehiclesThis child seat system conforms to all applicable FederalMotor Vehicle Safety Standards (FMVSS 213).AircraftThis child seat is certified for aircraft use. TheFAA recommends that a child weighing up to40 lbs (18 kg) use a certified, harnessed childseat while traveling on an aircraft.Install your child seat in a window seat to avoid blockingthe aisle. For aircraft installation, see Lap Belt Installationinstructions without base on pages 26 - 27. DO NOT usethe base on aircraft.* If the aircraft lap belt is too short, ask a flight attendantfor a belt extender.* Inflatable aircraft lap belts are NOT compatible with thischild seat.7
Britax Child Safety, Inc.RegistrationChild restraints could be recalled for safety reasons. Youmust register this restraint to be reached in a recall. Sendyour name, address, e-mail address if available and therestraint’s model number and manufacturing date to BritaxChild Safety, Inc. P.O. Box 91167 Allentown, PA 18109-9925,or call 1-888-427-4829, or register online at us.britax.com/registration. For recall information, call the U.S. Government’sVehicle Safety Hotline at 1-888-327-4236 (TTY 1-800-4249153), or go to http://www.NHTSA.gov.For your convenience, record all the information about yourchild seat below. Refer to the Serial Number & ManufacturedDate Label for all information, see page 3.Model Name and Number:Serial Number:Batch Number:Date of Manufacture:8
B-SAFE GEN2 FLEXFIT & FLEXFIT PLUS User GuideChild Fit InformationRear-Facing Only 4 - 35 lbs (1.8 - 15.8 kg)Use rear-facing only with children:12. inc5 hcm who weigh between 4 and 35 lbs(1.8 and 15.8 kg) and who are 32 inches (81.3 cm) in height orless and when the top of the head is one inchor more below the top of the child seatshell and when the harness straps are located in the closestharness slot at or below the child’s shoulders.IMPORTANT: See Adjusting the Harness on page 32.Top of child’s headat least 1” (2.5 cm)below top of shellHarness in closestposition at or belowshoulder levelChest clip atcenter of child’schest at armpitlevel9
Britax Child Safety, Inc.Using With the BaseBefore installing the infant car seat: Check that your vehicle seat belt is compatible withthe infant car seat by referring to your vehicle owner’smanual and page 41 in this user guide.OverhangIt is important that the base ofthe child seat rests completelyflat on the vehicle seat with noside overhang. As seen in theillustration, it is permissible toallow up to 3 in. (7.6 cm) of thebase to hang over the edge ofthe vehicle seat. Some vehicleseats do not allow enough ofthe child seat base to contactthe vehicle seat. If this is thecase, choose another seatingposition. Failure to do so couldcause the child seat to notperform as intended.Adjusting the Recline AngleIMPORTANT: Vehicle must beparked on a level surface.1. Pull up on the reclineadjustment button.103”
B-SAFE GEN2 FLEXFIT & FLEXFIT PLUS User Guide2. Move the base up ordown until the red markeris visible between the twolines on the recline angleindicators while on thevehicle seat.üüûûIf there is a problem achieving the proper recline angle afterinstalling, try another approved seating position in yourvehicle or:a. Uninstall the base and lower the recline angleadjustment foot so that the recline foot is notextended.b. Remove the base fromthe vehicle and placea rolled towel or poolnoodle in the vehicleseat bight.c. Place the base against the towel or poolnoodle to level the shell and install.NOTE: If a towel or pool noodle is needed for therecline angle, the recline angle adjustment foot onthe base should remain in its lowest position.IMPORTANT: After the child is secured in the infant carseat and the car seat is attached to the base, ensure thatthe red marker is visible between the two lines on therecline angle indicator.11
Britax Child Safety, Inc.Lower Anchor Installation1. Press and hold lowerconnector releasebutton and pull lowerconnectors firmly toremove from theirstorage in the base.2. Lengthen lowerconnector straps.NOTE: When lengtheningthe strap be careful not totwist prior to connectingto adjacent vehicle loweranchor.3. Place the base on thevehicle seat and pressthe lower connectorsonto the adjacentvehicle lower anchorsuntil a click is heard.NOTE: Pull the lowerconnectors to verify theyare secure.4. While pressing thecenter of the base intothe seat, pull up on thelower connector adjusterstraps to tighten.12
B-SAFE GEN2 FLEXFIT & FLEXFIT PLUS User Guide5. Feed excess webbingback into base andensure that lowerconnector straps areflush with the base.Base Installation with Lower AnchorsCHECKLIST9Check that the lower connector strap is tight, nottwisted, and that the base is secure. The base issecure when it moves less than 1 inch (2.5 cm)front-to-back or side-to-side at the vehicle belt path.9Check that the recline angle is correct and confirmthat the red marker is visible between the two lineson the recline angle indicators.13
Britax Child Safety, Inc.Lap-Shoulder Belt Installation1. Place the base on thevehicle seat and thenpass the vehicle beltthrough the belt route.2. Ensure that the vehicleseat belt is not twistedand buckle.3. Press the base firmly intothe vehicle seat whileremoving all slack fromfirst the lap portion andthen the shoulder portionof the vehicle seat belt.14
B-SAFE GEN2 FLEXFIT & FLEXFIT PLUS User Guide4. Hold the vehicle shoulderbelt tightly and slide firmlyunder the lock-off on theside of the base oppositethe buckle.Base Installation with Lap-Shoulder BeltCHECKLIST9Check that the vehicle belt is tight, not twisted, andthat the base is secure. The base is secure whenit moves less than 1 inch (2.5 cm) front-to-back orside-to-side at the vehicle belt path.9Check that the recline angle is correct and confirmthat the red marker is visible between the two lineson the recline angle indicators.15
Britax Child Safety, Inc.Lap Belt InstallationIMPORTANT: The lock-off does NOT secure this type ofvehicle belt. Vehicle belt MUST be locked according toyour vehicle owner’s manual.1. Place the base on thevehicle seat and thenpass the vehicle beltthrough the belt route.2. Ensure that the vehicleseat belt is not twistedand buckle.16
B-SAFE GEN2 FLEXFIT & FLEXFIT PLUS User Guide3. Press the base firmly intothe vehicle seat whileremoving all slack fromthe vehicle seat belt.Base Installation with Lap BeltCHECKLIST9Check that the vehicle belt is tight, not twisted, andthat the base is secure. The base is secure whenit moves less than 1 inch (2.5 cm) front-to-back orside-to-side at the vehicle belt path.9Check that the recline angle is correct and confirmthat the red marker is visible between the two lineson the recline angle indicators.17
Britax Child Safety, Inc.Attaching the Infant Car Seat1. Ensure that the base issecurely installed.2. Place the infant car seatinto the base and pressdown until a click is heard.3. Pull up on both sidesof the infant car seat toverify attachment.4. Ensure that the carryhandle is in one of thefour locked positions andcheck that the reclineangle is still correct.Removing the Infant Car Seat1. Pull and hold the release lever on the back of the infantcar seat.2. Lift the infant car seat upfrom the base.18
B-SAFE GEN2 FLEXFIT & FLEXFIT PLUS User GuideUninstalling the BaseLower Anchor Installation1. Press the lower connectorrelease button on the topof the base to loosen thestraps.2. Press each of the redrelease buttons on thelower connectors andrelease vehicle anchors.3. Store the lower connectors in the storage slots in thebase until reinstalling. Pull on the lower connector strapsin center of base to remove slack.Lap Shoulder Belt Installation1. Unbuckle the vehicle beltand remove from the lockoff. Pull the belt from thebase belt routes.Lap Belt Installation1. Unbuckle the vehicle beltand pull the belt from thebase belt routes.19
Britax Child Safety, Inc.Using Without the BaseBefore installing the Infant Car Seat: Secure the child in the infant car seat before installingthe car seat in the vehicle. Check that your vehicle seat belt is compatible withthe infant car seat by referring to your vehicle owner’smanual and page 41 in this user guide. Check your vehicle owner’s manual to determine howto lock your vehicle belt system.Adjusting the Recline AngleIMPORTANT: Vehicle must be parked on a level surface. When installed, the levelline on the shell of theinfant car seat should belevel to the ground.20
B-SAFE GEN2 FLEXFIT & FLEXFIT PLUS User GuideIf there is a problem achieving the proper recline angle afterinstalling, try another approved seating position in yourvehicle or:a. Uninstall the car seat and remove it from thevehicle seat.b. Place one rolled towelor one or more poolnoodles in the vehicleseat bight.c. Place the car seatagainst the towel orpool noodle(s) to levelthe shell and install.21
Britax Child Safety, Inc.Lap-Shoulder Belt Installation with European Belt GuideIMPORTANT: Check your vehicle owner’s manual todetermine how to lock your vehicle belt system.* If you cannot lock your vehicle seat belt you mustuse a locking clip. Locking clips are available fromBritax at 1-888-427-4829 or 1-704-409-1699.1. Secure your child in theinfant car seat beforeinstalling the car seat inthe vehicle.2. Place the infant car seatrear facing on the vehicleseat.3. Pull the vehicle beltout and only route thelap portion through thecarrier only belt guidesand buckle.4. Wrap the shoulder beltaround the infant carseat shell. Lock yourvehicle seat belt systemas instructed by yourvehicle owner’s manual.22
B-SAFE GEN2 FLEXFIT & FLEXFIT PLUS User Guide5. Push the infant car seatfirmly into the vehicleseat while removingall slack from the lapportion and then theshoulder portion of thevehicle belt.Carrier Only Installation with EuropeanLap-Shoulder Belt GuideCHECKLIST9Check that the vehicle belt is tight, not twisted, andthat the infant car seat is secure. The infant car seatis secure when it moves less than 1 inch (2.5 cm)front-to-back or side-to-side at the vehicle belt path.9Check that the recline angle is correct. The properrecline angle is achieved when the level line on thecarrier is level to the ground.9Check that the infant car seat handle is rotated intoany locked position.23
Britax Child Safety, Inc.Lap-Shoulder Belt InstallationIMPORTANT: Check your vehicle owner’s manual todetermine how to lock your vehicle belt system.* If you cannot lock your vehicle seat belt you mustuse a locking clip. Locking clips are available fromBritax at 1-888-427-4829 or 1-704-409-1699.1. Secure your child in theinfant car seat beforeinstalling the car seat inthe vehicle.2. Place the infant car seatrear facing on the vehicleseat.3. Pull the vehicle beltout and only route thelap portion through thecarrier only belt guides.4. Verify that the vehicle beltis not twisted and buckle.Lock your vehicle seatbelt system as instructedby your vehicle owner’smanual.24
B-SAFE GEN2 FLEXFIT & FLEXFIT PLUS User Guide5. Push the infant car seatfirmly into the vehicleseat while removingall slack from the lapportion and then theshoulder portion of thevehicle belt.Carrier Only Installation with Lap-Shoulder BeltCHECKLIST9Check that the vehicle belt is tight, not twisted, andthat the infant car seat is secure. The infant car seatis secure when it moves less than 1 inch (2.5 cm)front-to-back or side-to-side at the vehicle belt path.9Check that the recline angle is correct. The properrecline angle is achieved when the level line on thecarrier is level to the ground.9Check that the infant car seat handle is rotated intoany locked position.25
Britax Child Safety, Inc.Lap Belt InstallationIMPORTANT: Check your vehicle owner’s manual todetermine how to lock your vehicle belt system.1. Secure your child in theinfant car seat beforeinstalling the car seat inthe vehicle.2. Place the infant carseat rear facing on thevehicle seat.3. Pull the vehicle belt outand route it through thecarrier only belt guides.4. Verify that the vehiclebelt is not twisted andthen buckle. Lock yourvehicle seat belt systemas instructed by yourvehicle owner’s manual.26
B-SAFE GEN2 FLEXFIT & FLEXFIT PLUS User Guide5. Push the infant carseat firmly into thevehicle seat whileremoving all slack fromthe vehicle belt.Carrier Only Installation with Lap BeltCHECKLIST9Check that the vehicle belt is tight, not twisted, andthat the infant car seat is secure. The infant car seatis secure when it moves less than 1 inch (2.5 cm)front-to-back or side-to-side at the vehicle belt path.9Check that the recline angle is correct. The properrecline angle is achieved when the level line on thecarrier is level to the ground.9Check that the infant car seat handle is rotated intoany locked position.27
Britax Child Safety, Inc.Securing Your Child1. Ensure that you havefollowed all instructionsfor adjustment of theharness and buckle intothe correct position foryour child. See page 32.2. Loosen the harnessby pressing down theharness adjuster leverwhile pulling bothharness straps forward.3. Press the tab and pullapart the two halves torelease the chest clip.4. Release the buckle andattach the harness strapsto the harness holders.28
B-SAFE GEN2 FLEXFIT & FLEXFIT PLUS User Guide5. Place the child in theinfant car seat asshown. Ensure the childis positioned upright inthe infant car seat andnot slouching. Theirbottom and back mustrest flat against theinfant car seat.SlouchingSitting Up6. Position the harnessstraps around the child.See page 32.IMPORTANT: Removebulky coats and/ orjackets before putting thechild in the child seat.7. Buckle the harness.NOTE: After insertingeach buckle tongue, aclick helps confirm theconnection is secure.NOTE: Always pull onthe buckle to ensure itis properly connected.29
Britax Child Safety, Inc.8. Check for proper harnessheight and pull any excessslack up to the child’sshoulder area beforetightening.9. Slowly pull the adjusterstrap to tighten the harnessaround the child.NOTE: Snugly adjust thebelts provided with thischild restraint around yourchild. A snug strap shouldnot allow any slack. It liesin a relatively straight linewithout sagging. It doesnot press on the child’sflesh or push the child’sbody into an unnaturalposition. You should not beable to pinch excess.10. Fasten the chest clip bysliding the two halvestogether until a clickis heard. Position thechest clip at the centerof the child’s chest,level with the armpits.30
B-SAFE GEN2 FLEXFIT & FLEXFIT PLUS User GuideCHECKLISTBefore traveling, verify that the:9 Harness straps are not twisted.9Harness is snug.9Buckle is fastened.9Chest clip is at the child’s armpit level.IMPORTANT: After the child is secured in the infant carseat and the car seat is attached to the base, ensure thatthe red marker is visible between the two lines on therecline angle indicator.31
Britax Child Safety, Inc.Child Seat FunctionsAdjusting the HarnessThe infant car seat is assembled with the harness in theinner loop. Inner Loop: For infantsweighing less than 11 lbs (5 kg). Inner Loop Outer Loop: For infantsweighing over 11 lbs (5 kg).IMPORTANT: The harness strapsshould be located in the closest Outer Loopharness height position at orbelow the child’s shoulders.IMPORTANT: Ensure the harness straps are fully securedon the harness yoke.1. Loosen the infantcar seat harness bypressing the harnessadjuster release leverand pulling bothharness straps forward.2. On the back of the seat,squeeze the harnessheight adjuster andslide the harness to theappropriate height.32
B-SAFE GEN2 FLEXFIT & FLEXFIT PLUS User GuideAdjusting the Buckle Inner Slot: For infantsweighing less than 11 lbs(5 kg). Outer Slot: For infantsweighing over 11 lbs (5 kg).Inner SlotOuter SlotIMPORTANT: If your child eats and drinks while in thechild seat, you will need to check the buckle periodicallyand rinse out any accumulated debris (see page 46).1. Unbuckle the harnessby pressing the redbutton in the center ofthe buckle and slidingboth harness tonguesout of the buckle.2. Locate the buckle strapretainer on the bottomof the infant car seatand pull away from theseat to loosen.33
Britax Child Safety, Inc.3. Turn the buckle strapretainer so that the shortside will go through theslot in the infant car seatshell and cover.4. Pull the buckle and bellypad out of the slots in theshell and cover.5. Push the retainer throughthe slot in the cover andshell for the appropriatebuckle position.6. Pull up on the buckle toensure that the bucklestrap retainer is properlyseated.34
B-SAFE GEN2 FLEXFIT & FLEXFIT PLUS User GuideHandle PositionThe car seat handle must beadjusted to one of the fourlocked positions for use in avehicle.Always use position 1 to carrythe car seat.21CarryPosition34To adjust, press and holdboth handle adjuster leversand rotate the handle to thechosen position.IMPORTANT: Do not forcethe carry handle past theupright carry position towardthe child’s feet. Doing so maycause damage to the carryhandle.35 pag
BRITAX B-SAFE GEN2 FLEXFIT B-SAFE GEN2 FLEXFIT PLUS Type: Rear-facing-only Last date made: current . Length of buckle strap is not adjustable. . Pull recline adjustment lever at front of base and move foot up or down (diagram 3) to achieve desired angle. Angle is correct when red marker on level indicators on sides of base is between the .
