Transcription
98648-002-63Sartorius BasicElectronic Analytical and precision BalancesInstallation and Operating Instructions
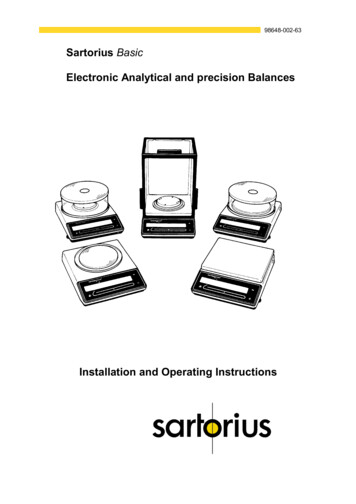
BA 210 S, BA 160 P, BA 110 S2
BA 310 S, BA 310 P3
BA 1104
BA 2105
BA 4100 S, BA 3100 P, BA 2100 S, BA 610; BA 6100, BA 4100, BA 21006
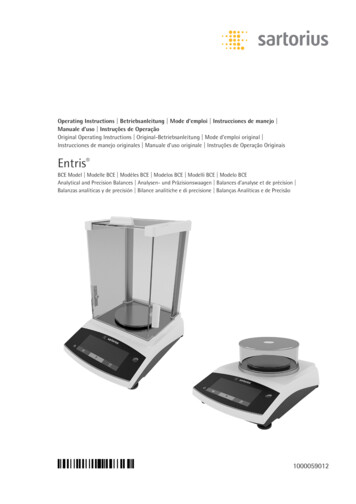
1 Weighing pan12 Weight display2 Compensating ring (depends on type of model)13 CAL key3 Pan support (depends on type of model)14 Print key (for data output)4 Protective ring (depends on type of model)15 Tare control5 Protective bushing (depends on type of model)16 ON/OFF key6 Weighing chamber base plate(depends on type of model)17 Data interface7 Locking ring (depends on type of model)18 AC jack8 Leveling foot (depends on type of model)19 Manufacturer’s label (on bottom of balance)9 Menu access switch (depends on type of model)20 Draft shield lid (depends on type of model)10 Level indicator (depends on type of model)21 Glass cylinder of the round draft shield(depends on type of model)11 Lug for attaching an antitheft locking device22 Draft shield base plate(depends on type of model)7
ContentsPageWarrantyStorage and Shipping ConditionsEquipment SuppliedInstallation InstructionsAmbient ConditionsStartupMounting the Analytical DraftShield ChamberConnecting the Balance to AC PowerVoltage SelectionSafety PrecautionsConnecting Electronic Devices(Peripherals)Information on WeighingElectro statically Charged SamplesLeveling the BalanceUsing the Level IndicatorHow to Operate the ��————————Special WeighingTurning the Display On and OffSelf-testTaringWeight Determination18181818Calibration19Data Interface20Below-Balance Weighing21Balance Operating Menu22Weighing Mode:Adaption to Ambient ConditionsStability RangeTare ParametersAuto Zero FunctionWeight UnitsCalibration FunctionFinal Readout Mode »--«22222222232323Additional Functions:Beep Tone (Acoustic Signal)Universal SwitchPower-On ModeAutomatic Shutoff24242424Utilities for Printouts or Data TransferData Output ParameterData Output in Defined IntervalsData ID Codes252525Changing Settings in theBalance Operating Menu26How to Undo All Menu CodeChanges: Reset ��——————How to Fasten anAntitheft Locking Device821Troubleshooting Guide29Care and MaintenanceCleaningSafety InspectionSafety Certificate30303031Accessories (Options)32Specifications35Dimensions (Scale Drawings)39
With this Sartorius Balance, you have acquired a high-quality electronic weighing instrument that will ease your daily work load.Please read these installation and operating instructions carefully before operating your new balance.WarrantyDo not miss out on the benefits of our full warranty.Please complete the warranty registration card, indicating the date ofinstallation, and return the card to your Sartorius dealer.Storage and Shipping ConditionsAllowable storage temperature:-40 C . 70 C-40 F . 158 FThe packaging has been designed to ensure that the balance will notbe damaged even if it is dropped from a height of 80 cm maximum(about 32 inches).Carefully unpack the balance and check the equipment immediatelyfor any visible damage as a result of rough handling during shipment.If this is the case, proceed as directed in the section entitled "SafetyInspection."Save all parts of the packaging and the box because you mayneed to ship your balance. Before packing your balance to shipit, unplug all connected cables to prevent damage.Do not expose the balance unnecessarily to extreme temperatures,moisture, shocks, blows or vibrations.9
Equipment SuppliedBA 210 S, BA 160 P,BA 110 S, BA 61BA 310 S,BA 310 PBA 110,BA 4100 S, BA 3100 P,BA 2100 S, BA 610,BA 210, BA 6100,BA 4100, BA 2100— Balance— Balance— Balance— AC adapter— AC adapter— AC adapter— Weighing pan— Weighing pan— Weighing pan— Weighing pan— Pan support— Pan support— Glass cylinder of theround draft shield— Draft shield lid— Draft shield baseplate— Pan support— Balance withanalytical draft shieldchamber— AC adapter— Protective ring— Draft shield baseplate— Protective bushing— Protective ring— Draft shield baseplate— Protective bushing— Locking ring— Compensating ring— Dust cover10— Compensating ring
Installation InstructionsAmbient ConditionsThe Sartorius Basic Balance is designed to provide reliable weighingresults under normal conditions in the laboratory and in industry.When choosing the area to Setup your balance, avoid exposing it tothe ambient conditions listed in the following so that you will be able towork with added speed and accuracy:- extreme heat radiation- drafts- inclined position- extreme vibrations- aggressive chemical atmospheresThe balance may not be used in a hazardous location/area wherethere is danger of explosion.Do not expose the balance to extreme moisture over long periods.Moisture in the air can condense on the surfaces of the balancewhenever a cold balance is brought to a substantially warmer place. lfyou need to transfer the balance to a warmer area, make sure to condition it for about two hours at room temperature (with the AC adapterdisconnected).Afterwards, if you keep the balance connected to power supply, thecontinuous positive difference in temperature between the inside ofthe balance and the outside will practically rule out the effects of moisture condensation.11
StartupMounting the Analytical Draft Shield Chamberon the BA 210 S, BA 160 P, BA 110 S and BA 61-Remove plastic, adhesive Strips and foam packaging-When you handle the draft shield chamber, make sure it is alwaysin an upright positionMounting the Draft Shield-Place the draft shield on the balanceTake the base plate out of the weighing chamberAlign the draft shieldPosition the locking ring (7) in the weighing chamber and turn itclockwise until it locks in placeInstalling the Weighing Chamber Base Plate (6)12-Position the base plateThe rear edge of the base plate has a sealing strip-Align the base plate with the sealing strip against the rear panel ofthe draft shield and then lower the front part of the base plate andpress it down into place.
Installing Components in the Weighing ChamberInstall the components in the following order:- protective bushing (5)- protective ring (4)- pan support (3)- compensating ring (2)- weighing pan (1)Starting Up the BA 310 S and BA 310 P-Place the draft shield base plate (22) on the balance and turn itclockwise until it locks in placeInstall the following parts on the balance in this order:- pan support (3)- weighing pan (1)- glass cylinder of the round draft shield (21)- draft shield lid (20)Starting Up the BA 110-Place the draft shield base plate (22) on the balance and turn itclockwise until it locks in placeInstall the following parts on the balance in this order:- - protective ring (4)- - pan support (3)- - compensating ring (2)- - weighing pan (1)- - glass cylinder of the round draft shield (21)- - draft shield lid (20)Starting Up the BA 210Place the weighing pan (1) on the balance13
Starting Up the BA 4100 S, BA 3100 P, BA 2100 S, BA 610,BA 6100, BA 4100 and BA 2100Place the weighing pan (1) on the balanceConnecting the Balance to AC PowerYour balance is energized by an AC adapter. Make sure the voltagerating printed on this unit is identical to your local line voltage.lf the voltage rating specified on the AC adapter or plug design doesnot match the rating or Standard you use, please contact your Sartorius dealer or Office.Important NoteOnly use original Sartorius AC adapters identified by the Sartorius label. Use of AC adapters from other manufacturers, even if these unitshave a registered approval rating from a national testing laboratory,requires the consent of a certified Sartorius technician.For information about operating the balance with an external batterypack, see the section entitled "Accessories."Detailed information on additional options for powering the balance isavailable in our Service Information Bulletin, no. 15/88 (for example,using local extra-low voltage).14
Plug the cord of the AC adapter into the jack on the balance. Nowplug the AC adapter into a wall outlet.Voltage SelectionYou can select the voltage only if you use our portable power supply(69 71172) that has a European-type plug (rounded prongs).Safety PrecautionsThe power supply or AC adapter rated to Class 2 can be plugged intoa wall outlet without taking any additional safety precautions.The pole of the output voltage is connected to the balance housingwhich can be grounded for Operation.The interface is also electrically connected to the balance housing(ground).Connecting Electronic Devices (Peripherals)Make sure to unplug the AC adapter from the wall outlet before youconnect or disconnect additional devices (printer or PC) to or from thebalance interface port.15
Information on Weighing Electro statically Charged Sampleslf you are using a balance with a 0.1 mg readability and electro statically charged glass or plastic Containers with a diameter larger thanthe weighing pan, you should utilize our antistatic pan(Ø 130 mm - see "Accessories") instead of the Standard weighingpan.Leveling the Balance Using the Level Indicator (depends on typeof model)At the point of use, level the balance using the leveling feet (8) so thatthe air bubble is centered within the circle of the level indicator (10).To raise the balance, lower the leveling feet (turn clockwise).To lower the balance, raise the feet (turn counter-clockwise).16
How to Operate the BalanceAfter you have initially plugged your balance into a wall outlet (orafter a relatively long power outage), allow for at least 30 minutes' warmupThe weight display shows the following messages for your information:{ (OFF)The balance was disconnected from AC power (power failure or outage for longer than approx 3 seconds, reconnection to AC power afterthe balance was unplugged).(StandbyThe display has been turned off with the ON/OFF key (16) and thebalance is now in the ready-to-operate mode so that it does not require warmup.(Busy)After the balance is turned on, the symbol is displayed until youpress a key for the first time. During Operation: The processor is stillbusy processing a function and will not accept any other command toperform functions at this time.17
WeighingTurning the Display On and Off (Standby Mode)Press the ON/OFF key (16) to turn the display on or off.Self-TestAfter the balance is turned on, an automatic self-test of the scale'selectronic circuitry is performed.This self-test ends with the readout "0.0 g/0.00 g/0.000 g or 0.0000 g"depending on the balance model.TaringFor exact weight determination, press the tare control (15) to zero theweight display. You can tare within the entire weighing range of thebalance.Weight DeterminationPlace your sample or obJect on the weighing pan (1).Read off the weight indicated in the display (12) only after the weightunit ("g" or another unit if selected - see the chapter entitied "BalanceOperating Menü") appears as the stability symbol.18
CalibrationDuring calibration, the balance is adapted to changes in ambient conditions.Calibrate your new balance at the point of use – after warmup and before the first measurement.Recalibrate your balance each time you move it to a different locationand whenever ambient conditions (especially the temperature)change considerably.Unload the weighing pan and tare.When you obtain a zero readout, press the CAL key (13). The calibration routine is started and the calibration weight in grams is displayed.lf external influences are affecting the calibration, "Err 02" may appear briefly. In this case, tare the balance and press the CAL keyagain once you obtain a zero readout.Center the calibration weight on the weighing pan.The balance calibrates itself automatically – an acoustic signal indicates completion of the calibration procedure.The balance can also be calibrated using other weights. See"Specifications" for a list of other calibration weights that areapproved for use with your balance.Only use calibration weights with tolerances that are equal to or betterthan the readability of your particular balance (see "Accessories" forinformation on calibration weights).Another weight is accepted for calibration if its exact weight briefly appears in the display.An acoustic Signal indicates completion of the calibration procedure.19
Data Interfacelf you wish to document your weighing data with the SartoriusData Printer, connect the printer's interface connector to the interface port (17) on the balance. You do not need to change anysettings!To do this, remove the protective cap from the data interface port.-Plug the interface connector into the interface portSecure the interface connector by tightening the screwsImportant NoteMake sure to unplug the AC adapter from the wall outlet before youconnect or disconnect additional devices (printer or PC) to or from thebalance interface port.Press thekey (14) for data output.See page 24 for information on data output parameters and data IDcodes. For more information about the data interface (e.g. data outputand input formats, pin assignment, etc.), see the enclosed "InterfaceDescription."20
Below-Balance WeighingA port for below-balance weighing is available on the bottom of thebalance (not on models BA 160 P, BA110 S, BA61, BA110, BA 210or BA 2100).To fasten an attachment or hanger, open the below-balance port byremoving the two screws on the bottom of the balance and detach theclosing plate.Now you can attach a sample using a Suspension wire, for example.Common applications for below-balance weighing include specificgravity determination or immersing a sample in a special atmosphere(medium for a reaction).Important NoteWhen you use such below-balance weighing attachments, you mustinstall a shield to eliminate drafts.How to Fasten an Antitheft Locking DeviceTo fasten an antitheft locking device, use the lug (11) located on therear panel of the balance.21
Balance Op
The Sartorius Basic Balance is designed to provide reliable weighing results under normal conditions in the laboratory and in industry. When choosing the area to Setup your balance, avoid exposing it to the ambient conditions listed in the following so that you will be able to work with added speed and accuracy: - extreme heat radiation - drafts - inclined position - extreme vibrations .