Transcription
PrintSecurePrinter Administration GuideFor Link-OS printersP1099957-001
Copyright 2018 ZIH Corp. and/or its affiliates. All rights reserved. ZEBRA and the stylized Zebra head aretrademarks of ZIH Corp., registered in many jurisdictions worldwide. All other trademarks are theproperty of their respective owners.Information in this document is subject to change without notice. The software described in thisdocument is furnished under a license agreement or nondisclosure agreement. The software may e usedor copied only in accordance with the terms of those agreements.For further information regarding legal and proprietary statements, please go to:SOFTWARE: www.zebra.com/linkoslegalCOPYRIGHTS: www.zebra.com/copyrightWARRANTY: www.zebra.com/warrantyEND USER LICENSE AGREEMENT: www.zebra.com/eulaTerms of UseProprietary StatementThis manual contains proprietary information of Zebra Technologies Corporation and its subsidiaries(“Zebra Technologies”). It is intended solely for the information and use for parties operating andmaintaining the equipment described herein. Such proprietary information may not be used,reproduced, or disclosed to any other parties for any other purpose without the express, writtenpermission of Zebra Technologies.Product ImprovementsContinuous improvement of products is a policy of Zebra Technologies. All specifications and designs aresubject to change without notice.Liability DisclaimerZebra Technologies takes steps to ensure that its published Engineering specifications and manuals arecorrect; however, errors do occur. Zebra Technologies reserves the right to correct any such errors anddisclaims liability resulting therefrom.Limitation of LiabilityIn no event shall Zebra Technologies or anyone else involved in the creation, production, or delivery ofthe accompanying product (including hardware and software) be liable for any damages whatsoever(including, without limitation, consequential damages including loss of business profits, businessinterruption, or loss of business information) arising out of the use of, the results of use of, or inability touse such product, even if Zebra Technologies has been advised of the possibility of such damages. Somejurisdictions do not allow the exclusion or limitation of incidental or consequential damages, so theabove limitation or exclusion may not apply to you.P1099957-001
IntroductionThis document details how to Administer a Zebra Label or Receipt printer. The content in thisdocument covers both Link-OS and ZebraLink printers, though the degree to which the twotypes of printers can be Administered is different. To make it easy to see where a givenAdministrative feature is available, the document will display the Link-OS or ZebraLink icon toindicate if the feature is available on the printer being configured.OverviewAdministering Thermal label and receipt printers can, at first, appear to be a very different taskthan managing other devices, such as computers or smartphones. Fortunately, there is a wellestablished, reliable model and a set of best practices that can be easily applied to minimizerisks and make the task straightforward.The “CIA Model” provides a guiding framework when considering how to reasonably andeffectively raise the bar on risk mitigation. The model can be applied to all devices that utilizethe data protected by enterprise information systems, from the more traditional connectedsolutions to the new players in the connected environment, such as intelligent thermal barcodeprinters. It includes three components:P1099957-001PrintSecure Printer Admin. Guide31/19/18
COMMON SENSE BEST PRACTICESThere are a set of Best Practices you can put in place to align your printer Administration withthe CIA concepts. By applying these common sense Best Practices, you can reduce risk, whilestill optimizing your use of thermal barcode printers.1 Start early. Plan for incoming devices, and how you’ll protect them.2 Use encrypted and authenticated connections where possible.3 Plan to rotate access passwords, access keys and authentication credentials.4 Defaults typically represent documented methods to access a device. ActivateUser Interface Passwords and consider turning off the device services that youdon’t plan to use.5 Leverage a remote management system to allow you to quickly update settingsand standards. The longer devices are using out of date settings, the longer theyrepresent the “easier target.”6 Keep update schedules and plans only in the hands of those who need to havethem. Knowing when updates are planned can inadvertently encourageinappropriate actions.7 Plan for a method to continuously monitor your system for “out of touch” devices.Where you suspect a device has been taken out of your environment, withdraw itscredentials until the device status is determined.8 Choose devices that can be updated across their long service lives so they keepcurrent with new standards. Verify that the update system uses a method to ensurethe update file hasn’t been tampered with.9 Plan for device retirement by removing enterprise system settings, deleting deviceuser Accounts/Credentials and checking to make sure the existing system isn’thardcoded to look for retired devices.10 Consider “Confidentiality”, “Integrity” and “Availability” during all stages of thedevices lifecycle.P1099957-001PrintSecure Printer Admin. Guide41/19/18
STEPS TO TAKEApplying these Best Practices is straightforward. The process involves four steps:1. Census– which devices do you have?2. Consider– which Admin capabilities do your printers have?3. Configure– send commands to alter Admin settings.4. Confirm– validate the new settings.CENSUS: WHICH DEVICES DO YOU HAVE?Zebra printers have been manufactured for over 30 years. Through that time, the scope ofAdministrative settings has grown. It’s important to know which printer models you are workingwith to know which Admin controls are available. The chart below will help you “place” yourprinter model into one of three categoriesLegacyModelsLink-OS (no admin features)Desktop PrintersA100 seriesA300 seriesBravo seriesCompanionEncore seriesLP/TLP seriesTiger Writer2746 seriesHT146DA402R402T300/T402Mobile PrintersCameo seriesMP seriesQL seriesPA400 seriesPT400 seriesPS2000-PS400 seriesTR220ZQ110Industrial PrintersZ60 seriesZ90 seriesZ100 seriesZ140 seriesZ200 series105SeOthersTTP Kiosk printer seriesP1099957-001(limited admin features)(most admin features)Desktop PrintersLP/TLP-Z seriesLP/TLP Plus seriesS300S400S500S600G seriesHC100Desktop PrintersZD200 seriesZD400 seriesZD500 seriesZD600 seriesMobile PrintersQLPlus seriesP4T seriesRW SeriesMobile PrintersiMZ seriesQLn seriesZQ300 seriesZQ500 seriesZQ600 seriesZR300 seriesZR600 seriesIndustrial PrintersZ4000/Z6000Z4M/Z6MZM400/600 series105SL series105SL Plus seriesXiII through Xi4 seriesOthersPAX 2 through PAX5 seriesZE500 seriesKR403Industrial PrintersZT200 seriesZT400 seriesZT500 seriesZT600 seriesPrintSecure Printer Admin. Guide5OthersN/A1/19/18
CONSIDER-WHICH ADMIN CAPABILITIES DOES YOUR PRINTER HAVE?Link-OS printers support a wide range of administrative commands and features, ZebraLinkprinters support a more limited set. Before using these capabilities please review the followingpages to carefully consider how changing these features settings could impact your application.Supported PrintersHTTPHTTPSFTPLPDUDPSMTPSNMPRaw TelnetPOP3Network Time ProtocolBluetoothBTLEUSB HostEthernetWLAN802.11xRTS/CTS protectionIP Address WhitelistIP PortIP Alternate portJSON portSingle connection portTLS IP PortTLS JSON PortTLS EnableWeb sockets portAsset Visibility AgentServices Communications ApplicationsData CaptureXML PrintingUSB MirrorFTP MirrorSFTP MirrorZebra Basic InterpreterPasswordP1099957-001 User Interface PrintSecure Printer Admin. Guide6 1/19/18
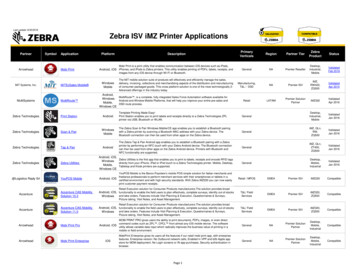
Premade Administration FilesZebra has created four pre-made files that you can send to your printer to quickly enable some of themost common security settings. These Premade Admin Files were designed and built using thecommands documented in this guide. However, because different user’s networks operate in differentways, there is no one configuration file that could address every user’s needs.You should edit the files to adapt to your unique needs. As you work with the Printer AdministrationGuide, you’ll quickly discover which commands and settings that are appropriate for your use case. Forexample, if your application uses Mirror, then turning off FTP wouldn’t make sense, since Mirror usesFTP to communicate to the printer. This example demonstrates why it is important to consider thefollowing pages below before sending the files.Sending the Administration files is simple. You can send the files to any port on the printer using our ZDownloader or Printer Setup Utility for Windows. The Z-Downloader app can be downloaded from thezebra web site. The Printer Setup Utility for Windows can be downloaded here.The Premade Administration files come in four groups:1. applications – Three files, which can be used to set, check settings, or default theapplication settings on the printer.2. communications. – Three files, which can be used to set, check settings, or default thecommunication settings on the printer.3. services– Three files, which can be used to set, check settings, or default the servicessettings on the printer.4. userinterface – Two files, which can be used to set or default the user interface settingson the printer. (Important note: Do not use the sample password shown in this file,please change it.)P1099957-001PrintSecure Printer Admin. Guide71/19/18
CONFIGURE – CONFIRM-SEND COMMANDS TO ALTER ADMIN SETTINGS.VALIDATE THE NEW SETTINGS.This can be the most time-consuming portion of the process. Each Administrative capabilityused will have consequences for how the printer works, what it can do, and how it will work withother devices. Time should be taken to carefully consider which Administrative features areused, and how they may impact the use of the printer.In this section, each Admin capability will be detailed, along with its defaults, its range ofsettings, how to activate/deactivate it, along with some notes to help you carefully consider theuse of the capability.NOTE: Many of the Administrative capabilities are controlled using the Set-Get-Do commandlanguage. If you are not familiar with this language, please consult the Zebra ProgrammingGuide, SGD Chapter for help with syntax and how to use this printer feature.P1099957-001PrintSecure Printer Admin. Guide81/19/18
HTTP SERVICEDescription: This port is used to provideHTTP access to the printerSupported PrintersConsiderations: The HTTP service runs on port 80 and provides support for the printer’sinternal web pages. It is also important to note that any POST to URL capability is disabledwhen this service is not enabled. The printer can still be managed by the Printer ProfileManager Enterprise app or via direct commands when this is disabled.Control Commands: The HTTP capability is controlled by the ip.http.enable commandTo set the command:! U1 setvar "ip.http.enable" "on"! U1 setvar "ip.http.enable" "off"To confirm the command is set:! U1 getvar "ip.http.enable"The printer should respond with the current setting value, or “?” if not supportedTo Default the command:! U1 setvar "ip.http.enable" "on"P1099957-001PrintSecure Printer Admin. Guide91/19/18
HTTPS SERVICEDescription: This port is used to provideHTTPS access to the printerSupported PrintersConsiderations: The HTTPS service runs on port 443 and provides support for the printer’sinternal web pages.Control Commands: The HTTPS capability is controlled by the ip.https.enable commandTo set the command:! U1 setvar "ip.https.enable" "on"! U1 setvar "ip.https.enable" "off"To confirm the command is set:! U1 getvar "ip.https.enable"The printer should respond with the current setting value, or “?” if not supportedTo Default the command:! U1 setvar "ip.https.enable" "on"Note:This command requires that a valid certificate is present on the printer.The certificate and private key can be deployed to the device as a single file, or separate files. Ifusing a single file, the name of the file must be:HTTPS CERT.NRDIf using multiple files:HTTPS CERT.NRD – certificate fileHTTPS KEY.NRD – private key fileOnce TLS communication is verified and operational, it is security best practice to disableunencrypted forms of communicating with the printer over a network.Certificate Size RequirementsIn keeping with latest industry wide recommendations (NIST, 2016), the printer will only acceptcertificates with a digest of SHA-224 or higher. For keys based on RSA or DSA the size must be2048 bits or higher. For keys based on ECDSA the size must be 224 bits or higher. Anycertificates with digest or key sizes smaller than this will be rejected.P1099957-001PrintSecure Printer Admin. Guide101/19/18
FTP SERVICEDescription: This port is used to sendcommands or files that the printer will actupon (this can include, CPCL, EPL, ZPL andSet-Get-Do commands).Supported PrintersConsiderations: FTP (port 21) can be used to place files on the printers file system, or forprinting. It is also the protocol used by the Mirror device management features. It is not a portthat is typically used for printing. As such, it’s a good candidate to be disabled, however, it’simportant to first check if your organization plans to use it for file transfer, printing or devicemanagement.Control Commands: The FTP capability is controlled by the "ip.ftp.enable" commandTo set the command:! U1 setvar "ip.ftp.enable" "on"! U1 setvar "ip.ftp.enable" "off"To confirm the command is set:! U1 getvar "ip.ftp.enable"The printer should respond with the current setting value, or “?” if not supportedTo Default the command:! U1 setvar "ip.ftp.enable" "on"Note:Only Link-OS printer can use SFTP.For further information on FTP and SFTP Mirror refer to the Programming Guide.P1099957-001PrintSecure Printer Admin. Guide111/19/18
LPD SERVICEDescription: This port is used to send printjobs to the printer that it will act upon (thiscan include, CPCL, EPL, ZPL).Supported PrintersConsiderations: The LPD (Port 515) or Line Printer Daemon is a printing protocol typicallyused in Unix/Linux systems and the Mac OS environment. This can be supported on aWindows network with the addition of software features. Check which printing technology youare using and disable the appropriate port(s).Control Commands: The LPD capability is controlled by the ip.lpd.enable commandTo set the command:! U1 setvar "ip.lpd.enable" "on"! U1 setvar "ip.lpd.enable" "off"To confirm the command is set:! U1 getvar "ip.lpd.enable"The printer should respond with the current setting value, or “?” if not supportedTo Default the command:! U1 setvar "ip.lpd.enable" "on"P1099957-001PrintSecure Printer Admin. Guide121/19/18
UDP SERVICEDescription: The UDP socket is only usedfor port defined by ip.port.Supported PrintersConsiderations: The User Datagram Protocol (UPD) is a connectionless protocol in contrastto Transmission Control Protocol (TCP) which requires a validated connection and an IPaddress.Control Commands: The UPD capability is controlled by the ip.upd.enable commandTo set the command:! U1 setvar "ip.upd.enable" "on"! U1 setvar "ip.upd.enable" "off"To confirm the command is set:! U1 getvar "ip.upd.enable"The printer should respond with the current setting value, or “?” if not supportedTo Default the command:! U1 setvar "ip.upd.enable" "on"P1099957-001PrintSecure Printer Admin. Guide131/19/18
SMTP SERVICEDescription: This Simple Mail TransferProtocol (SMTP) service (port 25) is used.Supported PrintersConsiderations: This SMTP service is used to receive printer jobs using the Simple MailTransfer Protocol (this can include, CPCL, EPL, ZPL).Control Commands: The SMTP capability is controlled by the ip.smtp.enable commandTo set the command:! U1 setvar "ip.smtp.enable" "on"! U1 setvar "ip.smtp.enable" "off"To confirm the command is set:! U1 getvar "ip.smtp.enable"The printer should respond with the current setting value, or “?” if not supportedTo Default the command:! U1 setvar "ip.smtp.enable" "on"Note:Ensure that the other dependent settings are configured correctly when using this capabilityFor further information on SMTP refer to the Programming Guide.For example:ip.smtp.server addrip.smtp.domainP1099957-001PrintSecure Printer Admin. Guide141/19/18
SNMP SERVICEDescription: The SNMPv1 service on UDPport 161 enables the manageability of theprinter using SNMP.Supported PrintersConsiderations: The SNMP (UDP port 161) allows the configuration of the printer andsupports the issuance of SNMP trap messages. Some of the basic printer MIB is supported aswell as a private MIB that contains Zebra specific settings and configuration. By default, thisuses the public community name, if you intend to use this consider changing the communityname from the default.Control Commands: The SNMP capability is controlled by the ip.snmp.enable commandTo set the command:! U1 setvar "ip.snmp.enable" "on"! U1 setvar "ip.snmp.enable" "off"To confirm the command is set:! U1 getvar "ip.snmp.enable"The printer should respond with the current setting value, or “?” if not supportedTo Default the command:! U1 setvar "ip.snmp.enable" "on"P1099957-001PrintSecure Printer Admin. Guide151/19/18
TELNET SERVICEDescription: The printer telnet service isused to access the printer configuration utility.Supported PrintersConsiderations: The Telnet service (port 23) is mainly used to setup and configure printserver settings and enable/disable printer daemons. Settings changed here will be reflectedby the values in the relevant SGD’s. It is important to note that a limited subset of capabilitiesis available using the telnet capability. This is primarily retained for backwards compatibility.Control Commands: The Telnet capability is controlled by the ip.telnet.enable commandTo set the command:! U1 setvar "ip.telnet.enable" "on"! U1 setvar "ip.telnet.enable" "off"To confirm the command is set:! U1 getvar "ip.telnet.enable"The printer should respond with the current setting value, or “?” if not supportedTo Default the command:! U1 setvar "ip.telnet.enable" "on"Note:It is not possible to disable the telnet service over a telnet session.P1099957-001PrintSecure Printer Admin. Guide161/19/18
POP3 MAIL SERVICEDescription: The printer has a pop3 mailservice and can poll a mailbox for incomingemails.Supported PrintersConsiderations: The POP3 service can query a mailbox for incoming emails, which cancontain ZPL/CPL/EPL in the body of the email. The printer will execute the commandlanguage.Control Commands: The POP3 capability is controlled by the ip.pop3.enable commandTo set the command:! U1 setvar "ip.pop3.enable" "on"! U1 setvar "ip.pop3.enable" "off"To confirm the command is set:! U1 getvar "ip.pop3.enable"The printer should respond with the current setting value, or “?” if not supportedTo Default the command:! U1 setvar "ip.pop3.enable" "on"Note:Ensure that the other dependent settings are configured correctly when using this capabilityFor further information on POP3 refer to the Programming Guide.For example:ip.pop3.server 099957-001PrintSecure Printer Admin. Guide171/19/18
NETWORK TIME PROTOCOL SERVICEDescription: This command enables ordisables the Network Time Protocol (NTP)feature.Supported PrintersConsiderations: The NTP command will enable or disable the Network Time Protocolcapability which allows the printer to synchronize with time servers. This may be important ifthere are date or time fields printed on the label. Time and data can also be provided by thehost system.Control Commands: The NTP capability is controlled by the ip.ntp.enable commandTo set the command:! U1 setvar "ip.ntp.enable" "on"! U1 setvar "ip.ntp.enable" "off"To confirm the command is set:! U1 getvar "ip.ntp.enable"The printer should respond with the current setting value, or “?” if not supportedTo Default the command:! U1 setvar "ip.ntp.enable" "off"Note:Ensure that the other dependent settings are configured correctly when using this capabilityFor further information on NTP refer to the Programming Guide.For ecure Printer Admin. Guide181/19/18
BLUETOOTHDescription: This command enables ordisables the Bluetooth radio in a printer thathas that option installed.Supported PrintersConsiderations: The Bluetooth enable command will disable all Bluetooth connectivity onthe printer. If you utilize Bluetooth for connection to a mobile computer for printing this willneed to be configured correctly.Control Commands: The Bluetooth enable capability is controlled by the bluetooth.enablecommandTo set the command:! U1 setvar "bluetooth.enable" "on"! U1 setvar "bluetooth.enable" "off"To confirm the command is set:! U1 getvar "bluetooth.enable"The printer should respond with the current setting value, or “?” if not supportedTo Default the command:! U1 setvar "bluetooth.enable" "on"P1099957-001PrintSecure Printer Admin. Guide191/19/18
BLUETOOTH LEDescription: For printer that support bothBluetooth classic and BTLE, this commandcontrols the mode of operation.Supported PrintersConsiderations: The printer Bluetooth radio can be configured to work in the followingmode; BTLE, Classic or Both.Control Commands: The Bluetooth controller mode is controlled by thebluetooth.le.contoller mode commandTo set the command:! U1 setvar "bluetooth.le.contoller mode" "both"! U1 setvar "bluetooth.le.contoller mode" "le"! U1 setvar "bluetooth.le.contoller mode" "classic"To confirm the command is set:! U1 getvar "bluetooth.le.contoller mode"The printer should respond with the current setting value, or “?” if not supportedTo Default the command:! U1 setvar "bluetooth.le.contoller mode" "both"Note:There are many other settings related to BT communication and these need to be reviewed andconfigured accordingly.For further information on Bluetooth refer to the Programming Guide.For example:bluetooth.discoverablebluetooth.minimum security modebluetooth.allow non display numeric comparisonbluetooth.bondingbluetooth.pinCommands no longer supported in Link-OS v5bluetooth.le.minimum securitybluetooth.le.print passkeyP1099957-001PrintSecure Printer Admin. Guide201/19/18
USB HOSTDescription: This command is used toenable or disable USB host capabilities in aprinter that supports USB HostSupported PrintersConsiderations: The USB host lockout command disables the USB host capability in aprinter that has support for it. USB devices connected to the printer will stop functioning whenthis is disabled. This will include USB mirror if that is being used.Control Commands: The USB host lock out capability is controlled by the usb.host.lock outcommandTo set the command:! U1 setvar "usb.host.lock out" "on"! U1 setvar "usb.host.lock out" "off"To confirm the command is set:! U1 getvar "usb.host.lock out"The printer should respond with the current setting value, or “?” if not supportedTo Default the command:! U1 setvar "usb.host.lock out" "off"P1099957-001PrintSecure Printer Admin. Guide211/19/18
WIRED ETHERNETDescription: Enable or disable the internalwired ethernet port on printers equipped withthis option.Supported PrintersConsiderations: The wired LAN enable command will disable or enable the internal wiredEthernet connection. The primary use for this command is to disable a port that is unused,where a different port is being used as the primary connection.Control Commands: The wired LAN capability is controlled by the internal wired.enablecommandTo set the command:! U1 setvar "internal wired.enable" "on"! U1 setvar “internal wired.enable" "off"To confirm the command is set:! U1 getvar "internal wired.enable"The printer should respond with the current setting value, or “?” if not supportedTo Default the command:! U1 setvar "internal wired.enable" "on"Note:NEW with Link-OS v5P1099957-001PrintSecure Printer Admin. Guide221/19/18
WLANDescription: This command can be used toenable or disable the WLAN functionality in aprinter fitted with a wireless option.Supported PrintersConsiderations: The WLAN command will fully disable all 802.11 wireless functionality. Thisshould only be disabled if the wireless option is present but is not being used for any reason.Control Commands: The WLAN capability is controlled by the wlan.enable commandTo set the command:! U1 setvar "wlan.enable" "on"! U1 setvar "wlan.enable" "off"To confirm the command is set:! U1 getvar "wlan.enable"The printer should respond with the current setting value, or “?” if not supportedTo Default the command:! U1 setvar "wlan.enable" "on"P1099957-001PrintSecure Printer Admin. Guide231/19/18
WIRELESS OPTIONDescription: This option provides amechanism to authenticate devices on a LANSupported PrintersConsiderations: When using the 802.1x authentication user must be aware of themovement of data to the printer during setup. Best practices should be employed to ensurethat certificates and passphrases are protected at all time. Configuration should be done overa local connection to prevent eavesdropping.Control Commands:To set the command:! U1 setvar "wlan.8021x.enable" "on"! U1 setvar "wlan.8021x.enable" "off"! U1 setvar "wlan.8021x.enable" "wpa"To confirm the command is set:! U1 getvar "wlan.8021x.enable"The printer should respond with the current setting value, or “?” if not supportedTo Default the command:! U1 setvar "wlan.8021x.enable" "off"Note:There are many other settings related to 802.1x Authentication and these need to be reviewed andconfigured accordingly.For further information on 802.1x refer to the Programming Guide.For example:wlan.8021x.authenticationwlan.8021x.ttls tunnelwlan.8021x.peap.peap usernamewlan.8021x.peap.peap password wlan.8021x.peap.privkey passwordwlan.8021x.peap.validate server certificatewlan.8021x.peap.anonymous wordwlan.8021x.eap.privkey passwordP1099957-001PrintSecure Printer Admin. Guide241/19/18
WIRELESS OPTIONDescription: This mode is to protect thetransmissions from interference from nearby802.11 signalsSupported PrintersConsiderations: The WLAN RTS CTS feature when enabled will put the WLAN radio inRTS/CTS protection mode. If this is not enabled the radio will default to CTS-to-Self mode.The mode that you run in will be dependent on your specific wireless LAN configuration andthe devices that connect to it.Control Commands: The WLAN RTS CTS capability is controlled by the wlan.rts cts enablecommandTo set the command:! U1 setvar "wlan.rts cts enabled" "on"! U1 setvar "wlan.rts cts enabled" "off"To confirm the command is set:! U1 getvar "wlan.rts cts enabled"The printer should respond with the current setting value, or “?” if not supportedTo Default the command:! U1 setvar "wlan.rts cts enabled" "off"Note:This command functions on the QLn and ZQ500 series printers.P1099957-001PrintSecure Printer Admin. Guide251/19/18
WHITELISTINGDescription: The whitelisting capabilityallows only authorized IP addresses toconnect to the printer.Supported PrintersConsiderations: The whitelisting capability is to ensure that only authorized hosts canconnect to the printer. The parameters that you set are the IP addresses that are permitted toconnect and can be single IP address or ranges. The maximum string length allowed is 256bytes.Control Commands: The whitelist capability is controlled by the ip.firewall.whitelist incommandTo set the command:! U1 setvar "ip.firewall.whitelist in" "192.168.1.20"! U1 setvar "ip.firewall.whitelist in" "192.168.1.20, 192.168.100.21"! U1 setvar "ip.firewall.whitelist in" "192.168.1.20-192.168.1.100"To confirm the command is set:! U1 getvar "ip.firewall.whitelist in"The printer should respond with the current setting value, or “?” if not supportedTo Default the command:! U1 setvar "ip.firewall.whitelist in" ""Note:This command allows up to 256 characters that define what IP’s or ranges of IP’s can connect to theprinter. If the IP address is not listed the connection will be refused. To reset this list, you will need toconnect to a local port and send this command if the IP you are trying to connect with is not in theallowed range.Examples:Single IP address! U1 setvar "ip.firewall.whitelist in" "192.168.1.20"Multiple IP addresses! U1 setvar "ip.firewall.whitelist in" "192.168.1.20, 192.168.1.21"IP address ranges! U1 setvar "ip.firewall.whitelist in" "192.168.1.20-192.168.1.40"IP ranges and Single/Multiple IPs! U1 setvar "ip.firewall.whitelist in" "192.168.1.20-192.168.1.40, 192.168.1.50, 192.168.1.75"P1099957-001PrintSecure Printer Admin. Guide261/19/18
TCP RAW PORTDescription: This port is used to sendcommands or files that the printer will actupon (this can include, CPCL, EPL, ZPL andSet-Get-Do commands).Supported PrintersConsiderations: Since this is frequently the primary port used for network based printing,disabling it could disable printer. Of course, printing could be happening over another port, viaFTP or web sockets. Additionally, changing the port number used could help obscure theprinting port, but note that the most port scanning tools can easily discover which ports areopen on a networked device.Control Commands: The TCP Raw Port setting is controlled by the "ip.port" commandTo set the command:! U1 setvar "ip.port" "9100"! U1 setvar "ip.port" "0" (Disables port)To confirm the command is set:! U1 getvar "ip.port"The printer should respond with the current setting value, or “?” if not supportedTo Default the command:! U1 setvar "ip.port" "9100" (All printers except mobile)! U1 setvar "ip.port" "6101" (Mobile printers)Note:Port numbers cannot be the same as any other SGD’s in the group below. If you try to set thevalue to something that is in use it will be ignored. Setting the value to “0” di
document covers both Link-OS and ZebraLink printers, though the degree to which the two types of printers can be Administered is different. To make it easy to see where a given Administrative feature is available, the document will display the Link-OS or ZebraLink icon to indicate if the feature is available on the printer being configured.
