Transcription
MICROSCOPE LABIntroduction:The microscope is a fundamental tool for biologists. This instrument has been perfectedover the past 300 years. It has, within limits, allowed the invisible to become the visible.The extension of the eye or vision makes much information available to the curiousstudent. For instance: shape, size, position, connections, colors, number, texture and evenchemical composition are some of the facts that may be recorded by the eye and themicroscope.Types of microscopes:Light Microscope - the models found in most schools, use compound lenses and light tomagnify objects. The lenses bend or refract the light, which makes the objectbeneath them appear closer.Scanning Electron Microscope - allow scientists to view a universe too smallto be seen with a light microscope. SEMs don’t use light waves; they useelectrons (negatively charged electrical particles) to magnify objects up to twomillion times.Transmission Electron Microscope - also uses electrons, but instead of scanning thesurface (as with SEM's) electrons are passed through very thin specimens.You will first learn to properly use the Compound Light Microscope.Terms:MagnificationHow much larger an object appears under a scope than it actually is;oculars are engraved with their magnifying powers; oculars magnify10X (magnification 10 multiplied by, for instance 4 for scanningpower 40 times normal size).ResolutionThe rendering of detail; high magnification without good resolution isworthless; light is the limiting factor of resolution; the blue light ofyour scope allows resolution of 0.2 microns.Depth of FieldThe distance through which you can move the specimen and still haveit in focus; the higher the magnification, the closer the objective is tothe slide and so the depth of field decreases; this requires a moredelicate technique.In order to see such small structures, the subject must be made larger or magnified. Thusin microscopy, we talk a lot about magnification. However, the most important functionof your microscope is not magnification, but the rendering of detail or resolution. If amouse was magnified to the size of an elephant, but you could not distinguish it from an2-182510Microscope Lab
elephant, would this extend your knowledge of the mouse? Accordingly, resolution is thecostly feature of a microscope.Here are some important precautions for handling our microscopesthat will keep them in great condition for many years. CARRYING:Always carry your microscope with two hands, one grasping the arm or back slotand the other supporting the base. TABLE PLACEMENT:Set the microscope on a flat, solid support and in a position where it will noteasily be knocked off. Coil the cord to avoid tripping over it. CLEANING:Lenses must be clean for resolution. Use only lens paper or gauze and cleaningsolution. Never use your finger, handkerchief, paper towels or spit to clean thelenses. Do not remove any parts for cleaning; it only allows dust to enter themicroscope. PUTTING AWAY:Turn off light & center mechanical stage.Position the nosepiece so that the lowest scanning (4X) objective is in place.Remove the slide from the stage, put in proper place.Clean the stage and lenses with gauze and lens cleaner, wipe off any oil.Wrap the cord around the arm.CAREFULLY carry with two hands and GENTLY place the microscope in theproper cabinet.2-282510Microscope Lab
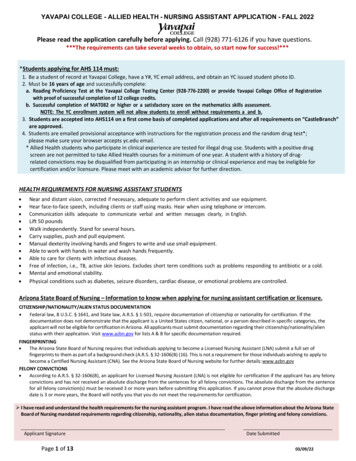
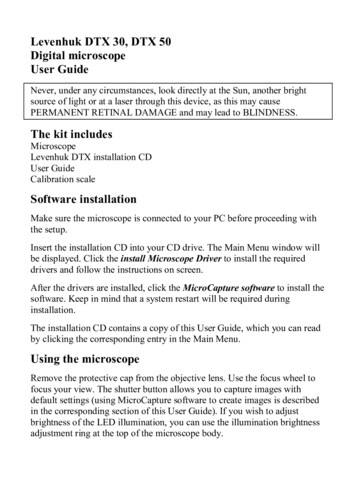
Exercise #1 — Parts of the MicroscopePlace the microscope on your desk with the oculars (eyepieces) pointing toward you.Plug in the electric cord and turn on the power by pushing the button or turning theswitch.In order for you to use the microscope properly, you must know its basic parts. Figure 1is an illustration of a typical microscope.You will be held responsible for knowing these parts of the microscope:1. OCULAR LENS or EYEPIECE — On a binocular scope there are two ocular lenses,one for each eye. These lenses magnify the image at 10X power. The power of theocular lens multiplied by the objective lens gives the total magnification of themicroscope.2. ARM — A support for the upper portion of the scope. It also serves as a convenientcarrying handle.3. MECHANICAL STAGE CONTROLS — A geared device to move the slide (placedin the slide clamp) precisely.4. COARSE ADJUSTMENT KNOB — A rapid control which allows for quickfocusing by moving the objective lens or stage up and down. It is used for initialfocusing.5. FINE ADJUSTMENT KNOB — A slow but precise control used to fine focus theimage when viewing at the higher magnifications.6. BASE — The part of your microscope that sits on a level, stable support.7. OCULAR ADJUSTMENT — An adjustment for differences in the focusing abilitiesof your eyes.8. DIOPTIC ADJUSTMENT — A horizontal adjustment of the oculars. Adjust for youreyes so you see only one field of view with both eyes open.9. NOSEPIECE — A circular plate with 4 objective lenses that can be rotated intoposition for different magnifications.10. OBJECTIVE LENS — Four separate lenses that magnify the image (4X, 10X, 40Xand 100X) depending on the objective in use. The lens is positioned just above theobject being viewed.OBJECTIVE POWER4X10X40X100XOBJECTIVE NAMESCANNINGLOW POWERHIGH POWEROIL IMMERSION2-382510Microscope Lab
11. SLIDE CLAMP — A clamp to hold the slide on the stage.12. STAGE — A platform for placement of the microscope slide.13. CONDENSER — A lens that concentrates or directs the light onto the slide.14. IRIS DIAPHRAGM CONTROL — A lever (or rotating disk) that adjusts the amountof light illuminating the slide. Use just enough light to illuminate the object on theslide and give good contrast.15. FILTER HOLDER — A blue filter rests in this holder below the substage condenser.16. CONDENSER HEIGHT CONTROL — A knob that controls the height of thecondenser.17. LAMP — The light source.18. LAMP SWITCH — Turns the lamp “on” and “off”.Figure 1. The Compound Microscope2-482510Microscope Lab
NameExercise #2 — Finding & Focusing Report SheetAll microscope observations begin with the Scanning (4X) objective. Three reasons forbeginning with the scanning objective are:1. The lower the power, the easier to focus.2. The lower the power, the greater the field (area) of view.3. Once the object has been found at scanning power with the coarse adjustment knob,there is no need to change the coarse adjustment again. Even after switching toanother objective, all further focusing is done with the fine adjustment knob.Fill in the chart below.NAME OFOBJECTIVE LENSOBJECTIVEMAGNIFICATIONOCULARTOTALMAGNIFICATION MAGNIFICATION1.2.3.4.Procedure:Obtain a prepared slide of the letter “e” or make your own slide by cutting out an"e" from the newsprint provided. Place the cut out "e" on a glass microscope slideand slowly lower a coverslip over it to hold it in place. DO NOT USE WATER.1. Turn on the microscope lamp and set the light intensity at “8”.2. Adjust the condenser to the highest or “all the way up” position, using the CondenserHeight Control knob.3. Open the iris diaphragm all the way, using the Iris Diaphragm Control knob. The irisdiaphragm is all the way open when the greatest amount of light is visible shiningthrough the stage hole.4. Place your slide on the stage. Position the letter "e", as it would be read, over thestage hole, and secure the slide with the slide clamp.2-582510Microscope Lab
5. Rotate the scanning (4X) objective lens into position and use the coarse adjustmentknob to move the stage and slide all the way up.6. Look through the ocular lenses and turn the coarse adjustment knob CLOCKWISEuntil the "e" comes into view.7. Center the "e" in your field of view.8. Fine focus the letter "e".9. Adjust the iris diaphragm until you have the proper amount of light with goodcontrast. It is very important that you reduce the light so that the details of the subjectcan be seen. Using too much light is the most common mistake that students make.10. Higher magnifications are obtained by one movement. Rotate the next higher powerobjective into place. Make sure it “clicks” into place. Now by adjusting the fineadjustment knob, the subject can be focused at this higher magnification.11. Increase the power of magnification until you are observing the subject at high power(400X). Upon completion, turn the nosepiece to the lowest power objective. Removeand clean the slide. Return all materials to their proper place.Discussion:1. Draw the letter "e" as it appears to the unaided eye. Then draw the orientation of theletter "e" as it appears under low power.NORMAL VIEWMICROSCOPE VIEW2. What happened to the image as the lenses of the microscope magnified it?3. When you move the slide to the left on the stage, in what direction does the "e"appear to move when viewed through the microscope?4. What are your conclusions about the appearance and movement of an object whenviewed through a microscope?2-682510Microscope Lab
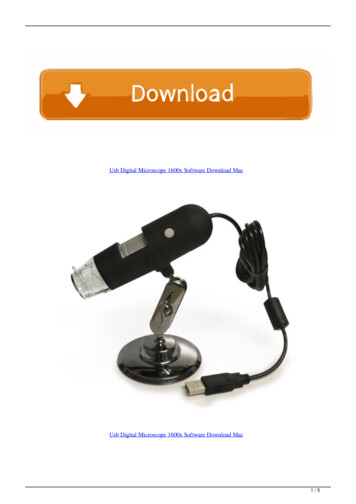
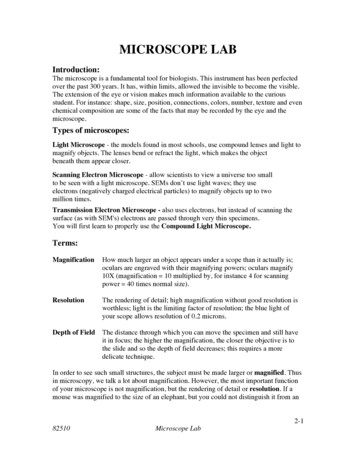
Exercise #3 — Depth of FocusThink back to photographs you have taken and seen. There always seems to be a zone ofsharp focus in the picture, with objects out of focus in front of and behind the sharp focuszone.The sharp focus zone is called the DEPTH OF FOCUS or Depth of Field. This canbecome a serious problem when using a microscope as you increase the magnification.In fact, when looking through a microscope, the zone of sharp focus can be a majorlimitation in viewing the whole object. But you can make use of that restriction by usingit as a tool to inspect different layers of the object being viewed.Depth of Focus is inversely proportional to magnification. In other words, the greater themagnification, the less the depth of focus.Figure 2. Depth of Focus Diagram2-782510Microscope Lab
NameDepth of Focus Report SheetProcedure:Obtain a prepared microscope slide of “Colored Threads” or “Crossed Threads”.1. Review the directions in Activity #2 for finding and focusing with the scanning (4X)objective lens.2. Bring the “Crossed Threads” in focus at scanning power (40X), with proper contrast,and be sure the point where the threads cross is centered in your field of view.3. Turn the nosepiece until the low power objective (10X) "clicks" into place. If you havedone a good job of centering the cross of the threads, it should be in your field of view.If not, go back to step #1 and try again.4. Focus using the fine adjustment knob and adjust the contrast if necessary. Again, putthe point where the threads cross in the center of your field of view.5. Now, use the fine adjustment knob to move the slide up (turnCOUNTERCLOCKWISE) until all the threads are blurred and slightly out of focus.6. Then, turning the fine adjustment knob CLOCKWISE, watch the crossed threads untilthe first thread comes into focus. This will be the bottom thread.Discussion:1. What color is the thread that is on the bottom, the middle and the top? Refer toprevious page if needed.BOTTOMMIDDLETOP2. What microscope part is used to change light intensity?3. What happens to the light intensity as you increase magnification?4. When you switch to higher magnification, what should you do to the light intensity?2-882510Microscope Lab
82510 Microscope Lab 2-3 Exercise #1 — Parts of the Microscope Place the microscope on your desk with the oculars (eyepieces) pointing toward you. Plug in the electric cord and turn on the power by pushing the button or turning the switch. In order for you to use the microscope properly, you must know its basic parts. Figure 1