Transcription
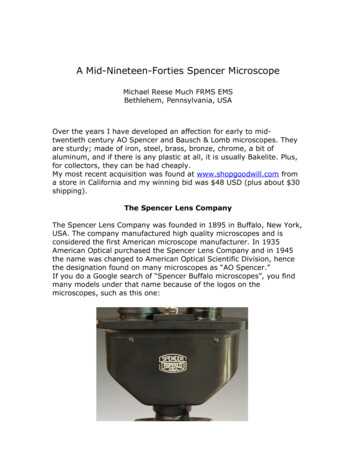
A Mid-Nineteen-Forties Spencer MicroscopeMichael Reese Much FRMS EMSBethlehem, Pennsylvania, USAOver the years I have developed an affection for early to midtwentieth century AO Spencer and Bausch & Lomb microscopes. Theyare sturdy; made of iron, steel, brass, bronze, chrome, a bit ofaluminum, and if there is any plastic at all, it is usually Bakelite. Plus,for collectors, they can be had cheaply.My most recent acquisition was found at www.shopgoodwill.com froma store in California and my winning bid was 48 USD (plus about 30shipping).The Spencer Lens CompanyThe Spencer Lens Company was founded in 1895 in Buffalo, New York,USA. The company manufactured high quality microscopes and isconsidered the first American microscope manufacturer. In 1935American Optical purchased the Spencer Lens Company and in 1945the name was changed to American Optical Scientific Division, hencethe designation found on many microscopes as “AO Spencer.”If you do a Google search of “Spencer Buffalo microscopes”, you findmany models under that name because of the logos on themicroscopes, such as this one:
A Spencer “Buffalo” microscope is no more a model designation as anOlympus ”Tokyo” microscope. It is simply the city where the companyis based.The microscope I obtained for my collection was shipped from Spencerin about 1944. I was able to track down the date through the serialnumber on the very thorough website about all things Spencermicroscope athttp://user.xmission.com/ psneeley/Personal/Microscope.htm , alabor of love by P.S. Neely.The scope came with the original wooden case (including the key!).
The scope needed a lot of work since most of the controls were stiff orfrozen through years of disuse. At the end of this article I will describesome of my practices for restoring antique microscopes.The condenser assembly featured a one-sided mirror – a flat ratherthan a flat and a concave on the other side.
The condenser has a slot in the bottom to accept filters. Thediaphragm lever has markings for values for the aperture settings,from 1.25 to .1. I am assuming the condenser has a numericalaperture of 1.25, since that is the setting when the aperture is wideopen.
The mechanical stage is fairly basic and is mounted on a Bakelitestage. It has no longitude or latitude scales.
The objective turret accommodates three objectives.The objectives that came with this microscope were marked:
SPENCER LENS CO. BUFFALO, N.Y.16MM- N.A. 0.25 – 10X4MM – N.A. 0.66 – 44XHOM. 1 – 1.8 N.A. 1.25 – 95XThe 95X is an oil immersion objective, and is not spring loaded. At thetime of manufacture “HOM.” meant “homogenous immersion.” Frommy test I found that the working distance of the 95X was so short thatwhen trying to view a commercially prepared slide with a .20 mmcover slip, the objective was locked down on the slide. Apparently theonly practical application of this objective was for specimens notrequiring a cover slip, such as blood smears.One interesting feature of the turret is that the click stops for rotationlabel the objectives. Today, we are accustomed to the color coding ofobjectives.The binocular head has dioptric eyesight correction for only one eye –the left, much like binoculars. Today we have correction for both eyes,which is valuable in trinocular microscopes used in photomicrography.The adjustment for interocular distance is controlled with a lever at thebase of the right eyepiece tube. Interestingly, the magnification value
of the 10X eyepieces is engraved on the eyepiece barrel, along withthe catalog number 325A.A few notes on my restoration techniquesAn antique microscope can be restored in three or four afternoons. Ihave come up with a number of practices which streamline thisprocess.Disassembly/ReassemblyMicroscopes are modular – they are made up of individualcomponents. The first step is to break the scope down into thesecomponents: frame, condenser assembly, stage, turret and head. Istore all but the frame off to the side in plastic bags. I restore theframe first and then reassemble the scope by restoring all of thecomponents from the bottom up, starting with the condenserassembly.When I was in the army, I maintained aerial camera and photolabsystems. Part of the training as a repair technician was how to serviceunfamiliar equipment, such as captured enemy materiel that wewished to use.On my work bench I have a pad of paper. As I disassemble acomponent, I put the pieces on the paper in sequence, making notes
and drawings underneath each part. Not all screws are the same. Irecently purchased a LOMO microscope and out of the four screwsholding the stage to the frame, there were two different lengths.If you disassemble and reassemble one component at a time you willhave fewer parts on your workbench to keep track of.Those little plastic cups for Catsup you can get at your local fast foodrestaurant make perfect holders for the small partsClean UpThe next step in restoration is cleaning up the device. In oldermicroscopes that have been sitting around for a while, the mainproblem is that the lubricants have dried up and the action of thecontrols is either stiff or totally locked up.I degrease the components using naphtha. I have a one gallon paintcan filled to three quarters capacity with naphtha. That is large anddeep enough to accommodate the top of most microscope frames. Ifyou use naphtha to degrease, it may take several immersions.Between immersions, I use a toothbrush to scrub away any driedshellac and rotate the fine focus from side to side to make sure it iscleaned out.If you have rusted parts, soak them overnight in naval jelly. It willdissolve the rust, but will blacken the part.Many components, such as mechanical stages, do not have to bedisassembled before degreasing. I keep a pair of kitchen tongs in mywork shop to fish the parts out of the naphtha.I keep some small tin cans such as small vegetable cans or tuna cansin the shop if I need to use a solvent such as acetone, which willdissolve plastic containers.I use a Dremel electric rotary tool to buff and polish bare metal parts.Using the Dremel felt polishing wheels and tips I polish the brass andchrome parts with Brasso and chrome polish respectively. I use theDremel wire brush attachments to remove corrosion and to buffchrome parts, such as objective barrels.PaintingI use a satin black enamel when refinishing old scopes. If there aregoing to be a nicks in the original finish, it will likely be on the base.This can be smoothed out with sand paper.I mask all bare metal control surfaces such as dovetail rack and pinionassemblies and knobs prior to painting. I use blue painters’ masking
tape and buy it in the 1½ inch width which I can cut down to narrowerwidths when needed.I pay special attention to protecting screw holes, lest paint gets inthem and clogs the threads. To protect screw holes I use thick pipecleaners (available at crafts stores), and regular pipe cleaners fromtobacconists. For very small screw holes, I use the tapered tips ofround toothpicks.After painting and removing the masking tape, I clean all bare metalsurfaces with steel wool. Even a little paint spatter will interfere withthe tolerances of dovetail assemblies.LubricationSince most of the microscopes I restore are for display, I lightlylubricate the moving parts with light machine oil applied with an artistspaint brush.Michael Reese Much can be contacted at Amoeba1@rcn.comPublished in the September 2015 issue of Micscape Magazine.www.micscape.org
A Spencer "Buffalo" microscope is no more a model designation as an Olympus "Tokyo" microscope. It is simply the city where the company is based. The microscope I obtained for my collection was shipped from Spencer in about 1944. I was able to track down the date through the serial number on the very thorough website about all things .


![WELCOME [ spencersavings ]](/img/37/business-conversion-guide.jpg)
