Transcription
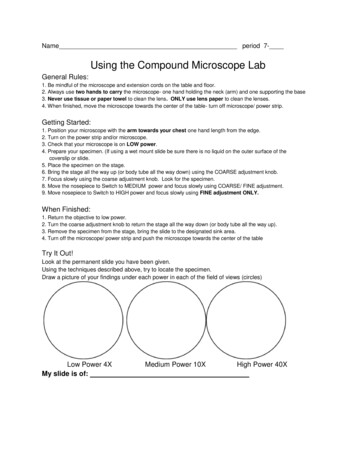
Name period 7-Using the Compound Microscope LabGeneral Rules:1. Be mindful of the microscope and extension cords on the table and floor.2. Always use two hands to carry the microscope- one hand holding the neck (arm) and one supporting the base3. Never use tissue or paper towel to clean the lens. ONLY use lens paper to clean the lenses.4. When finished, move the microscope towards the center of the table- turn off microscope/ power strip.Getting Started:1. Position your microscope with the arm towards your chest one hand length from the edge.2. Turn on the power strip and/or microscope.3. Check that your microscope is on LOW power.4. Prepare your specimen. (If using a wet mount slide be sure there is no liquid on the outer surface of thecoverslip or slide.5. Place the specimen on the stage.6. Bring the stage all the way up (or body tube all the way down) using the COARSE adjustment knob.7. Focus slowly using the coarse adjustment knob. Look for the specimen.8. Move the nosepiece to Switch to MEDIUM power and focus slowly using COARSE/ FINE adjustment.9. Move nosepiece to Switch to HIGH power and focus slowly using FINE adjustment ONLY.When Finished:1. Return the objective to low power.2. Turn the coarse adjustment knob to return the stage all the way down (or body tube all the way up).3. Remove the specimen from the stage, bring the slide to the designated sink area.4. Turn off the microscope/ power strip and push the microscope towards the center of the tableTry It Out!Look at the permanent slide you have been given.Using the techniques described above, try to locate the specimen.Draw a picture of your findings under each power in each of the field of views (circles)Low Power 4XMedium Power 10XHigh Power 40XMy slide is of:
Laboratory:Practice Using the MicroscopeObjective: Demonstrate the correct use of the microscopeMaterials:colored pencilscoverslipnewspaperlens paperonionrulermicroscopemicroscope slidecolor magazinedropperfeatherbaby food jarscissorswatertoothpickAnacharis leafcheek cellsstainProcedure:A. Label the parts of the microscope and complete the functions.Label the parts of the Microscope1. ARM – this attaches the and body tube to the .2. BASE – this s the microscope.3. BODY TUBE – the tube that supports the e .4. NOSEPIECE – the rotating device that holds the lenses5. COARSE ADJUSTMENT – a knob that makes adjustments to the focus- used under power6. FINE ADJUSTMENT – a knob that makes adjustments to the focus - used under power7. DIAPHRAGM – an adjustable opening under the stage, allowing different amounts of onto the stage.8. EYEPIECE – where you place your and focuses / magnifies the .Objective Lenses- Magnify the9. HIGH-POWER OBJECTIVE – a large lens with magnifying power ( lens) .MEDIUM-POWER OBJECTIVE – a medium lens with magnifying power ( lens).10. LOW-POWER OBJECTIVE – a small lens with low magnifying power ( lens).11. LIGHT SOURCE (or mirror) – this directs upwards onto the slide.12. STAGE – the on which a is placed.13. STAGE CLIPS – metal clips that a slide securely onto the
Name period 7-B. What is my power?To calculate the power of magnification:Multiply the power of the ocular lens (eyepiece) X the power of the objective lens Total MagnificationWhat are the powers of magnification for each of the objectives we have on our microscopes?Ocular / Eyepiece MagnificationObjective Lens MagnificationTotal MagnificationXXXXXXXXXOcular / Eyepiece MagnificationObjective Lens MagnificationTotal Magnification10 X4XX5XX200 XX10 X120 XPower of MagnificationDetailsAmount of Image seenLowMoreHighMorePractice:C. Comparing Powers of MagnificationWhat aspects of the specimen would be best observed under low power?What aspects of the specimen would be best observed under high power?
Name period 7-D. Preparing A Wet Mount SlideProblem: What is the purpose of a wet mount slide?Materials: see page 1Method/ Procedure:1. Obtain materials: Slide, coverslip, water, dropper, newsprint, scissors, paper towel2. Obtain a dry slide and coverslip.3. Cut a lower case “e” from the newsprint.4. Put a drop of water on the slide.5. Place the letter “e” in the drop of water.6. Slowly lower the coverslip over the “e’ at a forty-five degree angle.7. Inspect wet mount for smudges, air bubbles, excess water or insufficient water.Use the rubric for evaluation before submitting.8. Take your slide to the teacher for evaluationResults/ Data:1. Neatly draw a picture of your finished wet mount.2. Label your drawing: slide, coverslip, specimen, water location3. Use the Rubric below to see you have completed the drawing correctly and completely.Rubric for DrawingCorrect SizeEdges- straight & evenLabels-correctly spelledLabels-neatly printedLabels-not on drawingLabel-lines are horizontalRuler used for linesDrawing Of A Wet Mount SlideGreatGoodFairPoorNone21.51.50
Name period 7-Analysis: Answer the following statements using a “ ” for True and a “o” for false1. Everything observed with a compound microscope must be a wet mount.2. Wet mounts are useful when observing living cells or organisms with the microscope.3. Wet mounts will not dry up while observing specimens with a microscope.4. Only water can be used as a liquid in preparing a wet mount.5. A slide is a thicker piece of glass than a coverslip.6. A thick object, like a pencil, could be easily observed with a compound microscope.Conclusion: Write a complete sentence that answers the question asked in the ProblemSafety concerns:*No food, drink or GUM during class or the labs*Broken glass must be put in the broken glass container*Use equipment properly*Read today’s lab entirely before starting*Work quietly and cooperatively*Report cuts or injuries to the teacher*No horseplayE. Letter “e”Look through a newspaper for the smallest letter “e” you can find. Use scissors to cut out the letter.Make a wet mount slide: Place the letter in the center of a microscope slide. Use a dropper to place one drop of water on the piece ofnewspaper. Slowly lower a coverslip onto the wet newspaper.Place the slide onto the center of the stage of the microscope. Use the clips to secure the slide in place. Be sure the letter “e” is on the stage sowhen you view it from the side- you can read it normally. Also be sure the letter is over the opening in the stage.Look into the eyepiece. Slowly turn the coarse adjustment knob until the letter “e” comes into focus then use the fine adjustment knob tosharpen the image.1. Draw the letter “e” as it looks under low power. Indicate the magnification on your drawing.Letter “e” Magnification2. Move the slide away from you.What direction did the image move?Draw an arrow in the circle to indicate the direction the image moved.What direction would the slide appear to move (as looking through theeyepiece) if you moved the slide towards you? The image would move .
3. Move the slide to the right.What direction did the image move?Draw an arrow in the circle to indicate the direction the image moved.What direction would the slide appear to move (as looking through theeyepiece) if you moved the slide to the left?The image would move .F. Color photograph/ magazine picture.Make a dry mount of a piece of colored photoDraw and color a small section what you seeCompare the colors you see with and without the microscopeWith my naked eye I see:With the microscope I see:G. FeatherMake a dry mount of a feather. Use a second slide as a coverslip.View the feather tip using the 10X objective lensDraw what you see
Name period 7-H. Anacharis/ Brazilian WaterWeed/ Elodea (Egeria densa)Problem: What organelles can you see in Anacharis?Materials: see page 1Method/ Procedure:1. Obtain a clean slide and cover slip2. Remove a small leaf from near the tip of an Anacharis plant.3. Make a wet mount (with water) of the Anacharis leaf.4. Observe the leaf under LOW power.5. Focus on the leaf using Low power and the coarse adjustment knob.6. Once focused, carefully rotate the nosepiece to medium power- sharpen the focus.7. Carefully switch to high power using the fine adjustment knob to sharpen your image.8. Record your observations below.Results/ Data:Draw, color and label a few of the cells as you saw them through the microscope.Use the following terms to label your drawing: cell wall, chloroplast, cytoplasm, cell membraneRecord the total magnification.Keep in mind proper techniques for scientific drawings: Print, Ruler, Horizontal lines, Color, Margins,Spelling, Location, Correct shapeMagnification: XAnalysis: Answer the following statements using a “ ” for True and a “o” for false1. Anacharis is a photosynthetic plant.2. Chloroplasts are green.3. The cell membrane is inside the cell wall.4. The cells of Anacharis resemble a stack of bricks.5. The nucleus was clearly visible in Anacharis6. The chloroplasts were located in the cytoplasm of each cell.Conclusion: Write a complete sentence that answers the question asked in the Problem
Name period 7-I. Onion SkinProblem: Do onion skin cells look the same as Anacharis cells?Materials: see page 1Method/ Procedure:1. Obtain a clean slide and cover slip2. Remove a very thin piece of onion skin from an onion as demonstrated by the teacher.3. Make a wet mount (with stain instead of water).****Be careful- will stain skin, clothes, books, tables.4. Observe under LOW power, then medium and high.5. Focus on the leaf using Low power and the coarse adjustment knob.6. Complete your Results, Conclusion and Analysis.7. Be sure to recall all the rules for proper focusing and scientific drawings.Results/ Data:Draw, color and label a few of the cells (4-5 cells) as you saw them through the microscope.Use the following terms to label your drawing:cell wall, chloroplast, cytoplasm, cell membrane, nuclear membrane, nucleus.Record the total magnification.Magnification: XAnalysis: Answer the following statements using a “ ” for True and a “o” for false1. Chloroplasts are clearly visible in onion cells2. Onion skin is a photosynthetic tissue3. The nucleus was clearly visible due to staining of the onion skin.4. Onion skin cells have both a cell wall and cell membrane.5. The cytoplasm is within the cell membrane.Conclusion:
Name period 7-J. Human Cheek CellsProblem: What organelles are visible in a human cheek cell?Materials: see page 1Method/ Procedure:1. Obtain a clean slide and cover slip2. Carefully and gently use a toothpick to gently remove some cheek cells from inside your mouth asdemonstrated by the teacher.3. Put a drop of stain on the slide****Be careful- will stain skin, clothes, books, tables.4. Gently stir the end of the toothpick with the cheek cells in the stain.5. Immediately throw out the toothpick.6. Add the coverslip and observe under low, medium and high powers.7. Record your Results, Conclusion and Analysis.8. Be sure to recall all the rules for proper focusing and scientific drawings.Results/ Data:Draw, color and label a few of the cells (4-5 cells) as you saw them through the microscope.Use the following terms to label your drawing:cytoplasm, cell membrane, nuclear membrane, nucleus.Record the total magnification.Magnification: XAnalysis: Answer the following statements using a “ ” for True and a “o” for false1. Cheek cells are shaped similar to onion cells and Anacharis cells2. Cheek cells have a regular shape.3. Cheeks cells have a cell wall and a cell membrane.4. A nucleus is observed in some cells on high power.5. Cheek cells may contain chloroplasts if you just finished eating green vegetables.6. Cheek cells have a cell membrane surrounding the cytoplasm.Conclusion:
Using the Compound Microscope Lab General Rules: 1. Be mindful of the microscope and extension cords on the table and floor. 2. Always use two hands to carry the microscope- one hand holding the neck (arm) and one supporting the base 3. Never use tissue or paper towel to clean the lens. ONLY use lens paper to clean the lenses. 4.