Transcription
Installation and operation manualGWL GridFree InverterWith Limit Sensor and WIFI Plug connectorsGF-SUN-1000G2 / GF-SUN-1000G2H / GF-SUN-2000G2(Generation 2)www.gwl.eu
Table of ContentsG2 Sun Series Grid Tie Inverter Models . . 3Safety Instructions. 4Introduction of Sunshine Grid Tie Inverter. 4Advantage of The Sunshine Grid Tie Power System. 6Sunshine Grid Tie Inverter Installation. 7Installation Procedure. 7Step1. Considering the total capacity of the grid tie power system that you need . 8Step2. Choosing applicable solar panels for Sunshine Grid Tie Inverter . . 8Step3. Selecting Accessory for Grid Tie Power System installation . . 11Step4. Selecting Correct Model of Sunshine Grid Tie Inverter . 12Step5. Installing Solar Panels to a suitable place . 13Step6. Installing Sunshine Grid Tie Inverter to a suitable place . . 14Step7. Connecting the Sunshine Grid Tie Power System with Cables and Connectors . . 14Step8. Grounding the system . . 14Step9. Connecting the PV modules after complete from Step1 to Step8 . 14Installing a larger capacity of grid tie power system . 18Installing Sunshine Grid Tie Power System to Three Phases Utility Grid . 20The Layout of Sunshine Grid Tie Power Inverter . 21Inverter Display Instruction . 23Technical Data of SUN Series Grid Tie Power Inverter . . 25Weight and Dimension of SUN series Grid Tie Power Inverter . . 26Troubleshooting . 27AC Output Current Waveform and PF Test Of 2000W Model . . 28www.gwl.eu
G2 Sun Series Grid Tie Inverter ModelsSun series grid tie inverters include several models, refer to table 1.Table 1, G2 Sun Series Grid Tie Inverter ModelsModelRated Power(Max./Continuous)DC InputVoltageAC OutputVoltageAC SUN-2000G2-H2000W / 1800W45V 90V185V 265V45Hz 64Hz92%1.5WSUN-1000G2-H1000W / 900W45V 90V95V 265V45Hz 64Hz92%1.5WSUN-2000G2-H2000W / 1800W45V 90V185V 265V45Hz 64Hz92%1.5WModel Name description:SUN-XXX G2-XDC Input Voltage Range, “M” is 22V 65V, “H” is45V 90V “G2” is the Abbreviation of Generation TwoThe Rated Output PowerThe Title Name of Sun Series ProductsImportant Safety InformationRead this First!This manual contains important instructions to follow during the installation and maintenance of theSunshine Grid Tie Inverter.To reduce the risk of electrical shock and ensure the safe installation and operation of the SunshineGrid Tie Inverter, the following safety symbols appear throughout this document to indicate dangerousconditions and important safety instructions.WARNINGThis indicates a situation where failure to follow instructions maybe causea safety hazard or equipment malfunction. Use extreme caution and followinstructions carefully.NOTEThis indicates information particularly important for optimal system operation.Follow the instructions closely.www.gwl.eu
Safety InstructionsWARNINGBe aware that the Sunshine Grid Tie Inverters‘ body is the heat sink and canreach a temperature of 80 C under extreme conditions. To reduce the riskof burns, do not touch. erform all electrical installations in accordance with all local electricalPcodes and the National Electrical Code. Be aware that only qualified personnel should install or replace SunshineGrid Tie Inverter. Do not attempt to repair the Sunshine Grid Tie Inverter; it contains nouser-serviceable parts. If it failed, please contact Sunshine customer service to obtain an RMAnumber and start the replacement process. Tampering with or openingthe Sunshine Grid Tie Inverter will void the warranty. Before installing or using the Sunshine Grid Tie Inverter, please read allinstructions and cautionary markings in the technical description and onthe Sunshine Grid Tie Inverter and the PV-array.Introduction of Sunshine Grid Tie InverterSunshine Grid Tie Power Inverter is the world‘s most technologically advanced inverter for use in utilityinteractive applications. This manual details the safe installation and operation of the Sunshine Grid TieInverter.This integrated system maximizes energy harvest, increases system reliability, and simplifies design,installation, and management.The small type of solar grid tie power inverter can obtain solar energy from the solar panel and tie to thegrid through its output cables with no extra equipment. The installation is very convenient and reliable.We call the system combining with small solar grid tie inverter and solar panels as ‚SGPV.‘ The systemincludes solar panels and small type grid tie inverter and installation kit. Solar panels can be mono silicon,polygon silicon, non-crystal film, or any other material that can convert solar energy into electric energy.The power of the grid tie inverter should be matched to the power of solar panels connected. So thepower of SGPV is defined by its solar panels, it can be standardization according to the actual using.The inverter can be connected to any outlets of the utility grid at the house. The small grid tie invertermonitors the voltage, frequency, and phase of the home utility grid, producing pure sine wave AC powerthat the frequency and phase are the same as the grids. The voltage is a bit higher than the grids, thenaccording to the current-controlled PWM, to control thewww.gwl.eu
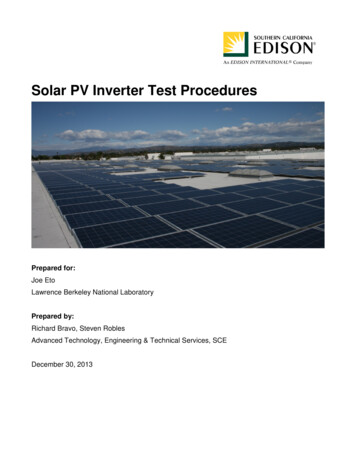
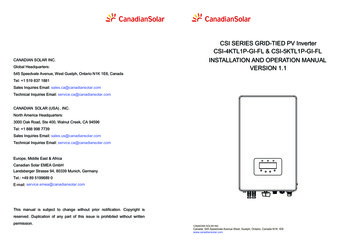
output power to the grid. The small grid tie inverter puts out power when the home grid is on. When thesun shines, the PV panel will produce DC voltage, and the grid tie inverter will change the DC voltage toAC voltage and puts out power to the home grid. When the total power of the electric apparatus thatare using in the house is larger than the output power of the inverters, this power from the inverters willbe consumed in the house. This will slow down the power meter; otherwise, the difference of the outputpower of the inverter between the total used power of the apparatus will go out from the house to theout grid.Fig 1. A Small Grid Tie Power System with Sunshine Grid Tie InverterFig 2. Multiple inverters can be connected in parallel to create a bigger system.Plug and play installationwww.gwl.eu
Advantage of The Sunshine Grid Tie Power SystemThere are many advantages of SGPV compare with the traditional grid tie power system.1. L ow cost and easy installation - SGPV can make full use of all types of buildings‘ surfaces that facethe sun in the city as well as fast and easy installation of solar modules and grid tie inverter. It justneeds very low maintenance costs.2. F ree combination - SGPV can be used as a separate grid tie system and set up as a large solar arraywith many of them. The quantity of SGPV in the array is just according to your desire.3. C ombination of SGPV does not interact - The traditional solar grid tie system is always connectedwith many panels. Those solar panels are connected in series, so the input voltage is very high,although, the traditional grid inverter has an MPPT feature (Maximum Power Point Tracking),but the maximum power point is according to the entire series in terms of solar panels array, if theperformance of one piece of solar panels in the system, for some reason, such as leaves, birddroppings, dust, shadow, etc. and degrades, the performance of the entire solar power system willdecrease.SGPV system has no such disadvantage. If the performance of a piece of solar panels in the systemdegrades, this just effects one SGPV, will not affect other SGPV in the system.4. I mproving the efficiency of the entire solar power system – In a traditional grid tie system, manysolar panels are connected in series, so the MPPT of the inverter is according to the total panelsin series, not to every panel. Still, there is a difference between every panel, so not every panel isworking at the maximum power, this will reduce the total power of these panels in series.But SGPV has no such disadvantage. Because every inverter of SGPV has MPPT function, so everypanel is working at the maximum power, this will increase the efficiency of the entire system.5. L ow power consumption – Most of the parts in the small grid tie inverter are digital ICs and lowpower MCU, so the power consumption of it is low. Though the quantity of grid tie inverters isincreased, this will not increase the power consumption much of the entire system.www.gwl.eu
Sunshine Grid Tie Inverter InstallationFollow the instructions in this section to install Sunshine Grid Tie Inverters.WARNINGBefore installing the Sunshine Grid Tie Inverter, read all instructions andcautionary markings in the user manual, on the Sunshine Grid Tie Inverter,and the photovoltaic array.Perform all electrical installations in accordance with all local electrical codesand the National Electrical Code (NEC)Connect the Sunshine Grid Tie Inverter to the electrical utility grid only afterreceiving prior approval from the utility company.Be aware that only qualified personnel should connect the Sunshine Grid TieInverter to the electrical utility grid.Be aware that the installation of this equipment includes the risk of electricshock. Normally grounded conductors may be ungrounded and energized whena ground fault is indicated.Installation ProcedureInstalling Sunshine Grid Tie Power System involves several key steps:1. Considering the total capacity of the grid tie power system that you need2. Choosing applicable solar panels for Sunshine Grid Tie Inverter3. Selecting accessory for installation of the Grid Tie Power System4. Selecting the correct model of Sunshine Grid Tie Inverter5. Installing solar panels to a suitable place6. Installing Sunshine Grid Tie Inverter to a suitable place7. Connecting Sunshine Grid Tie Power System with cables and connectors8. Grounding the system9. Completing the Sunshine installation map and Connecting the PV modulesEach of the detailed installation steps in the following sections is numerically referenced in theinstallation diagram below.WARNINGDO NOT connect Sunshine Grid Tie Inverters to the utility grid or energize the ACcircuit(s) until you have completed all of the installations.www.gwl.eu
STEP1. CONSIDERING THE TOTAL CAPACITY OF THE GRID TIE POWER SYSTEM THAT YOUNEED.The whole grid tie power system‘s total capacity is according to your power consumption in the site youwant to install, or how much power you want it to feed to the utility grid. The volume is just according toyour will because when the total power of electric appliances used in the installation site is larger thanthe output power of the grid tie power system, this power from the system will be consumed in the site,this will slow down the power meter; otherwise, the difference of the system‘s output power betweenthe total used power of the appliances will feed to the utility grid.For example, suppose you want to install a grid tie power system in your house. In thatcase, you could decide the total power volume according to the total power the appliances that you usein your house, maybe the consumption of total energy per day is about 5KWH. Then you should realizethe real irradiation time per day at your site actually the real irradiation time is an average result becauseit will vary every day according to the climate, just assume the time is 6 hours so that you can installa 1KW grid tie power system, with this capacity of the system, it can supply all power consumption inthe whole year.When the grid tie power system is working, sometimes, there is extra power feed to the utility grid ifthe power from the grid tie system is larger than the power consumed by the appliances in your house,and sometimes will not when it is not larger.Of course, you can install a 500W grid tie power system or 2KW grid tie inverter, even more largecapacity or more small capacity grid tie inverter, it doesn‘t matter. But if the capacity is too big,you should consider the volume of the AC system of your house, whether it can hold the fed poweror not.If you want not to allow the system to feed extra power to the grid, you can use the inverter‘s limitfunction.STEP2. CHOOSING APPLICABLE SOLAR PANELS FOR SUNSHINE GRID TIE INVERTER.www.gwl.eu
Description of Solar PanelA solar panel is an array of solar cells. It is an electrical device that converts the energy of light directlyinto electricity by the photovoltaic effect. When exposed to light, it can generate and support an electriccurrent without being attached to any external voltage source.Most solar panels consist of solar cells connected in serial. Recently, the main solar cells have two types,Mono and Poly. Their performance is almost the same.The main technical data of solar panels are including Efficiency, Pmax, Vmp, Imp, Voc, Isc, etc. Forexample, the specifications of one type of 245W solar panels consist of 60cells are shown below.Module Efficiency: 14.8%Vmp: 29.4VVoc: 36.9VPmax: 245WImp: 8.34AIsc: 8.68ANOTEThese specifications are under Standard Test Conditions (STC).STC: Irradiance 1000W/m2, Cell temperature 25 C, Air mass AM1.5,according to EN60904-3.Module Efficiency is the converting efficiency that the module converts the energy of light into electricalpower.Pmax is the Maximum Power of solar panels.Vmp is the Rated Voltage at Pmax.Imp is the Rated Current at Pmax.Voc is the Open Circuit Voltage.Isc is the Short Circuit Current.Because these specifications are under STC, these specifications are also sensitive to the temperatureof surroundings, so we should consider the variety of these specifications. Please check the curves of I-Vand Temperature Dependence of Isc, Voc, Pmax.www.gwl.eu
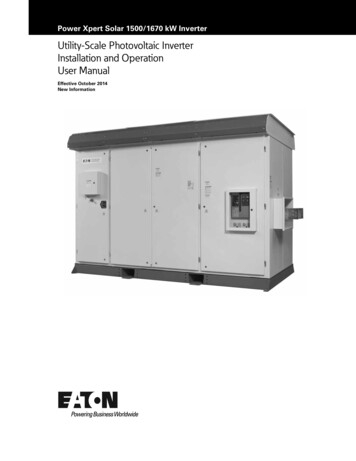
Fig 2. I-V CurvesFig 3. TemperatureDependence of Isc, Voc, PmaxThe I-V Curve shown in Fig. 2 is a solar panel‘s I-V curves that the power is 230W. You can get theinformation from this I-V curves that different irradiance under sunshine will get different powerfrom the same solar panel, and also different power will be converted under the same irradiance,but the output of DC voltage is different, the solar panel just can get maximum power at one pointunder a certain irradiance, this point is called maximum power point(MPP). The MPP also is sensitiveto the temperature of the surroundings.The temperature dependence of Isc, Voc, Pmax is shown in Fig. 3. You can see that the Pmax and Vochave negative temperature characters, Vmp also has the same character.Choosing solar panelsThe most important specifications when selecting solar panels are Pmax, Voc, Vmp, and Isc.1. T he total Pmax of solar panels should be equal to or less than the RatedPower(Peak)of the inverter that you will connect.2. T he total Voc of solar panels should be less than the maximum point of the DC input range of theinverter. It is according to the connecting method if you connect solar panels in parallel, all panelsmust have the same Voc, the Pmax of each panel can be different or same, so the total Voc is assame as one Voc, but if you connect solar panels in serial, the Isc of each solar panel must be same,the Pmax of each panel can be different or same, so the total Voc is the summation of all solarpanels connected in serial. Connecting solar panels with the same specifications in a single systemis the best choice.3. T he total Vmp of solar panels should above the minimum point of the DC input range of theinverter. The connecting method principle is as same as item 2 above.www.gwl.eu
STEP3. SELECTING ACCESSORY FOR GRID TIE POWER SYSTEM INSTALLATIONThe accessory for grid tie power system including:1. DC cables will be connected with solar panels and inverters.2. Connectors.3. AC cables.4. Power meter(Optional).5. Bracket for solar panels installation(not included in this user manual).Selecting DC cablesBefore you connect the solar panels to the inverter, a suitable specification of cables should be selected.The selection of specifications of the cables is according to the total power of the solar panels and theconnecting method of solar panels.You should calculate the maximum current that will transit through the cables, we mark it as Imax.First, calculate the total Pmax of the solar panels that will be consisted of the grid tie power system,we mark it as TPmax, then calculate the total Vmp of them, we mark it as TVmp, we also can get totalImp, mark it as TImp, with this, we can get the TImax using formula (1) or (2) shown below.TImp TPmax/TVmp ------ (1)orTImp Imp N ------ (2)N is the parallel number of solar panelsAfter finished the calculation of Imax, then we can pick suitable cables according to Table 2. It‘s the bestway that you choose solar cables for outdoor use.Selecting ConnectorsWhen installing the SGPV system, maybe you should use some connectors for connecting solar panelsand inverter. Most of these connectors are shown below.MC4 ConnectorsConnectors for parallel connectingSelecting AC cablesAC cables will be supplied with inverters by our factory. We will supply different types of AC cablesaccording to the standards of different countries. You should provide the information to the dealerswhere you will install the system.www.gwl.eu
STEP4. SELECTING CORRECT MODEL OF SUNSHINE GRID TIE INVERTER.When finished step1 to step3 and decided the connecting method of the solar panels, you can selecta correct inverter model. The input DC voltage range of the inverter should fit the DC output voltageof the solar panel array, the rated power of the inverter should also fit the total power of the solar panelarray, and the AC output of the inverter should fit the standard of AC utility tanceResistance[Ohms /1000 ft] [Ohms/ km]Max Current[Amperes]Max Frequencyor 100% skindepth0 (1/0)0.32498.2524653.50.09830.322424150250 Hz10.28937.3482242.40.12390.406392119325 Hz20.25766.5430433.60.15630.51266494410 Hz30.22945.8267626.70.1970.6461675500 Hz40.20435.1892221.20.24850.8150860650 Hz50.18194.6202616.80.31331.02762447810 Hz60.1624.114813.30.39511.295928371100 Hz70.14433.6652210.50.49821.634096301300 Hz80.12853.26398.370.62822.060496241650 Hz90.11442.905766.630.79212.598088192050 Hz100.10192.588265.260.99893.276392152600 Hz110.09072.303784.171.264.1328123200 Hz120.08082.052323.311.5885.208649.34150 Hz130.0721.82882.622.0036.569847.45300 Hz140.06411.628142.082.5258.2825.96700 Hz150.05711.450341.653.18410.443524.78250 Hz160.05081.290321.314.01613.172483.711 kHz170.04531.150621.045.06416.609922.913 kHz180.04031.023620.8236.38520.94282.317 kHz190.03590.911860.6538.05126.407281.821 kHz200.0320.81280.51810.1533.2921.527 kHz210.02850.72390.4112.841.9841.233 kHz220.02540.645160.32616.1452.93920.9242 kHz230.02260.574040.25820.3666.78080.72953 kHz240.02010.510540.20525.6784.19760.57768 kHzwww.gwl.eu
Resistance[Ohms /1000 ft] [Ohms/ km]Max Current[Amperes]Max Frequencyor 100% skindepth250.01790.454660.16232.37106.17360.45785 kHz260.01590.403860.12940.81133.85680.361107 kHz270.01420.360680.10251.47168.82160.288130 kHz280.01260.320040.08164.9212.8720.226170 kHz290.01130.287020.064281.83268.40240.182210 kHz300.010.2540.0509103.2338.4960.142270 kHz310.00890.226060.0404130.1426.7280.113340 kHz320.0080.20320.032164.1538.2480.091430 kHz330.00710.180340.0254206.9678.6320.072540 kHz340.00630.160020.0201260.9855.7520.056690 kHz350.00560.142240.0163291079.120.044870 kHz360.0050.1270.0127414.813600.0351100 kHz370.00450.11430.01523.117150.02891350 kHz380.0040.10160.00797659.621630.02281750 kHz390.00350.08890.00632831.827280.01752250 kHz400.00310.078740.0050104934400.01372900 kHzSTEP5. INSTALLING SOLAR PANELS TO A SUITABLE PLACE.Install the solar panels of the SGPV to a suitable location that sunshine can irradiate on them.There must have no shadow, the installation direction of the solar panels should be according to thegeography position that the system will be installed. Different positions should have different installationdirections, the principle is to get maximum irradiation in all year round.WARNINGEnsure that there is no shadow at the location that solar panels will be installedbecause even the shadow just covers only one cell of solar panel, maybe it willcause the total system to stop to produce power.Ensure using a strong bracket to fix the solar panels to avoid the danger underhigh wind.www.gwl.eu
STEP6. INSTALLING SUNSHINE GRID TIE INVERTER TO A SUITABLE PLACE.Place the Sunshine Grid Tie Inverter on a surface protected from direct sunlight, high temperatures, andwater. The inverter requires at least 150mm of clearance around itself for ventilation. The inverters arefor indoor use, can‘t use outdoor. You can use screws to fix the inverter to the surface because somemodels of Sunshine grid tie inverter have fans on the bottom cover, so the surface should be flat.STEP7. CONNECTING THE SUNSHINE GRID TIE POWER SYSTEM WITH CABLES ANDCONNECTORSAfter finished from Step1 to Step6, you should connect the solar panels and inverters with cables andconnectors to integrate the Sunshine Grid Tie System.STEP8. GROUNDING THE SYSTEM.Route a continuous GEC through each of the solar panels to the NEC approved AC grounding electrode.The racking and module could be grounded to this conductor using a crimp connection. An alternativemethod would be to connect the grid tie inverters to the grounded racking using a grounding washerapproved for the racking. The ground wire of the AC cables are connected to the housing of the inverterwhen the AC cables are connected to the inverters, so when the AC plug is inserted to the socket of theAC outlet of the utility grid in the house, the ground pin of the socket must be connected to the Earthground.STEP9. CONNECTING THE PV MODULES AFTER COMPLETE FROM STEP1 TO STEP8.WARNINGIf you connect the PV modules to the inverter under sunshine, you should coverthe modules with no transparent material like black cloth. If the modules havebeen connected in serial, cover one module, actually, just need to cover one cellof the module, but if the modules have been connected in parallel, you shouldcover one module of every branch, also just need to cover one cell when youcover a module.Cover the modules under sunshine just to avoid the sparkle when connectingthe cables.www.gwl.eu
Example of Installation of 1KW grid tie power systemTo explain the installation operation, we assume that there is a house that the usual electricityconsumption is about 5KWH per day, and the real irradiation time is about 5 hours.1. C onsidering the total capacity of the grid tie power system that you need.As we stated at Step1, we can get a result that a 1kW Sunshine Grid Tie Power System is suitable forthis house, so we will establish a 1KW grid tie power system step by step. We also assume that wewill install the system in the house where the utility grid is 230V/50Hz.2. C hoosing applicable Solar Panels.Because the most popular solar panels are 240Wp 250Wp poly panels with 60 PCS solar cells,so choosing this kind type panels will be more economical. The system is a 1KW power system,so we should use 4 PCS 240Wp to 250Wp solar panels.Most of these kinds of solar panels have similar specifications shown below.Module Efficiency: 14.8% Pmax: 245WVmp: 29.4VImp: 8.34AVoc: 36.9VIsc: 8.68Aso use 4 PCS of this type panels, we can get total power:TPmax 245Wp 4 980Wpfrom these solar panels, it is suitable for the 1KW SUN-1000G model inverter.NOTEThe Pmax specification of a solar panel is under STC, the actual power isvariation according to the irradiation on the panel and the temperaturesurroundings. The real output power can‘t reach Pmax for most in thewhole day.www.gwl.eu
3. S electing Accessory for Grid Tie Power System installation.Because we should connect 4 PCS solar panels to Sunshine Grid Tie Inverter, so some connectorsare necessary. Considering the Voc, Vmp, and Isc, we choose some MC4 connectors and someconnectors for parallel connecting.For the choice of DC cables, we should consider the connecting method of solar panels. There aretwo methods to choose.Method 1: Connecting the 4 panels in parallel so that the maximum DC current will beTImp TPmax/TVmp 980W/29.4V 33.3AorTImp Imp 4 8.34A 4 33.3AAccording to Table 2, we should choose AWG6 Cables.Method 2: Connecting 2 panels in serial consist as a pair, so 4 panels can be gotten 2 pairs,TImp TPmax/TVmp 980W/58.8V 16.7AorTImp Imp 2 8.34A 2 16.7ASo, according to Table 2, we should choose AWG9 Cables.Because the DC cables will be more expensive if the diameter is big, considering this matter, themethod that can use smaller diameter cables will be a good choice.4. S electing correct model of Sunshine Grid Power Inverter.Because maybe there will be several methods of connecting solar panels to Sunshine Grid TieInverter, different connecting methods maybe should use a different model inverter. In this case,there are two connecting methods.With method 1, because all panels are connected in parallel, so we can know that the TVoc(totalVoc of the solar panels) will be the same as Voc of one panel, and the TVmp also is the same asVmp of one panel. So we can get the specifications of the solar panels array with solar panelsconnected to each other.TPmax: 245W 4TVmp:29.4VTImp:8.34A 4TVoc:36.9VTIsc:8.68A 4From these specifications, we should use SUN-1000G-M. Because the DC input voltage range of thismodel is 22V to 65V, so the TVoc and TVmp are in the DC input voltage range.With method 2, we also can get the specifications of the solar panels array.TPmax:245W 4TVmp:29.4V 2TImp:8.34A 2TVoc:36.9V 2TIsc:8.68A 2From these specifications, we should use SUN-1000G-H. Because the DC input voltage range of thismodel is 45V to 90V, so the TVoc and TVmp are in the DC input voltage range.www.gwl.eu
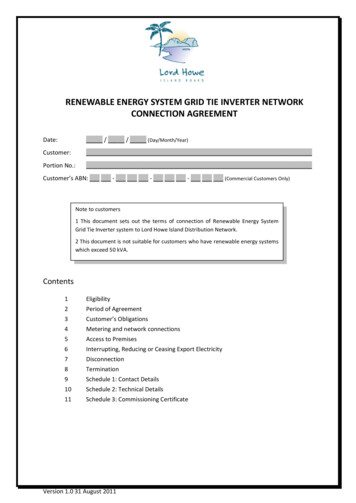
The two connecting method diagrams are shown in Fig.4 and Fig.5 below.4 245Wp Solar PanelsConnected in parallelOutlet of Utility GridSUN-1000G2-MFig.41KW Sunshine Grid TiePower System ConnectedWith Method 14 245Wp Solar Panels2 Panels Connected in Serial Constitutes a Pair of Panel2 Pairs Connected in ParallelOutlet of Utility GridSUN-1000G2-HFig. 51KW Sunshine Grid TiePower System ConnectedWith Method 2Comparing the connected method in Fig.4 and Fig5, we can see that method 2 is a good choice becausewith method 1, the DC cables are thicker, so it is more expensive, and three pairs of connectors forparallel connecting plus three pairs of MC4 connectors should be used.But with method 2, the DC cables are thin, and just a pair of connectors for parallel connecting and a pairof MC4 connectors should be used.www.gwl.eu
Installing a larger capacity of grid tie power systemSometimes, maybe you are willing to install a larger capacity of grid tie inverter in your house, this is alsovery easy to operate. For example, you want to install a 2KW grid tie power system, you can install two1KW grid tie power systems as shown in Fig.5, two AC output cables should be all connected to the ACoutlet of the utility grid with the plugs. The diagram of the 2KW grid tie system with two 1KW systems isshown in Fig. 6, we call this kind system as „Stackable System“.You can use just one SUN-2000G2 2KW inverter to replace two SUN-1000G2 1KW inverter, connectarround 2KW solar panels to the inverter to get a 2KW „SGPV“. You also can install many „SGPV“ inparallel to get large power grid tie system.4 245Wp Solar Panels2 Panels Connected in SerialConstitutes a Pair of Panel2 Pair Connected in Parallel4 245Wp Solar Panels2 Panels Connected in SerialConstitutes a Pair of Panel2 Pair Connected in ParallelSUN-1000G2-HSUN-1000G2-HFig.62KW Grid Tie Power System Consist of Two 1KW Grid Tie Power System StackedYou can install any capacity of the grid tie power system by stack small grid tie power systems.For example, if you want to install a 12KW grid tie power system, there are many choices, you can stacksix 2KW grid tie power systems, or twelve 1KW grid tie systems. Even you can mix different capacity gridtie power systems to gain large capacity system.www.gwl.eu
WARNINGDon‘t Connect the DC input Terminals of one Sunshine Grid Tie Power Inverterto another‘s. If so, neither of the inverters can find the correct maximum powerpoint(MPP), this will reduce the efficiency of the system. Shown in Fig.7.Solar Panel ArraySUN-1000G2
We call the system combining with small solar grid tie inverter and solar panels as ‚SGPV.' The system includes solar panels and small type grid tie inverter and installation kit. Solar panels can be mono silicon, polygon silicon, non-crystal film, or any other material that can convert solar energy into electric energy.
![Welcome [s3-ap-southeast-2.amazonaws ]](/img/28/wmi5140-user-manual.jpg)