Transcription
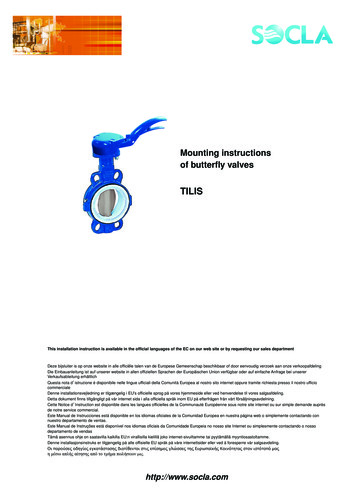
Mounting instructionsof butterfly valvesTILISThis installation instruction is available in the official languages of the EC on our web site or by requesting our sales departmentDeze bijsluiter is op onze website in alle officiële talen van de Europese Gemeenschap beschikbaar of door eenvoudig verzoek aan onze verkoopafdelingDie Einbauanleitung ist auf unserer website in allen offiziellen Sprachen der Europäischen Union verfügbar oder auf einfache Anfrage bei unsererVerkaufsabteilung erhältlichQuesta nota d istruzione è disponibile nelle lingue ufficiali della Comunità Europea al nostro sito internet oppure tramite richiesta presso il nostro ufficiocommercialeDenne installationsvejledning er tilgængelig i EU's officielle sprog på vores hjemmeside eller ved henvendelse til vores salgsafdeling.Detta dokument finns tillgängligt på vår internet sida i alla officiella språk inom EU på efterfrågen från vårt försäljningsavdelning.Cette Notice d Instruction est disponible dans les langues officielles de la Communauté Européenne sous notre site internet ou sur simple demande auprèsde notre service commercial.Este Manual de Instrucciones está disponible en los idiomas oficiales de la Comunidad Europea en nuestra página web o simplemente contactando connuestro departamento de ventas.Este Manual de Instruções está disponível nos idiomas oficiais da Comunidade Europeia no nosso site Internet ou simplesmente contactando o nossodepartamento de vendasTämä asennus ohje on saatavilla kaikilla EU:n virallisilla kielillä joko internet-sivuiltamme tai pyytämällä myyntiosastoltamme.Denne installasjonsinstruks er tilgjengelig på alle offisielle EU språk på våre internettsider eller ved å forespørre vår salgsavdeling.Οι παρούσες οδηγίες εγκατάστασης διατίθενται στις επίσηµες γλώσσες της Ευρωπα κής Κοινότητας στον ιστότοπό µαςη μέσω απλής αίτησης από το τμήμα πωλήσεων μας.http://www.socla.com
Mounting instructions of butterfly valvesTILISIntroductionTilis butterfly valve is designed for food products, pharmaceutical, cosmetic and chemical fluids. Nevertheless before fitting the valvebetween flanges, make sure that the operating conditions are compatible with the details given on the identification plate, this instructionnotice, the manufacturer's details (technical data sheets, price list).Socla cannot be held responsible for the malfunctioning of the valve nor for damage or injury resulting from failure to comply with thesedetails.European DirectivesOur butterfly valves comply to directives, and statements of conformity are available from our sales department.When using accessories, (actuators, limit switches, solenoid valves, ) please see the corresponding instructions documents. Directive 97/23/CE (Equipment under Pressure)Our Tilis butterfly valves conform to the Equipment under Pressure directive 97/23/CE in category I & II Machinery Directive 2006/42/EC(Machinery Directive)Our Tilis butterfly valves conform to the Machinery Directive 2006/42/EC Directive 94/9/CE (EXplosive ATmospheres)Our Tilis butterfly valves are, in standard version, conform to the Directive on equipment and protection systems destined to be used inExplosive Atmospheres 97/9/CE. In certain cases, the valves (valve/actuation set) do not conform to the Directive and are therefore notsold with an CE Statement of Conformity. In that case, the logois not mentioned on the identification plate of the valve .This directive is only applicable in the following atmospheric conditions :-20 C T 60 C and 0,8 bar P 1,2 barThe fluid being carried is not taken into account in the risk analysis of the valve made in this directive, even if the fluid bringsabout deliberate internal explosive atmospheres. It is the user’s responsibility to take into account the risks generated by thefluid for example:- the heating of the valve surface (this temperature can be higher than the one indicated on the different components of theassembly).The temperature of the valve surface should be considered as equivalent to the temperature of the fluid which passes throughthe pipe (in an environment normally ventilated). Considering the temperature of the fluid which passes through the pipe, theclass of temperature of the valve is :Class of temperature Maximum temperature of surface ( C)T1450T2300T3200T4135T5100T685- the generation of electrostatic charging due to fluid displacement,- internal shocks generated by granular substances, shock waves present in the installation (water hammer) or risks fromforeign objects which may be present in the installation.Classification of the valve only:II : group2 : categoryG : explosive atmospheres due to the presence of gas, vapours or mistsD : explosive atmospheres due to the presence of dustOur products are designed to be used in atmospheres of gas and vapours of groups IIA,IIB and IIC as their coatings are a maximum 0.2mm thick.Our valves (valve only) are marked :II 2 DGIn cases where the coating is between 0.2 and 2 mm the marking is :II 2 DG IIBClassification of the valve with control : Valve with hand lever:The use of Socla hand lever designed to function in ATEX zones does not present any extra risk.The valve / hand lever together have the same markingII 2 DG mark. Valve with other actuators:The classification of the valve and control together given by Socla is identical to the classification of the lowest-classed componentinvolved (see illustration below). The information concerning electric parts are not mentioned, as valve and hand lever are consideredas a mechanical unit.No supplementary markings are used to indicate the classification of valve/control combinations.If a single element of the combination does not carry the ATEX mark then the entire valve/control combination does notconform to the ATEX directive.The connecting base plate of butterfly valves conforms to the standard EN ISO 5211.1Modifications, errors and printing mistakes cannot be held responsible for damages. Socla reservesthe right to modify products without prior warning. All trademarks of theese products are the property ofthe respective companies. All rights reserved.
Mounting instructions of butterfly valvesTILISLimit switches :Pneumatic actuator :Solenoid valve :II 2G EEx ia IIC T4II 2 DG Tmax 95 CII 2 DG EEx ia IIC T6In the combination opposite, thewhole is classed :II 2G EEx ia IIC T4Valve :II 2 DGThe classification of the equipment allows its use in a determined area ; use in another area is under theresponsibility of the userIdentification plateAn identification plate with information required by the Directives is attached to the valve. This plate must not be removed and must bekept legible for the user.Name of the valveReferenceMaximum permissible pressureMaterial of the linerbetween flanges - Water : 20 CMaximum permissible pressureMaterial of the discbetween flanges for gas G1/G2Maximum permissible pressureMaximum permissible pressurebetween flanges L1/L2end of line for liquid L1/L2Mini / maxi permissible temperatureYear of manufactureaccording to the material of the linerNumber of manufacturing orderConnecting gaugeNotified Body numberLabelling relating to the Directivefor the directive PED 97/23/CEATEX 94/9/CEVarious approvalsFluids Group 1: dangerous fluids (directive 67/548/CEE) /explosive / extremely inflammable /easily inflammable /inflammable / verytoxic / toxic / combustive. Fluids Group 2: all other fluids (except for water supply, distribution and evacuation networks). Valve components1.2.3.4.ShaftBodyCirclipSealing washer5. O ring seal6. Anti-extrusion bush7. Upper anti-friction bearing8. O ring seal9.10.11.12.LinerDiscO ring sealLower anti-friction bearing13.14.15.16.SpacerScrewIdentification plateRivet17. Annular thimble (ATEX version ) 18. Anti-static earth strap (ATEX version ) 19. Anti-static earth strap(ATEX version ) 20. Stop washer (ATEX version ) 21. Screw (ATEX version ) 2Modifications, errors and printing mistakes cannot be held responsible for damages. Socla reservesthe right to modify products without prior warning. All trademarks of theese products are the property ofthe respective companies. All rights reserved.
Mounting instructions of butterfly valvesTILISTransport and storage Before installationThe valve must be held in a closed position (as delivered). In the case of motorized valves with spring controls, long storage is notadvised.The valve must not be removed from its original packaging.The valve must be stored inside premises which are clean, dry and free from UV light.On site, the valve must not be removed from its original packaging and must be protected from the surrounding elements (dust, sand,rain, .) During handling and installationThe valve must not be suspended by its shaft.The valve must be held using adequate straps. These must not be likely to damage the casing paint.Any item having suffered a large impact must be returned to Socla for checking. A crack which is invisible to the naked eye may in timelead to a leak into the atmosphere.Installation General remarksFor safety reasons, the installation must take place under the supervision of authorised people taking account of local safety instructionsand advice.The handling of butterfly valves and their controls must be done by staff trained in all technical aspects of their operation.Before installation the pipes must be depressurised and purged (empty of its fluid) in order to avoid any danger to the operator.The pipe work must be correctly aligned so that no extra stress is exerted on the valve casing.In ATEX zone, check that the pipes are connected to the earth. Do not use insulating pipes (PVC )Check the compatibility of the connection flanges against the operating pressure: the PN number of the flanges must be greater or equalto the operating pressure.The valve is a machined piece of equipment and must not be used to prise apart the flangesThe use of compensation joints, as well as flanges elastomer coated, between flange and valve are strictly forbidden. Fitting to the pipe workThe Tilis butterfly valve is bi-directional.The recommended installation position is with the spindle of the valve horizontal and the lower wing of the disc opening fromupstream to downstream (flow direction). Particularly when dealing with slurries or products with a tendency to solidify.Warning: Tilis butterfly valve mounted with a single acting electric or pneumatic actuator will always be delivered NormallyClosed (NC). If you need it Normally Open (NO), please read the following instructions:- Follow the general procedure of installation with mounting the valve and its actuator in normally closed position (NC).- Uncouple the valve and its actuator by unscrewing the four nuts (4) and with taking out the four washers (3).- Pull up the actuator (1).- Turn the disc at 90 with an adjustable spanner through the shaft up to the open position (the saw cut showsthe position of the disc). Check the saw cut is perpendicular to the valve.- Reassemble the actuator on the valve. It must be parallel to the pipe.- Screw the four nuts (4). Do not forget the washers (3).- Turn the position indicator (5) from 90 (the yellow strap on the position indicator, which shows the discposition, must be parallel to the pipe.Remarks :- In this configuration, the valve turns anti-clockwise.- Do not modify anything for solenoid valve setting.- In cases when using a positionner, modify the visual position indicator. Check and modify the wiring.3Modifications, errors and printing mistakes cannot be held responsible for damages. Socla reservesthe right to modify products without prior warning. All trademarks of theese products are the property ofthe respective companies. All rights reserved.
Mounting instructions of butterfly valvesTILISInstallationInstallation on existing pipe work1. Make sure that:- The flange surfaces are clean and undamaged.- The valve fits between the flanges without difficulty and without damaging the liner. Prise apart the flanges with suitabletools without damaging the flanges.- The internal diameter of the flanges conforms to the dimensions in the « flange ratings » table.- Nothing interferes with the movement of the disc when the valve is operating.2. Close the butterfly so that it is about 5 to 10mm inside the casing.If the disc is open too far, it may be damaged by the flanges.3. Slip the valve between the flanges. Centre the valve casing and fit all the screws.Using extra seals or grease between the valve and the flanges is prohibited.4. Open the valve completely.5. Keep the valve aligned with the flanges while removing the flange retractors and tightening the nuts by hand.6. Close the valve carefully making sure that the butterfly turns freely.7. In ATEX zone, connect the earth strap to one of the bolts of the flange. Check the link between the actuation shaft connected to theantistatic strap using an ohmmeter (test according to EN 1226-2, annex B, point b.2.2.2. and B.2.3.1). Check also that the pipes areconnected to the earth.For the Tiilis butterfly valve, the conductivity between the two pipes (upstream/downstream) is recommended. In Atex zone,it is compulsory.8. Open the butterfly again completely and tighten all the bolts (opposing bolts gradually and sequentially) according to the threadtorques in the table below.If the nuts are tightened with the valve closed, the liner is then compressed unequally. This results in excessive torque and possibleleaks.9. Make at least 5 complete actuations of the valve.10. See « bringing into service »paragraphPrise apart the flanges as much aspossible so that the valve collarslides in easily with the disc partlyopen. 4With the disc still partly openattach the bolts without tighteningthe nuts. Tighten opposing nuts sequentially,as indicated in the table. Modifications, errors and printing mistakes cannot be held responsible for damages. Socla reservesthe right to modify products without prior warning. All trademarks of theese products are the pr
Our butterfly valves comply to directives, and statements of conformity are available from our sales department. When using accessories, (actuators, limit switches, solenoid valves, ) please see the corresponding instructions documents. Directive 97/23/CE (Equipment under Pressure) Our Tilis butterfly valves conform to the Equipment under Pressure directive 97/23/CE in category I & II .