Transcription
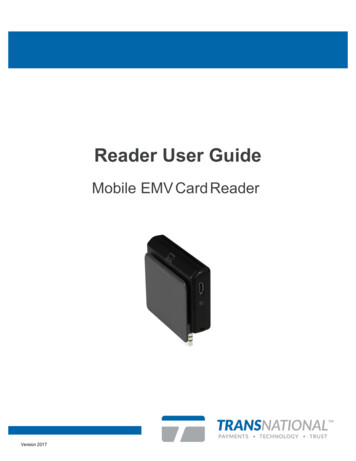
SWIPESIMPLE REGISTERSETUP GUIDESwipeSimple Card ReaderEclipse A200 Swift B200 Swift B250Star Micronics SM-L200Bluetooth Receipt PrinterSwift B250Swift B200Eclipse A200
Table of Contents3Setting Up Your SwipeSimple Register HardwareConnecting the SM-L200Loading the Receipt Paper RollOptional: Attaching the Belt ClipCompleting the Setup7Pairing the SM-L200 with Your Device (Android Only)8Downloading the SwipeSimple App9Logging into SwipeSimple9Printing a Test Receipt12Connecting the Card Reader (Swift B200 and Swift B250 Only)15Optional: Printing Receipts Automatically15All Set!16Quick Troubleshooting StepsSwipeSimple Register Setup Guide - SM-L200 - Version 2018.12
Setup should take between 5-10 minutesBefore setting up your SwipeSimple Register, please ensure that you have the followingCARD READERSwift B200Eclipse A200 Eclipse A200 or Swift B200 or Swift B250 Star Micronics SM-L200 printer Battery pack USB charging cable (connect one endto the printer and the other to a powersource) 2.28 in x 50 ft thermal receipt paper roll Optional: Belt clip iOS device running on iOS version 9.0and aboveYou may check the version you have bygoing to the Settings General About on your device Or Android device running on Androidversion 5.0 and aboveYou may check the version you haveby going to the Settings AboutDevice on your deviceSwift B250BLUETOOTH RECEIPT PRINTERiOS OR ANDROID DEVICE2
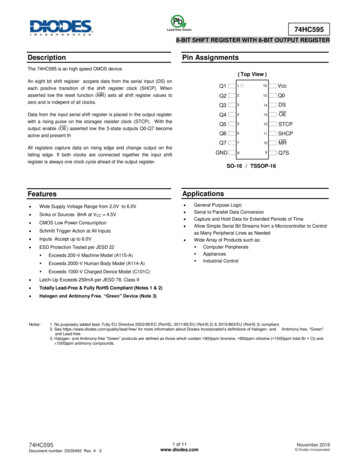
STEP 1aCONNECTING THE SM-L200First, we’ll set the equipment up and connect them to a power source (power adapter, PC, USB charger,etc.)Insert the battery pack into the back of the SM-L200, connect the USB charging cable to the port on theleft of the SM-L200 and an available power source. Turn it on by pressing and holding the MODE button,the LCD will display the printer’s status.Insert Battery PackInsert the battery pack into the backof the printer as illustrated.Secure the battery pack by pressingthe hook area until it clicks.Charge the Battery PackTo charge the battery pack, plug the smaller endof the USB charging cable into the USB portlocated on the left of the printer . Connect theother end of the USB cable to a power source .A full charge may take up to 5 hours.Optional: You may remove your U SB chargingcable after the printer is sufficiently charged.Switch Printer OnTurn on the printer by pressing and holding theMODE button. The LED indicator for Power onthe front of the printer will be green.4
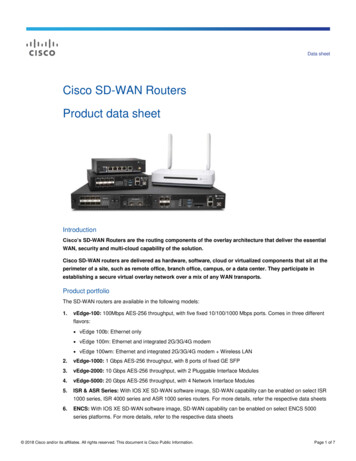
STEP 1bLOADING THE RECEIPT PAPER ROLLTo load the receipt paper roll, open the printer cover and set roll of paper as illustrated. Please ensure thatyou’re using a 2.28 in x 50 ft thermal receipt paper roll.Open Printer CoverPush the button located onthe left side of the printerdown to release printer coveras illustrated . Lift the printercover .Paper Roll SetupSet the paper roll with the paper rolling up in thedirection as illustrated.The paper roll will sit loosely in the paper holder.Close Printer CoverPull the end of the paper roll straight towardsyou . Close the printer cover by pushing bothends of the cover down until you hear a click .Remove Excess PaperUse the tear bar to cut away the extra receiptpaper.5
STEP 1cOPTIONAL: ATTACHING THE BELT CLIPTo attach the belt clip, please ensure that the belt clip is in the right orientation. By attaching the belt clip,you will be able to carry your printer around hands-free.Attach the Belt Clip to the PrinterEnsure that the velcro straps on the belt clip isfacing the front. Using the screw included in thebox, secure the belt clip by fastening the screwinto the designated screw hole. You may use acoin to securely fasten the screw.STEP 1dCOMPLETING THE SETUPSetup is complete when the LCD screen on the printer displays “Printer Status: Online”, and both thecard reader and your device are switched on.6
STEP 2PAIRING THE SM-L200 WITH YOUR DEVICE (ANDROID ONLY)After setting up your devices, we’ll now pair the SM-L200 with your Android device. If you’re using an iOSdevice, please locate the serial number of your SM-L200 and proceed to Step 3.The following steps apply toAndroid users. If you are usingan iOS device, pleaseproceedto Step 3.2a. On your Android device, goSettings Bluetooth.2b. Turn Bluetooth on. In the“Available Devices”section, select the printerwith your SM-L200’s serialnumber.i.The serial number can belocated at the back oftheSM-L200, or on the sideof the box in which yourSM-L200 came in.Format: STAR L200XXXXX, with the last fivedigits representing thelast five digits of your SML200’s serial number.ii.7If a PIN is required duringthe pairing request, pleaseenter “1234”.
2c. Once selected andsuccessfully paired, theSM-L200’s serial numberwill move from “AvailableDevices” to “PairedDevices” and be shown as“Paired”.STEP 3DOWNLOADING THE SWIPESIMPLE APPIf you have downloadedSwipeSimple on your deviceplease go to Step 4.3a. To download SwipeSimple,go to the App Storeon your iOS device, orthe Play Store on yourAndroid device.i.8Search for“SwipeSimple Point of Sale” onyour iOS device, or“SwipeSimple” onyour Android device.
STEP 4LOGGING INTO SWIPESIMPLEOnce the SwipeSimple app is installed, open it and login to your SwipeSimple account using the logininformation from the Welcome Email you received.This email will have the subject line Welcome to SwipeSimple.STEP 5PRINTING A TEST RECEIPT5a. Once you’ve logged intoyour SwipeSimpleaccount, connect the SML200 to your device to tryprinting a receipt.To connect the printer,go to Settings DeviceManagement on theSwipeSimple app.9
iOS:5b. Select the printer using yourSTAR L200-XXXXXserial number.It may take a few secondsfor your device to detect theprinter when connecting forthe first time.Android:To refresh the list ofdevices, simply pull andreleasetheDeviceManagement panel.10
iOS:Once connected, the selectedprinter will be shown as“Connected”.5c. Tap on “Print Test Receipt”to print a receipt via theSM-L200 withall theinformation on it (includingthe header andfooter)beforerunningatransaction.Android:5d. Tap on “Set Default Printer”if you are using an iOSdevice, or check the boxif you are on an Androiddevice to print a receiptduring a transaction.11
STEP 6CONNECTING THE CARD READER (SWIFT B200 AND SWIFT B250 ONLY)If you are using the Eclipse A200 card reader, please plug your card reader into your device and proceedto Step 7.After connecting the SM-L200, we’ll now connect the Swift B200 or Swift B250 with your device. Pleasenote that the Swift B200 or Swift B250 does not need to be paired with your device, connection is doneentirely through the SwipeSimple app.6a. Ensure that the card reader is turnedon.If you are using the Swift B200, a green light should be illuminated above the power button.If you are using the Swift B250, a blue light should be illuminated above the power button.12
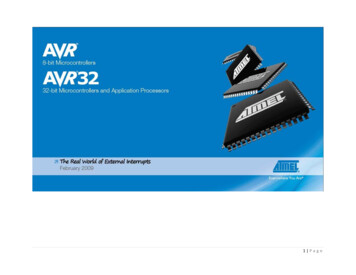
iOS:6b. To connect the card reader,go to Settings DeviceManagementontheSwipeSimple app.6c. Select the card reader withyour Swift B200 or SwiftB250’s serial number.i.The serial number can belocated at the back of thecard reader, or on the sideof the box in which yourSwift B200 or Swift B250came in.Format: Swift XXXX, withthelastfourdigitsrepresenting the last fourdigits of your Swift B200 orSwift B250’s serial number.ii.Android:It may take a few secondsfor your device to detectthe card reader whenconnecting for the firsttime.To refresh the list ofdevices, simply pull andreleasetheDeviceManagement panel.iii.13If you are using anAndroid device, tapon “Connect” toconnect your devicewith the Swift B200or Swift B250.
iOS:Once connected, the selectedreader will be shown as“Available”.6d. Tap on “Set Default Reader”if you are using an iOSdevice, or check the box ifyou are on an Androiddevice to skip connectingyour card reader beforerunning a transaction.Android:14
STEP 7OPTIONAL: PRINTING RECEIPTS AUTOMATICALLYTo print receipts automatically atthe end of every transaction, goto Settings Receipts on theSwipeSimple app.7a. Set the number of receiptsprint automaticallyselectingbetweencopy”, “1 copy”, andcopies”.toby“0“2Please note that you mustset a default printer priorto taking transactions, andthe selected printer mustbe available in order forpaper receipts to begenerated automatically.STEP 8ALL SET!Now you’re ready to take transactions!15
Quick Troubleshooting Steps1ISSUES POWERING UP THE SM-L2001.Ensure that your SM-L200 is fully charged.2.To charge your SM-L200, use the enclosed micro U SB charging cable in the box. The Powerlight will blink green when charging, and will be constantly green when fully charged. A fullcharge may take up to 5 hours. Please ensure that you do not remove the battery pack whilecharging.The battery pack can be charged approximately 500 times before losing performance.To power up your SM-L200, press and hold the MODE button for 5 seconds.3.2ISSUES PAIRING/CONNECTING THE SM-L200Ensure that your device’s OS and the SwipeSimple app are up to date. SwipeSimple Register requiresiOS version 9.0 and above, Android version 5.0, and SwipeSimple 4.6.0 and above.Ensure that you have a SwipeSimple Register account. In the SwipeSimple app Settings Edition, itshould display Register. If you have a different edition, please contact your Merchant Service Provider.1.Power down the SM-L200.2.Toggle your device’s Bluetooth setting off and then on again. Ensure that both your device andSM-L200 are within a 10-15 ft range.3.Turn the SM-L200 back on.4.In the SwipeSimple app Settings Device Management, pull and release the DeviceManagement panel to refresh it.5.If you’re using an Andriod device,a.Ensure that your printer is not paired with another device.b.In the Settings app of your device, go to Bluetooth and look for your SM-L200 device inthe Paired Devices section.c.Tap on the gear icon and select Unpair.d.Follow the steps in Step 2 to repair the SM-L200 with your Android device.16
3SM-L200 ERROR LIGHT BLINKS BLUEThis most likely indicates that the printer cover is open, the printer is out of paper, or the paper roll is notloaded correctly. Please check the SM-L200’s LCD screen for an error message.1.Open the printer cover and remove the paper roll, or reload a new roll if your printer’s paper isrunning low.2.Reload the paper roll and close the cover. Please ensure that the paper roll is loaded in the correctdirection.4RECEIPT PRINTS OUT BLANKThe SM-L200 uses thermal receipt paper, please ensure that you are using the recommended paper roll.1.Open printer cover.2.Flip paper roll over and close printer cover.3.Try re-printing a test receipt.4.If receipts are still blank, it is likely that the paper roll isn’t a thermal receipt paper roll. Pleasecontact your Merchant Service Provider to purchase thermal receipt paper.5RESETTING THE SM-L200 BACK TO FACTORY MODE1.Enter Menu Mode by pressing and holding both the MODE and FEED buttons for 5 seconds.2.Using the MODE button, select 2 System Setting. Confirm selection by pressing the FEED button.3.Ignore the Input Password screen, and press and hold the FEED button 5 seconds to enterSettings Menu.4.Using the MODE button, select 6-Factory Reset. Confirm selection by pressing the FEED button.5.Using the MODE button, select 1-Factory Reset to confirm that you wish to reset your SM-L200back to its factory settings.6.Press and hold the FEED button for 5 seconds to reset printer.7.Press and hold MODE button to power printer back up.To exit any current screens or return to previous menu, simply press and hold the FEED button for 5seconds.17
6ISSUES POWERING UP THE CARD READER1.Ensure that your card reader is fully charged.2.To charge your card reader, use the enclosed micro U SB charging cable in the box.The LED status indicator will be red when charging, and will be green (will be off for Swift B250)when fully charged. A full charge may take up to 2 hours.3.Swift B200 and Swift B250: To power up your card reader, press and hold the power button for 5seconds. The LED indicator will blink green for the Swift B200 and blink blue for the Swift B250when successfully switched on.7ISSUES CONNECTING THE CARD READEREnsure that your device’s OS and the SwipeSimple app are up to date. SwipeSimple Register requiresiOS version 9.0 and above, Android version 5.0, and SwipeSimple 4.6.0 and above.Eclipse A200:1.Ensure that your card reader is plugged in firmly by removing and reconnecting the card reader.You may need to remove any protective sleeve or casing.2.Ensure that the media volume or other audio settings on your device is maximized.Swift B200 and Swift B250:1.Toggle your device’s Bluetooth setting off and then on again. Ensure that both your device andcard reader are within a 10-15 ft range.2.Both Swift B200 and Swift B250 utilize Bluetooth Low Energy technology which does not require apairing process. Ensure that your card reader is not paired in the Settings app of your device.3.Power down your card reader and switch it back on.4.In the SwipeSimple app Settings Device Management, pull and release the DeviceManagement panel to refresh it.18
8ISSUES ACCEPTING CREDIT CARDSEnsure that your card reader is fully charged.Swiped Payments: Ensure that the magnetic stripe on the card is facing the right direction when swiping.Swipe the card in a slow fluid manner when prompted by SwipeSimple.Dipped Payments: Ensure that the chip on the card is facing the right direction when being dipped.Ensure that the card remains inserted and is only removed when prompted by SwipeSimple.Tapped Payments: Ensure that the payment device is being tapped on the card reader area thatdisplays the NFC, Apple Pay, and Google Pay icons when prompted by SwipeSimple.9RESETTING THE CARD READERUse a paperclip and insert it in to small reset button located at the bottom of the reader.Eclipse A200: The button is located to the right of the audio jack.Swift B200: The button is located to the left of the charging port.Swift B250: The button is located to the right of the charging port.10ORDERING ADDITIONAL RECEIPT PAPER ROLLSThe SM-L200 is a thermal printer, and uses special thermal receipt paper that does not require anyink or toner ribbon. Please ensure that you use the recommended receipt paper.Manufacturer: Star MicronicsModel: TRF58-D40-C12Size: Roll (2.28 in x 50 ft)Additional receipt paper rolls are usually sold in a case of 12 rolls.Please contact your Merchant Service Provider to purchase additional receipt paper rolls.19
For more information,please visit home.swipesimple.com/support-centeror contact your Retriever Merchant Solutions
6b. To connect the card reader, go to Settings Device Management on the SwipeSimple app. 6c. Select the card reader with your Swift B200 or Swift B250'sserialnumber. i. The serial number can be located at the back of the card reader, or on the side of the box in which your Swift B200 or Swift B250 came in. Format: SwiftXXXX, with the last .