Transcription
1 Pa g e
Atmel AVR External InterruptsReadingThe AVR Microcontroller and Embedded Systems using Assembly and C)by Muhammad Ali Mazidi, Sarmad Naimi, and Sepehr NaimiChapter 10: AVR Interrupt Programming in Assembly and C10.3 Programming External Interrupts10.5 Interrupt Programming in C2 Pa g e
ContentsExternal Interrupts. 4ATmega328P External Interrupt Sense Control . 6ATmega328P External Interrupt Enable . 7When Will External Interrupts Be Triggered? . 8Pin Change Interrupts . 9How a Pin Change Interrupt Works . 10How To Enable a Pin Change Interrupt. 11ATmega328P Interrupt Processing (Review) . 12Programming the Arduino to Handle External Interrupts . 13Programming the Arduino to Handle Interrupts . 14Design Example – Switch Debounce . 15Switch Debounce Solutions . 16Switch Debounce Circuit – A Simple Digital Low Pass Filter . 17Switch Debounce Circuit – Questions . 18Appendix AHow I Designed the Debounce Circuit . 19Logic Levels . 19Rise and Fall Times (Slew Rate) . 203 Pa g e
EXTERNAL INTERRUPTS Review ATmega328P Interrupts Lecture Notes page 4 "Interrupt Basics" External Interrupts are triggered by the INT0 and INT1 pins or any of the PCINT23.0 pins 23 Pin Change Interrupts are mapped to the 23 General Purpose I/O Port Pins:PCINT0 – PB0 PCINT7 – PB7PCINT8 – PC0 PCINT14 – PC6 (PCINT15 – PC7)PCINT16 – PD0 PCINT23 – PD74 Pa g e
ATmega328P Interrupt Vector TableVector 50x0030260x0032SourceInterrupt DefinitionRESETINT0INT1PCINT0PCINT1PCINT2WDTTIMER2 COMPATIMER2 COMPBTIMER2 OVFTIMER1 CAPTTIMER1 COMPATIMER1 COMPBTIMER1 OVFTIMER0 COMPATIMER0 COMPBTIMER0 OVFSPI, STCUSART, RXUSART, UDREUSART, TXADCEE READYANALOG COMPTWISPM READYResetExternal Interrupt Request 0 (pin D2)External Interrupt Request 1 (pin D3)Pin Change Interrupt Request 0 (pins D8 to D13)Pin Change Interrupt Request 1 (pins A0 to A5)Pin Change Interrupt Request 2 (pins D0 to D7)Watchdog Time-out InterruptTimer/Counter2 Compare Match ATimer/Counter2 Compare Match BTimer/Counter2 OverflowTimer/Counter1 Capture EventTimer/Counter1 Compare Match ATimer/Counter1 Compare Match BTimer/Counter1 OverflowTimer/Counter0 Compare Match ATimer/Counter0 Compare Match BTimer/Counter0 OverflowSPI Serial Transfer CompleteUSART Rx CompleteUSART, Data Register EmptyUSART, Tx CompleteADC Conversion CompleteEEPROM ReadyAnalog Comparator2-wire Serial Interface (I2C)Store Program Memory ReadyArduino/C ISR() MacroVector Name(INT0 vect)(INT1 vect)(PCINT0 vect)(PCINT1 vect)(PCINT2 vect)(WDT vect)(TIMER2 COMPA vect)(TIMER2 COMPB vect)(TIMER2 OVF vect)(TIMER1 CAPT vect)(TIMER1 COMPA vect)(TIMER1 COMPB vect)(TIMER1 OVF vect)(TIMER0 COMPA vect)(TIMER0 COMPB vect)(TIMER0 OVF vect)(SPI STC vect)(USART RX vect)(USART UDRE vect)(USART TX vect)(ADC vect)(EE READY vect)(ANALOG COMP vect)(TWI vect)(SPM READY vect)5 Pa g e
ATMEGA328P EXTERNAL INTERRUPT SENSE CONTROL Review ATmega328P Interrupts Lecture Notes page 8 "ATmega328P Interrupt Processing - Advanced -" The INT0 and INT1 interrupts can be triggered by a low logic level, logic change, and a falling or rising edge. This is set up as indicated in the specification for the External Interrupt Control Register A – EICRA asdefined in Section 12.2.1 EICRA of the Datasheet. The number “n” can be 0 or 1.ISCn1ISCn0Arduino modeDescription00LOW01CHANGEAny logical change on INTn generates and interrupt request10FALLINGThe falling edge of INT0 generates an interrupt request11RISINGThe rising edge of INT0 generates an interrupt requestThe low level of INTn generates an interrupt request6 Pa g e
ATMEGA328P EXTERNAL INTERRUPT ENABLE All interrupts are assigned individual enable bits which must be written logic one together with the GlobalInterrupt Enable bit in the Status Register (SREG) in order to enable the interrupt. The ATmega 328P supports two external interrupts which are individually enabled by setting bits INT1 andINT0 in the External Interrupt Mask Register (Section 12.2.2 EIMSK). Let's look at an example. When an edge or logic change on the INT0 pin triggers an interrupt request, INTF0becomes set (one). If the I-bit in SREG and the INT0 bit in EIMSK are set (one), the MCU will jump to thecorresponding Interrupt Vector. The flag is cleared when the interrupt routine is executed. Alternatively, the flag can be cleared by writing a logical one to it. The EIFR register is within the I/Oaddress range (0x00 to 0x1F) of the Set Bit in I/O Register (SBI) Instruction. This flag is always cleared whenINT0 is configured as a level interrupt.7 Pa g e
WHEN WILL EXTERNAL INTERRUPTS BE TRIGGERED? When the INT0 or INT1 interrupts are enabled and are configured as low level triggered (Type 21), theinterrupts will trigger as long as1. the pin is held low.2. the low level is held until the completion of the currently executing instruction3. the level is held long enough for the MCU to completely wake-up (assuming it was asleep).o Low level interrupt on INT0 and INT1 are detected asynchronously (no clock required). The I/O clockis halted in all sleep modes except Idle mode. Therefore low level interrupts can be used for wakingthe part from all sleep modes.4. Among other applications, low level interrupts may be used to implement a handshake protocol. When the INT0 or INT1 interrupts are enabled and are configured as edge or logic change (toggle)triggered, (Type 11) the interrupts will trigger as long as1. the I/O clock is present.o This implies that these interrupts cannot be used for waking up the part from sleep modes otherthan Idle mode.2. pulse lasts longer than one I/O clock period. Shorter pulses are not guaranteed to generate aninterrupt.1For more on Interrupt Types see ATmega328P Timer Interrupts “ATMEGA328P INTERRUPT PROCESSING – ADVANCED –“8 Pa g e
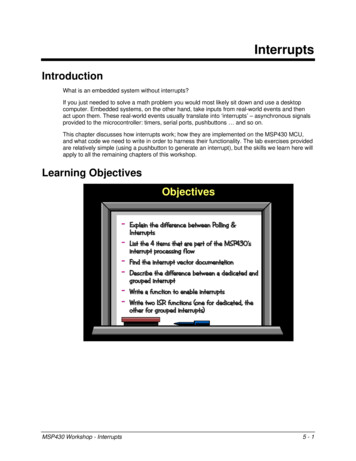
PIN CHANGE INTERRUPTSIn addition to our two (2) externalinterrupts, twenty-three (23) pins can beprogrammed to trigger an interrupt ifthere pin changes state.These 23 pins are in turn divided intothree (3) interrupt groups (PCI 2:0)corresponding to the three GPIO Ports B,C, and DEach of the groups are assigned to onepin change interrupt flag (PCIF) bit (2:0).A pin change interrupt flag will be set, ifthe interrupt is enabled (see How toEnable a Pin Change Interrupt), and anypin assigned to the group changes state (toggles).9 Pa g e
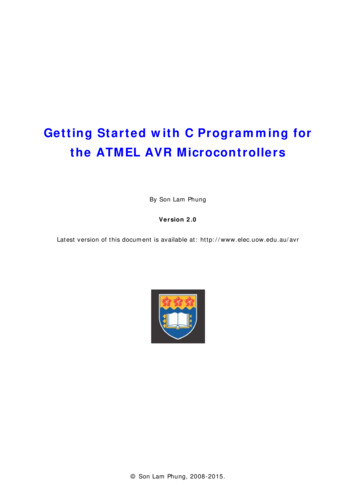
HOW A PIN CHANGE INTERRUPT WORKSHere is how it works 10 P a g e
HOW TO ENABLE A PIN CHANGE INTERRUPTIn addition to our two (2) external interrupts, twenty-three (23) pins PCINT 23:16, 14:0 can be programmed to trigger an interrupt ifthere pin changes state. These 23 pins are divided into three (3) interrupt groups (PCI 2:0) of eight (8), seven (7) and (8).Consequently to enable and individual pin change interrupt 3 interrupt mask bits must be set to one (1).1. The SREG global interrupt enable bit I2. The pin change interrupt enable bit (PCIE 2:0) group the pin is assigned. Specifically, a pin change interrupt PCI2 will trigger ifany enabled PCINT23.16 pin toggles. A pin change interrupt PCI1 will trigger if any enabled PCINT14.8 pin toggles. A pinchange interrupt PCI0 will trigger if any enabled PCINT7.0 pin toggles.3. The individual pin change interrupt enable mask bit assigned to the pin (PCINT 23:0) is set. These mask bits are located in thethree pin change mask registers assigned to each group.11 P a g e
ATMEGA328P INTERRUPT PROCESSING (REVIEW) When an interrupt occurs, the microcontroller completes the current instruction and stores the address ofthe next instruction on the stack It also turns off the interrupt system to prevent further interrupts while one is in progress. This is done byclearing the SREG Global Interrupt Enable I-bit. The Interrupt flag bit is cleared for Type 1 Interrupts only (see the next page for Type definitions). The execution of the ISR is performed by loading the beginning address of the ISR specific for that interruptinto the program counter. The AVR processor starts running the ISR. Execution of the ISR continues until the return from interrupt instruction (reti) is encountered. The SREGI-bit is automatically set when the reti instruction is executed (i.e., Interrupts enabled). When the AVR exits from an interrupt, it will always return to the interrupted program and execute onemore instruction before any pending interrupt is served. The Status Register (SREG) is not automatically stored when entering an interrupt routine, nor restoredwhen returning from an interrupt routine. This must be handled by software.12 P a g e
PROGRAMMING THE ARDUINO TO HANDLE EXTERNAL INTERRUPTS2 Stop compiler optimization of variables within an ISR by adding the volatile qualifier. Thiskeeps the current value in SRAM until needed.const byte pin 8;volatile int state LOW;// green LED 0 Add jumps in the IVT to ISR routine, configure External Interrupt Control Register A (EICRA), andenable local and global Interrupt Flag Bits.void setup(){ExternalInterrupt 0 or 1Interrupt SenseControl (ISC)pinMode(pin, OUTPUT);attachInterrupt(0, blink, CHANGE);// protoshield button}ISR Write Interrupt Service Routine (ISR)void blink(){state !state;}To disable interrupts globally (clear the I bit in SREG) call the noInterrupts() function. To onceagain enable interrupts (set the I bit in SREG) call the interrupts() function.2Source: Arduino attachInterrupt13 P a g e
PROGRAMMING THE ARDUINO TO HANDLE INTERRUPTS3In the AVR-GCC environment upon which the Arduino language is built, the interrupt vector table (IVT) ispredefined to point to interrupt routines with predetermined names (see “ATmega328P Interrupt VectorTable” on page 6).You create an ISR by using the Macro ISR() and these names.#include avr/interrupt.h ISR(ADC vect){// user code here}Now that you have defined the ISR you need to locally and globally enable it. Here are the relevant links forlearning how to complete your ISR definition.o Global manipulation of the interrupt flago Gammon Software Solutions forum - Interruptso ISR() macro3Source: Arduino attachInterrupt14 P a g e
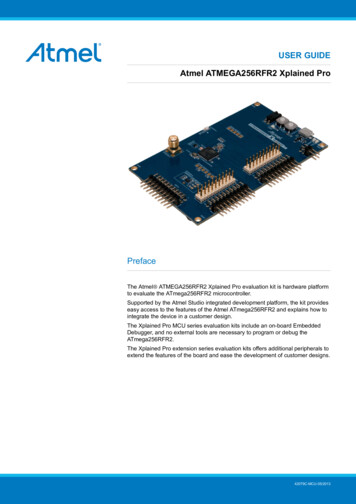
DESIGN EXAMPLE – SWITCH DEBOUNCEWhen you press a button, its contacts will open and close many times before they finally stay in position.This is known as contact bounce.Depending on the switch construction, this mechanical contact bounce can last up to 10 or 20 milliseconds.This isn't a problem for lamps, doorbells and audio circuits, but it will play havoc to with our edge-triggeredinterrupt circuitry.Figure 2Switch BounceWith respect to the waveform above, a switch debounce solution must be designed to filter out thesetransitions.15 P a g e
SWITCH DEBOUNCE SOLUTIONSSo how can we design a “Debounce Circuit” to filter out these transitions.1. The lowest-cost solution requires no hardware. Specifically, we disable the external interrupt during theswitch bounce time. This solution has been implemented for the Arduino by Nick Gammon with Arduinocode provided here in the “Example code of a pump timer” section.2. For some simple electrical solutions visit http://www.patchn.com/Debounce.htm.3. For our solution, I added a D flip-flop which is clocked at a frequency less than 50 Hz (1/20 milliseconds).This digital circuit acts as a low pass filter blocking the AVR interrupt circuitry from responding to any ofthese additional edges.16 P a g e
SWITCH DEBOUNCE CIRCUIT – A SIMPLE DIGITAL LOW PASS FILTERFrom the Pre-lab – Draw a waveform diagram with inputsD and clk of the Flip-flop and output Q. For the clockinput, show two (2) clock cycles with a period of 10milliseconds and a positive pulse with a width equal to 2clock cycles. Assume the Arduino Duemilanove clockfrequency of 16 MHz. For the D input assume the switchis initially pressed and that the input is at logic zero. Nextadd the bounce waveform shown Figure 2. The switchbounce should occur somewhere relative to the leading edge of the first clock signal. The exact phaserelationship of the switch bounce to the clock edge is left to you, but time scales must be the same betweenthe two (2) inputs. Based on these two inputs to the D Flip-flop draw output signal Q.10 msecPORT D bit 5 outputto FF CLK inputButtonto FF D inputFF Q outputto PIN D bit 2 input17 P a g e
SWITCH DEBOUNCE CIRCUIT – QUESTIONSHere is the push-button debounce circuit included with your proto-shield.Figure 1Debounce CircuitQuestions 1. After reset is applied, will the LED be ON or OFF?2. Assuming the current into the D input of the Flip-flop is negligible, what current, if any, would flow throughthe resistor when the button is pressed?18 P a g e
APPENDIX AHOW I DESIGNED THE DEBOUNCE CIRCUITHere is a real world problem that I considered while designing my Debounce circuit.LOGIC LEVELSBetween logic 0 and logic 1 there is an undefined region4. The figure below shows TTL input and output voltagelevels corresponding to logic 1 and 0 (source: Theory of TTL Logic Family). Recommended Reading: Logic signalvoltage levels4http://www.interfacebus.com/voltage threshold.html19 P a g e
RISE AND FALL TIMES (SLEW RATE)Electrical signals have a finite period to transition through this region, technically known at rise and fall timesor slew rate5.The table below provides data for propagation delay and slew rate for each of the families listed. Don't allowdigital logic slew rates to be slower than what is specified by the data sheet. All digital logic families willoscillate with slow rise times.5http://www.interfacebus.com/Logic Family Noise Margin.html20 P a g e
RISE AND FALL TIMES - CONTINUEDFor some micro-controller inputs rise and fall times can be no more than 20 nsec. If this specification isviolated the input may start to oscillate causing havoc within the device and ultimately destroying the inputgate structure of the receiving gate6.The input circuits of MOS devices, like our AVR micro-controller, can be characterized as capacitive in nature(can be modeled to the first order by a capacitor). For some inputs this capacitance can be as great as 10 pF(pico 10-12). Now, let us assume an external pull-up resistor of 10 KΩ. Given this information we come upwith a “back of the envelope” calculated time constant (RC) of 100 nsec.Clearly, we have a problem. I solved this problem by adding a TTL device between the switch and the microcontroller. The input of the 74ALS74 can be characterized as resistive in nature (can be modeled by aresistor). Combined with a pull-up resistance (10 KΩ) the input problem is ameliorated.The output of the 74ALS74 TTL device goes directly to the input of the AVR micro-controller solving our slewrate problem. This new faster circuit however introduces its own problems as discussed in the next section.6http://www.interfacebus.com/IC Output Slew Rate.html21 P a g e
In the AVR-GCC environment upon which the Arduino language is built, the interrupt vector table (IVT) is predefined to point to interrupt routines with predetermined names (see ATmega328P Interrupt Vector Table _ on page 6). You create an ISR by using the Macro ISR() and these names. #include avr/interrupt.h ISR(ADC_vect) { // user code here }