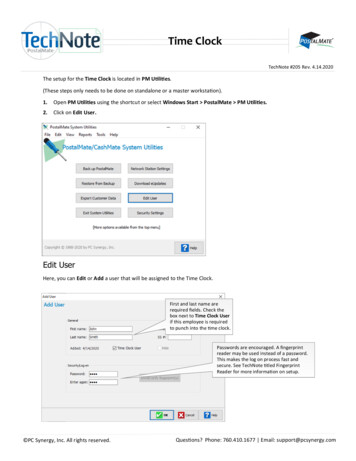
Transcription
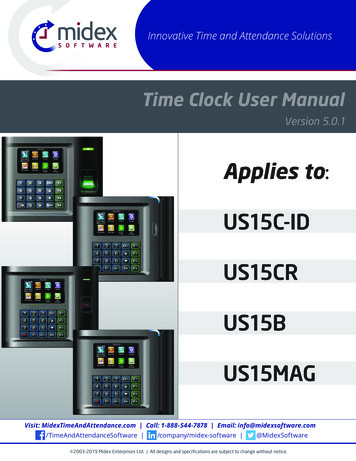
Innovative Time and Attendance SolutionsTime Clock User ManualVersion 5.0.1Applies to:US15C-IDUS15CRUS15BUS15MAGVisit: MidexTimeAndAttendance.com Call: 1-888-544-7878 Email: info@midexsoftware.com/TimeAndAttendanceSoftware /company/midex-software @MidexSoftware 2003-2019 Midex Enterprises Ltd. All designs and specifications are subject to change without notice.
CO N T E N T1USER MANAGEMENT51.1 New User . . . . . . . . . . . . . . . . . . . . . . . . . . . . . . . . . . . . . . . . . . . . . . . . . . . . . . . . . . . . . . . . . . . . . . . . 61.2 All Users. . . . . . . . . . . . . . . . . . . . . . . . . . . . . . . . . . . . . . . . . . . . . . . . . . . . . . . . . . . . . . . . . . . . . . . . 131.3 Single Line. . . . . . . . . . . . . . . . . . . . . . . . . . . . . . . . . . . . . . . . . . . . . . . . . . . . . . . . . . . . . . . . . . . . . 1423USER ROLE15COMMUNICATION173.1 Ethernet. . . . . . . . . . . . . . . . . . . . . . . . . . . . . . . . . . . . . . . . . . . . . . . . . . . . . . . . . . . . . . . . . . . . . . . . 183.2 Serial Communication. . . . . . . . . . . . . . . . . . . . . . . . . . . . . . . . . . . . . . . . . . . . . . . . . . . . . . . . 183.3 PC Connection. . . . . . . . . . . . . . . . . . . . . . . . . . . . . . . . . . . . . . . . . . . . . . . . . . . . . . . . . . . . . . . . . 193.4 Wireless Network. . . . . . . . . . . . . . . . . . . . . . . . . . . . . . . . . . . . . . . . . . . . . . . . . . . . . . . . . . . . . . 203.5 Cloud Server Settings. . . . . . . . . . . . . . . . . . . . . . . . . . . . . . . . . . . . . . . . . . . . . . . . . . . . . . . . 213.6 Wiegand Setup. . . . . . . . . . . . . . . . . . . . . . . . . . . . . . . . . . . . . . . . . . . . . . . . . . . . . . . . . . . . . . . . 234SYSTEM254.1 Date Time . . . . . . . . . . . . . . . . . . . . . . . . . . . . . . . . . . . . . . . . . . . . . . . . . . . . . . . . . . . . . . . . . . . . . . 264.2 Attendance. . . . . . . . . . . . . . . . . . . . . . . . . . . . . . . . . . . . . . . . . . . . . . . . . . . . . . . . . . . . . . . . . . . . . 264.3 Fingerprint. . . . . . . . . . . . . . . . . . . . . . . . . . . . . . . . . . . . . . . . . . . . . . . . . . . . . . . . . . . . . . . . . . . . . 294.4 Reset. . . . . . . . . . . . . . . . . . . . . . . . . . . . . . . . . . . . . . . . . . . . . . . . . . . . . . . . . . . . . . . . . . . . . . . . . . . . 314.5 USB Upgrade. . . . . . . . . . . . . . . . . . . . . . . . . . . . . . . . . . . . . . . . . . . . . . . . . . . . . . . . . . . . . . . . . . . 315PERSONALIZE325.1 User Interface. . . . . . . . . . . . . . . . . . . . . . . . . . . . . . . . . . . . . . . . . . . . . . . . . . . . . . . . . . . . . . . . . . 335.2 Voice. . . . . . . . . . . . . . . . . . . . . . . . . . . . . . . . . . . . . . . . . . . . . . . . . . . . . . . . . . . . . . . . . . . . . . . . . . . . 365.3 Bell Schedules. . . . . . . . . . . . . . . . . . . . . . . . . . . . . . . . . . . . . . . . . . . . . . . . . . . . . . . . . . . . . . . . . 375.4 Punch State Options. . . . . . . . . . . . . . . . . . . . . . . . . . . . . . . . . . . . . . . . . . . . . . . . . . . . . . . . . . 415.5 Shortcut Key Mapping. . . . . . . . . . . . . . . . . . . . . . . . . . . . . . . . . . . . . . . . . . . . . . . . . . . . . . . 425.6 Manual Add Log . . . . . . . . . . . . . . . . . . . . . . . . . . . . . . . . . . . . . . . . . . . . . . . . . . . . . . . . . . . . . . 47
CO N T E N T6DATA MANAGEMENT496.1 Delete Data. . . . . . . . . . . . . . . . . . . . . . . . . . . . . . . . . . . . . . . . . . . . . . . . . . . . . . . . . . . . . . . . . . . . 506.2 Backup Data. . . . . . . . . . . . . . . . . . . . . . . . . . . . . . . . . . . . . . . . . . . . . . . . . . . . . . . . . . . . . . . . . . . 516.3 Restore Data. . . . . . . . . . . . . . . . . . . . . . . . . . . . . . . . . . . . . . . . . . . . . . . . . . . . . . . . . . . . . . . . . . . 527ACCESS CONTROL547.1 Time Schedule. . . . . . . . . . . . . . . . . . . . . . . . . . . . . . . . . . . . . . . . . . . . . . . . . . . . . . . . . . . . . . . . . 557.2 Access Group. . . . . . . . . . . . . . . . . . . . . . . . . . . . . . . . . . . . . . . . . . . . . . . . . . . . . . . . . . . . . . . . . . 558USB MANAGER598.1 Download. . . . . . . . . . . . . . . . . . . . . . . . . . . . . . . . . . . . . . . . . . . . . . . . . . . . . . . . . . . . . . . . . . . . . . 608.2 Upload. . . . . . . . . . . . . . . . . . . . . . . . . . . . . . . . . . . . . . . . . . . . . . . . . . . . . . . . . . . . . . . . . . . . . . . . . . 618.3 Download Options. . . . . . . . . . . . . . . . . . . . . . . . . . . . . . . . . . . . . . . . . . . . . . . . . . . . . . . . . . . . 61910ATTENDANCE SEARCH63SHORT MESSAGE6610.1 New Message. . . . . . . . . . . . . . . . . . . . . . . . . . . . . . . . . . . . . . . . . . . . . . . . . . . . . . . . . . . . . . . . 6710.2 Public Messages. . . . . . . . . . . . . . . . . . . . . . . . . . . . . . . . . . . . . . . . . . . . . . . . . . . . . . . . . . . . . 6910.3 Personal messages. . . . . . . . . . . . . . . . . . . . . . . . . . . . . . . . . . . . . . . . . . . . . . . . . . . . . . . . . . 6910.4 Draft Messages. . . . . . . . . . . . . . . . . . . . . . . . . . . . . . . . . . . . . . . . . . . . . . . . . . . . . . . . . . . . . . . 6910.5 Message Options. . . . . . . . . . . . . . . . . . . . . . . . . . . . . . . . . . . . . . . . . . . . . . . . . . . . . . . . . . . . 7011WORK CODE7111.1 New Work Code. . . . . . . . . . . . . . . . . . . . . . . . . . . . . . . . . . . . . . . . . . . . . . . . . . . . . . . . . . . . . . 7211.2 ALL WORK CODES. . . . . . . . . . . . . . . . . . . . . . . . . . . . . . . . . . . . . . . . . . . . . . . . . . . . . . . . . . . 7311.3 SET WORK CODE. . . . . . . . . . . . . . . . . . . . . . . . . . . . . . . . . . . . . . . . . . . . . . . . . . . . . . . . . . . . . 73
CO N T E N T12JOB CODE7512.1 New Job Code. . . . . . . . . . . . . . . . . . . . . . . . . . . . . . . . . . . . . . . . . . . . . . . . . . . . . . . . . . . . . . . . 7612.2 All Job Codes. . . . . . . . . . . . . . . . . . . . . . . . . . . . . . . . . . . . . . . . . . . . . . . . . . . . . . . . . . . . . . . . . 7712.2 All Job Codes. . . . . . . . . . . . . . . . . . . . . . . . . . . . . . . . . . . . . . . . . . . . . . . . . . . . . . . . . . . . . . . . . 8012.3 Job Code Options. . . . . . . . . . . . . . . . . . . . . . . . . . . . . . . . . . . . . . . . . . . . . . . . . . . . . . . . . . . . 8312.4 Job Group Option Menu Operation. . . . . . . . . . . . . . . . . . . . . . . . . . . . . . . . . . . . . . . 8513TIP CODE8813.1 Tip code settings. . . . . . . . . . . . . . . . . . . . . . . . . . . . . . . . . . . . . . . . . . . . . . . . . . . . . . . . . . . . . 8913.2 Tip code. . . . . . . . . . . . . . . . . . . . . . . . . . . . . . . . . . . . . . . . . . . . . . . . . . . . . . . . . . . . . . . . . . . . . . . 9014AUTOTEST9414.1 All Test. . . . . . . . . . . . . . . . . . . . . . . . . . . . . . . . . . . . . . . . . . . . . . . . . . . . . . . . . . . . . . . . . . . . . . . . . 9514.2 Test LCD. . . . . . . . . . . . . . . . . . . . . . . . . . . . . . . . . . . . . . . . . . . . . . . . . . . . . . . . . . . . . . . . . . . . . . . 9514.3 Test Voice. . . . . . . . . . . . . . . . . . . . . . . . . . . . . . . . . . . . . . . . . . . . . . . . . . . . . . . . . . . . . . . . . . . . . 9714.4 Test Keyboard. . . . . . . . . . . . . . . . . . . . . . . . . . . . . . . . . . . . . . . . . . . . . . . . . . . . . . . . . . . . . . . . 9714.5 Test Fingerprint Sensor. . . . . . . . . . . . . . . . . . . . . . . . . . . . . . . . . . . . . . . . . . . . . . . . . . . . . 9714.6 Test Clock RTC. . . . . . . . . . . . . . . . . . . . . . . . . . . . . . . . . . . . . . . . . . . . . . . . . . . . . . . . . . . . . . . . 9715SYSTEM INFORMATION9815.1 Device Capacity. . . . . . . . . . . . . . . . . . . . . . . . . . . . . . . . . . . . . . . . . . . . . . . . . . . . . . . . . . . . . . 9915.2 Device Info. . . . . . . . . . . . . . . . . . . . . . . . . . . . . . . . . . . . . . . . . . . . . . . . . . . . . . . . . . . . . . . . . . . . 9915.3 Firmware Info. . . . . . . . . . . . . . . . . . . . . . . . . . . . . . . . . . . . . . . . . . . . . . . . . . . . . . . . . . . . . . . 100
1USER MANAGEMENT
1USER MANAGEMENT1.1 NEW USERGo to menu and select User Management .Select New User .Select User ID and press OK.Enter the User ID by using the keypad and press OK.Select User Role and press OKClick on Registrar and press OK.6
1USER MANAGEMENTA user with “Registrar” is able to “Add”, “Delete” and “Edit” standard users to thedevice.He is also able to view “Standard Attendance Data” for existing users on theclock.Select Super Admin and press OK.The super administratiotor has rights to all the menu functions.Select Verification Mode and press OK.Verification mode is basically used to verify the user.Select Apply Group Mode and press OK. By pressing the apply group modethe user can verify himself with all the options that are available in verification mode.By clicking the option above the user can verify himself either with his/herFingerprint/Password or Badge .Select Apply Group Mode and press OK.7
1USER MANAGEMENTWhen you select the option from above the user needs all three things toverify himself or it won’t verify.When you select the option above the user needs his/her fingerprint andeither badge or user id to verify himself.When there is “/ “sign it means you can use either option to verify.To enroll the fingerprint for the new user select fingerprint and select OK.Place your finger on the fingerprint sensor properly.Place the same finger on the fingerprint sensor for the second time.After that, you can again place the same finger on the fingerprint sensor.8
1USER MANAGEMENTEnrollment succeeds. If the enrollment fails, the system will display a promptmessage and return to the [Enroll Fingerprint] interface. In this case, youneed to repeat the operations of step 2After the fingerprint is enrolled succesfully the fingerprint will be shown as 1as above which means one fingerprint is enrolled.Select Badge Number and press OK.When you select the badge number it will tell you to swipe the badge/rfidcard to enroll.When you swipe the badge number the badge number will be displayed asabove.Here I swiped badge number 4261414 and that number is enrolled for thatuser.Select Password and press OK.9
1USER MANAGEMENTHere you can input the password by using the keypad to enroll.Once you have entered the password, the above image will be displayedfor that user with his/her fingerprint, the badge number, and password thatneeds to be entered.Select Lockout Override and select OKSelect lockout override as Disable .A user punches in off the activate schedules, the device will notify the userby “Error! Invalid time period Failed to verify.”Select lockout override as Enable .10
1USER MANAGEMENTWhen you enable this function the above image will be displayed.A user punches in off the activate schedules, the device will notify the userby “Successfully Verified.” as shown above.Select Access Control Role and press OK.Select Access Group and press OK.You can change the number for that group in the input section above usingthe keypad.Select verification mode and press OK11
1USER MANAGEMENTIn verification mode, you can select apply group mode which will select allthe methods of verification as shown above.Select duress fingerprint and press OK.Press to select enrolled fingerprint and press OK.Press to select Apply Group Time Period, press OK to select whether theuser uses his/her group’s default time zone.When OFF is selected, PressSimilarly, you can choose time period 2 and press OK.to select Time period 1.12
1USER MANAGEMENTSelect duplicate punch period and press OK.Here you can Disabled or select the punch period you want.1.2 ALL USERSPress to select “All User and press” OK.Select All users and press OK.Press OK to enter User Info interface. Here you can Edit the user information.The User ID cannot be modified, and the other operations are similar tothose performed to add a user.13
1USER MANAGEMENTIf you want to delete the user select Delete as shown above and press OKand the user will get deleted.1.3 SINGLE LINESingle LineMultiple linePressMixed Line14to select display style and press OK to return.
2USER ROLE
2USER ROLESelect User Role and press OK.Click on Registrar and press OKYou are also able to view “Standard Attendance Data” for existing users onthe clockHere you can Enable the defined Role for user by turning it ON.Select Define User Role and press OK.Pressand OK to select the rights. Press ESC to exit.16
3COMMUNICATION
3COMMUNICATION3.1ETHERNETGo to menu and select “COMM” and press OKSelect Ethernet and press OKIP Address: IP is 192.168.1.201 by default. You can modify it if it is necessary.But it cannot be the same with that of PC.3.2 SERIAL COMMUNICATIONSelect “Serial Port” and press OK.RS232: Whether to use RS232 to communicate or not. Select YES if RS232 isto be used.Select Serial Comm and press OK.18
3COMMUNICATIONSelect Serial Port as no using if you do not want to use the port.Baudrate: Used for communication with PC.There are five options: 9600, 19200, 38400, 57600 and 115200. If the communication speed is high, RS232 is recommended. If the communication speedis low, RS 485 is recommended3.3 PC CONNECTIONSelect Comm Key and press OKEnter a password in the input box using the keypad as shown above and toselect confirm OK and press OK.Select PC connection and press OK.19
3COMMUNICATIONSelect Device ID and press OK.Here you can input the number for this device by using the keypad and hitpress confirm OK.Here the Use SSH is OFFWhen you turn ON the “SSH” function the device will restart automaticallyas shown above.When this function is enabled you cannot “Telnet” into the clock as it willdisable that function.3.4 WIRELESS NETWORKWhen you select the wireless network option the following window willappear in which as a default WIFI would be OFF .Click on Wireless Network and press OK20
3COMMUNICATIONYou can turn ON the wireless network and the networks available in therange would be displayed as above.You can select any wireless network you wish to connect and you can upload the password via “USB” or by using the keypad on the clock.Once you upload the password the following network will get connected.See NOTE below3.5 CLOUD SERVER SETTINGSOnce the password is uploaded succesfully the above image will be dispalyed as “Upload is done”Click on “Cloud Server Settings” and press OKSelect Server mode as “PUSH” as shown above.Here the URL Mode is OFF .It refers to your push server address.NOTE: The new filename for uploading Wi-Fi password or URL Webserver: updataoptions2.cfgInside this file you can either use: WirelessKey [for uploading Wi-Fi password] or ICLOCKSVRURL [for uploading webserver URL]The clock won’t accept saving those two configurations under the same filename. Our suggestion would be to save one separate file for Wi-Fi and one for URL.21
3You can turn the “URL” mode ON by pressing theCOMMUNICATIONM/button on the clock.Once the “URL Mode” is ON you can upload the server address with “USB”.See NOTE belowHere the server address is the IP address of the webserver.Here you can change server port of the webserver by using the keypad andpressing confirm OK.Select Server port. It is as port which is used by the webserver.Here you can change server port of the webserver by using the keypad andpressing confirm OK.NOTE: The new filename for uploading Wi-Fi password or URL Webserver: updataoptions2.cfgInside this file you can either use: WirelessKey [for uploading Wi-Fi password] or ICLOCKSVRURL [for uploading webserver URL]The clock won’t accept saving those two configurations under the same filename. Our suggestion would be to save one separate file for Wi-Fi and one for URL.22
3COMMUNICATIONHere you can select the proxy server to be Enabled or not. If it is off as abovethe proxy server will be disabled.When you enable the proxy function, set the IP address and port numberof the proxy server. This option indicates whether or not to use a proxy IPaddress. You may choose to enter the proxy IP address or the server addressfor Internet access, whichever you like.3.6 WIEGAND SETUPClick on Card format detect automatically and press “OK”.s(This function is available only for standard RFID and HID proximity Cards )Click on Wiegand Setup and press OKHere you can swipe the multiple types of cards with different Wiegandformats.After you swipe multiple cards all the cards with different Wiegand formatswill be displayed as above.23
3COMMUNICATIONTo select the particular Wiegand card format select that format andpress OK as shown above.Here you can select the Wiegand format of the card you wish to choose toregister.If you select Cancel that Wiegand format would not be selected.24
4SYSTEM
34COMMUNICATIONSYSTEM4.1 DATE TIMESelect “System” and press OKSelect Date Time and press OK.Press and OK to select items. When the setting is completed, press OKto save the setting and exit.4.2 ATTENDANCEIf you want to display the user photo you can select ONIf you don’t want the user photo to be displayed select OFF as above.Select Attendance and press OK.26
34COMMUNICATIONSYSTEMWhen the available space is insufficient to store the specified number ofattendance records, the FFR terminal will automatically generate an alarm.(Value scope: 1-99)You can change the value for attendance log alert from the image above.Select Cyclic Delete ATT Data. It specifies the maximum number of attendance records that can be deleted at a time when the number of attendancerecords reaches the upper limit.This function can be disabled; otherwise, the value ranges from 1 to 999The screen delay specifies the time for displaying the authentication result.The value ranges from 1s to 9s.27
34COMMUNICATIONSYSTEMYou can select the expiration rule as OFF if you don’t want to retain the userinformation or to save attendance records.You can select one of the three conditions: Retaining user information and not saving attendance records; Retaining user information and saving attendance records; Deleting user informationClick on the Verification Result Font Customization option from above andpress ON to change the Font Size.Here the default the font size would we be set to “Medium”.Here you can change the Font size from Medium to Large or Maximum .Select Verification Result Font Color from above and press OK28
34COMMUNICATIONSYSTEMHere you can change the color of the font to a different color you wish toapply.4.3 FINGERPRINTHere select 1:1 Match Threshold . Thevalue is similar to the ID fingerprintverification and the enrolled template.You can change the value from the image above. The default will be selected as 15.Here select 1:N Match Threshold . The value is the similar to verification andthe enrolled template.You can change the value from the image above.The default will be set to 35Select Fingerprint option and click OK.29
34COMMUNICATIONSYSTEMSelect FP sensor Sensitivity and press OK. It is used to set the sensitivity offingerprint collection.The default value Medium is recommended. You can set the sensitivity offingerprint collection to High when the response to finger scan lags in a dryenvironment. When the usage environment is humid, you can set the sensitivity of fingerprint collection to Low if the fingerprint is difficult to identify.This parameter is used to set the retry times in the event of failure of 1:1 verification or password verification due to an absence of fingerprint enrollmentor improper finger placement, so as to avoid repetitive operations.You can change the retry times from the image above. The value rangesfrom 1 to 6.Here you can select the Fingerprint Image to be shown. If you select thisoption the display of the fingerprint image on the screen will be shown.Here you can change the fingerprint image to be shown while enrolling orto match and never30
34COMMUNICATIONSYSTEM4.4 RESETWhen you select Cancel it will go back to the previous menu.If you select OK it will reset the setting and restart the clock.Select Reset .4.5 USB UPGRADEIf the USB is not readable or properly inserted the image above will bedisplayed and you will not be able to upgrade.Select USB Upgrade .If the USB is readable or properly inserted the image above will be displayedand you will be able to upgrade.31
5PERSONALIZE
345COMMUNICATIONPERSONALIZESYSTEM5.1 USER INTERFACESelect Personalize and press OK.Select User Interface and press OKSelect Wallpaper and press OK.If you select the wallpaper, the different wallpapers will be displayed asshown above and you can select from any of the wallpaper you want to bedisplayed.Select Language and press OKHere you can select the language you wish to display on the clock. Theoptions are English and Espanol (Spanish).33
345COMMUNICATIONPERSONALIZESYSTEMTo prevent hostile power-off, select whether to lock power-off or not.“disable”: the power is off 3 seconds after pressing power-off.“Enable”: it is ineffective after pressing power-offThe device will display the main interface automatically when no operationis performed on a menu within the menu timeout timeThis function can be disabled; otherwise, the value ranges from 60s to99999s.The advertisement picture is displayed when no operation is performed onthe main interface within the waiting time.This function can be disabled; otherwise, the value ranges from 15s to 999s34
345COMMUNICATIONPERSONALIZESYSTEMThis parameter is used to set the picture cycle intervalThis parameter can be either disabled or ranges from 30 s to 999s.This parameter is used to set the picture cycle intervalThis parameter can be either disabled or ranges from 30 s to 999s.This parameter is used to specify a period after which the device is put insleep mode if no operation is performed within this period. You can wake upthe device from sleep by pressing any key or touching the screen.Numerical range in 30 minutes, the factory default for 30 minutes.35
345COMMUNICATIONPERSONALIZESYSTEMThis is to set where and how the clock and status key are displayed on themain screen.Here is the “Style 1”. If you want this style press Set and OK. And if you don’twant this style simply press back.Here is the “Style 2”. If you want this style press Set and OK. And if you don’twant this style simply to press back.Here is the “Style 3”. If you want this style press Set and OK. And if you don’twant this style simply press back5.2 VOICEVoice prompt: This parameter is used to set whether to play voice promptsduring the operation of the FFR terminal. Select ON to enable the voiceprompt, and select OFF to mute.Select Voice and press OK.36
345COMMUNICATIONPERSONALIZESYSTEMKeyboard prompt: This parameter is used to set whether to generate beepsound in response to every keyboard touch. Select ON to enable the beepsound, and select OFF to mute5.3 BELL SCHEDULESClick on New bell schedule.Click on bell status. It is whether you want the bell to enable. If you turn OFFit will disable the bell.If you turn ON it will enable the bell.The bell rings automatically when it is the specified time.Select “Bell Schedules” and press OK .37
345COMMUNICATIONPERSONALIZESYSTEMYou can change the timings for the bell to ring using the keypad and thenpress confirm OK.Here the bell is scheduled at 12.24PM.The Repeat function specifies whether to repeat the ringtoneYou can select any day of the week to repeat the ringtone. If you don’t wantthe ringtone to be repeated set to never.Select Bell Type and press OK.Here you can select the bell type. If you want the ringtone to be played internally then select internal bell, for external select external bell and for bothselect internal and external bell.Select Ringtone and press OK.38
345COMMUNICATIONPERSONALIZESYSTEMYou can select any ringtone you want from the above options and press OK.Select Internal bell delay (s) and press OK.It specifies the duration for ringtone playingYou can edit the delay of the internal bell from the image above. It rangesfrom 5 to 99 seconds.Select All bell schedules and press OK.Select New Bell Schedule and press OKSelect Edit and press OK39
345COMMUNICATIONPERSONALIZESYSTEMSelect Item you wish to edit.PressPressPressto select Options and press OK.Pressto select, press OK to save and return.to select YES or NO.Select External Bell Relay.40to “Delete” and press OK.
345COMMUNICATIONPERSONALIZESYSTEM5.4 PUNCH STATE OPTIONSPressPress and OK to select items. When the setting is completed, pressOK to save the setting and exit.to select Punch State Options and press OK.The main interface displays the status keys that can be switched automatically, and you are also allowed to switch status keys manually. A status keyyou select manually will be switched according to the automatic switchingplan after it disappears upon a timeout.Punch state timeout specifies the timeout period of the status key displayedon the main interface.You can change the punch state timeout from the image above. Thetimeout ranges from 5 to 99 sec.specifies whether the status of work attendance check must be selectedduring authentication.Here when its off it won’t be selected.41
345COMMUNICATIONPERSONALIZESYSTEMSpecifies whether the status of work attendance check must be selectedduring authentication.When it’s on it will be selected.5.5 SHORTCUT KEY MAPPINGSelect the keys and assign the group to that key.Pressing switch will enable and disable each individual “Job Group”.Select F1 key as Check in.Select Punch State Value and press OK.Press42to select Shortcut Key Mappings and press OK
345COMMUNICATIONPERSONALIZESYSTEMHere you can change the punch state value in the input screen by using thekeypad. The value ranges from 0 250.Here select punch state options as FunctionYou can change the function for the keys above.Select name for F1Choose the key you want for F1.Select Set Switch Time and press OK.43
345COMMUNICATIONPERSONALIZESYSTEMHere you can Switch CycleSelect job group and press OK. If you disable, the job group will be disabledand it will not show on the screenYou can select any job group you want and you can name the job group byusing the keypad.If you “Disable” the tip group the tip group will not be displayed on thescreen.To enable the tip group you can select the tip group you wish to enter inthat group.Here all the tip groups have been selected as above.44
345COMMUNICATIONPERSONALIZESYSTEMSelect F2 as Check Out.Select Punch State Value.Select F3 as “Tip code”.Here the punch state value is set to 251For more details refer to paragraph 13.You can change the value of the punch state by changing the value in theinput screen with the help of keypad.Select F3 as Tip code. For more details refer to No 13.You can change the function for that key from the image above.45
345COMMUNICATIONPERSONALIZESYSTEMHere the tip group is disabled and no tip group has been selected.You can select the tip group you want. Here all the tip groups are selectedWhen you select all the tip groups the select tip group will display as “Allgroup”.Select F4 as Job Code.For More Details please refer to NO.12Select the Function self-service for F4 and the F4 key will display as Job Codeon the main screen.You can change the functions from above.46
345COMMUNICATIONPERSONALIZESYSTEM5.6 MANUAL ADD LOGClick on User IDSelect manual add log and press OK.The user id is displaying as 1.Click on Verify mode.Here you can select any verification mode you want the user to get verified.The user can verify themselves either with their UserID, Fingerprint, Passwordor Card/Badge.Select verify state as none. In this all the users from all states can verifythemselves.If you verify the state, the user from that state only can verify themselves.47
345COMMUNICATIONPERSONALIZESYSTEMSelect Date and press OK .You can set the date by using the keypad. Here the date is set to 11/03/2017.Select Time and press OK .You can set the “Time” by using the keypad. Here the time is set to 12hr,43min, 38ss.48
6DATA MANAGEMENT
1 DELETE DATASelect Data Manager and press OKSelect Delete Data and press OK.It will delete the attendance recordsWhen selecting Delete All it will delete all the attendance recordsYou can delete the attendance data by Time Range too.To selete by time range you can select the time you want the data to bedeleted.It will delete the data for that specific time you selected.50
re you can delete all data by selecting delete all data and pressOK. CANCEL will take you back to previous screen.Here you can delete admin role by selecting delete admin role and press OK.CANCEL will take you back to previous screen6.2 BACKUP DATAPressPressto select Backup to Device and press OK.to select Backup Data and press OK.You can select the content you want to backup.Press and OK to select the local configuration items to be backed up todevice.51
TEMBackup to USB Disk , the operations are similar to those performed to Backupto select Backup Start and press OK.to Device.If the usb is not properly inserted the above screen will be displayed.You can either change the USB or insert it properly again.6.3 RESTORE DATAPressSelect the local configuration items to be restored and save the selecteditems.Pressto select Backup from Device and press OK52to select Restore Data and press OK
u can select the content you want to restore.
Time Clock User Manual 2003-2019 Midex Enterprises Ltd. All designs and specifications are subject to change without notice. Version 5.0.1 . Place the same finger on the fingerprint sensor for the second time. After that, you can again place the same finger on the fingerprint sensor. USER MANAGEMENT 1 9
