Transcription
REFRIGERATORUSER INSTRUCTIONSTHANK YOU for purchasing this high-quality product. If you should experience a problem not covered in TROUBLESHOOTING orPROBLEM SOLVER, please visit our website at www.whirlpool.com for additional information. If you still need assistance, call usat 1-800-253-1301. In Canada, visit our website at www.whirlpool.ca or call us at 1-800-807-6777.You will need your model and serial number, located on the inside wall of the refrigerator compartment.Table of ContentsREFRIGERATOR SAFETY. 2Proper Disposal of Your Old Refrigerator. 3INSTALLATION INSTRUCTIONS . 3Unpack the Refrigerator. 3Door Removal, Leveling and Alignment . 4Handle Installation and Removal . 7Location Requirements. 7Electrical Requirements . 8Water Supply Requirements. 8Connect Water Supply. 8Install Air Filter. 10REFRIGERATOR USE . 11Using the Controls . 11Convertible Drawer Temperature Control . 12Crisper Humidity Control . 12Chilled Door Bin . 13Water and Ice Dispensers. 13Ice Maker and Storage Bin . 14Water Filtration System. 15W10439277CSMART REFRIGERATOR FEATURES . 16Getting the Most from Your Smart Refrigerator. 16Using Smart Grid . 16Using Smart Features . 16REFRIGERATOR CARE . 17Cleaning . 17Lights. 17Vacation and Moving Care . 17PROBLEM SOLVER . 18ACCESSORIES . 23WATER FILTER CERTIFICATIONS. 24PERFORMANCE DATA SHEET. 25WARRANTY . 26
REFRIGERATOR SAFETYYour safety and the safety of others are very important.We have provided many important safety messages in this manual and on your appliance. Always read and obey all safetymessages.This is the safety alert symbol.This symbol alerts you to potential hazards that can kill or hurt you and others.All safety messages will follow the safety alert symbol and either the word “DANGER” or “WARNING.”These words mean:DANGERWARNINGYou can be killed or seriously injured if you don't immediatelyfollow instructions.You can be killed or seriously injured if you don't followinstructions.All safety messages will tell you what the potential hazard is, tell you how to reduce the chance of injury, and tell you what canhappen if the instructions are not followed.IMPORTANT SAFETY INSTRUCTIONSWARNING: To reduce the risk of fire, electric shock, or injury when using your refrigerator, follow these basic precautions:Plug into a grounded 3 prong outlet. Do not remove ground prong. Do not use an adapter. Do not use an extension cord. Disconnect power before servicing. Replace all parts and panels before operating. Remove doors from your old refrigerator. Use nonflammable cleaner.Keep flammable materials and vapors, such as gasoline,away from refrigerator.Use two or more people to move and install refrigerator.Disconnect power before installing ice maker (on ice makerkit ready models only).Use a sturdy glass when dispensing ice (on some models).Do not hit the refrigerator glass doors (on some models).SAVE THESE INSTRUCTIONSState of California Proposition 65 Warnings:WARNING: This product contains one or more chemicals known to the State of California to cause cancer.WARNING: This product contains one or more chemicals known to the State of California to cause birth defects or otherreproductive harm.2
Proper Disposal ofYour Old RefrigeratorWARNINGBefore You Throw Away Your Old Refrigerator or Freezer: Take off the doors. Leave the shelves in place so that children may not easilyclimb inside.Suffocation HazardRemove doors from your old refrigerator.Failure to do so can result in death or brain damage.IMPORTANT: Child entrapment and suffocation are not problemsof the past. Junked or abandoned refrigerators are still dangerous,even if they will sit for “just a few days.” If you are getting rid ofyour old refrigerator, please follow these instructions to helpprevent accidents.Important information to know about disposal ofrefrigerants:Dispose of refrigerator in accordance with Federal and Localregulations. Refrigerants must be evacuated by a licensed,EPA certified refrigerant technician in accordance withestablished procedures.INSTALLATION INSTRUCTIONSUnpack the RefrigeratorWARNINGExcessive Weight HazardUse two or more people to move and installrefrigerator.Failure to do so can result in back or other injury.Remove packaging materials. Do not use sharp instruments,rubbing alcohol, flammable fluids, or abrasive cleaners to removetape or glue. These products can damage the surface of yourrefrigerator. For more information, see “Refrigerator Safety.”When Moving Your Refrigerator:Your refrigerator is heavy. When moving the refrigerator forcleaning or service, be sure to cover the floor withcardboard or hardboard to avoid floor damage. Always pullthe refrigerator straight out when moving it. Do not wiggle or“walk” the refrigerator when trying to move it, as floordamage could occur.Important information to know about glass shelvesand covers:Do not clean glass shelves or covers with warm water whenthey are cold. Shelves and covers may break if exposed tosudden temperature changes or impact, such as bumping.Tempered glass is designed to shatter into many small,pebble-size pieces. This is normal. Glass shelves and coversare heavy. Use both hands when removing them to avoiddropping.3
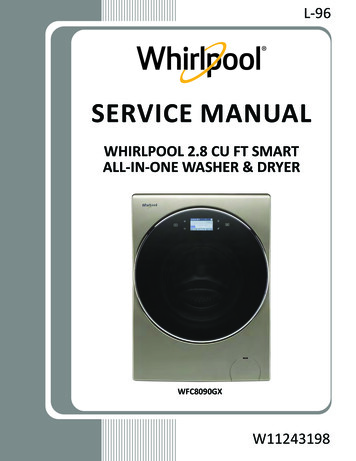
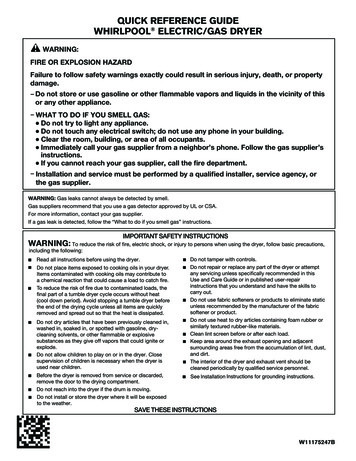
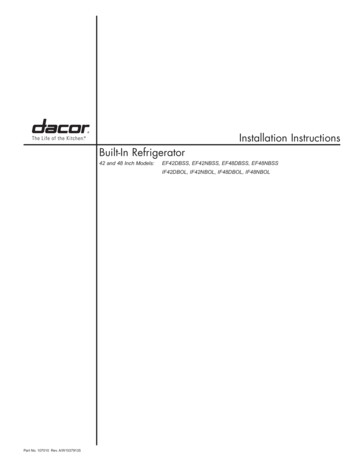
Door Removal, Leveling and AlignmentGather the required tools and parts and read all instructions before starting installation. Save these instructions for future reference.NOTE: Before moving your product into your home, measure the doorway of your home to see whether you need to remove therefrigerator and freezer doors. If door removal is necessary, see the instructions below.IMPORTANT: Before you begin, turn the refrigerator control OFF or turn cooling off. Unplug refrigerator or disconnect power. Removefood, the ice storage bin (on some models), and any adjustable door or utility bins from doors.TOOLS NEEDED:Bubble level, Phillips screwdriver, ³ ₁₆" hex key, ¹ ₄" hex-head socket wrench, ¹ ₄" and ⁵ ₁₆" open-ended wrenches or adjustable wrench,internal star drive or ³ ₈" hex-head socket wrenchWARNINGElectrical Shock HazardDisconnect power before removing doors.Failure to do so can result in death or electrical shock.3Wiring Connection45Top Left HingeDoor Removal6Top Right HingeAAAAA. Do Not Remove Screws.A BC DA. P-clampB. RoutingPlateC. ElectricalHousingEFA. Do Not Remove Screws.D. Wiring ClipE. GrommetsF. WiringPlugs7 Bottom Hinges(Left and Right)2A Water DispenserTubing Connection(Style 1)8LevelingABARaiseLowerCA. Bottom HingeB. Leveler BracketC. Leveling FootAA. Face of Fitting2B Water Dispenser TubingConnection (Style 2)9 Door Alignment(Bottom Right Hinge)1Base GrilleRaiseADoors must beopen to 90 4LowerA. Alignment Screw
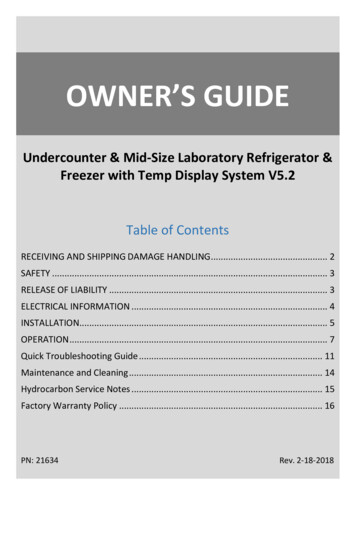
Remove the DoorsWARNING5. Close both doors and keep them closed until you are ready tolift them free from the cabinet.6. Use a ³ ₁₆" hex key to remove the top left hinge screws asshown. See Graphic 4.IMPORTANT: Do not remove either screw A.WARNINGExcessive Weight HazardUse two or more people to lift the freezer door.Electrical Shock HazardFailure to do so can result in back or other injury.Disconnect power before removing doors.Failure to do so can result in death or electrical shock.1. Unplug refrigerator or disconnect power.2. Open both doors to 90 . Remove the base grille by removingthe two screws, then pulling out on the outside corners. SeeGraphic 1.NOTE: The doors must only be opened to 90 . If they areopened all the way, the base grille will not come off.IMPORTANT: The Smart Grid antenna housing is mounted on themetal frame behind the base grille. Do not remove, open, crush,pull, kick or step on the antenna housing. Doing so can damagethe antenna.7. Lift freezer door straight up off bottom hinge. See Graphic 5.The water tubing and wiring remain attached to the freezerdoor and pull through the bottom left hinge.NOTE: This may require two people - one to lift the door andanother to feed the water tubing and wiring through the hinge.Be sure the hole in the hinge is clear of obstructions, thengently pull one water tube through the hinge. (Avoid kinkingthe tube.) Next, gently pull the other water tube through thehinge, again avoiding kinks. Finally, gently pull the wiringbundle (including the grommet and wiring plugs) through thehinge.IMPORTANT: Rest the door on its side on a soft, cleansurface, such as a towel, blanket or piece of cardboard. Thiswill help avoid damaging the door, water tubing and wiring.8. Use a ³ ₁₆" hex key to remove the top right hinge screws asshown. See Graphic 6.IMPORTANT: Do not remove either screw A.9. Lift the refrigerator door straight up off bottom hinge.IMPORTANT: Rest the door on its side on a soft, cleansurface, such as a towel, blanket or piece of cardboard. Thiswill help avoid damaging the door.ABA. Antenna housingB. Metal frame3. Disconnect the water tubing, located behind the base grille onthe freezer door side. The dispenser tubing runs through thedoor hinge, and must be disconnected in order to remove thedoor. Style 1: Press the colored outer ring against the face offitting and pull the water tubing free. See Graphic 2A. NOTE: Keep the water tubing connector attached to thetube that runs underneath the freezer. The door cannot beremoved if the connector is still attached to the tube thatruns through the door hinge.Style 2: Firmly pull on the clasp to release the tube, thenpull the water tubing free. See Graphic 2B.NOTE: Keep the clasp attached to the tube that runsunderneath the freezer.4. Disconnect the wiring, located behind the base grille on thefreezer door side. See Graphic 3. Remove the P-clamp using a ¹ ₄" hex-head socket wrench.Remove the small wiring bundle from the P-clamp. Remove the wiring clip using a ¹ ₄" hex-head socketwrench. Pull the electrical housing out from under the refrigerator.Disconnect the wiring plugs from the housing. Gently pull the large wiring bundle (with two white plugs)through the routing plate.10. It may not be necessary to remove the bottom hinges to movethe refrigerator through a doorway. Both bottom hinges havesimilar construction. If necessary, use an internal star drive or a ³ ₈" hex-headsocket wrench to remove the bottom hinges. SeeGraphic 7.IMPORTANT: The leveler brackets are mounted behindthe hinges. If you remove the hinges, make sure that theleveler brackets are replaced when reinstalling the hinges.Replace the Doors and Hinges1. Replace both bottom hinges, if removed. Make sure that theleveler brackets are assembled behind the hinges. Tightenscrews.IMPORTANT: When the screws are tightened properly, thereshould not be any gaps between the refrigerator, levelerbracket and hinge.NOTE: There are two wiring bundles that run underneath thefreezer - a large bundle with a large grommet and two white plugsat the end, and a small bundle with a small grommet and oneyellow plug at the end.5
WARNINGExcessive Weight HazardUse two or more people to lift the freezer door.Failure to do so can result in back or other injury.2. Before replacing the freezer door on the bottom left hinge,feed the small wiring bundle through the hinge. Assistancemay be needed.IMPORTANT: Do not feed the large wiring bundle through thehinge. This bundle is intended to run directly from the door tothe connections beneath the freezer. Forcing the large bundlethrough the hinge may damage the door and/or the wiring,and will keep the door from closing properly.3. Feed both water tubes through the bottom left hinge, thenreplace the freezer door on the hinge. Assistance may beneeded.NOTE: Provide additional support for the doors while the tophinges are being replaced. Do not depend on the door magnets tohold the doors in place while you are working.4. Align and replace the top left hinge as shown. See Graphic 4.Tighten screws.5. Reconnect water tubing and wiring.IMPORTANT: Do not intertwine the water tubing and wiringbundles when reconnecting them. 6.7.8.9.6Water Connection Style 1: Push the larger ⁵ ₁₆" (7.94 mm)water tube into the blue fitting until it stops, then push thesmaller ¹ ₄" (6.35 mm) water tube into the green fitting untilit stops. See Graphic 2A.Water Connection Style 2: Push the black water tubewith the blue tip into the blue fitting until it stops. Closethe clasp around the tubing, making sure it snaps intoplace. Repeat this process to connect the red-tippedblack water tube and the red fitting. See Graphic 2B.Reinstall the P-clamp around the small wiring bundle (withone yellow plug), then replace the P-clamp on the topscrew hole of the routing plate. See Graphic 3.Gently route the large wiring bundle (with two white plugs)through the hole in the routing plate, so that the wiringruns behind the right side of the routing plate. SeeGraphic 3.NOTE: The large wiring bundle should always remainbelow the small wiring bundle.Reconnect the wiring plugs to the electrical housing, thenpush the housing back under the refrigerator. Align the lefthole in the front lip of the housing with the right hole in therefrigerator's base crossbar. See Graphic 3. Reinstall the wiring clip over the grommets. First install thesmaller grommet into the top of the clip, then install thelarger grommet into the bottom of the clip (closest to thescrew hole). See Graphic 3. Align the clip's screw hole with the left hole in the electricalhousing and the right hole in the crossbar, and screw inthe clip using a single screw. Tighten screw. SeeGraphic 3.IMPORTANT: Once connected, the wiring bundles shouldnot be taut. Some flexibility is needed to allow the freezerdoor to open properly.Replace the refrigerator door by lifting the door onto thebottom right hinge.Align and replace the top right hinge as shown. See Graphic 6.Tighten screws.Replace the ice storage bin (on some models) and anyadjustable door or utility bins.Plug refrigerator into a grounded 3 prong outlet.Leveling and Door ClosingYour refrigerator has two adjustable front feet — one on the rightand one on the left. In most cases, the refrigerator should besteady when both feet are touching the floor. If your refrigeratorseems unsteady or if you want the doors to close more easily,adjust the refrigerator's tilt using the instructions below:1. Move the refrigerator into its final location. If necessary, openboth doors to 90 and remove the base grille. See Graphic 1.2. The two leveling feet are located on the brackets on each sideof the product. See Graphic 8.NOTE: Having someone push against the top of the refrigeratortakes some weight off the leveling feet. This makes it easier tomake adjustments.3. Use a ¹ ₄" open-ended or adjustable wrench to adjust theleveling feet. Turn the leveling foot to the left to raise that sideof the product, or turn it to the right to lower that side of theproduct.4. Open both doors again and check that they close as easily asyou like. If not, tilt the refrigerator slightly more to the rear byturning the leveling feet to the left. It may take several moreturns, and you should turn both leveling feet the sameamount.5. Use a bubble level to check the leveling of the refrigerator.NOTE: Whenever you need to move the refrigerator, turn theleveling feet to the right until they are no longer touching theground. This will allow the refrigerator to roll more easily.Door AlignmentA refrigerator that is not level from side-to-side may appear tohave doors that are not properly aligned. If the doors appear thisway, use the instructions in the previous section to check theleveling.The doors are designed to be slightly different heights when therefrigerator is empty, in order to account for the weight of foodthat will be placed on the doors. If the doors are still not alignedafter checking the leveling and loading the refrigerator with food,follow the steps below to adjust the door alignment.1. If necessary, open both doors to 90 and remove the basegrille. See Graphic 1.2. Locate the alignment screw on the bottom hinge of therefrigerator door. See Graphic 9.3. Use a ⁵ ₁₆" open-ended or adjustable wrench to turn the screw.To raise the refrigerator door, turn the screw to the right. Tolower the door, turn the screw to the left.4. Check that the doors are even at the top. If necessary,continue to turn the alignment screw until the doors arealigned.5. Open both doors to 90 . Replace the base grille. SeeGraphic 1.
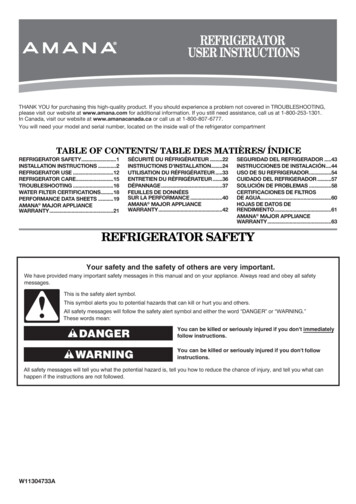
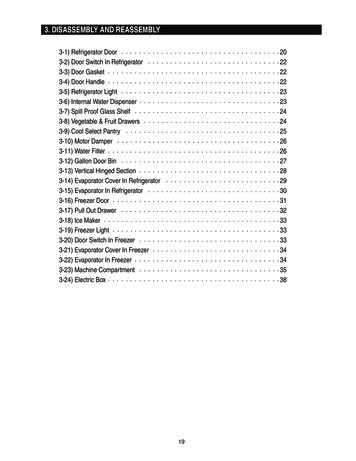
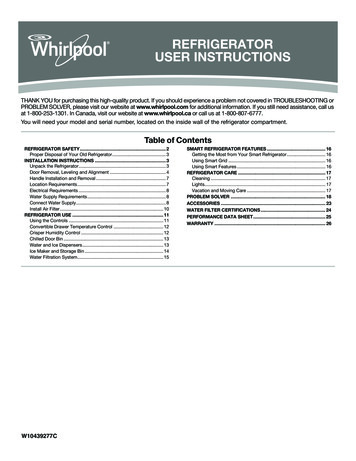
To Remove the Handles:Handle Installation and RemovalPARTS INCLUDED: Door handles (2), ¹ ₈" hex key, sparesetscrew(s)To Install the Handles:NOTE: The handle mounting setscrews are preinstalled in thehandle.1. Remove the handles, which are packed inside the refrigerator.NOTE: To avoid scratching the finish, place the handles on atowel or other soft surface.1. While holding the handle, insert the short end of the hex keyinto the lower setscrew hole and slightly rotate the hex keyuntil it is engaged in the setscrew.2. Using a counterclockwise motion, loosen the setscrew aquarter-turn at a time.3. Repeat steps 1 and 2 for the upper setscrew. Gently pull thehandle away from the door.4. If necessary, use a Phillips screwdriver to remove the shoulderscrews from the door.Location Requirements2. Open the freezer door. On the refrigerator door, place thehandle on the shoulder screws with the setscrews facing thefreezer.WARNINGAExplosion HazardBKeep flammable materials and vapors, such asgasoline, away from refrigerator.Failure to do so can result in death, explosion, or fire.A. Shoulder screwsB. Setscrews inside the handle3. Firmly push the handle toward the door until the handle baseis flush against the door.4. While holding the handle, insert the short end of the hex keyinto the upper hole and slightly rotate the hex key until it isengaged in the setscrew.IMPORTANT: This refrigerator is designed for indoor householduse only.To ensure proper ventilation for your refrigerator, allow for ¹ ₂"(1.27 cm) of space on each side and at the top. Allow for 1"(2.54 cm) of space behind the refrigerator. If your refrigerator hasan ice maker, allow extra space at the back for the water lineconnections. When installing your refrigerator next to a fixed wall,leave a 2" (5.08 cm) minimum space on each side (depending onyour model) to allow the doors to swing open.12/ " (1.27 cm)2" (5.08 cm)5. Using a clockwise motion, tighten the setscrew until it beginsto contact the shoulder screw.6. Repeat steps 4 and 5 to begin fastening the lower setscrew.7. Once both setscrews have been partially tightened as outlinedin the previous steps, fully tighten both the upper and lowersetscrews.IMPORTANT: When the screws feel tight, tighten them anadditional quarter-turn. The handle is not properly installedwithout this extra tightening.8. Open the refrigerator door and close the freezer door. Repeatsteps 2 through 7 to install the other handle onto the freezerdoor with the setscrews facing the refrigerator.9. Save the hex key and all instructions.NOTES: This refrigerator is intended for use in a location where thetemperature ranges from a minimum of 55 F (13 C) to amaximum of 110 F (43 C). The preferred room temperaturerange for optimum performance, which reduces electricityusage and provides superior cooling, is between 60 F (15 C)and 90 F (32 C). It is recommended that you do not install therefrigerator near a heat source, such as an oven or radiator. Normal minimum cabinet cut-out width required for productinstallation is 36" (91.44 cm). However, if the product is placedagainst an extended wall and the ability to remove the crisperpans is desired, an additional 18" (45.72 cm) of cabinet widthis required, so a total cabinet opening width of 54"(137.16 cm) is recommended.7
Water PressureElectrical RequirementsWARNINGA cold water supply with water pressure of between 30 and120 psi (207 and 827 kPa) is required to operate the waterdispenser and ice maker. If you have questions about your waterpressure, call a licensed, qualified plumber. If your refrigerator has a water dispenser: After installation iscomplete, use the water dispenser to check the waterpressure. With the water filter removed, dispense 1 cup (237 mL) ofwater. If 1 cup of water is dispensed in 8 seconds or less,the water pressure to the refrigerator meets the minimumrequirement. If it takes longer than 8 seconds to dispense 1 cup ofwater, the water pressure to the refrigerator is lower thanrecommended. See “Problem Solver” for suggestions.Electrical Shock HazardPlug into a grounded 3 prong outlet.Do not remove ground prong.Do not use an adapter.Reverse Osmosis Water SupplyDo not use an extension cord.IMPORTANT: The pressure of the water supply coming out of areverse osmosis system going to the water inlet valve of therefrigerator needs to be between 30 and 120 psi (207 and827 kPa).If a reverse osmosis water filtration system is connected to yourcold water supply, the water pressure to the reverse osmosissystem needs to be a minimum of 40 to 60 psi (276 to 414 kPa).If the water pressure to the reverse osmosis system is less than40 to 60 psi (276 to 414 kPa): Check to see whether the sediment filter in the reverseosmosis system is blocked. Replace the filter if necessary.Failure to follow these instructions can result in death,fire, or electrical shock.Before you move your refrigerator into its final location, it isimportant to make sure you have the proper electrical connection.Recommended Grounding MethodA 115 volt, 60 Hz, AC only, 15- or 20-amp fused, groundedelectrical supply is required. It is recommended that a separatecircuit serving only your refrigerator be provided. Use an outletthat cannot be turned off by a switch. Do not use anextension cord.NOTE: Before performing any type of installation or cleaning, orremoving a light bulb, turn cooling off or turn the control(Thermostat, Refrigerator or Freezer Control depending on themodel) to OFF, and then disconnect the refrigerator from theelectrical source. When you are finished, reconnect therefrigerator to the electrical source and turn cooling on or reset thecontrol (Thermostat, Refrigerator or Freezer Control depending onthe model) to the desired setting. See “Using the Controls” in theUser Instructions, User Guide, or Use & Care Guide.Water Supply RequirementsGather the required tools and parts before starting installation.Read and follow the instructions provided with any tools listedhere.TOOLS NEEDED: Flat-blade screwdriver ¹ ₄" Nut driver ⁷ ₁₆" and ¹ ₂" Open-end or twoadjustable wrenches ¹ ₄" Drill bit Cordless drillNOTE: Your refrigerator dealer has a kit available with a ¹ ₄"(6.35 mm) saddle-type shutoff valve, a union, and copper tubing.Before purchasing, make sure a saddle-type valve complies withyour local plumbing codes. Do not use a piercing-type or ³ ₁₆"(4.76 mm) saddle valve which reduces water flow and clogs moreeasily.IMPORTANT: All installations must meet local plumbing code requirements. 8Use copper tubing and check for leaks. Install copper tubingonly in areas where the household temperatures will remainabove freezing. Allow the storage tank on the reverse osmosis system to refillafter heavy usage. If your refrigerator has a water filter, it may further reduce thewater pressure when used in conjunction with a reverseosmosis system. Remove the water filter. See “Water FiltrationSystem” in the User Instructions, User Guide, or Use & CareGuide.If you have questions about your water pressure, call a licensed,qualified plumber.Connect Water SupplyRead all directions before you begin.IMPORTANT: Plumbing shall be installed in accordance with theInternational Plumbing Code and any local codes andordinances. The gray water tubing on the back of the refrigerator (which isused to connect to the household water line) is a PEX(cross-linked polyethylene) tube. Copper and PEX tubingconnections from the household water line to the refrigeratorare acceptable, and will help avoid off-taste or odor in your iceor water. Check for leaks.If PEX tubing is used instead of copper, we recommend thefollowing Whirlpool Part Numbers:W10505928RP (7 ft [2.14 m] jacketed PEX),8212547RP (5 ft [1.52 m] PEX), orW10267701RP (25 ft [7.62 m] PEX). Install tubing only in areas where temperatures will remainabove freezing.TOOLS NEEDED:Gather the required tools and parts before starting installation. Flat-blade screwdriver ⁷ ₁₆" and ¹ ₂" open-end wrenches or two adjustable wrenches ¹ ₄" nut driver
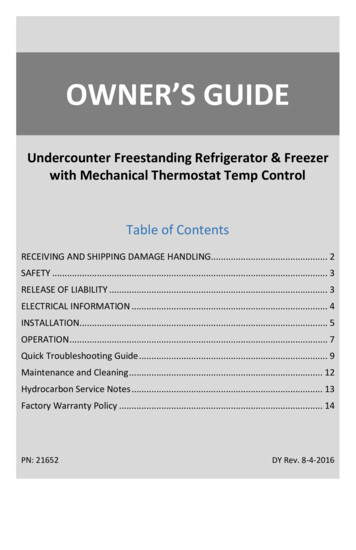
IMPORTANT:Connect to Water LineIMPORTANT: If you turn the refrigerator on before the water line isconnected, turn the ice maker OFF.Style 1 (Recommended)1. Unplug refrigerator or disconnect power.2. Turn OFF main water supply. Turn ON nearest faucet longenough to clear line of water.3. Use a quarter-turn shutoff valve or the equivalent, served by a¹ ₂" copper household supply line.NOTE: To allow sufficient water flow to the refrigerator, aminimum ¹ ₂" size copper household supply line isrecommended. Make sure it is a cold water pipe. Horizontal pipe will work, but drill on the top side of thepipe, not the bottom. This will help keep water away fromthe drill and normal sediment from collecting in the valve.4. Determine the length of copper tubing you need. Measurefrom the connection on the lower rear corner of refrigerator tothe water pipe. Add 7 ft (2.1 m) to allow for cleaning. Use ¹ ₄"(6.35 mm) O.D. (outside diameter) copper tubing. Be sure bothends of copper tubing are cut square.5. Using a cordless drill, drill a ¹ ₄" (6.35 mm) hole in the coldwater pipe you have selected.ABGCFA. Cold water pipeB. Pipe clampC. Copper tubingD. Compression nutABCDA. BulbB. NutC. Copper tubing (to refrigerator)D. Household supply line (½" minimum)4. Now you are ready to connect the copper tubing to the shutoffvalve. Use ¹ ₄" (6.35 mm) OD soft copper tubing to connect theshutoff valve and the refrigerator. Ensure that you have the proper length needed for the job.Be sure both ends of the copper tubing are cut square. Slip compression sleeve and compression nut ontocopper tubing as shown. Insert end of tubing into outletend squarely as far as it will go. Screw compression nutonto outlet end with adjustable wrench. Do notovertighten.EDE. Compression sleeveF. Shutoff valveG. Packing nut6. Fasten the shutoff valve to the cold water pipe with the pipeclamp. Be sure the outlet end is solidly in the ¹ ₄" (6.35 mm)drilled hole in the water pipe and that the washer is under thepipe clamp. Tighten the packing nut. Tighten the pipe clampscrews slowly and evenly so the washer makes a watertightseal. Do not overtighten, or you may crush the copper tubing.7. Slip the compression sleeve and compression nut on thecopper tubing as shown. Insert the end of the tubing into theoutlet end squarely as far as it will go. Screw the compressionnut onto outlet end with adjustable wrench. Do notovertighten.8. Place the free end of the tubing in a container or sink, and turnON the main water supply. Flush the tubing until water is clear.Turn OFF the shutoff valve on the water pipe. Coil the coppertubing.Connect to RefrigeratorStyle 1ABA. Compression sleeveB. Compression nutCC. Copper tubing5. Place the free end of the tubing into a container or sink, andturn on main water supply to flush out tubing until water isclear. Turn off shutoff valve on the water pipe.NOTE: Always drain the water line before making the finalconnection to the inlet of the water valve, to avoid possiblewater valve malfunction.1. Unplug refrigerator or disconnect power.2. Remove and discard the short, black plastic part from the endof the water line inlet.3. Thread the nut onto the end of the tubing. Tighten the nut byhand. Then tighten it with a wrench two more turns. Do notovertighten.NOTE: To avoid rattling, be sure the copper tubing does nottouch the cabinet’s side wall or other parts inside the cabinet.6. Bend the copper tubing to meet the water line inlet, which islocated on the back of the refrigerator cabinet as shown.Leave a coil of copper tubing to allow the refrigerator to bepulled out of the cabinet o
Shelves and covers may break if exposed to sudden temperature changes or impact, such as bumping. Tempered glass is designed to shatter into many small, pebble-size pieces. This is normal. . Unplug refrigerator or disconnect power. 2. Open both doors to 90 . Remove the base grille by removing the two screws, then pulling out on the outside .