Transcription
QUICK REFERENCE GUIDEWHIRLPOOL ELECTRIC/GAS DRYERWARNING:FIRE OR EXPLOSION HAZARDFailure to follow safety warnings exactly could result in serious injury, death, or propertydamage.– Do not store or use gasoline or other flammable vapors and liquids in the vicinity of thisor any other appliance.– WHAT TO DO IF YOU SMELL GAS: Do not try to light any appliance. Do not touch any electrical switch; do not use any phone in your building. Clear the room, building, or area of all occupants. Immediately call your gas supplier from a neighbor’s phone. Follow the gas supplier’sinstructions. If you cannot reach your gas supplier, call the fire department.– Installation and service must be performed by a qualified installer, service agency, orthe gas supplier.W11175247B
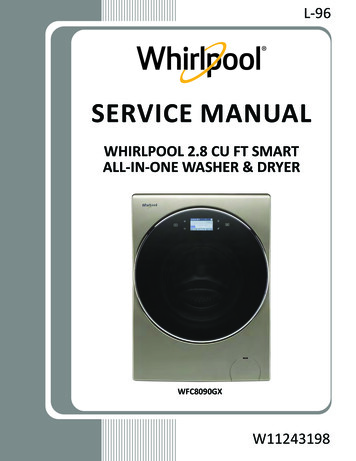
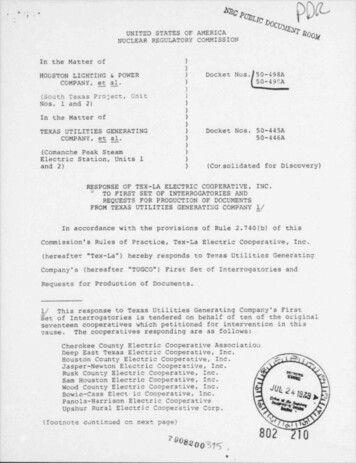
CONTROL PANEL AND FEATURES123Appearance may vary depending on model.51POWERTouch to turn on/off or to stop/cancel a cycle.2WHAT TO DRY/HOW TO DRY3First select a cycle from the “What to Dry” and then select the“How to Dry” to get the best combination cycle available for thetype of items you are going to dry. See “Cycle Guide” for cycledetails.START/PAUSETouch and hold; cycle will start after countdown.Touch START/PAUSE during a cycle to pause it. Touch again toresume.46MODIFIERS (Not all cycles and options are available on allmodels.)NOTE: Dryer remembers the last completed cycle and cyclesettings. The next time you turn dryer on, it will be set to run thelast cycle.TempTouch to modify the cycle’s available temperatures (Air Only,Low, Medium, Medium High, High). Follow garment labelinstructions for best results. Once a cycle has started, thetemperature can be changed within the first 5-8 minutes.DrynessTouch to modify the cycle’s available dryness levels on thesensor cycles (Less, Normal, More).NOTE: Dryness is for use with Automatic Cycles only.52Wrinkle Shield OptionTouch to turn on/off and on with steam (select models). WrinkleShield option adds up to 150 minutes of periodic tumbling andheat to help reduce wrinkling. Wrinkle Shield option with steamwill add a short steam cycle after 60 minutes to help smoothwrinkles.CYCLE OPTIONS (Not all cycles and options are available onall models.)Use to select available modifiers for your dryer.Remote EnableTouch each time you want to remotely control via the Whirlpool app. Follow the instructions in the “GET THE WHIRLPOOL APP AND GET CONNECTED” section below for more details.NOTE: Once Remote Enable has been selected, certaininteractions with the dryer will cause it to cancel Remote Enable.Example: Opening the door.45Damp Dry SignalTouch DAMP DRY SIGNAL or touch and hold DRUM LIGHT(depending on the model) for at least 3 seconds to turn theDamp Dry Signal on or off. You will get a sound and displaynotification as “Items are damp. You can pause and repositionfor best results”.Drum LightTouch to turn the drum light on/off.Steam OptionsTouch to add Steam and/or Reduce Static to selected cycle.Steam option adds steam to the end of cycle to help smoothwrinkle. Reduce Static will automatically tumble, pause andintroduce a small amount of moisture to the load to help reducestatic.Steam Refresh (steam models only)This cycle is best for reducing wrinkles from dry items. Cycletime will increase, depending on number of items. This is anindependent cycle that cannot be combined with any othercycle.More Time/Less Time Timed Dry AdjustTouch MORE TIME or LESS TIME with the Timed Dry/QuickDry cycle to increase or decrease the length of the cycle time.EcoBoostTM OptionThe EcoBoostTM option will default on only for the Regular/Normal cycle and is only available on that cycle. This optionallows you to increase your energy savings by using a slightlylower heat level. The EcoBoostTM option will increase dryingtimes by approximately 40 minutes, which will be reflected onthe LCD Display. If optimal time is desired, touch EcoBoost toturn off this option.Cycle SignalUse this option to turn the signal indicating the end of a dryingcycle to Low, Medium, High, or Off.NOTE: Press/hold Cycle Signal to select the volume.
More OptionsTouch to select your “Favorite cycle” (Only available for modelswith WiFi capability).Favorite cycle: You may create “custom” cycles in the app andstore one frequently-used or favorite cycle on the machine.6LCD DISPLAYWhen you select a cycle, its default settings will display andthe Estimated Time Remaining (for Automatic Cycles) will varydepending on “What to Dry” and “How to Dry” selections, oractual time remaining for Timed Dry cycles (for Manual Cycles)will be displayed.CYCLE PHASE LABELSSensingDisplays during Sensor cycles to indicate that the moisturesensor on the dryer is operating. It will not be displayed duringTimed/Quick Dry cycles or options such as Wrinkle Shield option.DryingDryer is in the main dry phase of the automatic cycle.Static ReduceReduce Static phase is running.EndDisplay message will show “Drying is complete” and will timeout after 5 minutes. This will indicate that the selected cycle hasended and the load may be removed from the dryer. If WrinkleShield option has been selected, the dryer may continue totumble the load, even if “End” is displayed.Check VentThe Check Vent alert is a feature available for Automatic cyclesonly. This alert will show the status of airflow through the dryerand the dryer vent system for the dryer’s life. During the sensingphase at the beginning of the cycle if it detects a blocked vent orlow pressure it will display “Check vent. Clean lint screen or ventfor better performance.”REMEMBER: The dryer will continue to operate even whencheck vent notification is displayed, but poor airflow can impactdry times and overall performance.Display message can be cleared by pressing any key with theexception of Power which will cancel the cycle.SteamingSteam option selected and Steam phase running.Cool DownThe dryer has finished drying with heat and is now tumbling theload without heat to cool it down.GET THE WHIRLPOOL APP AND GET CONNECTEDWith your mobile device download the Whirlpool app. You can get subscription and connectivityinstructions, terms of use, and privacy policy at www.whirlpool.com/connect or inCanada www.whirlpool.ca/connect.Once installed, launch the app and you will be guided through the steps to subscribe and create your user account to connect to yourappliance. If you have any problems or questions, call Whirlpool Connected Appliances at 1-866-333-4591.(Only available for models with WiFi capability).When unit is first powered on, it will prompt to select language before you see message to Download APP or press any other key to setupWiFi later.1CONNECTING UNITTO INTERNETTo connect your unit to the internetplease download the Whirlpool appand press REMOTE ENABLE.2ALLOWING REMOTECONTROL ANDINTERACTIONYou must press REMOTE ENABLEwhen connected in order to allowremote control and interaction.3
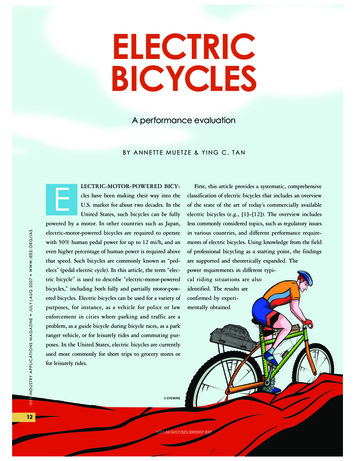
USING YOUR DRYERWARNINGWARNINGExplosion HazardFire HazardNo washer can completely remove oil.Do not dry anything that has ever had any type of oil onit (including cooking oils).Items containing foam, rubber, or plastic must be driedon a clothesline or by using an Air Cycle.Failure to follow these instructions can result in deathor fire.12CLEAN LINT SCREENKeep flammable materials and vapors, such asgasoline, away from dryer.Do not dry anything that has ever had anythingflammable on it (even after washing).Failure to follow these instructions can result in death,explosion, or fire.3LOAD DRYER4PRESS POWERTO TURN ONTHE DRYERSELECT WHATTO DRYClean the lint screen before each load.Also, clean the exhaust vent at leastevery 2 years.5SELECT HOW TODRY6ADJUST CYCLESETTINGS, IFDESIRED*7SELECT ANYADDITIONALOPTIONS*8TOUCH AND HOLDSTART/PAUSE TOBEGIN CYCLEIf you accidentally select wrong language during digital un-boxing and/or you want to get back to Factory settings then perform Factory Reset.FACTORY RESETPress/hold both TEMP and Wrinkle Shield keys until display count-down has completed. Unit will power back on with “Select Language”display message.*NOTE: See “Cycle Guide” for more information about cycles, settings, and options. Not all cycles, settings, and options are available with allmodels. Read all your Manuals for more information on your unit.4
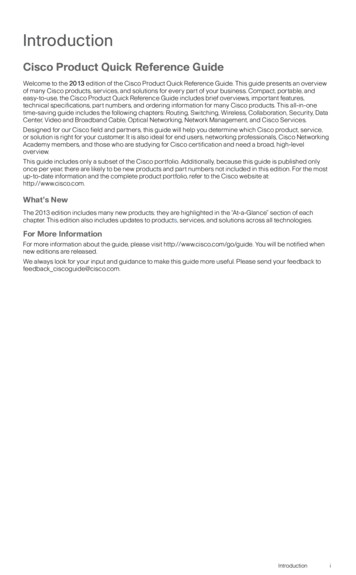
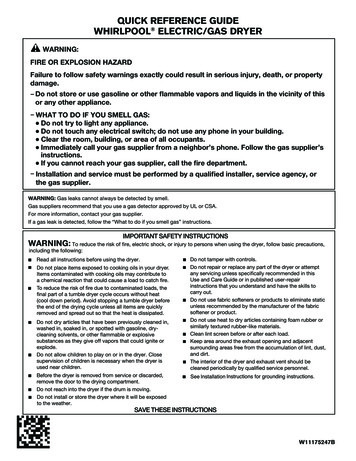
CYCLE GUIDEYour dryer has a unique user interface to help you select the best cycle you need for your load. The “What to Dry” “How to Dry” layout guidesyou to the optimal cycle in two easy steps:1. First determine what items are in the load that you are trying to dry. Use that to guide your “What to Dry” selection.2. Then determine how you want the dryer to dry them by selecting the appropriate “How to Dry” selection. Modifiers are preset for the itemsbeing dried, but can be changed if desired.To get the most energy savings and enhanced fabric care from your dryer, use the Automatic cycles. These cycles measure the drying airtemperature and moisture levels to turn the dryer off once the load reaches the selected dryness level. Dryer performance and results mayvary with service voltage less than rated voltage (Electric, 240 V; Gas, 120 V).How do you want to dry?For best fabric care, choose the cycle thatbest fits the load being dried.R – Recommended Cyclea – Alternate CycleBlank – Cycle is available but not optimal.What do youwant to egularAutomaticSensor Cyclestops whendryness levelis reached.RegularMachine Wash CurtainsRTableclothBusiness CasualNo-Iron FabricsaBrasFabric Shower CurtainaLingerieDelicatesaUndergarmentsWoolDress Shirts/PantsBlanketsFabric RugsHeavy DrapesJeansComfortersPet BeddingPillows - Fiber FillSheetsSleeping BagsStuffed AnimalsHeavy DutyHigh Heatlonger cycleAutomaticSensor Cyclestops whendryness levelis reached.RRaRaaCotton DrapesSheersWrinkleControlSanitize*Hot HighHeatUsed tokill 99.9%of threecommonbacteria.Timed DrySet amountof dry timeDryer runs forthe amount oftime selected.QuickSet amountof dry timeDryer runs forthe amount oftime selected.“What to Dry”Cycle SelectionBaby ClothesCoats and Jackets“How to Dry” Cycle SelectionBulky * Extended high-heat drying cycle intended to help sanitize items such as sheets and towels. This cycle is not recommended for all fabrics.For best results, this cycle should be run to completion to ensure sanitization and do not interrupt cycle.5
For best fabric care, choose the cycle thatbest fits the load being dried.R – Recommended Cyclea – Alternate CycleBlank – Cycle is available but not optimal.What do youwant to dry?Cotton UndergarmentsWhite NapkinsWhitesColorsColored NapkinsDish aticSensor Cyclestops whendryness levelis reached.Heavy DutyHigh Heatlonger cycleAutomaticSensor Cyclestops whendryness levelis reached.Sanitize*Timed DryQuickHot High HeatUsed to kill99.9% ofthree commonbacteria.Set amount ofdry timeDryer runs forthe amount oftime selected.Set amount ofdry timeDryer runs forthe amount oftime selected.“What to Dry”Cycle SelectionAthleticPerformance WearHow do you want to dry?“How to Dry” Cycle SelectionRRRRRaaaaaaaRRaaRNon-Rubber Lined Rugs*Extended high-heat drying cycle intended to help sanitize items such as sheets and towels. This cycle is not recommended for all fabrics.For best results, this cycle should be run to completion to ensure sanitization and do not interrupt cycle.Models 7120 & 8120NOTE: These clothes dryer’s Government energy certifications were based on the Regular Normal Cycle, Maximum Drying TemperatureSetting, Normal Dryness Level, EcoBoostTM On. The as - shipped defaults of EcoBoostTM On, Wrinkle ShieldTM option off, Remote Enable off,were used.Models 5100 & 6120NOTE: These clothes dryer’s Government energy certifications were based on the Regular Timed Dry Cycle and Maximum DryingTemperature Setting. The as - shipped defaults of EcoBoostTM On, Wrinkle ShieldTM option off, Remote Enable off, Normal Dryness level, wereused.DRYER BoostRemote EnableSteam RefreshStatusOffOffOnOnDrum Light6SteamOnReduce StaticOnReduce Static &SteamOnOffWiFi Status Indicator*NOTE: Whenthe WiFi isdisconnected, thepriority goes to thefirst, then as otheroptions added, itgoes to the leastagain.ConnectedDisconnected
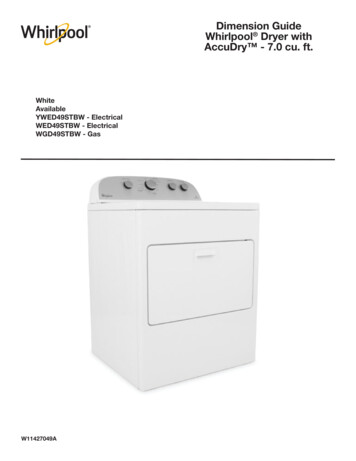
ImageDescriptionImageStatusSmartgrid,Peak rates in effectDescriptionStatusOnLowSmart DelayMediumCycle SignalHighSmart PauseFavorite CycleOffDownload & GoCycleOnDamp Dry SignalOffASSISTANCE OR SERVICE AND ADDITIONAL INFORMATIONFor detailed installation instructions and maintenance information, winter storage and transportation, please see the INSTALLATION ANDCARE INSTRUCTIONS MANUAL included with your machine.For detailed product dimensions, please see the DIMENSION GUIDE that can be found at www.whirlpool.com/owners orin Canada www.whirlpool.ca/owners.For information on any of the following items please visit www.whirlpool.com/owners or in Canada www.whirlpool.ca/owners.This may save you the cost of a service call.REGISTERPRODUCTSCHEDULESERVICEHOW TO’S & FAQSMANUALS &DOWNLOADSADD SERVICEPLANPARTSACCESSORIESTo speak with a customer service representative or if you have additional questions, call us toll free at1-866-698-2538 or in Canada call 1-800-688-2002.You can write with any questions or concerns at:Whirlpool Brand AppliancesCustomer eXperience Center533 Benson RoadBenton Harbor, MI 49022-2692Model & SerialNumber TaglocationWhirlpool Brand AppliancesCustomer eXperience CenterUnit 200-6750 Century AveMississauga, Ontario L5N 0B7Please include a daytime phone number in your correspondence.7
GUIDE DE RÉFÉRENCE RAPIDESÉCHEUSE ÉLECTRIQUE/À GAZ WHIRLPOOL AVERTISSEMENT :RISQUE D'INCENDIE OU D'EXPLOSIONLe non-respect des avertissements de sécurité peut causer des dommages à la propriété,des blessures graves, voire la mort.– Ne pas entreposer ou utiliser de l’essence ou d’autres vapeurs ou liquidesinflammablesà proximité de cet appareil ou de tout autre appareil électroménager.– QUE FAIRE DANS LE CAS D’UNE ODEUR DE GAZ : Ne pas tenter d’allumer un appareil. Ne pas toucher à un commutateur électrique; ne pas utiliser le téléphone se trouvantsur les lieux. Évacuer tous les gens de la pièce, de l’édifice ou du quartier. Appeler immédiatement le fournisseur de gaz d’un téléphone voisin. Suivre sesinstructions. À défaut de joindre votre fournisseur de gaz, appeler les pompiers.– L’installation et l’entretien doivent être effectués par un installateur qualifié, uneagencede service ou le fournisseur de gaz.AVERTISSEMENT : L’odorat ne permet pas toujours la détection d’une fuite de gaz.Les distributeurs de gaz recommandent l’emploi d’un détecteur de gaz (homologation UL ou CSA).Pour d'autres informations, contacter le fournisseur de gaz local.En cas de détection d’une fuite de gaz, exécuter les instructions “Que faire dans le cas d’une odeur de gaz”.Consulter les instructions d’installation pour savoircomment effectuer la mise à la terre.8
TABLEAU DE COMMANDE ET CARACTÉRISTIQUES123L’aspect peut varier en fonction du modèle.561POWER (alimentation)Toucher pour activer/désactiver ou pour arrêter/annuler unprogramme.2ARTICLES À SÉCHER/MÉTHODE DE SÉCHAGE3Sélectionner d’abord un programme, dans la partie « What to Dry »(articles à sécher), puis sélectionner un programme dans la partie« How to Dry » (méthode de séchage) pour obtenir la meilleurecombinaison de programmes disponibles pour le type d’articlesà sécher. Voir le « Guide des programmes » pour plus de détails.MISE EN MARCHE/PAUSEToucher et maintenir enfoncé; le programme démarre après lecompte à rebours.Toucher START/PAUSE (mise en marche/pause) pendant unprogramme en cours pour le mettre en pause. Toucher denouveau pour reprendre le programme.4MODIFICATEURS (Les programmes et options ne sont pastous offerts sur tous les modèles.)REMARQUE : La sécheuse garde en mémoire le dernierprogramme terminé et les réglages du programme. La prochainefois la sécheuse est mise en marche, elle démarre le dernierprogramme utilisé.Temp (température)Toucher pour modifier les températures disponibles du programme(Air Only [air uniquement], Low [basse], Medium[moyenne], MediumHigh [moyenne-élevée], High [élevée]). Suivre les instructions surl’étiquette du vêtement pour obtenir de meilleurs résultats. Une foisqu’un programme a été lancé, la température peut être modifiéedans les premiers 5 à 8 minutes.Dryness (niveau de séchage)Toucher pour modifier les niveaux de séchage disponibles surles programmes du capteur (Less [moins], Normal [normal],More [plus]).REMARQUE : Le réglage du niveau de séchage ne peut êtreutilisé qu’avec les programmes automatiques.5Wrinkle Shield Option (antifroissement)Toucher ce bouton pour activer/désactiver cette fonction etl’activer à la vapeur (sur certains modèles). L’option WrinkleShield (antifroissement) option ajoute jusqu’à 150 minutesde culbutage périodique et de chaleur afin d’aider à réduirele froissement. L’option Wrinkle Shield (antifroissement)option à la vapeur ajoute un programme de vapeur court après60 minutes pour aider à lisser les plis.OPTIONS DE PROGRAMME (Les programmes et options nesont pas tous offerts sur tous les modèles.)Utiliser ces boutons pour sélectionner les modificateurs offertssur la sécheuse.45Remote Enable (activation à distance)Toucher ce bouton chaque fois pour activer la commande àdistance via l’application Whirlpool . Suivre les instructionsdans la section « OBTENIR L’APPLICATION WHIRLPOOL ET SE CONNECTER » ci-après.REMARQUE : Une fois que Remote Enable (activation àdistance) a été sélectionné, certaines interactions avec lasécheuse l’annuleront.Exemple : Ouverture de la porte.Damp Dry Signal (signal de séchage humide)Toucher DAMP DRY SIGNAL (signal de séchage humide) outoucher et maintenir enfoncé le bouton DRUM LIGHT (lampe dutambour) pendant 3 secondes pour allumer ou éteindre lesignal de séchage humide. L’utilisateur recevra un signal sonore etune notification s’affichera indiquant « Les articles sont humides.Vous pouvez mettre sur pause et repositionner pour obtenir de bonsrésultats ».Drum Light (lampe du tambour)Toucher ce bouton pour allumer ou éteindre la lampe du tambour.Steam Options (option de vapeur)Toucher ce bouton pour ajouter la phase Steam (vapeur) et/ou la phase Reduce Static (réduction de l’électricité statique)au programme sélectionné. L’option Steam (vapeur) ajoutede la vapeur à la fin du programme pour aider à lisser les plis.La phase Reduce Static (réduction de l’électricité statique)effectue automatiquement un culbutage, fait une pause puisintroduit une petite quantité d’humidité dans la charge pour aiderà réduire le niveau d’électricité statique.Steam Refresh (rafraîchissement avec vapeur)(modèles à vapeur uniquement)Ce programme est idéal pour réduire les faux plis des vêtementssecs. La durée du programme augmentera en fonction du nombrede vêtements sélectionné. Il s’agit d’un programme indépendantqui ne peut être combiné à aucun autre programme.Réglage More Time/Less Time (plus de temps/moins detemps) du programme Timed Dry (séchage minuté)Toucher MORE TIME (plus de temps) ou LESS TIME (moins detemps) lors des programmes Timed Dry/Quick Dry cycle (séchageminuté/ séchage rapide) pour augmenter ou réduire la durée duprogramme.EcoBoostTM (puissance éco) optionL’option EcoBoostTM s’active par défaut avec le programmeRegular/Normal (ordinaire/normal) et ne peut être activéequ’avec ces programmes. Cette option permet d’accroîtrevos économies d’énergie en utilisant un niveau de chaleurlégèrement plus faible. L’option EcoBoostTM augmente le tempsde séchage d’environ 40 minutes, ce qui paraîtra sur l’afficheurACL. Pour obtenir un temps de séchage optimal, toucherECOBOOST (puissance éco) pour désactiver l’option.9
Cycle signal (signal de programme)Utiliser cette option pour placer le signal indiquant la fin d’unprogramme de séchage à faible, moyen, élevé ou désactivé.REMARQUE : Maintenir enfoncé le signal de programme poursélectionner le volume.More Options (autres options)Toucher ce bouton pour sélectionner « Favorite cycle »(programme favori) (uniquement disponible pour les modèlesavec capacité WiFi).Favorite cycle (programme favori) : L’utilisateur peut créer desprogrammes « personnalisés » dans l’application et conserverun programme fréquemment utilisé ou favori sur la machine.6AFFICHEUR ACLLorsqu’on sélectionne un programme, ses réglages par défauts’affichent et la durée restante estimée (pour les programmesautomatiques) variera en fonction des sélections des articlesà sécher et de la méthode de séchage ou de la durée restanteréelle pour les programmes Timed Dry (séchage minuté) (pourles programmes manuels) s’affiche.ÉTIQUETTES DE PHASE DE PROGRAMMESensing (détection)S’affiche lors du fonctionnement des programmes avec détectionpour indiquer que le capteur d’humidité de la sécheuse est encours de fonctionnement. Il ne sera pas affiché pendant lesprogrammes Timed Dry/Quick Dry (séchage minuté/séchagerapide) ou d’options telles que Wrinkle Shield (antifroissement)option.Drying (séchage)La sécheuse est en phase de séchage principal du programmeautomatique.Steaming (production de vapeur)L’option Steam (vapeur) est sélectionnée et la phase de vapeurest en cours d’exécution.Cool Down (refroidissement)La sécheuse a terminé le séchage avec chaleur et faitmaintenant culbuter la charge sans chaleur pour la refroidiret pour réduire le froissement.Static Reduce (réduction du niveau d’électricité statique)La phase de réduction du niveau d’électricité statique est encours d’exécution.End (fin)Le message affiché indiquera «Le séchage est terminé» etexpirera après 5 minutes. Ceci indique que le programmesélectionné est terminé et que l’on peut retirer la charge de lasécheuse. Si l’option Wrinkle Shield (antifroissement) optiona été sélectionnée, il est possible que la sécheuse poursuive leculbutage de la charge, même si « End » (terminé) est affiché.Check Vent (vérifier le conduit d’évacuation)L’alerte Check Vent (vérification de la conduite d’évacuation)n’est offerte qu’avec les programmes automatiques. Cette alerteindique la qualité de la circulation de l’air dans la sécheuse etle système d’évacuation de la sécheuse durant la durée de viede la sécheuse. Pendant la phase de détection au début duprogramme, si une conduite bloquée ou une faible pression estdétectée, le message « Vérifiez la conduite. Nettoyez le filtre àcharpie ou le conduit pour obtenir un bon rendement » s’affiche.NE PAS OUBLIER : La sécheuse continue à fonctionner mêmesi la notification Check Vent (vérifier le conduit d’évacuation)s’affiche, mais une mauvaise circulation de l’air peut avoir uneincidence sur le temps de séchage et le rendement.Le message affiché peut être effacé en appuyant sur n’importequelle touche, à l’exception de Power (mise sous tension) quiannulera le programme.OBTENIR L’APPLICATION WHIRLPOOL ET SE CONNECTERTéléchargez l’application Whirlpool sur votre appareil mobile. Vous pouvez obtenir les instructionsd’abonnement et de connectivité, les conditions d’utilisation et la politique de confidentialité àl’adresse www.whirlpool.com/connect ou www.whirlpool.ca/connect si vous résidez au Canada.Une fois installée, lancez l’application et vous devrez suivre les étapes pour vous abonner et créer votre compte utilisateur pour vousconnecter à votre appareil. Si vous avez des problèmes ou des questions, appelez Whirlpool Connected Appliances au 1-866-333-4591.(Uniquement disponible pour les modèles avec capacité WiFi).Lorsque l’appareil est mis sous tension pour la première fois, une message s’affiche pour inviter l’utilisateur de choisir la langue avant de voirapparaître le message Download APP (télécharger l’application) ou d’appuyer sur une autre touche pour configurer le WiFi ultérieurement.1CONNEXION DEL’APPAREIL ÀL’INTERNETPour connecter l’appareil à l’Internet,télécharger l’application Whirlpool et appuyer sur REMOTE ENABLE(activation à distance).102AUTORISER LACOMMANDEET L’INTERACTION ÀDISTANCEVous doit appuyer sur REMOTEENABLE (activation à distance) unefois connecté afin de permettre lacommande et l’interaction à distance.
UTILISATION DE LA SÉCHEUSEAVERTISSEMENTAVERTISSEMENTRisque d'explosionRisque d’incendieAucune laveuse ne peut complètement enlever l’huile.Ne pas faire sécher des articles qui ont été salis partout genre d’huile (y compris les huiles de cuisson).Les articles contenant mousse, caoutchouc ouplastique doivent être séchés sur une corde à linge oupar le programme de séchage à l’air.Garder les matières et les vapeurs inflammables, telleque l’essence, loin de la sécheuse.Nes pas faire sécher un article qui a déjà été touché parun produit inflammable (même après un lavage).Le non-respect de ces instructions peut causer undécès, une explosion ou un incendie.Le non-respect de ces instructions peut causer undécè ou un incendie.1NETTOYAGE DUFILTRE À CHARPIE23CHARGER LASÉCHEUSE4APPUYER SURLE BOUTOND’ALIMENTATIONPOUR METTRELA SÉCHEUSEEN MARCHESÉLECTIONNERLE TYPED’ARTICLESÀ SÉCHERNettoyer le filtre à charpie avant chaquecharge. Nettoyer aussi le conduitd’évacuation au moins tous les 2 ans.5SÉLECTIONNERLA MÉTHODEDE SÉCHAGE6AJUSTER LESRÉGLAGES DEPROGRAMMESI DÉSIRÉ7SÉLECTIONNERTOUTE OPTIONSUPPLÉMENTAIRE*8TOUCHER ETMAINTENIR ENFONCÉLE BOUTON START/PAUSE (MISE ENMARCHE/PAUSE)POUR DÉMARRERLE PROGRAMMESi la mauvaise langue est sélectionnée lors du déballage numérique ou si l’on souhaite revenir aux réglages d’usine, effectuer unrétablissement du paramétrage d’usine.FACTORY RESET (rétablissement du paramétrage usine)Appuyer sur les touches TEMP (température) et Wrinkle Shield (antifroissement) jusqu’à ce que le compte à rebours affiché soit terminé.L’appareil se remet sous tension une fois le message « Select Language » (sélectionner langue) s’affiche.*REMARQUE : Voir « Guide des programmes » pour plus d’informations sur les programmes, les réglages et les options. Les programmes,réglages et options ne sont pas tous offerts sur tous les modèles. Lire tous les manuels pour plus d’information sur l’appareilconcerné.11
GUIDE DES PROGRAMMESCette sécheuse possède une interface utilisateur unique pour aider l’utilisateur à sélectionner le programme le mieux adapté à la charge.Les configurations « What to Dry » (articles à sécher) et « How to Dry » (méthode de séchage) indiquent le programme idéal en deux étapes faciles :1. Déterminer d’abord les articles dans la charge qui doit être séchée. Sélectionner ainsi les articles adéquats dans la partie « What to Dry »(articles à sécher).2. Ensuite, déterminer la manière dont on souhaite sécher ces articles et sélectionner la méthode appropriée dans la partie « How to Dry »(méthode de séchage). Les modificateurs sont préréglés pour les articles à sécher, mais peuvent être modifiés au besoin.Utiliser les programmes automatiques pour réaliser un maximum d’économies d’énergie et pour que la sécheuse apporte un soin supérieur auxtissus. Ces programmes mesurent la température de l’air de séchage et les niveaux d’humidité afin d’éteindre la sécheuse une fois que la chargea atteint le niveau de séchage désiré. La performance et les résultats de la sécheuse peuvent varier si la tension nominale est inférieure à Tensionnominale (Électrique , 240 V; Gaz, 120 V).Quelle méthode de séchage souhaite-t-on utiliser?Pour un meilleur soin des tissus, choisirle programme qui convient le mieux à lacharge à sécher.R – Programme recommandéa – Programme alternatifCase vide – Programme disponible, maispas optimal.Quels articlessouhaite-t-on sécher?Vêtements pour bébéPyjamasMouchoirsT-shirtsHauts de survêtementsManteaux et vestesRideaux en cotonRideaux lavables enmachineNappeTenues de bureaudécontractéesTissus infroissablesSoutiens-gorgeRideau de douche Chemises et pantalonshabillésCouverturesTapis en tissuRideaux lourdsJeansDouillettesLits pour animaux decompagnieOreillers – remplies de fibresDrapsSacs de couchagePeluchesNormalSélection du programme « How to Dry » (méthode de séchage)Wrinkle Control Heavy DutySanitize*Timed dinaire)Programmeautomatiqueavec capteurqui s’arrêteune fois leniveau deséchage souhaité atteint.Chaleur c capteurqui s’arrête unefois le niveaude séchagesouhaité atteint.Chaleur élevéeUtilisé pouréliminer 99,9 %de trois desbactéries lesplus courantesDurée deséchagerégléeLa sécheusefonctionnependantla duréesélectionnée.Durée deséchagerégléeLa sécheusefonctionnependantla duréesélectionnée.Sélection duprogramme« What to Dry »(articles à entsdélicats)Bulky RRNondisponibleaaRaaRaR* Programme de séchage à chaleur élevée prolongé conçu pour aider à assainir les articles tels que les draps et les serviettes.Ce programme n’est pas recommandé pour tous les tissus. Pour de meilleurs résultats, ce programme doit fonctionner jusqu’à la fin pourassurer l’assainissement et ne doit pas être interrompu.12
Pour un meilleur soin des tissus, choisirle programme qui convient le mieux à lacharge à sécher.R – Programme recommandéa – Programme alternatifCase vide – Programme disponible, maispas optimal.Quels articlessouhaite-t-on sécher?Sous-vêtements en cotonServiettes de table blanchesWhites (blancs)Colors(couleurs)Torchons de vaisselleServiettesTapis sans garniture decaoutchoucNormalWrinkle Control Heavy ar(ordinaire)Programmeautomatiqueaveccapteurqui s’arrêteune fois leniveau t)Timed rogrammeprolongéProgrammeautomatiqueavec capteurqui s’arrêteune fois leniveau deséchagesouhaitéatteint.Chaleur élevéeUtilisé pouréliminer99,9 % detrois desbactéries lesplus courantes
Touch each time you want to remotely control via the Whirlpool app. Follow the instructions in the "GET THE WHIRLPOOL APP AND GET CONNECTED" section below for more details. NOTE: Once Remote Enable has been selected, certain interactions with the dryer will cause it to cancel Remote Enable. Example: Opening the door. 4 Damp Dry Signal