Transcription
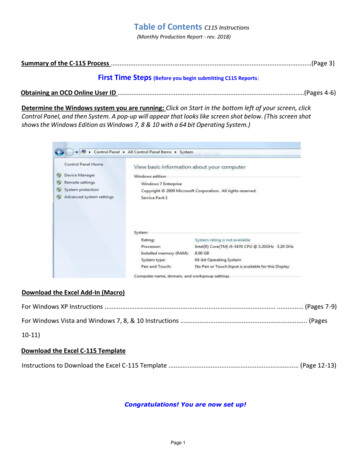
Table of Contents C115 Instructions(Monthly Production Report - rev. 2018)Summary of the C-115 Process .(Page 3)First Time Steps (Before you begin submitting C115 Reports)Obtaining an OCD Online User ID .(Pages 4-6)Determine the Windows system you are running: Click on Start in the bottom left of your screen, clickControl Panel, and then System. A pop-up will appear that looks like screen shot below. (This screen shotshows the Windows Edition as Windows 7, 8 & 10 with a 64 bit Operating System.)Download the Excel Add-In (Macro)For Windows XP Instructions . . (Pages 7-9)For Windows Vista and Windows 7, 8, & 10 Instructions . (Pages10-11)Download the Excel C-115 TemplateInstructions to Download the Excel C-115 Template . (Page 12-13)Congratulations! You are now set up!Page 1
Monthly Steps (To be done every month)Entering information into the Excel C-115 SpreadsheetDefinition of columns . . (Page 14)Using the Add-inFor Windows XP . . (Page 15)For Windows Vista and Windows 7, 8, & 10 . (Page16)Submitting the C-115OnlineInstructions on Submitting the C-115 Online .(Page 17)Errors, Troubleshooting and Solutions .(Pages 18-20)For Runtime Error 2110 Solution . . (Page 21)For Runtime Error 91 Solution . (Page 22)C-115 Status and Verification of Data: (It is the C-115 Filers responsibility to verify that the data submittedand what is posted on the website match and are correct to their knowledge. Do not submit your reportwithout verifying the data. Review any errors and re-submit if necessary)Approvals and Rejections . (Pages 23-27)Data Verification. . (Pages 28-29)Amendments and Corrections . (Page 30)Additional Useful InformationC-115 Data Layout . (Pages 31-34)Visit our Website: htmlBasic Instructions, Sample C-115, Excel Add-Ins, Excel Template, etc.For a printout of C-115 Due Dates: Please contact OCDPage 2
Summary of the C-115 ProcessThe C-115 process is slightly different depending on whether a well operator uses OCD’s Excel spreadsheettemplate or uses a custom system. All of the terms used below are more thoroughly described later in thisdocument.If the well operator does not use a vendor’s system, filing C-115s involves downloading an Excel add-in (asmall macro) and an Excel C-115 template from the OCD’s web site. The well operator keys the wells andother information in a specified format into the Excel template which is simply a spreadsheet. Next, thewell operator clicks on the add-in which puts the spreadsheet information (well production, disposition,transporters, etc.) into a structured format that we call the .txt file because the file extension is.txt.The well operator then signs in to OCD’s web electronic permitting system called OCD Online and selectsC-115 from a list of forms/permits and then submits the .txt file. OCD Online asks the user to attachthe .txt file created from the previous step and the system compares the information in the .txt fileto the wells that the operator operates. If OCD Online finds errors the user can view the reports withdetails of the problems.Errors found are: production errors, disposition errors, omissions, and out of balance conditions. Ifnecessary, the user returns to the Excel spreadsheet and changes the entries related to the errors. Theywill then re-run the add-in again and attach the new .txt file validating in OCD Online until no errorsappear. At that point, the user can submit the C-115 to OCD for acceptance.The user is notified by an automated e-mail when the C-115 has been accepted. Other tools in OCDOnline that help the well operator see C-115 information are Action Status and the C-115 Reportsoptions.Operators who use custom software don’t use the Excel add-in or the Excel spreadsheet (template), butthey do attach the .txt file created by their software in OCD Online and follow the remaining stepsfrom that point.Skim Oil on Salt Water Disposal wells is reported on Form C-117APage 3
Obtain NM Oil Conservation Division (OCD) Online UserIDThere are two types of User IDs: Operator Administrator – Each operator may only designate one OperatorAdministrator (this individual is the operator’s “super user”). Only OperatorAdministrators have the authority in the system to set up Operator Users andsubmit all types of OCD Forms online on behalf of their company including aChange of Operator or C145. Operator User(s) – Companies can assign multiple Users. This level of authorityallows for submission of most OCD Forms online on behalf of the company excepta Change of Operator or C145.How to sign up to be an Operator Administrator: Using your computer’s web browser, navigate to the Division’s websitelocated at http://www.emnrd.state.nm.us/ocd/. Locate OCD Online on theLeft hand side of the Home Page. Click OCD Online. Click E-Permitting. Locate Sign up to be an Operator Administrator Located in the middle ofthe web page and click on it. Find your Companies name in the dropdown list and click on it.o If there is already and Operator Administrator for your company itwill state:“Warning! [Name] is already identified as the Operator Administratorfor your OGRID. Please contact him/her for access to the system.”o If you wish to replace the person (perhaps they are no longer withthe company or their duties have changed), click on Change theOperator Administrator. Who May Authorize an Operator Administrator under Duly AuthorizedRepresentative?o The Duly Authorized Representative must be:Page 4
The President of the company;The Vice President of the company;An employee of the corporation duly authorized (by corporateresolution or Power of Attorney) to approve and sign an OilConservation Division form on behalf of the corporation;A Manager (if it does business as a limited liability company);A Partner (if it does business as a partnership); orThe operator individually (if it is a sole proprietorship).Key in the Duly Authorized Representative’s Name andTitle.Key in the Name of the proposed Operator Administrator.Key in the proposed Operator Administrator e-mail Address.Key in the proposed Operator Administrator Phone Number (in XXX-XXXXXXX format).Click on Click here to print the Request.Print form.Have the Duly Authorized Representative, Sign the form.Have the proposed Operator Administrator, Sign the form.Fax to Oil Conservation Division at (505) 476-3462.OCD will process your request and e-mail the new Operator Administratortheir User ID and Password. At this point, the process is complete and theOperator Administrator is ready to establish any necessary Operator Usersusing their “super user” authority.How to establish Operator Users: Once an Operator Administrator is set up for your organization, that “superuser” can establish additional users under their account as an extension ofthe written authority the Operator Administrator has been granted by theDuly Authorized Representative of the organization. Note that thedesignated Operator Administrator for an organization is responsible forthe activities of any Operator Users that exist under that organization’saccount. For that reason, it is important that organizations and OperatorAdministrator be fully aware of who has been granted authorities for thePage 5
organization and that they immediately revoke authorities from anyindividuals as soon as the organization desires for that individual to ceaseto act on the organization’s behalf.o The process an Operator Administrator would follow to establishusers under their account is as follows: Sign in. Click on Administration. Click Add or Remove Users. Follow the prompts to either identify the User being removedor to enter the information for the new User being added. Acceptance or Rejection E-mail Notificationo When the C-115 has been either Rejected or Accepted The Operator Administrator and the Op Users whom have theReceive Rejection Email and Receive Approval Email checkmarked will receive an e-mail notification specifying if the C115 was Accepted or Rejected You may verify your User ID has been set up to receive Approval and RejectionEmails and update your information including the Email address if it haschanged by:o signing in to OCD Onlineo Click on Administrationo Click on Modify Personal Informationo Then you may verify that the appropriate boxes are check markedand that all the information is correct an up to dateo If there are changes needed you my enter appropriate changes andclick Update Sometimes the e-mail may get routed to your SpammailPage 6
Download the Excel Add-in Instructions for XP1. Open Internet Explorer Web Browser to Locate C115 Instructions and Add- InMacro Open Internet Explorer Web Browser Click on Address Bar located on the top tool bar Key in http://www.emnrd.state.nm.us/ocd/ Under Hot Topics on the Home Page Click on HOW DO I FILE A MONTHLY WELL PRODUCTION REPORT (C115)?2. Download C115 Add-in Macro to Desktop Right click on Excel Add In (Macro) Select Save Target as or Save Link As Select C Drive or Local Disk C in the Save In drop down list Click Program File Folder Click Microsoft Office Folder Select one of the following Office11 or Office12 or Office13 or Office14,ECT (specific to your computer program) Click on XLSTART or 1033 folder. Change the file name from C115 000.xls to C115.xla Click Save When download complete, (click on Close) Minimize Internet Browser3. Verify the C115 Add-in Macro is Active Open Microsoft Excel For Microsoft Office Newer than Microsoft Office 2003 Locate the Add-Ins tab on the top toolbar Click Add-Ins Verify that C115 Electronic Reporting appears twice. For Microsoft Office 2003 and older software Locate Tools on the Top Tool Bar Click on Tools Verify that C115 Electronic Report Appears in the list (itshould be listed after Options)4. If the Add-in Tab does not appear in Excel you will need to activate it in ExcelAdd-ins by doing the following Open Microsoft Excel For Microsoft Office Software Newer than Microsoft Office 2003Page 7
or the File Tab (Located on the Select the Office Buttonupper Left-hand corner) Select Excel Options or Options, located on the bottom toolbar Locate Add-Ins on the left tool bar Click on Add-Ins Locate Manage Excel Add- Ins on the lower portion of thepage Click Goa.(Sample) A pop up will appear titledAdd-Ins Click on the Browse button located on the right hand side ofthe box Click on Look In Box Select C Drive (Local Disk C) Click on the Program Files Folder Click on the Microsoft Office folder Select one of the following Office11 or Office12 or Office13or Office14, ECT (specific to your computerprogram) Click on XLSTART or 1033 folder C115 or C115.xla should appear(Sample) Double click on C115.xla Add-In box will appear with a checkmark in the NMONGARD option Click OK (The Add-Ins Tab should appear) Locate the Add-Ins tab on the top toolbar Click Add-Ins Verify that C115 Electronic Reporting appears twice. For Microsoft Office 2003 and older software Locate Tools on the Top ToolBar Click on Tools Locate Add-ins in the list Click on Add-ins Click on the Browse button located on the right hand side ofthe box Click on Look In Box Select C Drive (Local Disk C)Page 8
Click on the Program Files Folder Click on the Microsoft Office folder Select one of the following Office11 or Office12 or Office13or Office14, ECT (specific to your computerprogram) Click on XLSTART or 1033 folder C115 or C115.xla should appear(Sample) Double click on C115.xla Add-In box will appear with a checkmark in the NMONGARD option Click OK Locate Tools on the Top Tool Bar Click on Tools Verify that C115 Electronic Report Appears in the list (itshould be listed after Options)Page 9
Download the Excel Add-inInstructions for Vista, Windows7, 8, & 101. Create Folder in C Drive Option 1 (using Computer icon on desktop) Create a New Folder Titled, C115 (no Dashes No Spacesjust C115) in your C Drive (Local Disk C) Double Click on My Computer or Computer from your Desktop Right Click on OSDisk C: or Local Disk C: Select New, Folder Name it C115 Option 2 (using Windows Explorer) Create a New Folder Titled, C115 (no Dashes No Spacesjust C115) in your C Drive (Local Disk C) Right Click on OSDisk C: or Local Disk C: Select New, Folder Name it C1152. Open Internet Explorer Web Browser to Locate C115 Instructions andAdd- In Macro Open Internet Explorer Web Browser Click on Address Bar located on the top tool bar Key in http://www.emnrd.state.nm.us/ocd/ Under Hot Topics on the Home Page Click on HOW DO I FILE A MONTHLY WELL PRODUCTIONREPORT(C-115)?3. Download C115 Add-in Macro Right click on Excel Add In Macro (Windows 7,8, & 10 64 bit) Select Save Target As Click on My Computer or Computer Select your C Drive (OSDisk C: or Local DiskC:) Double Click on the C115 folder you created above I n F i l e N a m e b o x change the file name from C115 000.xls toC115.xla Click Save When download complete, (click on Close or X) Minimize Internet BrowserPage 10
4. Verify the C115 Add-in Macro is Active Open Microsoft Excel Locate the Add-Ins tab on the top toolbar Click Add-Ins Verify that C115 Electronic Reporting appears twice.5. If the Add-in Tab does not appear in Excel you will need to activate it inExcel Add-ins by doing thefollowing Open Microsoft Excel Select the Office Buttonor the File Tab (Located on the upperLeft-hand corner) Select Excel Options or Options Locate Add-Ins on the left tool bar Click on Add-Ins Locate Manage Excel Add- Ins on the lower portion of the page Click Go (Sample) A pop up will appear titledAdd-Ins Click on the Browse button located on the right hand side of thebox Select C Drive (OSDisk C: or Local DiskC:) D o u b l e c lick on the C115 folder C115 or C115.xla should appear Double click on C115.xla Add-In box will appear with a checkmark in the NMONGARDoption ! Click OK {The Add-Ins Tab should appear) ! Locate the Add-Ins tab on the top tool bar ! Click Add-Ins ! Verify that C115 Electronic Reporting appears twice. ! IF Add-Ins tab still doesn’t appear, close and restart Excel.You may also try downloading the 32-bit macro.Page 11
Add-In not showing up on Excel RibbonThe issue here is that Excel is now placing certain untrusted files into protectiveviewing mode silently. This prevents the C-115 Add-in from being loaded as allfiles download from the internet are untrusted. Microsoft release a SecurityUpdate for Excel mid 2016 that enforces this new security policy.Our suggested fix is to unblock access to c115 000.xla this will indicate to excelthat this is a trusted file. To do this:1.Right click on c115 000.xla and choose Properties2.On the General tab, click Unblock3.Click OK4.Restart Excel.Unable to run the Add-InThe issue here is that the Add-In is installed and the Add-In ribbon is visible butclicking on the link does nothing. It appears that the user needs full control ofthe latest Office folder to run the Add-In.Our suggested fix is to grant the user group of the machine full access to theOffice folder. To do this:1.Go to C:\Program Files (x86)\Microsoft Office right click on latest Officefolder (general the one with the highest number) and choose Properties2.Go to the Security tab, click Edit3.Click on Users (machine-name\Users) and check Allow for Full Control4.Click on Ok5.Restart Excel.Page 12
Downloading the C-115 Excel Spreadsheet TemplateWorks with all Windows SystemsOpen Internet Explorer Web Browser to Locate C115 Instructions and Excel C115 Template Open your Internet Explorer Web Browser Click on Address Bar located on the top tool bar Key in http://www.emnrd.state.nm.us/ocd/ Under Hot Topics on the Home Page Click on HOW DO I FILE A MONTHLY WELL PRODUCTION REPORT (C115)?Page 13
Download the C-115 Excel Spreadsheet Template Locate Download the Excel C-115Template Right click Excel C-115 Template Select Save Target As Select Desktop in the Save In drop downlisto You may move the file later to a location you prefer No need to change the File Name C115Spreadsheet.xls unless you prefer too You will need to remember the file name this is where you will beentering all your production information each month Click Save When download complete, (click on Close)Page 14
Definitions of ColumnsProduction Side of C1157.Pool and NameProperty Number andName Well No U-L-ST- RAPI Number1. Enter the 5-digit pool #followed by the poolname (in the same celladd zeros if necessary,ex: 07227).2. In the next row enterthe 6-digitproducing property# followed by thepropertyname (in9.VolumeEnter thenumberof barrelsof wateror MCFof gasinjected.Repeat steps 3-4 for each wellwithin that property #. Repeatentire procedure for each differ-(PSIG).Please donot reportvacuum(wholeamountsnodecimals)the same cell- addzeros if necessary, ex:026481).3. In the next row enter thewell number followedby the unit-lettersection-townshiprange(U-L-S-T-R) location forthe well. This entireline is optional depending on the operators’ preference.4. In the next row enter thewells API # (dashesare important). Needto appear like so,Ex: 30-025-05250.10.PressureEnter theinjectionpressure12. Barrelsof oil/condensateproducedEnter the #of barrels ofcrude oil orcondensateproducedfor themonth.(Wholeamounts, nodecimals)Disposition Side of C11513. Barrelsof WaterProducedEnter the #of barrels ofwater produced forthe month.(WholeAmounts, NoDecimals)14. MCFGasProducedEnter theMCF ofgas(includeCO²)producedfor themonth.15. DaysProduceEnter the# of daysthat nts,adjusted to15.025 psia)11. CODE 2Type of injected fluidcode(MUST BE IN CAPS)W - WaterG - GasC - CO²O - Other8. CODE 1Well Status(MUST BE IN CAPS)F - FlowingT - TemporarilyAbandonedP - PumpingI - Injection Well (even ifshut-in)G - Gas LiftD - Salt Water Disposal Well (even if shut-in)S - Shut-inA - Plugged and Abandoned8. CODE 3Disposition of producedproduct. If you have all threeput them on separaterows.(MUST BE IN CAPS)G - Gas (includes CO²)O - Crude Oil, Condensate, DripW - Water17. Point OfDispositionEnter thepoint-ofdisposition(POD)Number(7-digits) foreach producttransportedfrom theproperty orenter the non-transportedvolumes andoil storagebalance. AnOil POD# isrequired forall reportedOil disposition. TheassignedPOD# foreach wellcompletioncan be foundon the OCDWell List18. GasBTU Or OilAPI GravityEnter the gasBTU (WholeNumber) ineffect for thegas volumetransported(adjusted to15.025 PISAat 60 F) orenter theweightedaverage APIoil gravity(include onedecimal spaceformat: 00.0)of oiltransported.19. Oil onHand atBeginning ofMonthEnter thebeginning oilstorage volume for thecurrent reportingmonth.(Whole20. VolumeEnter thevolume ofoil, gas, orwatertransportedorotherwisedispositionAmount, NoDecimals)(Whole Numbers, NoDecimals)(lost, vented,spilled, usedon property,ect).21.TransporterOGRIDEnter atransporterOGRID for oiland gas volumes transported from thePOD. A list ofcurrenttransporters isavailable onOCD’s websiteunder Statistics,C115Transporters.Do not enter atransporterOGRID, if thevolume in Box20 correspondsto nontransporteddisposition anda “code 4” isentered23. OilOnHand atthe Endof ts)8 CODE 4 Non Transported Disposition – is when the product is not transported by atransporter (MUST BE IN CAPS)
Page 14
Using the Add-in with Windows XPConvert your C115 Excel Spreadsheet into a text file Locate your Completed C115 Excel Spreadsheet Double click your Completed C115 Excel Spreadsheet to open For Microsoft Office Newer than Microsoft Office 2003 Locate the Add-Ins tab on the top toolbar Click Add-Ins C115 Electronic Reporting appears twice For Microsoft Office 2003 and older Locate Tools on the Top Tool Bar Click on Tools C115 Electronic Report Appears in the list (it should be listedafter Options) Click on C115 Electronic Report On the first tab titled C115 Report Settings fill in OGRID Report Month Report Year (Must be 4digits) Contact Name Phone (Ex. 505-123-4567) Click on the Output File TabUncheck the Confirmation Sheet boxThen delete everything in the File Path NameEnter the following exactly C:/Feb08.txto Remember your unique name this will be the file nameofyour text file Ex. Feb08.txto To save to a different drive like an L Drive you would changethe capital C to a capital L and so on for otherdrives.(ex. L:/March08.txt)click OkC-115 Processing Box will appearClick ExitPage 15
Using the Add-in with Vista and Windows 7,8, & 10Convert your C115 Excel Spreadsheet into a text file Locate your Completed C115 Excel Spreadsheet Double click your Completed C115 Excel Spreadsheet to open Click on Add-Ins Tab Click C115 Electronic Report (it will appear twice it doesn’t matterwhich one you click on) On the first tab titled C115 Report Settings fill in OGRID Report Month Report Year (Must be 4digits) Contact Name Phone (Ex. 505-123-4567) Click on the Output File Tab Uncheck the Confirmation Sheet box Then delete everything in the File Path Name Enter the following exactly C:/C115/Feb08.txto Remember your unique name this will be the file nameof your text file Ex. Feb08.txto To save to a different drive like an L Drive you wouldneed to create a new folder titled C115 in that drive,then you would change the capital C to a capital L andso on for other drives. (ex. L:/C115/March08.txt) click Ok C-115 Processing Box will appear Click ExitPage 16
Submitting your C-115 Form on OCD OnlineIn order to submit your C115 you will have needed to Fill out the C115Form and convert it to a text file Open your Internet Explorer Web Browser Click on Address Bar on the top tool bar Key in http://www.emnrd.state.nm.us/ocd/ Locate OCD Online on the left list of the Home Page Click OCD Online Click E-permitting Under Operator Data Locate the Sign in Option listed last Click on Sign In Enter your User Id and Password Click Sign In Under Submit Forms locate Other Click Other Click C115 Click Create a New C115 Click on Browse to find your text (.txt)file Select C Drive (Local Disc C) in the Look In Drop Down List Locate C115 folder Click on C115 Folder Click on Open Click on Add Attachment Click on Validate files If “No Errors Exist” then Click SubmitIf there are errors you will need to correct all errors on your C115 Form Save Changes in Excel Run the Add-In C115 Electronic Report Recreate the text file Start from the beginning of this current list.Page 17
Production Errors/SolutionsError CodeSolutionAInvalid PoolThe pool # does not exist. Please refer to the Well Search option. Enter the affected API Number andclick on Find, look under Well Completions to locate the correct pool number. Pool numbers need tobe 5 digits long, if your pool number is less than 5 digits, add leading zeros, such as 05550. If correctthenlook at the effective date for that pool.The API # does not exist. Review the Well Search to search for the well name and number (property #) tolocate the correct API. Note: Review the History Tab under Well Search to verify Effective Date, Property#, and Operator are correct and reflect the month and year of the C115 you are trying to submit.OCD records indicate this API does not have an approved completion in this pool for the month ofproduction. Review the Well Search to search by the API for approved completions and theircorresponding pool #’s. Note: Review the History Tab under Well Search to verify Effective Date,Property #, & Operator are correct and reflect the month and year of the C115 you are trying to submit.OCD records indicate another operator operates this well. If a Change of Operator took place verify theeffective date of approval, effective dates can cause errors please verify that the effective dates are insequence with the C-115 month and year you are trying to submit. Contact the appropriate OCD districtoffice if you believe your organization operates this well.The injection fluid code (code 2) is not correct. Valid codes are and must be in CAPS: W, G, C or ODefinitions W – Water; G – Gas; C - CO²; O – OtherThe status (code 1) for this completion is not correct. Valid codes are and must be in CAPS: F, P, G, S, T, I,D or A. Definitions F – Flowing; T - Temporarily Abandoned; P – Pumping; I - Injection Well (even if shutin); G - Gas Lift; D - Salt Water Disposal Well (even if shut-in); S - Shut-in; A – Plugged & AbandonedThis well completion is zone abandoned for this production month. Please remove the affected API fromthis pool on your C-115. If this completion had production, confirm its removal does not result in an outof balance condition with disposition.This completion was reported twice on the same C-115. This may occur because you have multiplesheets with the same API information on your C115 Excel Spreadsheet verify that you have only onesheet for your C115 form.BInvalid WellCInvalid WellCompletionDInvalidOperatorEInvalid FluidFInvalid StatusGPlugged ZoneHDuplicate WellCompletionINon NumericAn entry on this line, such as the transporter OGRID # or a disposition number, was reported with analpha character instead of a # - typically an ‘O’ instead of a zero.JInvalid PropertyThe property # is incorrect. Review the Well Search. Enter the affected API Number and click on Find,look under History to locate the correct Property #. Property numbers need to be 6 digits long if yourProperty number is less than 6 digits then add preceding zeros such as 004226. * Note – Propertynumbers change when a Change of Operator takes place, new Property numbers are issued. Refer toyour Well List to record the new property numbers of the wells affected by the Changeof Operator.KNo Water withOil ProductionThis is an allowable error - Per 19.15.18.14 NMAC, an operator is required to report the volume ofwater produced from an oil and/or associated pool. Produced water includes all water that is anincidental byproduct from drilling for or the production of oil and gas, including load water. Pleaseverify that there was no water produced from the respective pools, and if you have oil and/orassociated pools with ZERO barrels of water produced, include a comment detailing the situation toallow the OCD to process your C-115.Page 18
Disposition Errors/SolutionsError CodeSolutionAInvalid PoolThe pool # does not exist. Please review the Well Search. Use the edit/find option with the affectedAPI to locate the correct pool number. Your Pool #’s must be 5 digits, If it is less than 5 digits addleading zeros, such as05550.BInvalid PropertyThe property # does not exist. Review the Well Search to find the valid property # for this well.Property #’s must be 6 digits, if it is less than 6 digits, add leading zeros such as 002543. * Note –Property numbers change when a Change of Operator takes place, new Property numbers areissued. Refer to your Well List to record the new property numbers of the wells affected by theChange of Operator.CInvalid Operator forPropertyThe property # is valid, but the OCD records indicate a different Operator for that property #. Lookup the valid property # using the Well Search.DInvalid TransporterThe transporter OGRID # is not correct or is missing. Check the transporter OGRID # with yourtransporter, or review OCD’s Transporter List. Also confirm there is an OGRID # entered for eachsale.EInvalid ProductThe product code (Code 3) is incorrect. Valid product disposition codes are and must be in CAPS:O, G and W. Definitions G - Gas (includes CO²); O - Crude Oil, Condensate, Drip; W - WaterFNo Completions inthe Pool/PropertyThere are no well completions in this pool/property combination for this month. Review the WellList to find the correct property # for this API. If you believe OCD records are not current, pleasecontact the appropriate OCD District Office.GNon NumericAn entry on this line, such as the transporter OGRID # or a disposition number, was reported with analpha character instead of a # - typically an ‘O’ instead of a zero.HCan't report both atransporter OGRIDand nontransporteddisposition codeCheck your C-115 columns 21-22 and delete any codes (V, O, T, etc.) if you intend to report atransported volume on th
Select Excel Options or Options, located on the bottom tool bar Locate Add-Ins on the left tool bar Click on Add-Ins Locate Manage Excel Add- Ins on the lower portion of the page Click Go a. (Sample) A pop up will appear titledAdd-Ins Click on the Browse button located on the right hand side of the box