Transcription
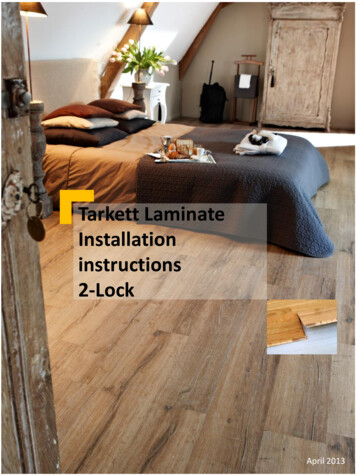
Tarkett LaminateInstallationinstructions2-LockApril 2013
Product usage Tarkett Laminate flooring is not recommended for use in highhumidity areas where the floor is usually wet (steam rooms,saunas). For the use in bathrooms, we recommend to use our wetroom solution Aquastyle (see specific installation instructions) Tarkett Laminate can be used with underfloor heatingInstalling laminate floor with underfloor heating Explanation and restrictions:Laminate flooring is suitable for installation on top of underfloor heatingsystems provided that the heating element is embedded into concrete or anyother sub floor. Laminate flooring is not suitable for installation on top ofunderfloor heating foil installed on top of concrete or any other sub floorunless otherwise specified by the underfloor heating manufacturer. Surfacetemperature should never exceed 28 C. Procedure:Installing laminate flooring on top of low temperature under-floor heating ispossible provided that a specific heating procedure (in accordance to DIN4725 & regardless of the season) is followed before the damp proofing layeris put in place: set the temperature of your heating device at 25 C & let it runfor 3 days. Increase your heating in steps of 5 C up to its max. temperature.Let it run continuously for 72 hours. Decrease the temperature in steps of10 C until reaching a floor surface temperature of 18 C. Before, during & atleast 3 days after the installation of your flooring, the floor surfacetemperature should be maintained at 18 C.Do not forget to install the 0.2 mm vapour barrier!Please check with your dealer & the floor heating system producer.
Recommended tools Vacuum cleaner T-square Tape measure Saw - table saw (fine tooth carbide tipped blade)/miter saw/circular saw/jigsaw Safety glasses and safety glovesRecommended installation accessories 8 mm spacers (or installation springs) Foam underlay Skirtings, clipholders for skirtings and profiles for a perfect finishPlease see our brochure or our website www.tarkett.com for the full range ofaccessories
Preparation before installation AcclimationTarkett Laminate Flooring must be allowed to acclimate to the temperature of the room in which itwill be installed. Place the unopened cartons of laminate lying horizontally for a minimum of 48 hours beforeinstallation in the room in which they will be installed Do not remove the plastic wrapping Room temperature shall be a minimum of 18 C (65 F) Subfloor preparationTarkett Laminate Flooring may be installed over most types of subfloors and existing floors onall grade levels. The subfloor must be structurally sound and free from movement. The subfloormust be clean, dry, level and free of any defects: Dry. Measure humidity with adequate test instruments. Moisture content of cementscreed/concrete must be 2% CM (CM method ) and of anhydrite cement floors (calciumsulphate screed) 0.5% CM. Level. The subfloor must be leveled within 3 mm in 1 m -1/4” in 8 ft.- (DIN 18202) or 2mm over 2 m. Smooth and level all irregularities with a hydraulic (portland) cement basepatching and leveling compound. Free of any defect. Cross check old wood floors, nail/screw to eliminate squeaking. Brushor vacuum clean your floor before beginning installation. Concrete Concrete subfloors shall be properly cured and allowed to dry for a minimum of 90 daysbefore installation Wood Suspended wood subfloors shall have a minimum of 45 cm (18”) of well-ventilated airspace clearance above the ground A vapour barrier shall not be installed over wooden floor/construction Moisture content of wood subfloor shall not exceed 12%
Existing Sheet and Tile Flooring Existing flooring must be fully adhered and in good condition Existing floor must be in a single layer Repair any damaged areas Carpeting Deep pile carpeting and padding must be removed before laying laminate flooring Tarkett Laminate Flooring may be installed over industrial direct glue carpeting (nopadding) that is installed over wood subfloors only Carpeting must be removed if installed over concrete The use of a foam underlay is not recommended over carpetIMPORTANT ! A min. 0.2 mm vapour barrier PE foil shall be installed over all sub floors, except onwooden floor/construction. We recommend the use of the Tarkett Soundblock Foam which canreduce impact sound by 18-20 dB. Please check our catalogue or our website www.tarkett.com formore information. Room preparation Carefully remove existing wall skirtings and doorway transition profiles. If using quarterround skirtings, wall base skirtings do not have to be removed. Existing quarter roundmay be reused or replaced with matching quarter round. The skirting must be ofsufficient size to cover a 14 mm (0,55”) area around the perimeter of the floor Leave at least 20 mm (0.79”) between the surface of the flooring and the bottom ofelectric baseboard heaters to allow heat to circulate Undercut door jambs and door moldings to allow the flooring to fit underneath. Use ascrap piece of flooring and foam underlayer as a guide Sweep and/or vacuum subfloor to remove all dirt and debris.
Preparation before installation Before startingProduct check Inspect all planks for visible defects and damage before and during installation. Do not install damaged or defective planks. During installation, inspect the groove area for any debris that may prevent properassembly of planksRoom check Determine in which direction the planks will be installed. To make the room appear largeror if installing in very small rooms or hallways, it is preferable to lay the planks parallel tothe longest room dimension. Otherwise lay towards the main source of light It is recommended that cabinets be installed before installing planks. However, if planksare installed prior to installing cabinets, the cabinets must be fastened or secured to thesupporting wall. Do not fasten cabinets through the laminate flooring. Carefully measure the room to determine squareness and also to determine the width ofthe last row of planks. If the width of the last row of planks is less than 50 mm, excludingthe tongue, the width of first row of planks will have to be cut accordingly.Installation instructions Check out our installation video here:http://home.tarkett.com/content/2-lockGeneral installation instructionsnew-generation-locking-system Begin laying planks on the left side of the starting wall and work to the right side. Thetongue side of the plank shall face the starting wall. Place spacers (minimum 8 mm) between the short and long side of the planks and thewall. Press the short end of the next floorboard at an angle to the first one, then lay down.Complete the first row in the same manner. If the starting wall is irregular, scribe or tracethe contour of the wall on the first row and cut.
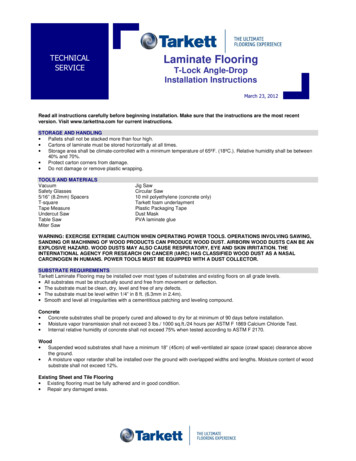
General installation instructions (continued) The first and last plank in each row must be at least 30 cm in length. The last plank of therow will have to be cut, but if the remaining but if it is less than 30 cm, the first plank inthe row will have to be also cut to allow for a longer plank at the end of the row. If theremainder of the last plank is over 30cm, it can serve as the first plank of the next row (ifthis is done, it will produce an irregular pattern, which can be desired or not). Also makesure that the planks are staggered with minimum 30cm between the short sides fromone row to the next. Determine the width of the last row of planks by measuring the distance wall to wallallowing the 8 mm expansion gap on both sides. If it is less than 50 mm, excluding thetongue, the width of the first row of planks will have to be cut accordingly. When cutting planks, make sure that the teeth of the saw blade are cutting into thedecorative surface. Best results are achieved when using a carbide tipped cutting blade. If the surface is larger or longer than 10m, use transition profiles to reduce the length ofthe rows and allow for natural expansion. Use transition profiles in doorways. Installation step-by-step1.Before installing the first row, the part of the groove profilewhich sticks out must be cut off2.First row. Start in a left-hand corner with the groove sideagainst the wall and work towards the right. Press spacersbetween the floor and the wall to create an expansion gapof 8-10 mm.33.Second plank, first row. Place it corner to corner with thefirst plank, then connect with a sliding movement. Makesure that the two planks are perfectly in line.3.At the end of the row, turn the last board so that it liestongue to tongue. Push the short end tightly against thewall. Mark where to cut with a pencil 8-10 mm from theprevious board’s short end to allow for an expansion gapwhen the board is tapped into place.
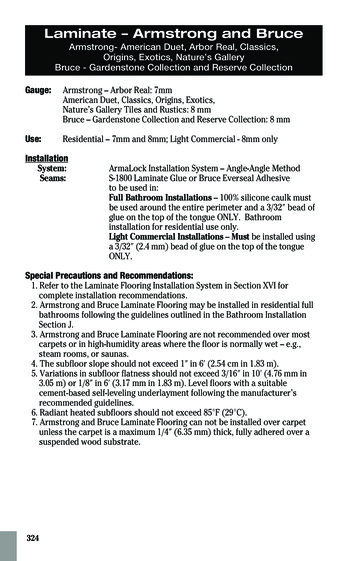
5. First plank, second row. Start with the rest of the cut boardfrom the first row. Ensure that all the short end joints arestaggered from the short end joints of the other row by atleast 30 cm.6. Second plank, second row. Place the panel gently and tight tothe short end of the previous panel. Fold the panel down in asingle action movement with a slight press to the short end ofthe previous panel. During the fold down, make sure thepanels are tight against each other.7. Final row: When you get to the final row, it is possible thatthe boards will not fit width wise. In this case, place a boardwith the tongue facing the wall, on top of and edge to edgewith the last board. Place a spare board on top, and use it asguide for marking the boards of the final row that will besawn accordingly. Remember to allow for the expansion gap.If the final row of boards does not need to be cut, the tonguemust be sawn off in order to allow for the expansion gap. Specific instructions In areas where it is difficult to angle the planks intoposition, such as around door moldings, it isnecessary to remove the lip on the groove edge ofthe planks of the last row installed. This is done bylightly sanding or planing off the lip (1). This willallow you to install the plank by laying it flat. Apply athin bead of Tarkett D3 glue on top of the modifiedtongue and push the plank of the last row intoposition. Immediately wipe off any excess glue with adamp cloth If you wish or need to remove the flooring, separatethe whole row by carefully lifting up and slightlyknocking just above the joint. Fold up and release thewhole long side (1). Disassemble the panels by slidinghorizontally (Do not fold up) (2)1.1.2.
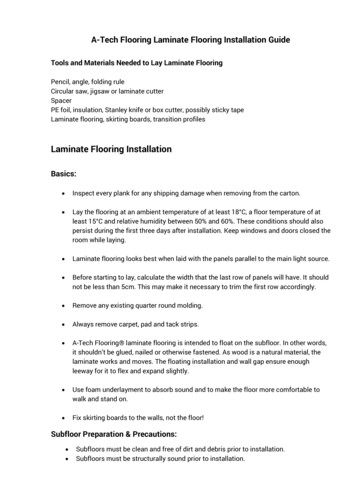
Specific instructions (continued) If the long side of the board meets a pipe: Drill ahole with a diameter min. 16 mm greater than thepipe diameter to give an expansion gap around thepipe. Mark with a pencil where to saw. Saw off thebit which will fit behind the pipes, closest to the wall.Cut at an angle as shown in the picture. If the pipesare located along the short side of the floor, cut theboard at a 90 angle straight through the holes.Finish Remove spacers from perimeter of room. If you used installation springs, you leave them inplace. Install transition profiles. Do not fasten profiles through the laminate flooring. Install quarter round or baseboard skirtings. Skirtings must be of sufficient size to cover a 14mm gap. Do not fasten skirtings through the laminate flooring, fasten into the wall. Use plywood when moving heavy furniture or appliances into position. To help protect the floor, place felt pads or other type of protection under the legs offurniture. At all times, the recommended room relative humidity (RH) of 45-60% and temperature of18-24 C should be kept. If necessary install a humidifier/dehumidifier to ensure the bestclimate for yourself, furniture and your floor.For further information, please contact your local sales officeWestern Europe: Austria: Tarkett Holding GmbH, Niederlassung Wien – Tel. 43 1 47 88 062 Belgium: Tarkett France Belux – Tel. 32 16 35 98 80 Denmark: Tarkett A/S – Tel. 45 43 90 60 11 Finland: Tarkett Oy – Tel. 358 9 5406 5870 France: Tarkett SAS – Tel. 33 1 41 20 42 49 Germany: Tarkett Holding GmbH, Bereich Objekt – Tel. 49 62 33 810 Greece: Tarkett Monoprosopi Ltd – Tel. 30210 6745 340 Italy: Tarkett S.p.A. – Tel. 39 0744 7551 Luxembourg: Tarkett GDL SA – Tel. 352 949 211 8804 Netherlands: TarkettHolding GmbH, Vestiging Nederland – Tel. 31 76 57 80 760 Norway: Tarkett AS – Tel. 47 32 20 92 00 Portugal: Tarkett SA – Tel. 351 21 427 64 20 Spain: Tarkett Floors S.L – Tel. 34 91 358 00 35 Sweden: Tarkett Sverige AB – Tel. 46 771 25 19 00Switzerland: Tarkett Holding GmbH, Bereich Objekt Schweiz – Tel. 41 043 233 79 24 Turkey: Tarkett Aspen - Tel. 90 212 213 65 80United Kingdom: Tarkett Ltd – Tel. 44 (0) 1622 854 040 Baltic Countries: Ta rkett Baltics: Tel. 370 37 262 220 Czech Republic:Tarkett France SAS, org. slozka - Tel. 420-271 001 602 Hungary: Tarkett France SAS - Tel. 36 1 437 8150 Poland: Tarkett PolskaSp. z o. o. – Tel. 48 22 639 31 68 Russian Federation: ZAO Tarkett RUS - Tel. 7 495 775 3737 Slovakia: Tarkett France SAS,org.zlozka - Tel. 421 248 291 317 South East Europe: Tarkett Trade d.o.o. – Tel. 381 21 7557 649 (44) 569 12 21 Ukraine: TarkettUA – Tel: 38 (0) 44 569 12 21 Asia and Oceania: Australia: Tarkett Australia Pty Ltd – Tel. 61 2 88 53 12 00 China: Tarkett FloorCovering (Shanghai) Co. Ltd. – Tel. 86 (21) 60 95 68 38 ext 841 Hong Kong: Tarkett Asia Pacific Ltd. – Tel. 852 2511 8716 India:Tarkett France (India Branch) - Tel. 91 11 4352 4073 South East Asia: Tarkett Asia Pacific Ltd – Tel. 65 97 57 36 45 Africa: TarkettInternational: Tel. 33 1 41 20 41 01 Middle Ea st: Tarkett Middle East: Tel. 961 1 51 3363/4 Israël: Tarkett International: Tel. 331 41 20 41 01 Latin America: Brazil: Tarkett Fademac - Tel. 55 12 3954 7108 Other countries: Tarkett America Latina – Tel. 55 113047 7200 Argentina - Chile - Uruguay: Tarkett Latam Mercosur - Tel. 54 11 48 06 74 28 / 54 9 11 44 46 88 82 Colombia - Panama Caribian: Tarkett Latam Andina - Tel. 57 1 759 5781 / 57 312 273 1566 Bolivia - Ecuador - Paraguay - Peru: Tarkett Latam Sur Oeste- Tel. 55 11 3047 7233 Mexico /Central America: Tarkett Latam Mexico - Tel. 52 735 35 63 918 / 52 55 51 07 9524
Laminate flooring is not suitable for installation on top of underfloor heating foil installed on top of concrete or any other sub floor unless otherwise specified by the underfloor heating manufacturer. Surface temperature should never exceed 28 C. Procedure: Installing laminate flooring on top of low temperature under-floor heating is