Transcription
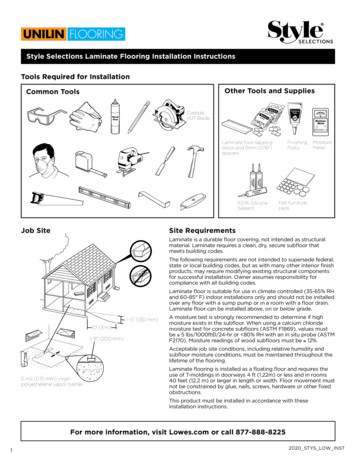
TECHNICALSERVICELaminate FlooringT-Lock Angle-DropInstallation InstructionsMarch 23, 2012Read all instructions carefully before beginning installation. Make sure that the instructions are the most recentversion. Visit www.tarkettna.com for current instructions.STORAGE AND HANDLING Pallets shall not be stacked more than four high. Cartons of laminate must be stored horizontally at all times. Storage area shall be climate-controlled with a minimum temperature of 65ºF. (18ºC.). Relative humidity shall be between40% and 70%. Protect carton corners from damage. Do not damage or remove plastic wrapping.TOOLS AND MATERIALSVacuumSafety Glasses5/16” (8.2mm) SpacersT-squareTape MeasureUndercut SawTable SawMiter SawJig SawCircular Saw10 mil polyethylene (concrete only)Tarkett foam underlaymentPlastic Packaging TapeDust MaskPVA laminate glueWARNING: EXERCISE EXTREME CAUTION WHEN OPERATING POWER TOOLS. OPERATIONS INVOLVING SAWING,SANDING OR MACHINING OF WOOD PRODUCTS CAN PRODUCE WOOD DUST. AIRBORN WOOD DUSTS CAN BE ANEXPLOSIVE HAZARD. WOOD DUSTS MAY ALSO CAUSE RESPIRATORY, EYE AND SKIN IRRITATION. THEINTERNATIONAL AGENCY FOR RESEARCH ON CANCER (IARC) HAS CLASSIFIED WOOD DUST AS A NASALCARCINOGEN IN HUMANS. POWER TOOLS MUST BE EQUIPPED WITH A DUST COLLECTOR.SUBSTRATE REQUIREMENTSTarkett Laminate Flooring may be installed over most types of substrates and existing floors on all grade levels. All substrates must be structurally sound and free from movement or deflection. The substrate must be clean, dry, level and free of any defects. The substrate must be level within 1/4” in 8 ft. (6.3mm in 2.4m). Smooth and level all irregularities with a cementitious patching and leveling compound.Concrete Concrete substrates shall be properly cured and allowed to dry for at minimum of 90 days before installation. Moisture vapor transmission shall not exceed 3 lbs./ 1000 sq.ft./24 hours per ASTM F 1869 Calcium Chloride Test. Internal relative humidity of concrete shall not exceed 75% when tested according to ASTM F 2170.Wood Suspended wood substrates shall have a minimum 18” (45cm) of well-ventilated air space (crawl space) clearance abovethe ground. A moisture vapor retarder shall be installed over the ground with overlapped widths and lengths. Moisture content of woodsubstrate shall not exceed 12%.Existing Sheet and Tile Flooring Existing flooring must be fully adhered and in good condition. Repair any damaged areas.
Carpeting Non-level loop, carpet installed over pad and padding must be removed before installing laminate flooring. Tarkett Laminate Flooring may be installed over industrial, level loop direct glue carpeting (no padding) that is installed overwood substrates only. Use of a foam underlayment is not recommended over carpet. All carpeting must be removed if installed over concrete.Radiant Heated Floors Tarkett Laminate Flooring is suitable for installation over underfloor heating systems provided that the heating element isinstalled at least 2” below the surface of the concrete and the flooring installation is guaranteed and warranted by theheating system manufacturer. Lower temperature of heating system to 60 F (16 C) for one week prior to flooring installation. Gradually increase temperature in increments of 10 per hour. Surface temperature should not exceed 85 F (28 C).CONDITIONING / ACCLIMATION Tarkett Laminate Flooring must be allowed to acclimate to the temperature of the room in which it will be installed. Place the unopened cartons of laminate lying horizontally in the room in which they will be installed for a minimumof 48 hours before installation. Do not remove the plastic wrapping. Room temperature shall be a minimum of 65 F (18 C) . Relative humidity must be between 40% and 70%.ROOM PREPARATION Remove existing wall moldings and doorway transition moldings. Leave at least ½” between the surface of the flooring and the bottom of electric baseboard heaters to allow heat to circulate. Undercut door moldings and casings to allow the flooring to fit underneath without restriction. Use a piece of laminate andfoam underlayment as a height guide. Sweep and/or vacuum substrate to remove all dirt and debris.It may be necessary to trim the bottom of any doors to allow for the change in floor height.Install foam underlayment:Tarkett Polyfoam - Tarkett PolyFoam is recommended for use on suspended wood substrates. Butt edges together andtape edges with plastic packaging tape. Tarkett Polyfoam may also be used on concrete substrates. However, a 10milpolyethylene vapor retarder must be installed over the concrete prior to installing the polyfoam. Overlap the edges of thepolyethylene 8 inches and tape the entire length of the seam with plastic packaging tape.Tarkett Polyfoam with Vapor Retarder - Tarkett Polyfoam with Vapor Retarder is recommended for use on all gradelevels of concrete and suspended wood substrates. Overlap the edges of the adjoining sheets and continuously seal usingthe tape attached to the vapor retarder. Tarkett Quiet-Cor - Tarkett Quiet-Cor is designed to improve the sound quality within the room and to help reduce the sound transmission to the floors below. Quiet-Cor is recommended for use on all grade levels of concrete and suspendedwood substrates. The vinyl foam side serves as a moisture vapor retarder when installing on concrete substrates. Installwith the vinyl foam side down. Butt edges together and seal with plastic packaging tape.
GETTING STARTED1. Tarkett Laminate is a floating floor and should not be glued or nailed to the substrate.2. Tarkett Laminate is intended for indoor use only.3. Tarkett Laminate is not recommended for use in high humidity areas where the floor may become wet (full bathrooms,steam rooms, etc.).4. Determine in which direction the planks will be installed. To make the room appear larger or if installing in very small roomsor hallways, it is preferable to lay the planks parallel to the longest room dimension.5. Do not install cabinets on planks.6. Carefully measure the room to determine squareness and also to determine the width of the last row of planks. If the widthof the last row of planks is less than 2” (50mm), excluding the tongue, the width of first row of planks will have to be cutaccordingly.7. A minimum 5/16” (8.2mm) expansion space is required around the perimeter of the room and all vertical objects.8. Inspect all planks for visible defects and damage before and during installation. Do not install damaged planks.Tarkett will not accept responsibility for claims on flooring installed with obvious defects. During installation,inspect the groove area and remove any debris that may prevent proper assembly of planks.INSTALLING PLANKSNEVER USE A HAMMER AND TAPPING BLOCK TO INSTALL TARKETT T-LOCK ANGLE-DROP LAMINATE.1.Begin laying planks from the left side of the starting wall and work to the right side. The tongue side of the plank shall facethe starting wall.TongueGroove2.Place 5/16” (8.2mm) spacers between the short and long side of the planks and the wall. Place spacers every 12” apartalong starting wall. Always position one spacer between the wall and where the planks join. This will prevent end joints fromopening or skewing.3.The end joints of the planks in the first row are assembled by inserting the tongue side into the groove side of the previousplank. Install remaining full planks in the first row.
4.The last plank in the first row will need to be cut. Measure the distance between the wall and the surface of the last fullplank. Subtract 5/16” (8.2mm) from this measurement to allow for the spacer. If this measurement is less than 12” (30.4cm),the length of first plank in the row must be cut. This will allow for a longer plank at the end of the row. The first and last plankin each row must be at least 12” (30.4cm) in length.5.When cutting planks, make sure that the teeth of the saw blade are cutting into the decorative surface. Best results areachieved by using a carbide tipped cutting blade.6.Many walls are irregular. Scribe or trace the contour of the wall onto the first row. Carefully detach planks and cut alongscribe mark. Reinstall first row of planks.7.The remaining piece cut off from the last plank in the first row may serve as the first plank in the second row provided it is atleast 12” (30.4cm) long. Position the first plank of the second row by inserting the long side tongue into the groove of thefirst row at approximately a 30º angle and rotate plank downward until laying flat. Always stagger end joints from row to rowa minimum of 12” (30.4cm).8.Position the second plank of the second row by inserting the long side tongue into the groove of the first row atapproximately a 30º angle. Gently slide or position the plank so it is aligned with the short side of the previous plank. Rotatethe plank downward to fully engage the long and short side joints. Continue with each plank in the row until row iscompleted. NOTE: Any lifting of the end joints will be corrected once the next row is installed.9.Continue working from left to right, row by row.
10. For rooms wider or longer than 40’ (12 meters), the use of Tarkett T-Moldings is required to account for the normalmovement of the floor. When required, T-Moldings should be positioned in areas such as doorways, archways, etc.11. In areas where it is difficult to angle the planks into position, such as around door moldings and casings, it is necessary toremove the lip on the groove edge of the planks you are fitting to. This is done by lightly scraping or planing off the lip onthe groove side of the plank. This will allow you to install the plank laying flat. After the lip has been trimmed on the planksyou are fitting to, lay the plank flat on the floor. Apply a thin bead of PVA laminate glue on top of the tongue and push theplank into position. Immediately wipe off any excess glue with a damp cloth.12. The last row of planks may need to be cut lengthwise to obtain the proper width. The width of the last row shall not be lessthan 2”. Align a plank that has been cut to the correct length exactly over the first plank in the previous row. Lay a scrapplank over top of the plank to be cut and mark the distance with a pencil. Cut each plank accordingly. When performing thisstep, remember to allow for a 5/16” (8.2mm) spacer between the wall and the last row of planks.FINISHING THE INSTALLATION After all planks have been installed, remove spacers from perimeter of room. Install transition moldings. Do not fasten any moldings through the laminate flooring. Predrill and install quarter round or baseboard molding. Molding must be sufficient size to cover the 5/16” (8.2mm) space.Do not fasten moldings through the laminate flooring. Fasten into the wall. Use plywood to cover the top of the laminate when moving heavy furniture or appliances into position. Use proper floor protectors under the legs of furniture. Maintain post installation temperature between 55º F and 100º F. Maintain relative humidity between 40% and 70%.CUTTING HOLES FOR PIPES1. Measure the distance from the wall to the center of the pipe. Mark the plank where the hole for the pipe will be drilled.Remember to allow for the 5/16” (8.2mm) spacer.2. Measure the diameter of the pipe. Drill the hole in the plank 5/16” (8.2mm) larger than the diameter of the pipe.3. If the hole for the pipe is located in the center of the plank, make a cut perpendicular to the long side of the plank. The cutshould be made going directly through the hole.4. If the hole for the pipe is located near the edge of the plank, make two 45º angle cuts to the hole from the side of the plankclosest to the hole. You can now position the two pieces around the pipe. Apply a bead of PVA laminate glue to the cutedge of the fill piece and press into place. Immediately wipe off any excess glue from the surface with a damp cloth. Use a5/16” (8.2mm) spacer to wedge and hold in place until glue dries.4. The 5/16” (8.2mm) expansion space around the perimeter of the pipe shall be completely filled with a silicone caulking.INSTALLATION ON STAIRS1. Tarkett Laminate Flooring may be installed on stairs and risers by fully adhering the planks. Do not use a foamunderlayment when installing on stairs. Tarkett Laminate products with attached foam should not be installed on stairs.2. Stairs and risers must be structurally sound. The existing stair nosing must have a square edge flush with the riser. If thenosing is rounded or exceeds the riser, cut it flush with the riser.3. If carpeting was installed on the steps, make sure all staples are removed. Sweep and/or vacuum to remove all dirt anddebris.
4.5.6.Starting at the bottom riser, measure and cut a plank to fit the riser. The plank for each riser shall be cut flush with the top ofthe existing stair tread. Using a good quality construction adhesive, apply a serpentine bead to the back of the plank. Pressplank firmly into place.Measure and cut a plank and stair nosing to fit the stair tread. Dry fit each piece to make sure they fit properly. Applyconstruction adhesive to the stair tread and spread evenly over the entire tread with a 1/16” x 1/16” x 1/16” notched trowel.Position plank and stair nosing and press firmly into place.If installing over a wood substrate, predrill holes through the stair nosing and fasten with finishing nails. Set nails so they arejust below the surface of the stair nosing.
Tarkett Laminate Flooring is suitable for installation over underfloor heating systems provided that the heating element is installed at least 2" below the surface of the concrete and the flooring installation is guaranteed and warranted by the heating system manufacturer. Lower temperature of heating system to 60 F (16 C) for one .