Transcription
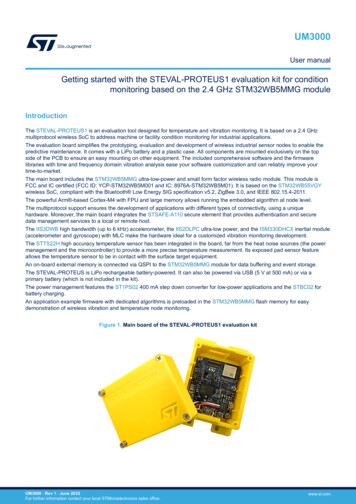
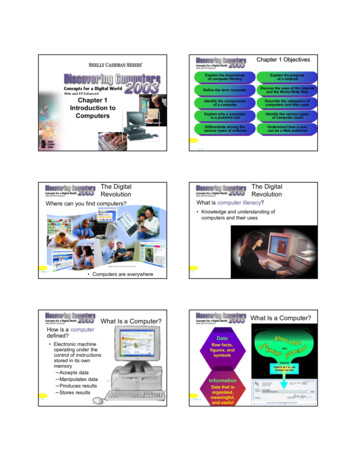
UM1560User manualSTEVAL-IPC004V1: handheld point-of-sale (POS)based on the STM32F1 seriesIntroductionThis user manual describes the functioning of the handheld point-of-sale system (theSTEVAL-IPC004V1) based on the STM32F1 series.The system consists of the inbuilt thermal printer, external bar code scanner, memoryinterface, LCD display, rechargeable battery supply system and many other features.This system works like a typical POS. It catches the item information thanks to a USB-basedbar code scanner and after processing the information, adds it to the transaction record.There are 2 methods of payment: smart card/ magnetic card interface over GPRS or cashthrough keypad. The thermal printer prints the sales report and the result is recorded in theonboard memory. The STEVAL-IPC004V1 operates from a 5 V adaptor, which is connectedto the board through the power jack provided. The system also comes with a PC-basedserver application which has various access levels to control the STEVAL-IPC004V1activities such as registration, the loading of item allotment tables in the internal memory,and the storage of sales data for future reference. The server keeps sales data in thedatabase up to 2 months and it also monitors the STEVAL-IPC004V1 health status andaccordingly enables/disables its functioning. For human interaction, there is a keypad with16 keys allowing a flexible interface. Finally, the system can be customized to includeinterfaces such as: smart card, GPRS as per customer requests.Figure 1. STEVAL-IPC004V1 evaluation boardMay 2014DocID023545 Rev 11/59www.st.com
ContentsUM1560Contents1Getting started . . . . . . . . . . . . . . . . . . . . . . . . . . . . . . . . . . . . . . . . . . . . . . 51.1System requirements . . . . . . . . . . . . . . . . . . . . . . . . . . . . . . . . . . . . . . . . . 51.2Package contents . . . . . . . . . . . . . . . . . . . . . . . . . . . . . . . . . . . . . . . . . . . . 51.3Hardware installation . . . . . . . . . . . . . . . . . . . . . . . . . . . . . . . . . . . . . . . . . 51.42342/591.3.1Power supply . . . . . . . . . . . . . . . . . . . . . . . . . . . . . . . . . . . . . . . . . . . . . . 51.3.2Jumper/ connector settings . . . . . . . . . . . . . . . . . . . . . . . . . . . . . . . . . . . 5Software installation . . . . . . . . . . . . . . . . . . . . . . . . . . . . . . . . . . . . . . . . . . 6STEVAL-IPC004V1 evaluation board description . . . . . . . . . . . . . . . . . 112.1STEVAL-IPC004V1 evaluation board architecture . . . . . . . . . . . . . . . . . . .112.2STEVAL-IPC004V1 evaluation board block diagram . . . . . . . . . . . . . . . . 122.3STEVAL-IPC004V1 behavior diagram . . . . . . . . . . . . . . . . . . . . . . . . . . . 13Major component description . . . . . . . . . . . . . . . . . . . . . . . . . . . . . . . . 143.1STEVAL-IPC004V1 PC server application . . . . . . . . . . . . . . . . . . . . . . . . 143.2Web-based virtual bank application . . . . . . . . . . . . . . . . . . . . . . . . . . . . . 153.3Front keypad . . . . . . . . . . . . . . . . . . . . . . . . . . . . . . . . . . . . . . . . . . . . . . 153.4Thermal printer . . . . . . . . . . . . . . . . . . . . . . . . . . . . . . . . . . . . . . . . . . . . . 163.5External bar code scanner . . . . . . . . . . . . . . . . . . . . . . . . . . . . . . . . . . . . 163.6Monochrome graphic LCD . . . . . . . . . . . . . . . . . . . . . . . . . . . . . . . . . . . . 163.7GPRS interface . . . . . . . . . . . . . . . . . . . . . . . . . . . . . . . . . . . . . . . . . . . . 163.8Smart card interface . . . . . . . . . . . . . . . . . . . . . . . . . . . . . . . . . . . . . . . . . 163.9Magnetic card interface . . . . . . . . . . . . . . . . . . . . . . . . . . . . . . . . . . . . . . 163.10Memory interface . . . . . . . . . . . . . . . . . . . . . . . . . . . . . . . . . . . . . . . . . . . 163.11Battery charger interface . . . . . . . . . . . . . . . . . . . . . . . . . . . . . . . . . . . . . 173.12Other interfaces . . . . . . . . . . . . . . . . . . . . . . . . . . . . . . . . . . . . . . . . . . . . 17Interaction with the server to setup the STEVAL-IPC004V1 . . . . . . . . 184.1Starting the STEVAL-IPC004V1 evaluation board . . . . . . . . . . . . . . . . . . 184.2Starting the STEVAL-IPC004V1 server application . . . . . . . . . . . . . . . . . 184.3Connecting the STEVAL-IPC004V1 to the server application . . . . . . . . . 204.4STEVAL-IPC004V1 registration . . . . . . . . . . . . . . . . . . . . . . . . . . . . . . . . 21DocID023545 Rev 1
UM1560Contents4.55Using the STEVAL-IPC004V1 for transactions . . . . . . . . . . . . . . . . . . . 245.1Starting transaction . . . . . . . . . . . . . . . . . . . . . . . . . . . . . . . . . . . . . . . . . . 245.2Adding item to the transaction table . . . . . . . . . . . . . . . . . . . . . . . . . . . . . 245.3Completing the transaction . . . . . . . . . . . . . . . . . . . . . . . . . . . . . . . . . . . . 255.4Payment . . . . . . . . . . . . . . . . . . . . . . . . . . . . . . . . . . . . . . . . . . . . . . . . . . 255.56STEVAL-IPC004V1 synchronization with server application . . . . . . . . . . 225.4.1Cash mode . . . . . . . . . . . . . . . . . . . . . . . . . . . . . . . . . . . . . . . . . . . . . . 255.4.2Card mode . . . . . . . . . . . . . . . . . . . . . . . . . . . . . . . . . . . . . . . . . . . . . . . 26Recording of sales record . . . . . . . . . . . . . . . . . . . . . . . . . . . . . . . . . . . . 27Inventory management . . . . . . . . . . . . . . . . . . . . . . . . . . . . . . . . . . . . . . 286.1Adding item to the inventory list . . . . . . . . . . . . . . . . . . . . . . . . . . . . . . . . 286.2To view the inventory . . . . . . . . . . . . . . . . . . . . . . . . . . . . . . . . . . . . . . . . 296.3Updating inventory . . . . . . . . . . . . . . . . . . . . . . . . . . . . . . . . . . . . . . . . . . 306.4Sales record view . . . . . . . . . . . . . . . . . . . . . . . . . . . . . . . . . . . . . . . . . . . 31Appendix A Schematic diagram and bill of materials . . . . . . . . . . . . . . . . . . . . . 33Revision history . . . . . . . . . . . . . . . . . . . . . . . . . . . . . . . . . . . . . . . . . . . . . . . . . . . . 58DocID023545 Rev 13/5959
List of figuresUM1560List of figuresFigure 1.Figure 2.Figure 3.Figure 4.Figure 5.Figure 6.Figure 7.Figure 8.Figure 9.Figure 10.Figure 11.Figure 12.Figure 13.Figure 14.Figure 15.Figure 16.Figure 17.Figure 18.Figure 19.Figure 20.Figure 21.Figure 22.Figure 23.Figure 24.Figure 25.Figure 26.Figure 27.Figure 28.Figure 29.Figure 30.Figure 31.Figure 32.Figure 33.Figure 34.Figure 35.Figure 36.Figure 37.Figure 38.Figure 39.Figure 40.Figure 41.4/59STEVAL-IPC004V1 evaluation board . . . . . . . . . . . . . . . . . . . . . . . . . . . . . . . . . . . . . . . . . . 1Component dependency. . . . . . . . . . . . . . . . . . . . . . . . . . . . . . . . . . . . . . . . . . . . . . . . . . . . 6SQL server installation . . . . . . . . . . . . . . . . . . . . . . . . . . . . . . . . . . . . . . . . . . . . . . . . . . . . . 7SQL server component installation . . . . . . . . . . . . . . . . . . . . . . . . . . . . . . . . . . . . . . . . . . . . 7Installation window . . . . . . . . . . . . . . . . . . . . . . . . . . . . . . . . . . . . . . . . . . . . . . . . . . . . . . . . 8License window . . . . . . . . . . . . . . . . . . . . . . . . . . . . . . . . . . . . . . . . . . . . . . . . . . . . . . . . . . 8Customer information . . . . . . . . . . . . . . . . . . . . . . . . . . . . . . . . . . . . . . . . . . . . . . . . . . . . . 9Destination folder . . . . . . . . . . . . . . . . . . . . . . . . . . . . . . . . . . . . . . . . . . . . . . . . . . . . . . . . . 9Ongoing installation . . . . . . . . . . . . . . . . . . . . . . . . . . . . . . . . . . . . . . . . . . . . . . . . . . . . . . 10STEVAL-IPC004V1 layered architecture . . . . . . . . . . . . . . . . . . . . . . . . . . . . . . . . . . . . . . 11STEVAL-IPC004V1 block diagram . . . . . . . . . . . . . . . . . . . . . . . . . . . . . . . . . . . . . . . . . . . 12STEVAL-IPC004V1 behavior diagram . . . . . . . . . . . . . . . . . . . . . . . . . . . . . . . . . . . . . . . . 13STEVAL-IPC004V1 PC-based server application . . . . . . . . . . . . . . . . . . . . . . . . . . . . . . . 14Virtual bank application. . . . . . . . . . . . . . . . . . . . . . . . . . . . . . . . . . . . . . . . . . . . . . . . . . . . 15STEVAL-IPC004V1 keypad . . . . . . . . . . . . . . . . . . . . . . . . . . . . . . . . . . . . . . . . . . . . . . . . 15User login information . . . . . . . . . . . . . . . . . . . . . . . . . . . . . . . . . . . . . . . . . . . . . . . . . . . . . 18Connecting STEVAL-IPC004V1 to server . . . . . . . . . . . . . . . . . . . . . . . . . . . . . . . . . . . . . 20Unregistered terminal . . . . . . . . . . . . . . . . . . . . . . . . . . . . . . . . . . . . . . . . . . . . . . . . . . . . . 20Register window . . . . . . . . . . . . . . . . . . . . . . . . . . . . . . . . . . . . . . . . . . . . . . . . . . . . . . . . . 21Authenticated STEVAL-IPC004V1 . . . . . . . . . . . . . . . . . . . . . . . . . . . . . . . . . . . . . . . . . . 21Synchronize tab . . . . . . . . . . . . . . . . . . . . . . . . . . . . . . . . . . . . . . . . . . . . . . . . . . . . . . . . . 22Synchronization operation result . . . . . . . . . . . . . . . . . . . . . . . . . . . . . . . . . . . . . . . . . . . . 23Inventory report tab. . . . . . . . . . . . . . . . . . . . . . . . . . . . . . . . . . . . . . . . . . . . . . . . . . . . . . . 28Add to inventory tab . . . . . . . . . . . . . . . . . . . . . . . . . . . . . . . . . . . . . . . . . . . . . . . . . . . . . . 28Item added successfully . . . . . . . . . . . . . . . . . . . . . . . . . . . . . . . . . . . . . . . . . . . . . . . . . . . 29View inventory . . . . . . . . . . . . . . . . . . . . . . . . . . . . . . . . . . . . . . . . . . . . . . . . . . . . . . . . . . 29Search result by category search criteria . . . . . . . . . . . . . . . . . . . . . . . . . . . . . . . . . . . . . . 30Updated item in inventory . . . . . . . . . . . . . . . . . . . . . . . . . . . . . . . . . . . . . . . . . . . . . . . . . . 31Sales tab . . . . . . . . . . . . . . . . . . . . . . . . . . . . . . . . . . . . . . . . . . . . . . . . . . . . . . . . . . . . . . . 31Sales record tab . . . . . . . . . . . . . . . . . . . . . . . . . . . . . . . . . . . . . . . . . . . . . . . . . . . . . . . . . 32Schematic diagram (1/11). . . . . . . . . . . . . . . . . . . . . . . . . . . . . . . . . . . . . . . . . . . . . . . . . . 33Schematic diagram (2/11). . . . . . . . . . . . . . . . . . . . . . . . . . . . . . . . . . . . . . . . . . . . . . . . . . 34Schematic diagram (3/11). . . . . . . . . . . . . . . . . . . . . . . . . . . . . . . . . . . . . . . . . . . . . . . . . . 35Schematic diagram (4/11). . . . . . . . . . . . . . . . . . . . . . . . . . . . . . . . . . . . . . . . . . . . . . . . . . 36Schematic diagram (5/11). . . . . . . . . . . . . . . . . . . . . . . . . . . . . . . . . . . . . . . . . . . . . . . . . . 37Schematic diagram (6/11). . . . . . . . . . . . . . . . . . . . . . . . . . . . . . . . . . . . . . . . . . . . . . . . . . 38Schematic diagram (7/11). . . . . . . . . . . . . . . . . . . . . . . . . . . . . . . . . . . . . . . . . . . . . . . . . . 39Schematic diagram (8/11). . . . . . . . . . . . . . . . . . . . . . . . . . . . . . . . . . . . . . . . . . . . . . . . . . 40Schematic diagram (9/11). . . . . . . . . . . . . . . . . . . . . . . . . . . . . . . . . . . . . . . . . . . . . . . . . . 41Schematic diagram (10/11). . . . . . . . . . . . . . . . . . . . . . . . . . . . . . . . . . . . . . . . . . . . . . . . . 42Schematic diagram (11/11). . . . . . . . . . . . . . . . . . . . . . . . . . . . . . . . . . . . . . . . . . . . . . . . . 43DocID023545 Rev 1
UM1560Getting started1Getting started1.1System requirementsSoftware–Processor: minimum 500 MHz, recommended 1.0 GHz–RAM: minimum 256 MB, recommended 1 GB depending on the operating systemused–Hard disk: 7200 rpm HDD–Supported operating systems: Windows Server 2003; Windows XP–The latest service pack and critical updates are requested according to the versionof Windows used. These can be downloaded from Microsoft update website–Microsoft .NET Framework 2.0 SP1 has to be installed on the PC–Microsoft Internet Explorer 7.0 (with the latest service pack) has to be installed–VC 2005 runtime has to be installed on the system–Full installation of POS software application requires about 10 MB of hard diskspace. Additional space may be required for inventory databaseTo know the operating system present in the computer, below steps can be followed:1.21.Click “start”2.Right click “my computer”3.Click “properties”4.Go to system tab where the operating system is listedPackage contentsThe STEVAL-IPC004V1 system includes the following items:1.Hardware content: the STEVAL-IPC004V1 evaluation board2.Software content: PC-based server application software with help file1.3Hardware installation1.3.1Power supplyThe board can be powered either connecting a 5 V, 2.5 A adapter to J12 or by 7.2 V, 2 A LiIon-based battery pack. The correct terminal of the battery, BT1, has to be connected to themain board (refer to the schematic in appendix A). A battery charging circuitry is alsoimplemented on the board.1.3.2Jumper/ connector settingsMost of connectors are always available on the system and some of them are veryimportant for the correct use of the system.DocID023545 Rev 15/5959
Getting startedUM1560BT1 (battery connector):BT1 is the optional battery connector, which connects the battery to the system and itsspecifications are: 7.2 V, 2 A.J12 (power jack connector):J12, power jack connector, connects the external DC supply to the system (2.5 A powersupply); the default supply is 5 V, 2.5 A. However, the print quality of the thermal printer canbe improved if a higher voltage: 7 V, 2.5 A is connected.Therfore, J12 should be connectedmanually to the appropriate external power supply. The maximum DC input should be lessthan 10 V for safe operation.J14 (USB micro AB connector):J14 is used for USB operation to connect to PC or to connect to USB scanner. J2 (DFUconnector) enables DFU mode to upgrade the firmware.1.4Software installationThe latest version of the PC application software can be downloaded from St’s officialwebsite.To install the PC-based STEVAL-IPC004V1 server application software, follow below steps: Step 1: click the setup.exe icon and the following window appears.Figure 2. Component dependencyThis window appears if SQL server 2005 is not installed in your system. So, click “Install” tostart the installation as shown in Figure 3.6/59DocID023545 Rev 1
UM1560Getting startedFigure 3. SQL server installationPlease, follow instructions and accept both terms and conditions as displayed in Figure 4.Figure 4. SQL server component installationDocID023545 Rev 17/5959
Getting startedUM1560 Step 2: when the software has been installed, the following window appears, see Figure 5.Click on “Next” button.Figure 5. Installation window Step 3: read the license file and click on “I accept” button if you accept it.Figure 6. License window8/59DocID023545 Rev 1
UM1560Getting started Step 4: below, the application registration window, fill in the form and click on “Next”button.Figure 7. Customer information Step 5: select the folder where the software has to be installed. The destination folder isby default C:\.\STMicroelectronics\POS PC Application\.Figure 8. Destination folderDocID023545 Rev 19/5959
Getting startedUM1560 Step 6: click on “Next” button to start the software installation.Figure 9. Ongoing installationWhen the installation has been completed, the window appears, so click on “Finish” buttonto complete the operation. The software is now available in the selected directory or in thedefault directory. Besides, the shortcut of this software is also available in START menu.Warning:10/59When POS evaluation board is connected for the first time,the driver is requested. The path for driver installation is bydefault C:\Program Files\STMicroelectronics\POS PCApplication\Driver.DocID023545 Rev 1
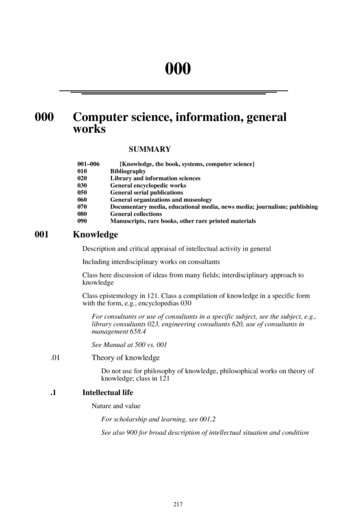
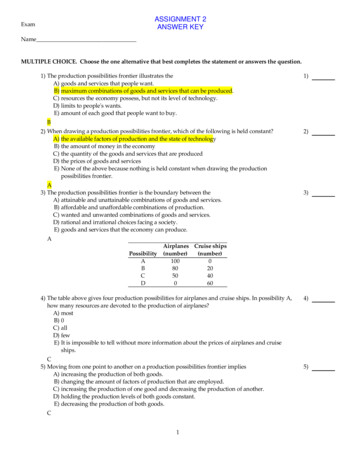
UM1560STEVAL-IPC004V1 evaluation board description2STEVAL-IPC004V1 evaluation board description2.1STEVAL-IPC004V1 evaluation board architecturePOS evaluation board is a modular system based on the STM32F1 series which comes withserver applications to complete the transaction.The STEVAL-IPC004V1 bases on a layered architecture which can be divided in thefollowing sections:a)Application management layerb)Component layerc)Peripheral layerFigure 10. STEVAL-IPC004V1 layered architecture DQGKHOG 326 DSSOLFDWLRQ SSOLFDWLRQ PDQDJHPHQW OD\HU326 PHPRU\ 326 *8, PDQDJHPHQW PDQDJHPHQW 326 VHFXULW\&RPS FRQI PDQDJHPHQW.H\SDG GLVSOD\326 VWDWH PDQDJHPHQW&RPSRQHQW OD\HU0HPRU\ XGLR6PDUW FDUG86%,QWHUUXSW'LVSOD\3URWHFWLRQ0(067HPS VHQVRU6FDQQHU 6WRXFKB/LE3ULQWHU:HLJKLQJ6FDOH*60670 6'. 9 VWDQGDUG SHULSKHUDO OLEUDU\ 0 Y a)Application management layer.This is the main application layer of the STEVAL-IPC004V1, whose major role is tointeract with the server application and to handle various events and output thecorrect message on LCD.b)Component layer management.This is a critical layer, which acts as a bridge between various device libraries andthe application layer. Each component of this layer has a specific behavior. Forexample the bar code scanner component handles all events related to the barcode scanner.DocID023545 Rev 111/5959
STEVAL-IPC004V1 evaluation board descriptionc)UM1560Peripheral layer.This is the driver layer and it is the software implementation over the STM32F1hardware to use all available peripherals.2.2STEVAL-IPC004V1 evaluation board block diagramFigure 11. STEVAL-IPC004V1 block diagram12/59DocID023545 Rev 1
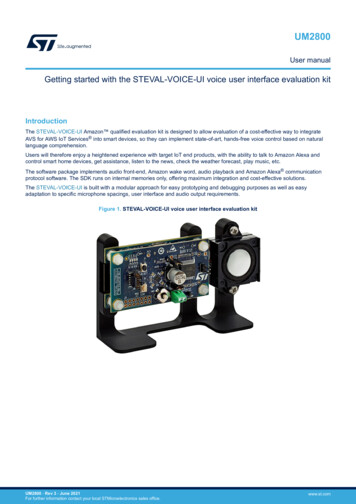
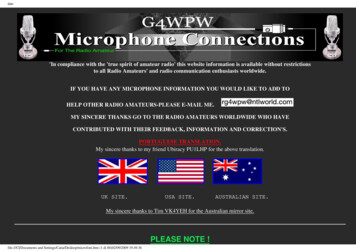
UM15602.3STEVAL-IPC004V1 evaluation board descriptionSTEVAL-IPC004V1 behavior diagramFigure 12 shows the STEVAL-IPC004V1 behavior diagram.Figure 12. STEVAL-IPC004V1 behavior diagram6FDQQHU7KHUPDO 3ULQWHU 0HPRU\'LVSOD\,WHPV3ULQWV,WHP WHPSODWH DQG LW XSGDWHV VDOHV UHFRUG 6SHFLDO PRGHV RI PHPRU\ PDQDJHPHQW6DOHV,WHP,QIR6DOHVUHSRUW7RXFKSDG 326RSHUDWRU7DPSHU GHWHFWLRQ KHDOWK PRQLWRULQJ DQG SRZHU PDQDJHPHQW6FDQ ,WHP8SGDWHV 6DOHV 5HFRUGV# RQFH SHU GD\7DNHV FDVK DQG SURYLGHV VDOH UHFHLSW GYHUWLVHPHQW PHVVDJH XWKHQWLFDWHV 326 DQG XSORDGV LQYHQWRU\# RQFH SHU GD\6SHDNHU6HUYHU0DQDJHU OORFDWH LQYHQWRU\&RQVXPHU%DWWHU\ LQWHUIDFH:HLJKLQJ VFDOH 0 Y DocID023545 Rev 113/5959
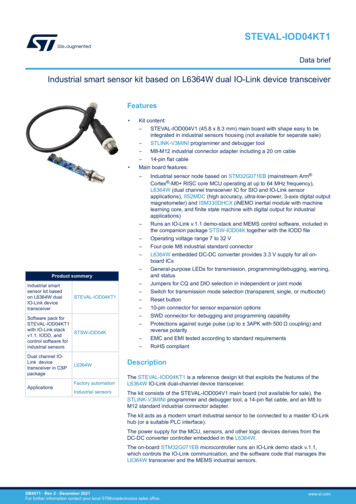
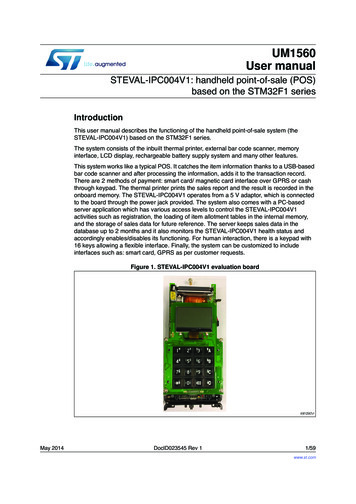
Major component descriptionUM15603Major component description3.1STEVAL-IPC004V1 PC server applicationThe STEVAL-IPC004V1 evaluation board is a modular system based on the STM32F1series, which comes with server applications to complete the transaction.The system interacts with a PC-based server application on a USB-based vendor specificprotocol. Before the initialization, an authentication process based on AES128 encryptionalgorithm is performed. Once the STEVAL-IPC004V1 system is authenticated, access tosales record is allowed.Figure 13. STEVAL-IPC004V1 PC-based server applicationTo know the details about the STEVAL-IPC004V1 server application, please refer to its helpfile.14/59DocID023545 Rev 1
UM15603.2Major component descriptionWeb-based virtual bank applicationIn this web-based virtual bank application, a new account can be added. During thecashless transaction, the STEVAL-IPC004V1 system uses the magnetic card/ smart cardinterface over GPRS.Figure 14. Virtual bank application3.3Front keypadThe STEVAL-IPC004V1 keypad is given in Figure 15.Figure 15. STEVAL-IPC004V1 keypadOn the front keypad, 16 keys are present: “A” complete key: to complete the ongoing transaction. “C” cancel key: to cancel the ongoing transaction. “B” back key: to delete one character from the LCD during bar code and cash entry fromthe numeric keypad. By pressing “B” key the previous transaction can be deleted.DocID023545 Rev 115/5959
Major component descriptionUM1560 “*” up key: to go up in the menu. “#” down key: to go down in the menu. “D” enter key: to select the current selected item from the menu. “0” - “9” numeric keys: they are only used to manually enter the bar code information andthe cash information.3.4Thermal printerFujitsu FTP-628 MCL101/103 series ultra compact thermal printer is used in the currentSTEVAL-IPC004V1 evaluation board. This kind of printer is quite useful in applications suchas handheld POS. For detailed information, please refer to FTP-628 MCL101/103 series.3.5External bar code scannerThe STEVAL-IPC004V1 supports any USB driver bar code scanner. So any external powersupply for this scanner is useless.3.6Monochrome graphic LCDThis system uses a 132x64 monochrome graphic LCD HTG13264C, with a 3.3 V supply.3.7GPRS interfaceThis system supports GPRS interface over USART. The current supported module isSIM900D but it can also be customized for other modules.3.8Smart card interfaceThis system supports the ST8024 smart card interface.3.9Magnetic card interfaceThe system supports dual and single track interface.3.10Memory interfaceThe system uses serial NOR N25Q064. In addition, NAND512 interface is also provided foradditional memory requirements.16/59DocID023545 Rev 1
UM15603.11Major component descriptionBattery charger interfaceDriven by the STM8S microcontroller, this section comes with a customizable dual cell LiIon battery charger. This charger is flexible in terms of setting charging voltage, chargingcurrent etc.3.12Other interfacesThe STEVAL-IPC004V1 also has the following interfaces: UART interface Pen drive interfaceDocID023545 Rev 117/5959
Interaction with the server to setup the STEVAL-IPC004V14Interaction with the server to setup the STEVALIPC004V14.1Starting the STEVAL-IPC004V1 evaluation boardUM1560The STEVAL-IPC004V1 evaluation board has to be powered up, as described inSection 1.3.1. Some messages can be read on the LCD screen, finally the below messageappears: "In Conf Mode"This means that the STEVAL-IPC004V1 board has been correctly started and user can goahead.Note:A different final message appears when the STEVAL-IPC004V1 evaluation board isconnected to the server application, as described in the coming section.4.2Starting the STEVAL-IPC004V1 server applicationFigure 16. User login informationDouble click on POSApplication.exe, and the user login window appears. Theadministration password is given by default and it allows the user to enter the application.Click on “Login” button, and the server application opens.18/59DocID023545 Rev 1
UM1560User access levelsDepending on the access level given, the following user profiles are supported.Table 1. User access levels in GUIChangeViewpassword inventorySynchronizeterminalRemove\ Add\Add eformatrecord inventory inventory inventory terminalterminal userDescriptionLevel 0No accessYesNoNoNoNoNoNoNoNoNoNoLevel 1GuestYesYesYesNoNoNoNoNoNoNoNoLevel 2Sales personYesYesYesYesNoNoNoNoNoNoNoLevel 3StoremanagerYesYesYesYesYesYesYesYesNoNoNoLevel l 59Interaction with the server to setup the STEVAL-IPC004V1DocID023545 Rev 1Feature
Interaction with the server to setup the STEVAL-IPC004V14.3UM1560Connecting the STEVAL-IPC004V1 to the server applicationTo connect a new STEVAL-IPC004V1 to the server application, go to “Synchronize” tab,click on “Connect” button as shown in Figure 17.Figure 17. Connecting STEVAL-IPC004V1 to serverA new STEVAL-IPC004V1 appears as shown in Figure 18:Figure 18. Unregistered terminalNext step is to register the STEVAL-IPC004V1.20/59DocID023545 Rev 1
UM15604.4Interaction with the server to setup the STEVAL-IPC004V1STEVAL-IPC004V1 registrationGo to “Terminal Management” tab, click on “Register Terminal” button as shown inFigure 19.Figure 19. Register windowEnter POS serial key in “Terminal Serial” text box and the STEVAL-IPC004V1 description in“Description” text box. Click on “Register Terminal” button. Go back to the “Synchronize” tabwindow and click on “Connect” button again, “POS Confirmed, Authenticated” is theapplication bottom status bar as shown in Figure 20.Figure 20. Authenticated STEVAL-IPC004V1DocID023545 Rev 121/5959
Interaction with the server to setup the STEVAL-IPC004V14.5UM1560STEVAL-IPC004V1 synchronization with server applicationAfter connecting and authenticating the STEVAL-IPC004V1 with the server application asdescribed in the previous section, the synchronization between the STEVAL-IPC004V1 andthe server application can be performed.Go to “Synchronize” tab, click “Sync Terminal” button. The following window opens asshown in Figure 21.Figure 21. Synchronize tabClick “Sync Terminal” button and the synchronization starts. See Figure 22.22/59DocID023545 Rev 1
UM1560Interaction with the server to setup the STEVAL-IPC004V1Figure 22. Synchronization operation resultThere is a default item allotment table (table containing item information about thetransaction) available in the STEVAL-IPC004V1 server application.During the synchronization, any sales record available in the STEVAL-IPC004V1 terminalmerges with the server database and updated item allotment table is downloaded in theSTEVAL-IPC004V1 memory. Thanks to the option available in the form “Retain Sales Data”,sales data can be retained in the STEVAL-IPC004V1 memory.Note:Default item allotment table is given just for demo purpose. The administrator of theSTEVAL-IPC004V1 server application can generate a new item allotment table. How togenerate the item allotment table is described in the following section.DocID023545 Rev 123/5959
Using the STEVAL-IPC004V1 for transactions5UM1560Using the STEVAL-IPC004V1 for transactionsTo perform the transaction, follow below steps.Power up the board and the following message appears:'Welcome to''STMicroelectronics'After few seconds, the following menu shows modes to be selected on the LCD:'Normal Mode''USB Mode''REPORT''GPRS DEMO''SELF DIAG''REG MODE"Please wait for 3-4 minutes (for GPRS connectivity stabilization) press 'D' (enter) key toselect modes.Note:Don't leave the board in idle status for long time during a transaction. In fact, after a whilethe board goes to screensaver mode and the transaction has to be deleted by pressing “C”cancel key.5.1Starting transactionSelecting “Normal Mode”, the transaction mode is automatically set and the followingmessage can be read on the LCD screen.'New Transaction Started'After few seconds, below message appears:'Add Items using Keypad or Scanner'5.2Adding item to the transaction tableCurrently the item information can be retrieved from the STEVAL-IPC004V1 using the barcode assigned for each item. The current system supports up to 5000 types of iteminformation which is stored in the onboard memory. This can be easily customized.An external bar code scanner is used to add item information. Alternatively, the bar codeinfo can be added using the keypad as well. Please make sure that bar code scanner isconnected to USB connector of the board before powering the board.Once the bar code information is entered (for example: press button 3), the followingmessage appears:'ITEM BARCODE'.324/59DocID023545 Rev 1
UM1560Using the STEVAL-IPC004V1 for transactionsIf entered bar code is not present, the below message appears:'Wrong Item Bar code'Then the correct bar code has to be entered.Now press “D” enter key and the following message is displayed:'3000000000000000'Press Enter to proceed'.Press “D” enter key to be added to the current transaction. In each transaction, around 100different item types can be inserted.Now the following message appears:'SN1.ITEMQNTCheese 001Total Amt INR'0040'0040.0 RBy pressing “A” complete key, the payment mode selection is requested.Further quantity of the same item can be added. For example, if 2 pieces of cheese have tobe bought, then item bar code has to be added as shown below:'SN1.ITEMQNTCheese 002Total Amt INR'0080'0080.0 RBy pressing “A” complete key, the payment mode selection is asked.5.3Completing the transactionTo complete the transaction, press “A” complete key. This forces the STEVAL-IPC004V1 tocompile the current transaction list and asks for the payment mode which is shown asfollows:'1) Cash Mode2) Card Mode'Select the payment mode using “*” up and “#” down key and then press “D” enter key.5.4Payment5.4.1Cash modeIf the cash mode has been selected, the amount has been entered using the keypad. TheLCD display also shows the total amount required.Press “D” enter key. The recording of the current traction is carried out in the memory andonce it is completed, the following message can be read:'Amt Rec. 0030.0 RTotal Amt. 0027.0 RChange 0003.0 R'Now press “D” enter key to get the transaction slip.DocID023545 Rev 125/5959
Using the STEVAL-IPC004V1 for transactions5.4.2UM1560Card modePlease make sure that SIM card has been inserted before choosing the card mode. The slotfor SIM card is on the back of the board. Also, the content of atcommands.h file has to bechanged according to GPRS connection.For example: if airtel SIM card is used, settings have to be changed accordingly inatcommands.h file.static uc8 uc8 GDefinePDP[] "AT CGDCONT 1,\"IP\",\"airtelgprs.com\"";static uc8 uc8 GSetAPN[] "AT CSTT \"airtelgprs.com\"";If the card mode has been selected, the following message is shown:'Card mode selected'Total Amt 0040.0 R'The amount is entered using the keypad and pressing “D” enter key. The below messagecan be read.'Insert card for payment using card'Now the card can be placed in the magnetic card slot. If the card insertion is successful,then the following message appears.'WaitInitializing GPRS'Then the below message is given:'GPRS initialized, verifying card'For the successful transaction, the LCD shows the transaction detail as follows:'Amt Rec. 0
This user manual describes the functioning of the handheld point-of-sale system (the STEVAL-IPC004V1) based on the STM32F1 series. The system consists of the inbuilt thermal printer, external bar code scanner, memory interface, LCD display, rechargeable battery supply system and many other features. This system works like a typical POS.