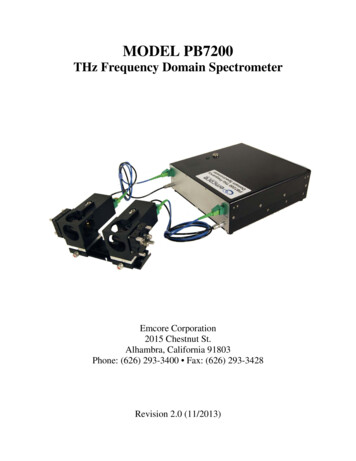
Transcription
PB7200BenQ PB7220PB7100User’s Manual
CopyrightCopyright 2003 by BENQ Corporation. All rights reserved. No part of this publicationmay be reproduced, transmitted, transcribed, stored in a retrieval system or translatedinto any language or computer language, in any form or by any means, electronic,mechanical, magnetic, optical, chemical, manual or otherwise, without the prior writtenpermission of BENQ Corporation.DisclaimerBENQ Corporation makes no representations or warranties, either expressed or implied,with respect to the contents hereof and specifically disclaims any warranties,merchantability or fitness for any particular purpose. Furthermore, BENQ Corporationreserves the right to revise this publication and to make changes from time to time in thecontents hereof without obligation of BENQ Corporation to notify any person of suchrevision or changes.Fill this in!!In case service is needed in the future, record the information described below. Theserial number is on the back of the product.Projector InformationProduct Name:PB7200/ PB7220/ PB7100Serial Number:Date of Purchase:Dealer InformationDealer:TelephoneNumber:Address:
BenQ PB7200/ PB7220/ PB7100 User’s ManualTable of ContentsIntroduction . . . . . . . . . . . . . . . . . . . . . . . . . . . . . . . . . . . . . . . 1Safety Instructions . . . . . . . . . . . . . . . . . . . . . . . . . . . . . . . . . . . . . . . . . . . . . . . . . . . . . . . .1Shipping Contents . . . . . . . . . . . . . . . . . . . . . . . . . . . . . . . . . . . . . . . . . . . . . . . . . . . . . . . .2Alternative Accessories . . . . . . . . . . . . . . . . . . . . . . . . . . . . . . . . . . . . . . . . . . . . . . . . 2Optional Accessories . . . . . . . . . . . . . . . . . . . . . . . . . . . . . . . . . . . . . . . . . . . . . . . . . . 2Projector Description . . . . . . . . . . . . . . . . . . . . . . . . . . . . . . . . . . . . . . . . . . . . . . . . . . . . .3Projector . . . . . . . . . . . . . . . . . . . . . . . . . . . . . . . . . . . . . . . . . . . . . . . . . . . . . . . . . . . 3External Control Panel . . . . . . . . . . . . . . . . . . . . . . . . . . . . . . . . . . . . . . . . . . . . . . . . . 4Adjuster . . . . . . . . . . . . . . . . . . . . . . . . . . . . . . . . . . . . . . . . . . . . . . . . . . . . . . . . . . . . . 5Projector Features . . . . . . . . . . . . . . . . . . . . . . . . . . . . . . . . . . . . . . . . . . . . . . . . . . . . 5Remote Control Description . . . . . . . . . . . . . . . . . . . . . . . . . . . . . . . . . . . . . . . . . . . . . . .6Remote Control Effective Range . . . . . . . . . . . . . . . . . . . . . . . . . . . . . . . . . . . . . . . . . 7Installing or Replacing Batteries . . . . . . . . . . . . . . . . . . . . . . . . . . . . . . . . . . . . . . . . . . 7Installation . . . . . . . . . . . . . . . . . . . . . . . . . . . . . . . . . . . . . . . . . 8Screen Size . . . . . . . . . . . . . . . . . . . . . . . . . . . . . . . . . . . . . . . . . . . . . . . . . . . . . . . . . . . . . .8Connecting to Various Equipment . . . . . . . . . . . . . . . . . . . . . . . . . . . . . . . . . . . . . . . . . . .9Operation . . . . . . . . . . . . . . . . . . . . . . . . . . . . . . . . . . . . . . . . 12Start Up . . . . . . . . . . . . . . . . . . . . . . . . . . . . . . . . . . . . . . . . . . . . . . . . . . . . . . . . . . . . . . .12Digital Keystone Correction . . . . . . . . . . . . . . . . . . . . . . . . . . . . . . . . . . . . . . . . . . . . . . .13Auto Adjustment . . . . . . . . . . . . . . . . . . . . . . . . . . . . . . . . . . . . . . . . . . . . . . . . . . . . . . . .13Source Selection . . . . . . . . . . . . . . . . . . . . . . . . . . . . . . . . . . . . . . . . . . . . . . . . . . . . . . . .14Blank . . . . . . . . . . . . . . . . . . . . . . . . . . . . . . . . . . . . . . . . . . . . . . . . . . . . . . . . . . . . . . . . .14Menu System . . . . . . . . . . . . . . . . . . . . . . . . . . . . . . . . . . . . . . . . . . . . . . . . . . . . . . . . . . .151. Display Menu . . . . . . . . . . . . . . . . . . . . . . . . . . . . . . . . . . . . . . . . . . . . . . . . . . . . . 162. Image Menu . . . . . . . . . . . . . . . . . . . . . . . . . . . . . . . . . . . . . . . . . . . . . . . . . . . . . . 173. Source Menu . . . . . . . . . . . . . . . . . . . . . . . . . . . . . . . . . . . . . . . . . . . . . . . . . . . . . 184. Control Menu . . . . . . . . . . . . . . . . . . . . . . . . . . . . . . . . . . . . . . . . . . . . . . . . . . . . . 195. PIP Menu . . . . . . . . . . . . . . . . . . . . . . . . . . . . . . . . . . . . . . . . . . . . . . . . . . . . . . . . . 20Shutdown . . . . . . . . . . . . . . . . . . . . . . . . . . . . . . . . . . . . . . . . . . . . . . . . . . . . . . . . . . . . . .21Maintenance . . . . . . . . . . . . . . . . . . . . . . . . . . . . . . . . . . . . . . 22Lamp Information . . . . . . . . . . . . . . . . . . . . . . . . . . . . . . . . . . . . . . . . . . . . . . . . . . . . . . .22Use and Replacement of the Lamp . . . . . . . . . . . . . . . . . . . . . . . . . . . . . . . . . . . . . . . 22Lamp Replacement . . . . . . . . . . . . . . . . . . . . . . . . . . . . . . . . . . . . . . . . . . . . . . . . . . . 22Resetting Lamp Hours. . . . . . . . . . . . . . . . . . . . . . . . . . . . . . . . . . . . . . . . . . . . . . . . . 24Temp Information . . . . . . . . . . . . . . . . . . . . . . . . . . . . . . . . . . . . . . . . . . . . . . . . . . . . . . .24LED Indicator Status & Illustration . . . . . . . . . . . . . . . . . . . . . . . . . . . . . . . . . . . . . . . . . .24Table of Contentsiii
BenQ PB7200/ PB7220/ PB7100 Manualllustration . . . . . . . . . . . . . . . . . . . . . . . . . . . . . . . . . . . . . . . . . . . . . . . . . . . . . . . . . . 24Service Information . . . . . . . . . . . . . . . . . . . . . . . . . . . . . . . . . . . . . . . . . . . . . . . . . . . . . 26Accessories (included in the standard package) . . . . . . . . . . . . . . . . . . . . . . . . . . . . 26Alternative Accessories . . . . . . . . . . . . . . . . . . . . . . . . . . . . . . . . . . . . . . . . . . . . . . . 26Optional Accessories (not included in the standard package) . . . . . . . . . . . . . . . . 26Ordering Parts or Getting Information . . . . . . . . . . . . . . . . . . . . . . . . . . . . . . . . . . . 26Troubleshooting . . . . . . . . . . . . . . . . . . . . . . . . . . . . . . . . . . . 27Common Problems & Solutions . . . . . . . . . . . . . . . . . . . . . . . . . . . . . . . . . . . . . . . . . . . . 27Status Messages . . . . . . . . . . . . . . . . . . . . . . . . . . . . . . . . . . . . . . . . . . . . . . . . . . . . . . . 28Specifications . . . . . . . . . . . . . . . . . . . . . . . . . . . . . . . . . . . . . 29Projector Specifications . . . . . . . . . . . . . . . . . . . . . . . . . . . . . . . . . . . . . . . . . . . . . . . . . . 29Timing Chart . . . . . . . . . . . . . . . . . . . . . . . . . . . . . . . . . . . . . . . . . . . . . . . . . . . . . . . . . . 30Dimensions . . . . . . . . . . . . . . . . . . . . . . . . . . . . . . . . . . . . . . 31Warranty. . . . . . . . . . . . . . . . . . . . . . . . . . . . . . . . . . . . . . . . . 32Limited Warranty . . . . . . . . . . . . . . . . . . . . . . . . . . . . . . . . . . . . . . . . . . . . . . . . . . . . 32Safety Regulations . . . . . . . . . . . . . . . . . . . . . . . . . . . . . . . . . 33FCC Statement . . . . . . . . . . . . . . . . . . . . . . . . . . . . . . . . . . . . . . . . . . . . . . . . . . . . . . 33EEC Statement . . . . . . . . . . . . . . . . . . . . . . . . . . . . . . . . . . . . . . . . . . . . . . . . . . . . . . 33ivTable of Contents
BenQ PB7200/ PB7220/ PB7100 User’s ManualINTRODUCTIONCautionTO PREVENT SHOCK, DO NOT OPEN THE CABINET. NO USER –SERVICEABLE PARTS INSIDE. REFER SERVICING TO QUALIFIED SERVICEPERSONNEL. PLEASE READ THIS USER’S MANUAL BEFORE YOUOPERATE YOUR PROJECTOR. SAVE THIS USER’S MANUAL FORFUTURE REFERENCE .Safety Instructions1.Read this user’s manual before you operate your projector and save it for futurereference.2.The lamp becomes extremely hot during operation. Allow the projector to coolfor approximately 45 minutes prior to removing the lamp assembly forreplacement. Do not operate lamps beyond the rated lamp life. Excessiveoperation of lamps beyond the rated life could cause them to explode on rareoccasions.3.Never replace the lamp assembly or any electronic components unless theprojector is unplugged.4.To reduce the risk of electric shock, do not disassemble this appliance. Take it to aqualified technician when service or repair is required. Incorrect reassembly cancause electric shock when the appliance is subsequently used.5.Do not place this product on an unstable cart, stand, or table. The product mayfall, sustaining serious damage.6.This product is capable of displaying inverted images for ceiling mount installation.Please use suitable equipment for mounting the unit and ensure it is securelyinstalled. Always open the lens shutter or remove the lens cap when the projectorlamp is on.Do not look straight at the projector lens during operation. The intenselight beam may damage your eyes.In some countries, the line voltage is NOT stable. This projector isdesigned to operate safely within a bandwidth of 110 to 230 volts, butcould fail if power cuts or surges of more than10 volts occur. In thesehigh-risk areas, it is recommended that a power stabilizer unit be used inconjuction with this projector.Caution Introduction1
BenQ PB7200/ PB7220/ PB7100 User’s ManualShipping ContentsThe projector is shipped with the cables required for connection to standard PC orlaptop computers. Carefully unpack and verify that you have all the items shown below.If any of these items are missing, please contact personnel at the place of purchase.User’s ManualProjectorQuick Start Card Warranty BookletUser’sManual CDHDTV CableRemoteControlAudio CablesS-VideoCableBatteriesSoft Carry CaseVGA CableUSB CableAlternative AccessoriesFor the US:Power Cord and 3-2ConverterFor UK andEU countries:220V and240V PowerCords3-2 ConverterOptional Accessories21.Macintosh adapter2.250W lamp module3.Ceiling mount kitIntroductionVideo Cable
BenQ PB7200/ PB7220/ PB7100 User’s ManualProjector DescriptionProjector11Audio jack2External control panel(see next page)Projection lens12USB mouse connector3Front adjuster13S-Video jack4IR remote sensor14RS 232 control port5Ventilation grill15AC power cord inlet6Speaker16Main power switch7Projection lens adjuster17Rear adjuster feet8RGB (PC/ Mac) signal input - 118Kensington lock slot9RGB (PC/ YPbPr/ YCbCr) signal input-2Video connector19Lamp door110Introduction3
BenQ PB7200/ PB7220/ PB7100 User’s ManualExternal Control Panel1 PowerPresses the Power key to turn theprojector on or off.2 SourceSelects signal sources from among RGB1, RGB-2, YPbPr, S-Video and Video.4 Exit 5 Right 6 MenuMenu will display the menu system onscreen. Press Menu again to access thesub-menus. Left and Right help younavigate among choices and settings inthe menus and sub-menus. However,when the on-screen menu is notactivated, the Left and Right buttonswill function as Keystone -/ hot keys.Press the Exit button to go back to themain menu. Press Exit again to leave themenu system.3 Left7 AutoAutomatically determines the bestpicture settings for current receivedsignals.4Introduction8 BlankUses Blank to hide the screen image.You can unseal the image gradually byusing the mouse of the remote control,or simply press Blank to turn on theimage immediately.9 Power indicatorIt will light up or flash when the projectoris under operation.10Temp indicatorThe Temp indicator will flash when thesystem temperature is too high, whichmay occur if the projector is operatedimproperly. See "Temp Information" onpage 24 for more detailed information.11Lamp indicatorThe Lamp Indicator will light up when thelamp needs service or replacement. See“Lamp Information” on page 22 for moredetailed information.
BenQ PB7200/ PB7220/ PB7100 User’s ManualAdjusterThe projector is equipped with 1 quick-release adjuster foot. Push the button to adjustits tilt angle.1.Lift the projector up and press the adjuster button to release the adjuster.2.The adjuster will drop into position and be locked.Projector FeaturesThe projector integrates high-performance optical engine projection and a user-friendlydesign to deliver high reliability and ease of use.The projector offers the following features: Small and light for portability Full-function remote control with laser pointer/ remote mouse function High quality manual zoom lens One-key auto-adjustment to display the best picture quality Digital keystone correction to correct distorted images Adjustable color balance control for data/video display Ultra-high brightness projection lamp Ability to display 16.7 million colors On-screen menus in 8 languages: English, French, German, Italian, Spanish, Korean,Traditional Chinese and Simplified Chinese. Switchable Normal/ Economic mode to adjust the power consumption Powerful AV function to provide high quality AV picture HDTV compatibility (YPbPr)Note: The brightness of the projected image will vary depending on theambient lighting conditions and contrast/brightness settings.Introduction5
BenQ PB7200/ PB7220/ PB7100 User’s ManualRemote Control DescriptionPowerLEDMenu3 Left/ Keystone 4 Right/ Keystone AutoL-Click/ R-clickZoom in/ outBy pressing ZOOM IN , the centerof the picture will be magnified.When the button is pressed again,the picture is further magnified, upto four times the original size. Bypressing ZOOM OUT -, the size ofthe image is reduced. When the button is pressed again, the pictureis further reduced until it is restoredto its original size. To return to thenormal display mode, press theRETURN button. (This function canbe used in combination withFREEZE. )Laser PointerSourceExitBlankMouse PadDragVolume /MutePIP SourcePIP Pos.PIP SizeBy pressing the PIP-Source,PIP-Pos and PIP-Size hotkeys,you can enable the PIP(Picture In Picture) functionand choose the position andsize of the PIP image.ReturnRatioFreezeThe image is frozen when FREEZE is pressed. A “Pause” iconwill appear in the lower right corner of the screen. To stopthe freeze function, press the FREEZE button, RETURNbutton or SOURCE button (when the input source isswitched over during display) again.6IntroductionBy pressing the Ratio hotkey,you can select the screenaspect ratio you prefer:4:3,16:9 or 1:1.
BenQ PB7200/ PB7220/ PB7100 User’s ManualRemote Control Effective RangeThe remote sensors are located on the front and the back of the projector. It canfunction in a range of 30 degrees horizontally and 30 degrees vertically relative to a linethat is a right angle to the remote sensors. The distance between the remote controland the remote sensors must be shorter than 6 meters (19.5 feet).Installing or Replacing Batteries1Push and open thebatterycompartment lid inthe direction shown.2Install batteries asindicated by thediagram inside thecompartment.3Position the lidover thecompartment andsnap it back intoplace.CautionAvoid excessive heat and humidity. There may be danger of an explosion ifbatteries are incorrectly replaced. Replace only with the same or equivalenttype recommended by the manufacturer. Dispose of used batteries according to the manufacturer’s instructions.Introduction7
BenQ PB7200/ PB7220/ PB7100 User’s ManualINSTALLATIONScreen SizePlace the projector at the required distance from the screen according to the desiredpicture size (see the table below). 8PB7200/ PB7220 (XGA) screen size chartDiagonal measurementMinimumMaximumzoomzoominches feet inches feet inches482.49 29.9 3.05 36.6723.73 44.8 4.57 54.9964.98 59.7 6.10 73.21206.22 74.7 7.62 91.41447.47 89.6 9.14 109.71688.71 104.5 10.67 128.01929.96 119.5 12.19 146.3216 11.20 134.4 13.72 164.6240 12.45 149.4 15.24 182.9264 13.69 164.3 16.76 201.2288 14.94 179.2 18.29 219.5312 16.18 194.2 19.81 237.7336 17.42 209.1 21.34 256.0360 18.67 224.0 22.86 274.3384 19.91 239.0 24.38 292.6Distancefrom screenDistance 50300350400450500550600650700750800Diagonal measurementMinimumMaximumzoomzoommeters cm meters cm0.6262.20.7676.20.9393.31.14 114.31.24 124.5 1.52 152.41.56 155.6 1.91 190.51.87 186.7 2.29 228.62.18 217.8 2.67 266.72.49 248.9 3.05 304.82.80 280.0 3.43 342.93.11 311.2 3.81 381.03.42 342.3 4.19 419.13.73 373.4 4.57 457.24.04 404.5 4.95 495.34.36 435.6 5.33 533.44.67 466.7 5.72 571.54.98 497.8 6.10 609.6
BenQ PB7200/ PB7220/ PB7100 User’s Manual PB7100 (SVGA) screen size chartDiagonal measurementMinimumMaximumzoomzoominches feet inches feet 86.8582.28.39 100.61927.8393.99.58 115.02168.80 105.7 10.78 129.42409.78 117.4 11.98 143.7264 10.76 129.1 13.18 158.1288 11.74 140.9 14.37 172.5312 12.72 152.6 15.57 186.9336 13.70 164.3 16.77 201.2360 14.67 176.1 17.97 215.6384 15.65 187.8 19.17 230.0Distance fromscreenfeet468101214161820222426283032Distance 150200250300350400450500550600650700750800Diagonal measurementMinimumMaximumzoomzoommeters cm meters cm0.4948.90.6059.90.7373.40.9089.80.9897.81.20 119.81.22 122.3 1.50 149.71.47 146.7 1.80 179.71.71 171.2 2.10 209.61.96 195.7 2.40 239.62.20 220.1 2.70 269.52.45 244.6 2.99 299.52.69 269.0 3.29 329.42.93 293.5 3.59 359.43.18 317.9 3.89 389.33.42 342.4 4.19 419.33.67 366.8 4.49 449.23.91 391.3 4.79 479.1Connecting to Various EquipmentHDTV EquipmentThe projector is capable of displaying various High Definition TV display modes. Someof these sources are: Digital-VHS (D-VHS) player DVD player Satellite Dish HDTV receiver DTV tunersMost of these sources will provide an analog component video output, a standard VGAoutput, or a YPbPr (default) format.The projector is capable of accepting HDTV data through a YPbPr connector. Use aHDTV cable that came with your projector to display HDTV images.The following standards are supported in the HDTV function: 480i 480p 720p 1080iPlease refer to "Menu System" on page 15 for information on the HDTV OSDselections.Installation9
BenQ PB7200/ PB7220/ PB7100 User’s ManualConnecting to Various EquipmentIt only takes a few seconds to connect your projector to your desktop or notebookcomputer, VCR, or other systems. However, a Mac adapter (an optional accessory) isneeded for connection to Macintosh computers.1.Notebook/ Computer (Macintosh computer or SOG signal is only supported withRGB IN-1.)The USB cable is not needed unless you have a remote control with mousefunctions.102.DVD player or HDTV can only support with RGB IN-2.3.S-video deviceInstallation
BenQ PB7200/ PB7220/ PB7100 User’s Manual4.Video device or VCRInstallation11
BenQ PB7200/ PB7220/ PB7100 User’s ManualOPERATIONStart Up1.Plug the power cord into the projector and into a wall socket.2.Turn on the main power switch.3.Press and hold POWER to start the unit. The back-lit POWER key flashes greenand stays green when the power is turned on.ProjectorRemote Control(When the power is turned off, there is a 90-second cooling period before theprojector can be re-started.)4.12OperationSwitch on all connected equipment.
BenQ PB7200/ PB7220/ PB7100 User’s ManualDigital Keystone CorrectionKeystoning refers to the situation where the projected image is noticeably wider ateither the top or bottom. To correct this, press 3 Left/ Right 4 (hot key) on thecontrol panel of the projector or KEYSTONE 3/4 on the remote control, and thenadjust the sliding bar labeled Keystone, as needed. Press to correct keystoning at thetop of the image. Press - to correct keystoning at the bottom of the image.ProjectorRemote controlAuto AdjustmentIn some cases, you may need to optimize the picture quality. To do this, press the AUTOkey on the control panel of the projector or on the remote control. Within 3 seconds,the built-in Intelligent Auto Adjustment function will re-adjust settings to provide thebest picture quality.ProjectorRemote controlOperation13
BenQ PB7200/ PB7220/ PB7100 User’s ManualSource SelectionWhen several input sources are available, press the SOURCE key to make a selectionfrom the control panel of the projector or the remote control.ProjectorRemote controlBlankUses Blank to hide the screen image. You can unseal the image gradually by using themouse of the remote control, or simply press Blank to turn on the image immediately.Projector14OperationRemote control
BenQ PB7200/ PB7220/ PB7100 User’s ManualMenu SystemPress Menu for the main menu, and then press 3orMenu again to select items in the sub-menu.4 to select a sub-menu. PressMenu eH SizeS-VideoAuto ResizeH PositionV PositionColor TempInformationRatioColorTintColor orTintRatioSystemSharpnessColor TempInformationSourceMirrorSource esetLamp HourPIPMain page:PIP SourcePIP SizePIP Pos.H PositionV PositionMore OptionsSub ration15
BenQ PB7200/ PB7220/ PB7100 User’s Manual1. Display MenuFUNCTIONDESCRIPTIONCorrects any keystoning of the image.Keystone -Adjusts the brightness of the image.BrightnessAdjusts the degree of difference between dark and light in theimage.ContrastAdjusts to avoid the occurrence of flicker.Phase*This function is not available when the input mode is Video or SVideo.Adjusts to fit in the desired image size.H SizeColorTint16Operation*This function is not available when the input mode is Video or SVideo.Increases or decreases the color range (R, G, B) of the image.*This function is not available when the input mode is PC.Adjusts the image to make it appear more red or blue.*This function is not available when the input mode is PC.
BenQ PB7200/ PB7220/ PB7100 User’s Manual2. Image MenuFUNCTIONAuto ResizeDESCRIPTIONMakes the best fit of the image to the screen,1. On 2. Off 3. 16:9*This function is available only when the input mode is PC .RatioUsers have 2 options for the image ratio.1. 4 : 3 2. 16 : 9*This function is available when the input mode is YPbPr, Video or SVideo.Adjusts the horizontal position of the projected image.H Position*This function is available only when the input mode is PC.Adjusts the vertical positon of the projected image.V Position*This function is available only when the input mode is PC.Color TempAdjusts the color temperature to fit your preference.InformationShows the current resolution.SystemSharpnessColorTintSystem information will be shown:1.NTSC 2. PAL 3.SECAM 4. YUVAdjusts the image to make it look sharper or softer.*This function is not available when the input mode is PC or YPbPr.Increases or decreases the color range (R, G, B) of the image.*This function is not available when the input mode is PC.Adjusts the image to make it appear more red or blue.*This function is available only when the selected System is NTSC.Operation17
BenQ PB7200/ PB7220/ PB7100 User’s Manual3. Source MenuFUNCTIONMirrorSource ScanDESCRIPTION1. Default2. Ceiling mounted projection3. Rear screen projection4. Ceiling mounted and rearscreen projectionShows the input source from among RGB-1, RGB-2, YPbPr, S-Videoand Video when several sources are available.Adjusts the volume level.VolumeOffMute18OperationOn
BenQ PB7200/ PB7220/ PB7100 User’s Manual4. Control MenuFUNCTIONLanguageOSDSetupEconomic ModeResetLamp HourDESCRIPTIONLanguage sets the language for the OSD control menus.Use the 3 / 4 key to select the desired language from amongEnglish, French, German, Italian, Spanish, Korean, TraditionalChinese and Simplified Chinese.OSD Pos.Selects a desired OSD position.OSD TimeSets the length of time the OSD will remain active after thelast time you pressed the button. The range is from 5 to 60seconds in 5-second increments.Source ScanWhen selected, activates the Source scan function.Keystone HoldWhen selected, preserves the last keystone correction valueeven when the projector is restarted.Mirror HoldWhen selected, preserves the last mirror correction valueeven when the projector is restarted.Blank TimeDetermines the length of time before the projector is shut offwhen Blank is activated.Auto OffSets the length of time before the system is shut off when noinput is detected.User LogoEnables the user to define his/her own logo screen that willdisplay during strat-up. Three modes are available: Default(BENQ logo), black screen and blue screen.Selects Economic mode to lower brightness and extend thelamp life.Returns all settings to their factory preset values.Shows lamp usage time.Operation19
BenQ PB7200/ PB7220/ PB7100 User’s Manual5. PIP MenuThese functions are available only when the input mode is PC and the PIP source isVideo or S-Video.FUNCTIONPIP SourceDESCRIPTIONSelects the source for the PIP.Enables use of the 3 / 4 key to scroll through the four alternatives: Off, Small, Medium, Large.PIP SizePIP-SourcePIP-PosPIP-SizeSelects a desired position for the PIP.PIP-SourcePIP-PosPIP-SizePIP PositionH PositionAdjusts the horizontal position of the PIP image.V PositionAdjusts the vertical position of the PIP image.More OptionsBrightnessContrastColorAdjusts the degree of difference between dark and light for thePIP image.Increases or decreases the color range (R, G, B) of the image.TintAdjusts the image to make it appear more red or blue.SharpnessAdjusts the image to make it appear sharper or softerSystem20Enables use of the 3 / 4 key to select more PIP functionsincluding Brightness, Contrast, Color, Tint, Sharpness and System.Adjusts the brightness of the PIP image.OperationShows PIP image systems: NTSC, PAL, SECAM
BenQ PB7200/ PB7220/ PB7100 User’s ManualShutdown1.Press and hold POWER and a warning message will appear. To turn off theprojector, press and hold POWER again.ProjectorRemote Control2.The fan will continue to run for approximately 90 seconds.3.Turn off the main power switch.4.Disconnect the power cord from the wall socket.CautionPlease do not unplug the power cord before POWER is shut down or during the 90-second cooling process.If the projector is not properly shut down, to protect the lamp, the system will detect this and cool the lamp for 90 seconds automaticallybefore turning on again.Operation21
BenQ PB7200/ PB7220/ PB7100 User’s ManualMAINTENANCELamp InformationUse and Replacement of the LampWhen the Lamp Indicator lights up red or a message appears suggesting the time oflamp replacement, please install a new lamp or consult your dealer. An old lamp couldcause a malfunction in the projector and in rare instances may even break.For more detailed information, please refer to "LED Indicator Status & Illustration" onpage 24.CautionThe Lamp and Temp indicators will light up if the lamp becomes too hot.Turn off the power and let the projector cool for 45 minutes. If the Lamp orTemp indicator still lights up when turning the power on, please contactyour dealer.Lamp ReplacementCautionTo reduce the risk of electrical shock, always turn off the projector and disconnect the power cord before changing the lamp.To reduce the risk of severe burns, allow the projector to cool for at least 45minutes before replacing the lamp.To reduce the risk of injuries to fingers and damage to internal components,use caution when removing lamp glass that has shattered into sharp pieces.To reduce the risk of injuries to fingers and/or compromising image qualityby touching the lens, do not touch the empty lamp compartment when thelamp is removed.This lamp contains mercury. Consult your local hazardous waste regulations to dispose of this lamp in a proper manner.22Maintenance
BenQ PB7200/ PB7220/ PB7100 User’s ManualStep 1. Turn off the projector. Disconnect the power cord from the outlet and theprojector.Step 2. Loosen the screw and remove the lampcover. If the lamp is hot, avoid burns bywaiting 45 minutes until the lamp hascooled.Step 2Step 3. Loosen the 3 screws. (It is stronglyrecommended that you use amagnetic-head screwdriver.) Pull thehandle to remove the lamp housing. Ifthe screws are not loosenedcompletely, they could injure yourfingers. Do not insert your hand intothe box after the lamp is removed. Ifyou touch the optical componentsinside, this could cause colorunevenness in projected images.Step 3Step 4. Replace the lamp with a new one.Insert it into the projector, and tightenthe screws firmly. Loose screws maycause a bad connection, which mayresult in malfunction.Step 4Step 5. Re-install the lamp cover and tightenthe screw. Do not turn on thepower with the lamp coverremoved. Whenever the lamp isreplaced, reset the total lampoperation time. Do not reset if thelamp is not replaced as this couldcause damage.Step 5Maintenance23
BenQ PB7200/ PB7220/ PB7100 User’s ManualResetting Lamp HoursIf you replace the lamp after 2000 hours of operation, please follow the instructionsbelow within 10 minutes of powering on.OSDFUNCTIONPress and hold the Exit button on theprojector for 3 seconds to display the totalused lamp time. Press the MENU button on theprojector during the lamp hourmessage. An adjustment message willappear.Press W or X to reset lamp hours orpress EXIT to leave.Temp InformationWhen the LED lights up, it is warning you of the following possible problems:1.The internal temperature is too high.2. The fans are not working.Turn off the projector and contact qualified service personnel for further help.For more detailed information, please refer to "LED Indicator Status & Illustration" onpage 24.LED Indicator Status & Illustrationllustration1.24- : LED OFF2.: LED blinking3.: LED solid ONMaintenance
BenQ PB7200/ PB7220/ PB7100 User’s ManualLEDStatus & DescriptionPower Temp LampPower eventsPower switch onOOOO-
BenQ PB7200/ PB7220/ PB7100 User's Manual Remote Control Description Power Menu 3 Left/ Keystone - 4 Right/ Keystone Auto L-Click/ R-click Zoom in/ out Return PIP Source PIP Pos. PIP Size By pressing the PIP-Source, PIP-Pos and PIP-Size hotkeys, you can enable the PIP (Picture In Picture) function and choose the position and size of the PIP .