Transcription
BANNER 9 ADMIN GENERAL NAVIGATIONUSER'S GUIDEComputing and Telecommunications ServicesBanner 9 Admin General Navigation - User's GuideWRIGHT STATE UNIVERSITY0
ContentsBanner 9 Admin General Modules . 2Obtaining Banner 9 Admin Access . 4Features . 5Types of Banner 9 Admin Pages. 6Logging in to Banner 9 Admin . 7My Banner (GUAPMNU) . 9Filtering in My Banner (GUAPMNU) . 10Page Header . 11Notifications . 13Record Navigation . 14Common Actions/Features . 15Supplemental Data Engine . 15Records Displayed in a Grid . 16Page Footer/Section Navigation . 17Looking Up a Client Using the ID Text Box . 18Banner 9 Admin Job Submission . 19Frequently Asked Questions . 21Banner 9 Admin General Navigation - User's Guide1
Banner 9 Admin General Navigation - User's GuideWelcome to Banner 9 Admin General Navigation. This guide is designed to provide you with the information neededto successfully access and navigate Banner 9 Admin.What is Banner 9 Admin?Banner 9 Admin is an administrative suite of integrated applications Wright State University has selected to run theinformation systems used by the University. Banner allows the integration of data between Student, Finance, HR, andAdvancement systems.Banner 9 Admin is a browser-based application, accessible using Chrome, or Firefox. Note: To access Banneroff campus, a VPN connection with Wright State’s network or remote desktop must be established. Contactthe CaTS Help Desk at (937) 775-4827 to set up the VPN connection or remote desktop.Banner 9 Admin General ModulesThe General System contains the modules that are common to all the Banner application systems.Banner 9 Admin Application Systems Student Accounts Receivable Financial Aid Human Resources Advancement FinanceGeneral System Modules Job Submission Population Selection Letter GenerationBanner 9 Admin General Navigation - User's Guide2
Job SubmissionThis module facilitates the submission of reports and processes throughout Banner. You can define newreports and process to Job Submission, define default parameters, and run Banner reports and processes.You can also set up Job Submission for reports and processes developed on site.Population SelectionThis module lets you identify and group entities in the database, such as people, vendors, or organizations.You can define selection criteria to identify and extract a subset of these entities to use in Banner reports,processes, and letters.Letter GenerationThis module lets you define extract variables, build paragraphs, build a letter, extract variable data fromthe database, and merge the extracted variable data into the letter. You can also create a download filethat can be used to produce letters with Microsoft Word.Banner 9 Admin General Navigation - User's Guide3
Obtaining Banner 9 Admin AccessThe University currently has three user access levels: Business, Student, and Xtender. The ability to view,access, and edit data vary with each access level.Business Modules: Advancement Finance HR/PayrollStudent Modules: Bursar General/Registration Financial Aid Grad Admissions Undergrad AdmissionsXtender: Student Finance Alumni HR/PayrollAccess requests can be submitted using the Banner Admin Access form located ms via ServiceNow.Banner 9 Admin General Navigation - User's Guide4
FeaturesThe General System includes the following major features: Comprehensive Reporting: Both hard-copy reports and online inquiry forms are available. Main Menu: The Main Menu provides easy access and navigation to infrequent users. Frequent userscan use Direct Access or Object Search to bypass the Main Menu. Validation Forms: Validation Forms standardize the contents of certain fields and control data input.You can specify custom values without programmer intervention. Flexible, User-Defined Security - The limited access security system helps ensure that data is viewedand updated by authorized users only. The security feature can accommodate both centralized anddecentralized operations. In some fields, data can be partially or completely obscured for selected users through techniquescalled masking and concealing. Fields can also be made completely invisible to users through fieldhiding. Value-based security (VBS) and personally identifiable information security (PII) - both implementedthrough Oracle's Fine-Grained Access Control (FGAC), can selectively limit the data users can seethrough Banner forms. The details of the limitations depend entirely on the institution's VBS and PIIrules. Online Help: The Online Help system contains information about forms and fields. Item Properties: Available from the Tools pull-down menu in Banner; displays column informationwhen it is available.Banner 9 Admin General Navigation - User's Guide5
Types of Banner 9 Admin PagesApplication PagesUse these forms to enter, update, and query information. This is the most common type of page.Application pages are also referred to as functional pages.Validation PagesValidation pages define the values that can be entered in designated fields of Application pages. Thesevalues are used throughout Banner as List of Values (LOV) to validate that data has been entered correctlyfor a specific field.When the cursor is in a field that must be validated, the Search Icon appears and List of Values appears inthe status line, indicating that the entry must be included in the LOV listing. If a value is entered that isnot predefined in the LOV, an auto hint message appears stating that an invalid value has been entered.Rule and Control PagesUse these pages to define the calculations, parameters, and processing rules that impact processing onother pages, reports, and jobs.Only University administrators with the proper security permissions may enter new values or update existing validationentries.Query PagesUse these pages to look up existing information, often returning information to the calling page.Inquiry PagesUse these pages to look up existing information, often returning information to the calling page. Inquirypages are accessed from the General Menu, within other pages, with Direct Access, or with Object Search.Banner 9 Admin General Navigation - User's Guide6
Logging in to Banner 9 Admin1. Open a web browser of your choosing.2. Go to ban9admin.wright.edu.3. Enter your campus 'w' username and password. If you do not know your password, contact the CaTS Help Desk at (937) 775-4827.Banner 9 Admin General Navigation - User's Guide7
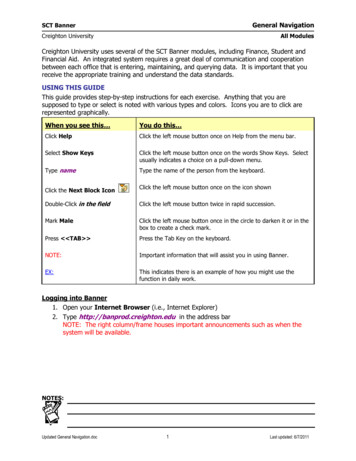
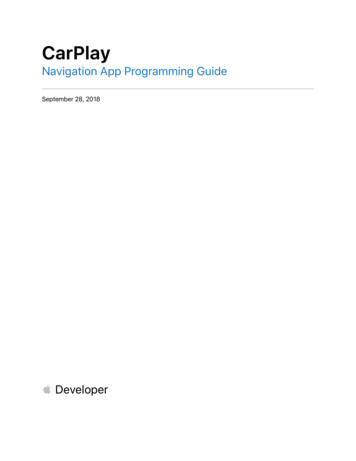
Application NavigatorApplication Navigator uses single-sign on to provide access to all Banner 9 administrative applications.1. Navigation Bar (Highlighted in Blue)2. Menu Icon: Provides access to Banner Menu (Ctrl M)3. Search: Provides quick access to search for another page (Ctrl Shift Y)4. Recently Opened: Provides a menu of your recently accessed pages5. Wright State University: Select to return to the homepage at any time6. Sign Out: Select to sign out of Banner 9 Admin7. Help: Online help accessible from any page in Banner8. Keyboard Shortcuts: Keyboard shortcuts for navigating around the homepage Note: This is not the list of shortcuts used when navigating pages. For page navigation shortcuts, see the KeyboardShortcuts section at the end of this document234568Banner 9 Admin General Navigation - User's Guide87
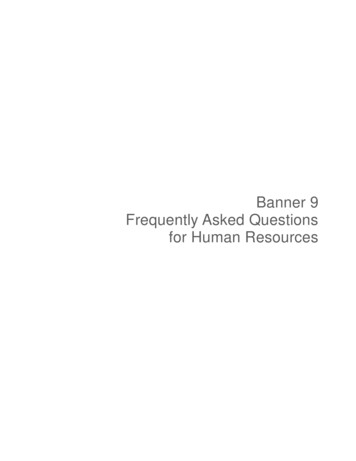
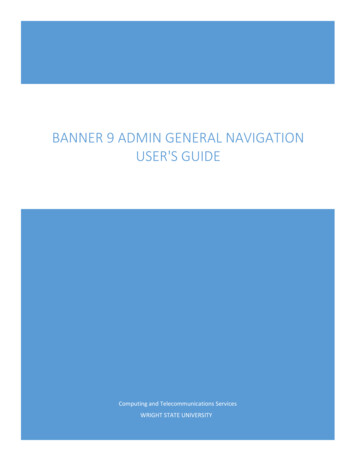
My Banner (GUAPMNU)This page lets you set up and modify your personal menu, My Banner. My Banner gives you easy accessto the pages, jobs, reports, menus, and QuickFlows you need to use.Accessing My Banner1. Click on the Menu Icon in the top left-hand corner2. Select My BannerAdd a Form to My Banner1. Enter GUAPMNU in the search bar.2. In the Object Type column click on the page you want to add3. Click Insert Selection4. The page will be added to the column on the right. To change the name/description of the page, clickinto the text box under the Description column and type in the new title5. In the bottom right hand corner, click Save2435Banner 9 Admin General Navigation - User's Guide9
Filtering in My Banner (GUAPMNU)1. Click into one of the pages listed in the left hand column2. In the top right hand corner, select Filter3. In the Add Another Field dropdown menu, select Object4. The second dropdown menu will autofill to Contains5. In the text box next to the second dropdown, type in the first letters of the form you want to search for and hitEnter, or click Go453Banner 9 Admin General Navigation - User's Guide10
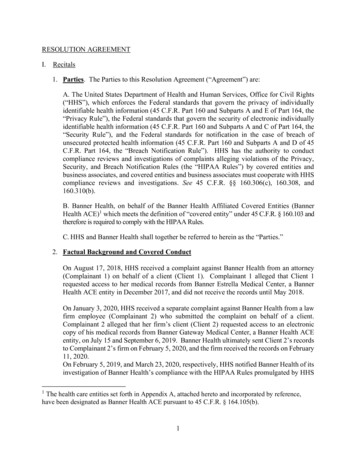
Page HeaderPage Title can be controlled by the user preference page (GUAUPRF).6. Exit (Ctrl Q): Close page7. Page Name8. Add: Used with Banner Document Management (BDM)/Xtender to add documents9. Retrieve: Used with Banner Document Management (BDM)/Xtender to view documents10. Related (Alt Shift R): Provides quick access to pages that can be accessed from this page11. Tools (Alt Shift T): Provides access to Actions and Options available from this page12Banner 9 Admin General Navigation - User's Guide345611
Key BlockThe key block determines what data is entered or displayed on the rest of the page. All information on the page isrelated to the key block. The key block stays on the page as subsequent sections are displayed.Go: Advances to the body of the page after populating the key blockStart Over: Returns to the key block of the pageBanner 9 Admin General Navigation - User's Guide12
NotificationsCheck for messages notifying you of information, successful actions, warnings, and errors.To exit Notifications, click on the notification number box (highlighted in red) or hit Tab.Banner 9 Admin General Navigation - User's Guide13
Record Navigation1. First Page: Navigate to the first page of records2. Previous Page: Navigate to previous page of records3. Record: Quickly navigate to a specific record by entering the record number4. Next Page: Navigate to the next page of records5. Last Page: Navigate to the last page of records6. Per Page Drop-down: Change the number of records displayed on screen7. Record Count: Shows which record you have selected and the total number of records1327546Banner 9 Admin General Navigation - User's Guide14
Common Actions/FeaturesIf available, individual sections of a page can include actions:1. Open/Close Sections: Click the down or up arrow to open and close sections2. Insert (F6): Create a new record3. Delete (Shift F6): Delete selected record4. Copy (F4): Copy selected record5. More Information (Ctrl Shift U): Only displays if supplemental data (see Supplemental DataEngine below for more information) can be entered or displayed for the record.6. Filter (Query Mode) (F7): Filter records/enter Query Mode1. Execute (F8)2. Exit Query (Ctrl Q): Exit Query Mode123456Supplemental Data EngineThe Supplemental Data Engine (SDE) allows you to store data that is not part of the Banner data model.The data is displayed in the More Information window.If supplemental data exists for a section of a page, the More Information button is displayed in the sectionheader. The More Information window is where information can be viewed, edited, or added. Wheninformation is added or changed, you are prompted to save the changes. You can continue to work on theprimary page.Banner 9 Admin General Navigation - User's Guide15
Multiple Records1. Multiple Record View (grid):2. Single Record ViewRecords Displayed in a Grid1. Sort records by clicking on a column header with a * to display and activate the up (ascending) ordown (descending) sort arrow2. Rearrange the order of columns by dragging the column header to the desired location3. Resize columns by dragging the end of the column header box, increasing or decreasing its size.Note: These options come in handy for viewing and printing pages that have too many columns to display on apage.Banner 9 Admin General Navigation - User's Guide16
Page Footer/Section Navigation1. Previous Selection (Alt Pg-Up): Navigate to previous block/tab/page2. Next Selection (Alt Pg-Down): Navigate to next block/tab/page3. Record Information: Contains activity date and user4. Action Buttons:1. Save (F10): Save current changes2. Cancel (Ctrl Q): Cancel selection3. Select (Alt S): Select and return value1234Banner 9 Admin General Navigation - User's Guide17
Looking Up a Client Using the ID Text BoxSearching by UID1. Enter the UID into the ID: text box2. Click Go in the upper right hand corner or hit EnterSearching by Name3. From any page with an ID field, click into the ID: text box4. Hit tab; a second text box will appear on the right where you can enter the name of the client you wantto search for (last name, first name, or by using the % Wildcard)5. Press Go in the upper right hand corner or hit Enter to view the results of the name searchNote: Clicking the ellipses to the right of the ID: text box will bring up an Option List to search usingdifferent criteria.1234Banner 9 Admin General Navigation - User's Guide518
Banner 9 Admin Job Submission1.Enter the page name in the Application Navigator and hit Enter. The GJAPCTL page will appear with the Process in theupper left corner.2.Navigate to the next section (Alt PageDown, Go button, or Next Section button in the lower left hand corner) to accessPrinter Control, Parameter Values and input any changes needed. Note: Page navigation arrows may be needed to access all parameters3.Navigate to the next section to access Submission and save your parameters with or without a name, etc4.Run your Banner Process (F10, or Save button in the lower right hand corner)5.After running the Process, a Notification appears with the job numbers and files6.Access the output for the Process: Close the Notification (via clicking the notification in the upper right or hitting the tab key)Access the Related form (via clicking the Related icon in the upper right or Alt Shift R) Select Review Output (GJIREVO) via clicking on it in the Related drop-down menu or using down arrow tohighlight the drop-down menu item and then hitting Enter.7.The GJIREVO page displays the Process and Number as in the earlier Notification. To view the output, select the FileName (via F9 or clicking the drop-down menu. Output records are typically in the .lis file).8.After selecting the File Name, click the OK button or hit Enter. This will display output in the Saved Output Reviewsection of the form. 9.To bring up the print page, click on the Tools icon and select Print.Make sure the correct printer is selected, and hit OK to print your document.To view the Process output in a separate browser window, access the Tools menu (via clicking on the Tools button at theupper right or Alt Shift T). Within the drop-down Tools menu, select the Show Document (Save and Print File) row (via clicking on it, or usingdown arrow and then clicking Enter).Depending on your Data Extract format setting in GUAUPRF Directory Options: If set to FILE: A Notification appears to ask if you wish to continue. Click Yes. A new web page will appear, from which you can use the Browser to search, save, print, etc. Close browser tab/window to return to GJIREVO If set to WEBUTIL: A Notification window will come up asking you to Save File After clicking on Save File, your file will download and appear in the lower left status area of your browserwindow. You can open your file or go to your Downloads folder to view/print the file.Banner 9 Admin General Navigation - User's Guide19
APPLICATION NAVIGATORAccess HelpAccess MenuDisplay Recently Opened ItemsSearchSign OutBANNER DOCUMENT MANAGEMENT (BDM)Add BDM DocumentsRetrieve BDM DocumentsCancel Page, Close Current Page, or Cancel Search/Query (inQuery mode)Change MEP ContextChoose/SubmitClear All in SectionClear One RecordClear Page or Start OverCount QueryDelete RecordDown/Next RecordDuplicate ItemDuplicate Selected RecordEditExecute Filter QueryExitExpand/Collapse Drop-Down FieldExportFirst PageInsert/Create RecordLast PageList of ValuesMore InformationNext Field or ItemNext Page DownNext SectionOpen Menu DirectlyOpen Related MenuOpen Tools MenuPage Tab 1, Page Tab 2, etcPrevious Field or ItemPrevious Page UpPrevious SelectionPrintRefresh or RollbackSaveSearch or Open Filter QuerySelect on a Called PageToggle Multi/Single Records ViewUp/Previous RecordWORKFLOWRelease WorkflowSubmit WorkflowBanner 9 Admin General Navigation - User's GuideCTRL MCTRL YCTRL SHIFT LCTRL SHIFT YCTRL SHIFT FALT AALT RCTRL QALT SHIFT CENTERSHIFT F5SHIFT F4F5SHIFT F2SHIFT F6Down ArrowF3F4CTRL eF8CTRL QALT Down ArrowSHIFT F1CTRL HomeF6CTRL EndF9CTRL SHIFT UTabPage DownALT Page DownCTRL MALT SHIFT RALT SHIFT TCTRL SHIFT 1, CTRL SHIFT 2, ETCSHIFT TabPage UpALT Page UPCTRL pF5F10F7ALT SCTRL GUp ArrowALT QALT W20
Frequently Asked QuestionsWill QuickFlows still be available in Banner 9 Admin?QuickFlows will still be available in Banner 9 Admin. For information about creating and usingQuickFlows, visit ces/banner-9.What is a name search?A name search is a way to look through the Banner system to find the ID of a person or organization, withan unknown UID, that may have records within the system.Important Information about Name Searching: Name Searching is not case sensitive Name Searches can be done from any form that requires a UID Enter as few letters in the name as possible to get the broadest search Be cautious of multiple spellings of namesWhy can't I do an insert and copy a previous record like I did in Banner 8?Banner 9 only requires you to highlight the record you want to copy and select the Copy action (F4).Why are the Insert, Delete, and Copy actions deactivated (grayed out)?You must have your cursor active in the section you want to use the action in. If these actions are notavailable for that section, they will remain deactivated.What do I do if I get a Service Invocation Failed error message?Sign out of Application Navigator using the Sign Out link in the upper right corner. Access Banner 9Admin again, OR clear your browser cache and cookies. Close your browser windows and access Banner9 Admin again.If you want a more permanent solution, change your browser settings to always delete cookies when youclose the browser.Banner 9 Admin General Navigation - User's Guide21
Do I have to continue to Microsoft Internet Explorer (IE) to access Banner 9 Admin?Unlike Banner 8 admin, Banner 9 Admin is not browser dependent. You may use Firefox, Chrome, orMicrosoft Edge to access Banner 9. It is not recommended that you use IE for Banner 9. IE has beenreported to not fully support the latest web technology.In Banner Job Submission when I select Show Document (Save and Print File) and click Continue, why don't Iget the new window that displays my output?If you have pop-up blockers turned on, check to make sure that your browser has not blocked the pop-upwindow. If the content was blocked, accept the content and try Show Document again.How do I get rid of the menu column down the left hand side of the page so that I can see the full page?Click on the menu icon to toggle the menu display on and off. This applies to all icons and items in thepage header that use a dropdown display (Menu, Search, Recently Opened, Related, Tools). Each toggleson and off with a mouse click or shortcut key.How do I display the form name on the Banner 9 Admin menu?You can do this by going to General User Preferences Maintenance (GUAUPRF) and under the DisplayOptions section, check the box for ‘Display Form Name on Menu’.How do I get column headers to appear in the .csv file when I export data from a Banner 9 Admin page?You can do this by going to General User Preferences Maintenance (GUAUPRF) and under the DataExtract section, check the box for ‘Include Header Row in Data Extract’.Where can I get a list of Banner 9 Admin pages that I have access to?Go to Object Maintenance (GUAOBJS) and Filter on Type Equals FORM.How do I display more information on a page?Under Tools and Page Layout you can toggle your page layout between Expanded (more white space) andCompact view. You can also use Ctrl- and Ctrl to decrease and increase the font size in your browser(Zoom).Where did the Next Block, Previous Block and Save buttons go?In Banner 9, Blocks are now Sections. The Next Section, Previous Section arrows are located in the lowerleft corner of the page. The SAVE/CANCEL/SELECT buttons are located in the lower right corner ofthe page, depending on the page.Banner 9 Admin General Navigation - User's Guide22
What's a Wildcard, and how do I use it? The % sign is used as the wildcard ALWAYS use the wildcard You may use more than one wildcard in each name field Wildcards may be placed anywhere in the name field Without the wildcard the system will look foran exact match Example:Banner 9 Admin General Navigation - User's Guide23
Add: Used with Banner Document Management (BDM)/Xtender to add documents 9. Retrieve: Used with Banner Document Management (BDM)/Xtender to view documents 10. Related (Alt Shift R): Provides quick access to pages that can be accessed from this page 11. Tools (Alt Shift T): Provides access to Actions and Options available from this page .