Transcription
Configure AnyConnect Secure Mobility Clientwith Split Tunneling on an mponents UsedBackground InformationAnyConnect License InformationConfigureNetwork DiagramASDM AnyConnect Configuration WizardSplit Tunnel ConfigurationDownload and Install AnyConnect ClientWeb DeploymentStandalone DeploymentCLI ConfigurationVerifyTroubleshootInstall the DARTRun the DARTRelated InformationIntroductionThis document describes how to configure the Cisco AnyConnect Secure Mobility Client via theCisco Adaptive Security Device Manager (ASDM) on a Cisco Adaptive Security Appliance (ASA)that runs software Version 9.3(2).PrerequisitesRequirementsThe Cisco AnyConnect Secure Mobility Client web deployment package should be downloaded tothe local desktop from which the ASDM access to the ASA is present. In order to download theclient package, refer to the Cisco AnyConnect Secure Mobility Client web page. The webdeployment packages for various Operating Systems (OSs) can be uploaded to the ASA at thesame time.These are the web deployment file names for the various OSs: Microsoft Windows OSs - AnyConnect-win- version -k9.pkg
Macintosh (MAC) OSs - AnyConnect-macosx-i386- version -k9.pkg Linux OSs - AnyConnect-linux- version -k9.pkgComponents UsedThe information in this document is based on these software and hardware versions: ASA Version 9.3(2) ASDM Version 7.3(1)101AnyConnect Version 3.1The information in this document was created from the devices in a specific lab environment. All ofthe devices used in this document started with a cleared (default) configuration. If your network islive, make sure that you understand the potential impact of any command. Background InformationThis document provides step-by-step details about how to use the Cisco AnyConnectConfiguration Wizard via the ASDM in order to configure the AnyConnect Client and enable splittunneling.Split-tunneling is used in scenarios where only specific traffic must be tunneled, opposed toscenarios where all of the client machine-generated traffic flows across the VPN when connected.Use of the AnyConnect Configuration Wizard will by default result in a tunnel-all configuration onthe ASA. Split tunnelling must be configured separately, which is explained in further detail in thesection of this document.In this configuration example, the intention is to send traffic for the 10.10.10.0/24 subnet, which isthe LAN subnet behind the ASA, over the VPN tunnel and all other traffic from the client machineis forwarded via its own Internet circuit.AnyConnect License InformationHere are some links to useful information about the Cisco AnyConnect Secure Mobility Clientlicenses: Refer to the AnyConnect Secure Mobility Client Features, Licenses, and OSs, Release 3.1document in order to determine the licenses that are required for AnyConnect Secure MobilityClient and the related features.Refer to the Cisco AnyConnect Ordering Guide for information about AnyConnect Apex andPlus licenses.Refer to the What ASA License Is Needed for IP Phone and Mobile VPN Connections?document for information about the additional license requirements for IP phone and mobileconnections.
ConfigureThis section describes how to configure the Cisco AnyConnect Secure Mobility Client on the ASA.Network DiagramThis is the topology that is used for the examples in this document:ASDM AnyConnect Configuration WizardThe AnyConnect Configuration Wizard can be used in order to configure the AnyConnect SecureMobility Client. Ensure that an AnyConnect client package has been uploaded to the flash/disk ofthe ASA Firewall before you proceed.Complete these steps in order to configure the AnyConnect Secure Mobility Client via theConfiguration Wizard:1. Log into the ASDM, launch the Configuration Wizard, and click Next:2. Enter the Connection Profile Name, choose the interface on which the VPN will beterminated from the VPN Access Interface drop down menu, and click Next:
3. Check the SSL check box in order to enable Secure Sockets Layer (SSL). The DeviceCertificate can be a trusted third party Certificate Authority (CA) issued certificate (such asVerisign, or Entrust), or a self-signed certificate. If the certificate is already installed on theASA, then it can be chosen via the drop down menu. Note: This certificate is the server-sidecertificate that will be provided. If there are no certificates currently installed on the ASA, anda self-signed certificate must be generated, then click Manage.In order to install a third-partycertificate, complete the steps that are described in the ASA 8.x Manually Install 3rd PartyVendor Certificates for use with WebVPN Configuration Example Cisco document.4. Click Add:5. Type an appropriate name into the Trustpoint Name field, and click the Add a new identity
certificate radio button. If there are no Rivest-Shamir-Addleman (RSA) key pairs present onthe device, click New in order to generate one:6. Click the Use default key pair name radio button, or click the Enter new key pair nameradio button and enter a new name. Select the size for the keys, and then click GenerateNow:7. After the RSA key pair is generated, choose the key and check the Generate self-signed
certificate check box. Enter the desired subject Domain Name (DN) into the CertificateSubject DN field, and then click Add Certificate:8. Once the enrollment is complete, click OK, OK, and then Next:9. Click Add in order to add the AnyConnect Client image (the .pkg file) from the PC or from theflash. Click Browse Flash in order to add the image from the flash drive, or click Upload in
order to add the image from the host machine directly:10. Once the image is added, click Next:11. The user authentication can be completed via the Authentication, Authorization, andAccounting (AAA) server groups. If the users are already configured, then choose LOCAand click Next. Note: In this example, LOCAL authentication is configured, which meansthat the local user database on the ASA will be used forauthentication.
12. The address pool for the VPN client must be configured. If one is already configured, thenselect it from the drop down menu. If not, click New in order to configure a new one. Oncecomplete, click Next:13. Input the Domain Name System (DNS) servers and DNs into the DNS and Domain Namefields appropriately, and then click Next:
14. In this scenario, the objective is to restrict access over the VPN to the 10.10.10.0/24network that is configured as the Inside (or LAN) subnet behind the ASA. The trafficbetween the client and the inside subnet must be exempt from any dynamic NetworkAddress Translation (NAT).Check the Exempt VPN traffic from network address translation check box andconfigure the LAN and WAN interfaces that will be used for the exemption:15. Choose the local networks that must be exempt:
16. Click Next, Next, and then Finish.The AnyConnect Client configuration is now complete. However, when you configure AnyConnectvia the Configuration Wizard, it configures the Split Tunnel policy as Tunnelall by default. In orderto tunnel specific traffic only, split-tunneling must be implemented.Note: If split-tunnelling is not configured, the Split Tunnel policy will be inherited from the
default group-policy (DfltGrpPolicy), which is by default set to Tunnelall. This means thatonce the client is connected over VPN, all of the traffic (to include the traffic to the web) issent over the tunnel.Only the traffic that is destined to the ASA WAN (or Outside) IP address will bypass the tunnelingon the client machine. This can be seen in the output of the route print command on MicrosoftWindows machines.Split Tunnel ConfigurationSplit tunnelling is a feature that you can use in order to define the traffic for the subnets or hoststhat must be encrypted. This involves the configuration of an Access Control List (ACL) that will beassociated with this feature. The traffic for the subnets or hosts that is defined on this ACL will beencrypted over the tunnel from the client-end, and the routes for these subnets are installed on thePC routing table.Complete these steps in order to move from the Tunnel-all configuration to the Split-tunnelconfiguration:1. Navigate to Configuration Remote Access VPN Group Policies:2. Click Edit, and use the navigation tree in order to navigate to Advanced Split Tunneling.Uncheck the Inherit check box in the Policy section, and select Tunnel Network List Belowfrom the drop down menu:3. Uncheck the Inherit check box in the Network List section, and click Manage in order toselect the ACL that specifies the LAN network(s) to which the client needs access:
4. Click Standard ACL, Add, Add ACL, and then ACL name:5. Click Add ACE in order to add the rule:6. Click OK.
7. Click Apply.Once connected, the routes for the subnets or hosts on the split ACL are added to the routingtable of the client machine. On Microsoft Windows machines, this can be viewed in the output ofthe route print command. The next hop for these routes will be an IP address from the client IPpool subnet (usually the first IP address of the subnet):C:\Users\admin route printIPv4 Route Table Active Routes:Network Destination Netmask Gateway Interface Metric0.0.0.0 0.0.0.0 10.106.44.1 10.106.44.243 26110.10.10.0255.255.255.010.10.11.2 10.10.11.12!! This is the split tunnel route.10.106.44.0 255.255.255.0 On-link 10.106.44.243 !! This is the route for the ASA Public IP Address.On MAC OS machines, enter the netstat -r command in order to view the PC routing table: netstat -rRouting tablesInternet:Destination Gateway Flags Refs Use Netif Expiredefault hsrp-64-103-236-1. UGSc 34 0 en110.10.10/2410.10.11.2UGSc044utun10en1!! This is the split tunnel route.10.10.11.2/32 localhost UGSc 1 0 lo0172.16.21.1/32hsrp-64-103-236-1. UGSc1!! This is the route for the ASA Public IP Address.Download and Install AnyConnect ClientThere are two methods that you can use in order to deploy Cisco AnyConnect Secure MobilityClient on the user machine: Web deploymentStandalone deploymentBoth of these methods are explained in greater detail in the sections that follow. Web DeploymentIn order to use the web deployment method, enter the https:// ASA's FQDN or ASA's IP URLinto a browser on the client machine, which brings you to the WebVPN portal page.Note: If Internet Explorer (IE) is used, the installation is completed mostly via ActiveX, unlessyou are forced to use Java. All other browsers use Java.
Once logged into the page, the installation should begin on the client machine, and the clientshould connect to the ASA after the installation is complete.Note: You might be prompted for permission to run ActiveX or Java. This must be allowed inorder to proceed with the installation.Standalone DeploymentComplete these steps in order to use the standalone deployment method:1. Download the AnyConnect Client image from the Cisco website. In order to choose thecorrect image for download, refer to the Cisco AnyConnect Secure Mobility Client web page.A download link is provided on this page. Navigate to the download page and select theappropriate version. Perform a search for Full installation package - Window / Standalone
installer (ISO). Note: An ISO installer image is then downloaded (such as anyconnect-win3.1.06073-pre-deploy-k9.iso).2. Use WinRar or 7-Zip in order to extract the contents of the ISO package:3. Once the contents are extracted, run the Setup.exe file and choose the modules that mustbe installed along with Cisco AnyConnect Secure Mobility Client.Tip: In order to configure additional settings for the VPN, refer the Configuring AnyConnectVPN Client Connections section of the Cisco ASA 5500 Series Configuration Guide usingthe CLI, 8.4 and 8.6.CLI ConfigurationThis section provides the CLI configuration for the Cisco AnyConnect Secure Mobility Client forreference purposes.ASA Version 9.3(2)!hostname PeerASA-29enable password 8Ry2YjIyt7RRXU24 encryptedip local pool SSL-Pool 10.10.11.1-10.10.11.20 mask 255.255.255.0!interface GigabitEthernet0/0nameif outsidesecurity-level 0ip address 172.16.21.1 255.255.255.0!interface GigabitEthernet0/1nameif insidesecurity-level 100ip address 10.10.10.1 255.255.255.0!boot system disk0:/asa932-smp-k8.binftp mode passiveobject network NETWORK OBJ 10.10.10.0 24subnet 10.10.10.0 255.255.255.0object network NETWORK OBJ 10.10.11.0 27subnet 10.10.11.0 255.255.255.224access-list all extended permit ip any any!***********Split ACL configuration***********access-list Split-ACL standard permit 10.10.10.0 255.255.255.0no pagerlogging enablelogging buffered debuggingmtu outside 1500
mtu inside 1500mtu dmz 1500no failovericmp unreachable rate-limit 1 burst-size 1asdm image disk0:/asdm-721.binno asdm history enablearp timeout 14400no arp permit-nonconnected!************** NAT exemption Configuration *****************!This will exempt traffic from Local LAN(s) to the!Remote LAN(s) from getting NATted on any dynamic NAT rule.nat (inside,outside) source static NETWORK OBJ 10.10.10.0 24 NETWORK OBJ 10.10.10.0 24destination static NETWORK OBJ 10.10.11.0 27 NETWORK OBJ 10.10.11.0 27 no-proxy-arproute-lookupaccess-group all in interface outsideroute outside 0.0.0.0 0.0.0.0 172.16.21.2 1timeout xlate 3:00:00timeout pat-xlate 0:00:30timeout conn 1:00:00 half-closed 0:10:00 udp 0:02:00 icmp 0:00:02timeout sunrpc 0:10:00 h323 0:05:00 h225 1:00:00 mgcp 0:05:00 mgcp-pat 0:05:00timeout sip 0:30:00 sip media 0:02:00 sip-invite 0:03:00 sip-disconnect 0:02:00timeout sip-provisional-media 0:02:00 uauth 0:05:00 absolutetimeout tcp-proxy-reassembly 0:01:00timeout floating-conn 0:00:00dynamic-access-policy-record DfltAccessPolicyuser-identity default-domain LOCALaaa authentication ssh console LOCALhttp server enablehttp 0.0.0.0 0.0.0.0 outsideno snmp-server locationno snmp-server contact!********** Trustpoint for Selfsigned certificate***********!Genarate the key pair and then configure the trustpoint!Enroll the trustpoint genarate the self-signed certificatecrypto ca trustpoint SelfsignedCertenrollment selfsubject-name CN anyconnect.cisco.comkeypair sslcertcrl configurecrypto ca trustpool policycrypto ca certificate chain SelfsignedCertcertificate 4748e654308202f0 308201d8 a0030201 02020447 48e654300500303a 311d301b 06035504 03131461 6e79636f636f6d31 19301706 092a8648 86f70d01 0902160a170d3135 30343032 32313534 30375a17 0d323530311d301b 06035504 03131461 6e79636f 6e6e656319301706 092a8648 86f70d01 0902160a 5065657206092a86 4886f70d 01010105 00038201 0f00308255a975ec a1f2133f 0a2c3960 0da670f8 bcb6dad7ed327ec5 286594bc 29291d8f 15140bad d33bc4927877042b b6980dc7 ccaa39c8 c34164d9 e2ddeea175930fd9 888f92b8 9f424fd7 277e8f9e 15422b405a084cf0 403267a6 23c18fa4 fca9463f aa76057a53d17d9f 4c28a3fd 609891f7 3550c991 61ef0de803a5e788 94678f4d 7f273516 c471285f 4e23422e19f99ab7 c2bedb68 6d182b82 7ecf39d5 1314c87b300d0609 2a864886 f70d0101 05050003 82010100c09ea8da 314900e7 5fa36947 c0bc1778 d132a36064dfb267 51e8af22 0a6a8378 5ee6a734 cf51aa36030100016cb43296b27e29b17bf8fe41
daf46e34 bd9fd20a bacf86e1 3fac8165 fc94fe00 4c2eb983 1fc4ae60f2a674e1 8b5d651f 760b7e8b f853822c 7b875f91 50113dfd f68933a24f9d9bda 7ae2f750 313c6b76 f8d00bf5 1f74cc65 7c079a2c 8cce91b0900a72a4 22c2b70d 111e1d92 62f90476 6611b88d ff58de5b fdaa6a803fe4b836 6bd213d4 a6356a6c 2b020191 bf4c8e3d dd7bdd8b 8cc35f0bb2371ee4 23b16359 ba1a5541 ed719680 ee49abe8quittelnet timeout 5ssh timeout 5ssh key-exchange group dh-group1-sha1console timeout 0management-access insidethreat-detection basic-threatthreat-detection statistics access-listno threat-detection statistics tcp-interceptssl server-version tlsv1-onlyssl encryption des-sha1 3des-sha1 aes128-sha1 e!******** Bind the certificate to the outside interface********ssl trust-point SelfsignedCert outside!********Configure the Anyconnect Image and enable Anyconnect***webvpnenable outsideanyconnect image disk0:/anyconnect-win-3.1.06073-k9.pkg 1anyconnect enabletunnel-group-list enable!*******Group Policy configuration*********!Tunnel protocol, Spit tunnel policy, Split!ACL, etc. can be configured.group-policy GroupPolicy SSLClient internalgroup-policy GroupPolicy SSLClient attributeswins-server nonedns-server value 10.10.10.23vpn-tunnel-protocol ikev2 ssl-clientsplit-tunnel-policy tunnelspecifiedsplit-tunnel-network-list value Split-ACLdefault-domain value Cisco.comusername User1 password PfeNk7qp9b4LbLV5 encryptedusername cisco password 3USUcOPFUiMCO4Jk encrypted privilege 15!*******Tunnel-Group (Connection Profile) Configuraiton*****tunnel-group SSLClient type remote-accesstunnel-group SSLClient general-attributesaddress-pool SSL-Pooldefault-group-policy GroupPolicy SSLClienttunnel-group SSLClient webvpn-attributesgroup-alias SSLClient enable!class-map inspection defaultmatch default-inspection-traffic!!policy-map type inspect dns preset dns mapparametersmessage-length maximum client automessage-length maximum 512policy-map global policyclass inspection defaultinspect dns preset dns mapinspect ftp
inspect sipinspect xdmcp!service-policy global policy 0a0: endVerifyComplete these steps in order to verify the client connection and the various parameters that areassociated to that connection:1. Navigate to Monitoring VPN on the ASDM:2. You can use the Filter By option in order to filter the type of VPN. Select AnyConnectClient from the drop down menu and all of the AnyConnect Client sessions. Tip: Thesessions can be further filtered with the other criteria, such as Username and IPaddress.3. Double-click a session in order to obtain further details about that particular session:
4. Enter the show vpn-sessiondb anyconnect command into the CLI in order to obtain thesession details:# show vpn-sessiondb anyconnectSession Type : AnyConnectUsername : cisco Index : 14Assigned IP : 10.10.11.1Public IP : 172.16.21.1Protocol : AnyConnect-Parent SSL-Tunnel DTLS-TunnelLicense : AnyConnect PremiumEncryption : AnyConnect-Parent: (1)none SSL-Tunnel: (1)3DES DTLS-Tunnel: (1)DESHashing : AnyConnect-Parent: (1)none SSL-Tunnel: (1)SHA1 DTLS-Tunnel: (1)SHA1Bytes Tx : 11472 Bytes Rx : 39712Group Policy : GroupPolicy SSLClientTunnel Group : SSLClientLogin Time : 16:58:56 UTC Mon Apr 6 2015Duration : 0h:49m:54sInactivity : 0h:00m:00sNAC Result : UnknownVLAN Mapping : N/A VLAN : none5. You can use the other filter options in order to refine the results:# show vpn-sessiondb detail anyconnect filter name ciscoSession Type: AnyConnect DetailedUsername : cisco Index : 19Assigned IP : 10.10.11.1Public IP : 10.106.44.243Protocol : AnyConnect-Parent SSL-Tunnel DTLS-TunnelLicense : AnyConnect PremiumEncryption : AnyConnect-Parent: (1)none SSL-Tunnel: (1)3DES DTLS-Tunnel: (1)DESHashing : AnyConnect-Parent: (1)none SSL-Tunnel: (1)SHA1 DTLS-Tunnel: (1)SHA1Bytes Tx : 11036 Bytes Rx : 4977Pkts Tx : 8 Pkts Rx : 60Pkts Tx Drop : 0 Pkts Rx Drop : 0Group Policy : GroupPolicy SSLClient Tunnel Group : SSLClientLogin Time: 20:33:34 UTC Mon Apr 6 2015Duration : 0h:01m:19sAnyConnect-Parent Tunnels: 1
SSL-Tunnel Tunnels: 1DTLS-Tunnel Tunnels: 1AnyConnect-Parent:Tunnel ID : 19.1Public IP : 10.106.44.243Encryption : none Hashing : noneTCP Src Port : 58311 TCP Dst Port : 443Auth Mode : userPasswordIdle Time Out: 30 Minutes Idle TO Left : 29 MinutesClient OS : WindowsClient Type : AnyConnectClient Ver: Cisco AnyConnect VPN Agent for Windows 3.1.06073Bytes Tx : 5518 Bytes Rx : 772Pkts Tx : 4 Pkts Rx : 1Pkts Tx Drop : 0 Pkts Rx Drop : 0SSL-Tunnel:Tunnel ID : 19.2Assigned IP : 10.10.11.1 Public IP : 10.106.44.243Encryption : 3DES Hashing : SHA1Encapsulation: TLSv1.0 TCP Src Port : 58315TCP Dst Port : 443 Auth Mode : userPasswordIdle Time Out: 30 Minutes Idle TO Left : 29 MinutesClient OS : WindowsClient Type : SSL VPN ClientClient Ver : Cisco AnyConnect VPN Agent for Windows 3.1.06073Bytes Tx : 5518 Bytes Rx : 190Pkts Tx : 4 Pkts Rx : 2Pkts Tx Drop : 0 Pkts Rx Drop : 0DTLS-Tunnel:Tunnel ID : 19.3Assigned IP : 10.10.11.1 Public IP : 10.106.44.243Encryption : DES Hashing : SHA1Encapsulation: DTLSv1.0 UDP Src Port : 58269UDP Dst Port : 443 Auth Mode : userPasswordIdle Time Out: 30 Minutes Idle TO Left : 30 MinutesClient OS : WindowsClient Type : DTLS VPN ClientClient Ver : Cisco AnyConnect VPN Agent for Windows 3.1.06073Bytes Tx : 0 Bytes Rx : 4150Pkts Tx : 0 Pkts Rx : 59Pkts Tx Drop : 0 Pkts Rx Drop : 0TroubleshootYou can use the AnyConnect Diagnostics and Reporting Tool (DART) in order to collect the datathat is useful for troubleshooting AnyConnect installation and connection problems. The DARTWizard is used on the computer that runs AnyConnect. The DART assembles the logs, status, anddiagnostic information for the Cisco Technical Assistance Center (TAC) analysis and does notrequire administrator privileges to run on the client machine.Install the DARTComplete these steps in order to install the DART:1. Download the AnyConnect Client image from the Cisco website. In order to choose thecorrect image for download, refer to the Cisco AnyConnect Secure Mobility Client web page.
A download link is provided on this page. Navigate to the download page and select theappropriate version. Perform a search for Full installation package - Window / Standaloneinstaller (ISO). Note: An ISO installer image is then downloaded (such as anyconnect-win3.1.06073-pre-deploy-k9.iso).2. Use WinRar or 7-Zip in order to extract the contents of the ISO package:3. Browse to the folder to which the contents were extracted.4. Run the Setup.exe file and select only Anyconnect Diagnostic And Reporting Tool:Run the DARTHere is some important information to consider before you run the DART: The issue must be recreated at least once before you run the DART.The date and time on the user machine must be noted when the issue is recreated.Run the DART from the Start Menu on the client machine:
Either Default or Custom mode can be selected. Cisco recommends that you run the DART in theDefault mode so that all of the information can be captured in a single shot.Once completed, the tool saves the DART bundle .zip file to the client desktop. The bundle can
then be emailed to the TAC (after you open a TAC case) for further analysis.Related Information AnyConnect VPN Client Troubleshooting Guide - Common ProblemsJava 7 Issues with AnyConnect, CSD/Hostscan, and WebVPN - Troubleshooting GuideTechnical Support & Documentation - Cisco Systems
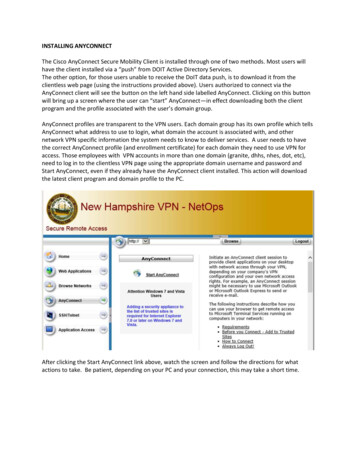
The Cisco AnyConnect Secure Mobility Client web deployment package should be downloaded to the local desktop from which the ASDM access to the ASA is present. In order to download the client package, refer to the Cisco AnyConnect Secure Mobility Client web page. The web . ASDM Version 7.3(1)101 AnyConnect Version 3.1