Transcription
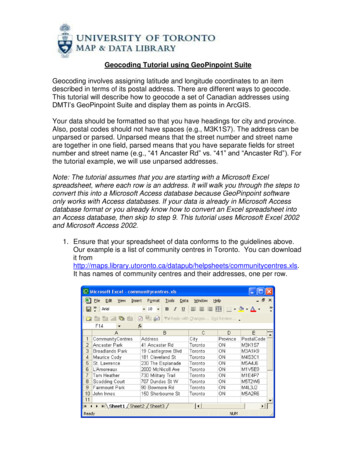
Geocoding Tutorial using GeoPinpoint SuiteGeocoding involves assigning latitude and longitude coordinates to an itemdescribed in terms of its postal address. There are different ways to geocode.This tutorial will describe how to geocode a set of Canadian addresses usingDMTI’s GeoPinpoint Suite and display them as points in ArcGIS.Your data should be formatted so that you have headings for city and province.Also, postal codes should not have spaces (e.g., M3K1S7). The address can beunparsed or parsed. Unparsed means that the street number and street nameare together in one field, parsed means that you have separate fields for streetnumber and street name (e.g., “41 Ancaster Rd” vs. “41” and “Ancaster Rd”). Forthe tutorial example, we will use unparsed addresses.Note: The tutorial assumes that you are starting with a Microsoft Excelspreadsheet, where each row is an address. It will walk you through the steps toconvert this into a Microsoft Access database because GeoPinpoint softwareonly works with Access databases. If your data is already in Microsoft Accessdatabase format or you already know how to convert an Excel spreadsheet intoan Access database, then skip to step 9. This tutorial uses Microsoft Excel 2002and Microsoft Access 2002.1. Ensure that your spreadsheet of data conforms to the guidelines above.Our example is a list of community centres in Toronto. You can downloadit eets/communitycentres.xls.It has names of community centres and their addresses, one per row.
2. Open up Microsoft Access and create a new blank database by clicking onBlank Database in the right toolbar (you will be prompted to give it a newname and asked where to save the new database file (“.mdb” file):3. Import the Microsoft Excel spreadsheet into the newly created databaseby selecting File- Get External Data- Import
4. You will be prompted for the spreadsheet file. Make sure to select“Microsoft Excel (*.xls)” for the Files of type to see your file in the list.Double click on your spreadsheet file to import it.
5. The Import Spreadsheet Wizard will take you through the steps ofimporting. First make sure that the correct sheet is highlighted in the listabove and that your data is appearing correctly in the sample datapreview window below. If everything looks okay, click on the Next button.
6. Put a checkmark next to “First Row Contains Column Headings” and clickon the Next button:
7. Continue working through the wizard by clicking on the Next buttonrepeatedly. You should encounter three more screens, but the defaultscan be used. On the fourth and final screen, you can name the table“CommunityCentres” by filling in the Import to Table field. Then click onthe Finish button to complete the import:8. Once the import has completed you can exit out of Microsoft Access.
9. Start up the GeoPinpoint program. Make sure that it is set up correctly byhaving a path entered for the Geo-reference Database. If this is not thecase, click on the Browse button and browse to the correct directory. Itshould be something similar to “C:\data\GeoPinpoint\Georef”. Place acheckmark next to “Save as Default” and click on the Select button:10. Click on the Define Geocoding Path button and make sure that there is acheckmark next to Geocoding Path. If you are asked if you want to selectall geocoding targets under this Node, say “Yes.” Click on the OK buttonto close the window:
11. Click on the MDB button next to the Target Database field to browse toyour newly created database of addresses:
12. Select your database file and click on the Open button:13. Choose the table name “CommunityCentres” in the database and click onthe Select button:
14. You will be asked if you want to add missing columns x, y, Rcode, andPrescode. Click on the Yes button:15. You should see the path to your database filled in next to TargetDatabase and your table name listed next to Table/SQL. Click on theNext button to continue:
16. GeoPinpoint’s default is to use un-parsed addresses – keep this checked.In this screen, you need to give it information about your column headersand how they match up to the data that GeoPinpoint needs. For ourexample, we should select Address from the drop-down menu next to theUn-Parsed Address field. We should also select City for Municipality,Province for Province, and PostalCode for Postal Code. Once you havematched up fields, click on the Next button:
17. The next screen is telling you that four fields will be added to yourdatabase table: x, y, Rcode, and Prescode. The longitude will be outputtedto field x and the latitude will be outputted to field y. You can leave thedefaults as is and click on the Next button:
18. Click on the Start button to start geocoding your addresses. A window willpopup to say when it is done. Click on the OK button.
19. GeoPinpoint will provide you with a summary report of the geocodingprocess. It will prompt you for where to save it. Browse to where you wantto save it, give it a name (if it does not have one already), and click on theSave button.
20. This window will give you a summary of how the process went. Click onthe Exit button to close the program:
21. To see how your file has changed, double click on your database file, andthen double click on your table name to open up the table and view thedata.22. You should see four additional columns of data, including longitude (x)and latitude (y) columns:
23. To display these points on a map, we can use ArcMap. Close MicrosoftAccess and open up ArcMap. Using a blank map template, click on theAdd Data icon:
24. Browse to and select the database file and click on the Add button;25. You will then be prompted to select the table you want to add. Select“CommunityCentres” and click on the Add button:
26. Right click on “CommunityCentres” in the Table of Contents left sidebarand select Display XY Data
27. A window opens showing that the X field in ArcMap matches the x columnin our database table and the Y field matches the y column; however, italso says that the Coordinate System is unknown. To correct this so thatthe map will display correctly, click on the Edit button:
28. Click on the Select button:
29. Browse to Geographic Coordinate Systems\North America\ and doubleclick on NAD 1983.prj (what GeoPinpoint uses):
30. Click on the OK button. Then click again on the OK button to complete themap display. You should now see points on your map, similar to this:
31. Finally, we need to export it as a shapefile to save the changes we madein ArcMap. Right click on “CommunityCentres Events” and select Data Export Data
32. Click on the folder to browse to where you want to save the shapefile andgive the shapefile a name. Then click on the OK button:33. You will be prompted to add the exported data as a layer, say Yes. Nowyou have a shapefile with points representing each address you had inyour original Excel spreadsheet:
You have now geocoded addresses using GeoPinpoint and displayed them aspoints in ArcMap.If you have any questions or comments, please contact us atgis.maps@utoronto.ca.U:\staff\docs\Help Sheets and Workshops\Geocoding Tutorial using a/docs/GeocodingGeoPinpoint.pdf
Geocoding Tutorial using GeoPinpoint Suite Geocoding involves assigning latitude and longitude coordinates to an item described in terms of its postal address. There are different ways to geocode. This tutorial will describe how to geocode a set of Canadian addresses using DMTI's GeoPinpoint Suite and display them as points in ArcGIS.