Transcription
Step-by-Step Guide to Geocoding Using US Census TIGERStep 1- Compile or obtain address listIf you are compiling your own address list, read through all these steps first. This will help youdetermine how much data you will need and the format needed.Data will need to be in .txt (Tab delimited text file), .dbf (DBASE), or .mdb (Microsoft Access)to import into ArcMap. If your data comes to you in another format, most software packageshave a Save As option which will convert your data into one of these formats.Confirm or edit addresses until at least one field contains address number and street nametogether and (if available) zip code in another field. You can leave any other data fields that youwish.Tip: Use short, concise column labels to avoid problems during the Save As or Add New Dataprocesses.Save your data file as .dbf , .txt, or .mdb.Step 2 – Open ArcMapAdd the TIGER line road layer(s) for area. If you do not have these files already, the 2000TIGER files can be downloaded at:http://www.esri.com/data/download/census2000 tigerline/index.htmlIf you are geocoding for a multi-county area you will need to merge all of the road layerstogether to use as the reference file when you define the geocoding service in the next step. Tomerge these in Arc 8, use the Geoprocessing Wizard. In Arc 9 this process is a bit morecomplicated:1. Copy one of the road layers to another location using the ArcToolbox/DataManagement Tools/General/Copy. This just prevents changing the original layer incase you need it in the future.2. Using the ArcToolbox/Data Management Tools/General/Append, select theremaining road layer to append/concatenate to the COPY of the first road layer.Now you have a reference file to use when defining your geocoding service. This is a good timeto add your address data file and browse it in ArcMap. Make sure your data set is complete,sometimes errors will occur during the save as process and you will have to repeat the process.Step 3 – Define Geocoding ServiceYou can define a Geocoding Service (also called Address Locator) in ArcToolbox orArcCatalog. I feel that ArcCatalog has a better interface and is easier for new users. Once youare more experienced with writing Geocoding Services, check out the ArcToolbox method.Open ArcCatalog. In the catalog pane (on the left) click to expand “Address Locators”. In theright window, you will see all previously defined services (if any).
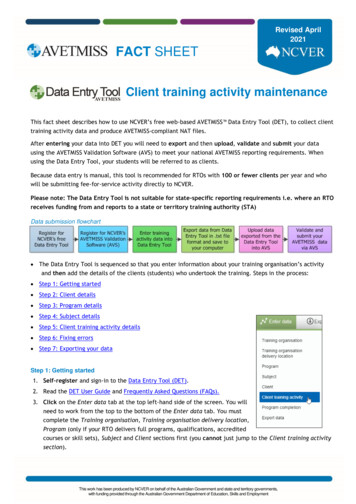
Click Create New Address Locator. A dialog box will open giving you a list of types of servicesyou can define. If you have addresses from a single city or zip, the easiest way is to define a USSTREETS (FILE) geocoding service using the TIGER line file for roads for the county. If yourdata spans several cities or counties AND you have a zip code available for each address thenyou will want to consider defining a US STREETS WITH ZONE (FILE). Select the typeappropriate for your reference file.Once a type is selected, a new formwill appear.1. Enter a name for yourgeocoding service. It will get veryconfusing after a while if you haveNew Address Locator 1, NewAddress Locator 2, etc.2. Set your reference file. This isthe TIGER road file that you haveor created in Step 2.3. Make sure all of the appropriatefields are recognized. If you aredefining a service without azipcode, only Prefix Type, LeftZone, and Right Zone will be None .4. All options on the right-hand side can be altered, if you choose to, at the time you geocodeyour addresses. Setting them here will establish defaults, but you will still have the option ofchanging them later. Click OK to complete this process.Close ArcCatalog.Step 4 – Geocode Address ListIn ArcMap, right click on your address list in the layers window. Select Geocode Addresses.When the dialog box opens, you will see any geocoding services previously used on the project.Usually though, this window is blank and you will need to add a geocoding service.Click Add. Click the drop down arrow next to the Look In box. Select Address Locators toview a list of all available geocoding services. Select the service you defined in Step 3 and clickAdd. With your service highlighted, click OK.Select the appropriate fields from your address data set to correspond with the Address InputFields needed by the geocoding service.Guide to Geocoding using US Census TIGERPage 2 of 7
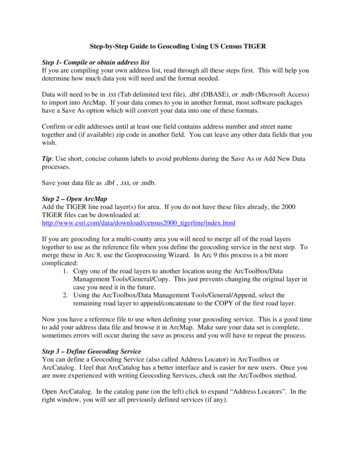
Tip: In the output section, it is helpful to save the resulting shapefile with a meaningful name andin a location where you will be able to locate it.The Geocoding Options button will bring up the default options you set in Step 3 for thegeocoding service and allow you to alter the options for this batch, if so desired.Step 5 – Review resultsOnce process completes, a Review/RematchAddresses box will appear. This box will tell you howwell your geocoding service worked and give you theopportunity to manually match any points that it wasunable to locate.The critical points are those that remain unmatched.In the screen shot at the left you can see this is only 7addresses.Make sure “Unmatched addresses” is selected in theRematch Criteria section and click MatchInteractively.The Interactive Review window will now appear with only those addresses that remainunmatched.You will need to revieweach address that isshown in the top window.The bottom windowdisplays all possiblematches for this address.In this example, you cansee that TIGER is missingdata on the FRADDR andTOADDR fields for thefirst choice. This is likelythe correct street segment.You can highlight it andclick the Match button.Guide to Geocoding using US Census TIGERPage 3 of 7
The second entry, however,does not display any possiblematches.This requires a bit moreknowledge of the area or theassistance of an online toollike MapQuest.In this example, I suspect that“Lees Summit Rd” should be“Lee’s Summit Rd”. To trythis change, click the Modifybutton (left side in themiddle). Make the changeand press the Tab key. Thiswill allow you to view thepossible matches without closing the modify box in case other changes to this address areneeded.You can see on theleft that in thisexample, adding theapostrophe broughtup only onepossibility.Select the correctroad segment andclick the Matchbutton.Repeat this processfor each listing in thetop window. Onceyou are finished,click the Closebutton.Guide to Geocoding using US Census TIGERPage 4 of 7
Now you will see the updated statistics.Step 6 - Reviewing matched addressesIt is always a good idea to verify some (or all) ofthe addresses to ensure the geocoding processplaced the address point in the correct place. Inparticular, you should verify all of the addresseswith tied candidates. This is more importantwhen dealing with multi-county areas, but thesame address may exist more than once in a singlecounty. For example, the address 408 Elm isvalid both in the city of Lawrence and BaldwinCity resulting in tied possibilities and potentiallyplacing the point in the incorrect city.Click Done to close the Review/Rematch window and return to your map. You will now seeyour addresses as points on the map. Identify or select all points that have a Status code ’T’.This indicates the address had two or more possible matches with the same score. Also look forany outliers. In this example, all points were supposed to be within Kansas City, Missouri.Adding the layer for the city boundary quickly identified the point shown below as being outsidethe city.Guide to Geocoding using US Census TIGERPage 5 of 7
This is where a service like MapQuest comes inhandy, especially if you are not very familiar withthe area you are mapping.In this example, I quickly confirmed that thegeocode point for 720 Oak Street, Kansas City,Missouri was in the wrong place.Tip: You can reduce the chance of misplacedpoints, but defining your geocoding service toinclude the zip code (if it is available in youraddress data).Locate the correctroad line segment onyour map.Use the Identify toolto view the segmentidentification. Oftentimes, TIGER data isincomplete and theline segment willhave missingattributes. Note anyidentifying measuresfor the correctsegment to help youselect it from theReview/Rematchsection.Right click on yournew shapefile of addresses. Select Data and then Review/Rematch Addresses. This will openthe statistics window again and allow you to Match Interactively any address points that youhave identified as being in the wrong place. Select All Addresses and then click MatchInteractively.Tip: Addresses will appear in order by FID. Noting the FID for any points that need to be movedwill make it easier to locate them in the list.Guide to Geocoding using US Census TIGERPage 6 of 7
In this example, the correct line segment is the last one listed. Click on the correct segment andthen click the Match button. You will see the status for this point change to “M” for matched.When you are finished correctly matching each point that needs correction, click Close and thenDone. Review your map and ensure each point was moved to the correct location.Questions? Please contact:Xan StevensPolicy Research InstituteThe University of Kansas1541 Lilac Lane607 Blake HallLawrence, KS 66044(785) 864-9111xan@ku.eduGuide to Geocoding using US Census TIGERPage 7 of 7
The Geocoding Options button will bring up the default options you set in Step 3 for the geocoding service and allow you to alter the options for this batch, if so desired. Step 5 - Review results Once process completes, a Review/Rematch Addresses box will appear. This box will tell you h well your geocoding service worked and give you th