Transcription
Revised April2021FACT SHEETavetmiss fACT SheetClient training activity maintenanceMonth2014This fact sheet describes how to use NCVER’s free web-based AVETMISS Data Entry Tool (DET), to collect clienttraining activity data and produce AVETMISS-compliant NAT files.MonthAfter entering your data into DET you will need to export and then upload, validate and submit 2014your datausing the AVETMISS Validation Software (AVS) to meet your national AVETMISS reporting requirements. Whenusing the Data Entry Tool, your students will be referred to as clients.Because data entry is manual, this tool is recommended for RTOs with 100 or fewer clients per year and whowill be submitting fee-for-service activity directly to NCVER.Please note: The Data Entry Tool is not suitable for state-specific reporting requirements i.e. where an RTOreceives funding from and reports to a state or territory training authority (STA)Data submission flowchart The Data Entry Tool is sequenced so that you enter information about your training organisation’s activityand then add the details of the clients (students) who undertook the training. Steps in the process: Step 1: Getting started Step 2: Client details Step 3: Program details Step 4: Subject details Step 5: Client training activity details Step 6: Fixing errors Step 7: Exporting your dataStep 1: Getting started1. Self-register and sign-in to the Data Entry Tool (DET).2. Read the DET User Guide and Frequently Asked Questions (FAQs).3. Click on the Enter data tab at the top left-hand side of the screen. You willneed to work from the top to the bottom of the Enter data tab. You mustcomplete the Training organisation, Training organisation delivery location,Program (only if your RTO delivers full programs, qualifications, accreditedcourses or skill sets), Subject and Client sections first (you cannot just jump to the Client training activitysection).This work has been produced by NCVER on behalf of the Australian Government and state and territory governments,with funding provided through the Australian Government Department of Education, Skills and Employment
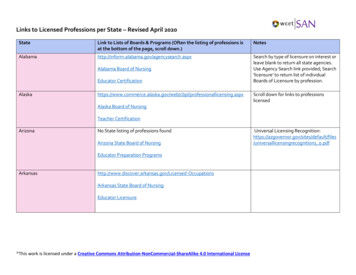
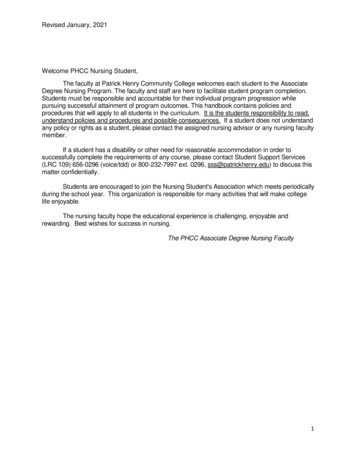
FACT SHEET4. Select Client training activity once you have completed the sections above.5. Click on the blue Add new button to start a new client training activity record. This will bring you to theClient training activity maintenance screen.Step 2: Client detailsPlease match the reference numbers on the followingscreen shots with the text beside it, whereapplicable.1. Read the information provided at the top of eachsection/tab (highlighted in yellow) where you willfind lots of valuable information.2. Select the client from the table that lists yourexisting clients.3. Select the Study reason from the available optionsin the drop-down menu.4. ONLY for students that are undertaking anapprenticeship or traineeship — please enter in therequired apprenticeship/traineeship fields.5. Select Next to move onto the Program tab.Step 3: Program details1. Commencing program identifier - though listed as an optional field you must select one of the following: 3 — Commencing enrolment in the program if a client commenced a program for the first time duringthe current collection year. 4 — Continuing enrolment in the program from a previous year if a client commenced the program ina previous collection year and is continuing with that study in the current year or if a client commencedin a program that superseded a program in a previous collection year and is continuing with that studyunder the new program in the current year. None – can be selected in lieu of one of the above options. 8 —Subject enrolment only if the enrolment is a unit of competency/subject or module enrolment only(client not enrolled in a full program), this must be selected if there is no program involved.2. Enter in the Program id if you selected the commencing program identifier ‘3’, ‘4’ or ‘none’. If youselected ‘8’ do not enter a program identifier — click on the green Next button to continue on to theSubject tab.Step 4: Subject details1. Click on the blue New client subject enrolment button to enrol the client into a subject. You will need torepeat this step for each subject that a student is enrolled in. For example, if a student is enrolled in 8subjects you will need to complete this step 8 times.2. After clicking the New client subject enrolment button, the Client subject enrolment maintenance windowwill pop up.This work has been produced by NCVER on behalf of the Australian Government and state and territory governments,with funding provided through the Australian Government Department of Education, Skills and Employment
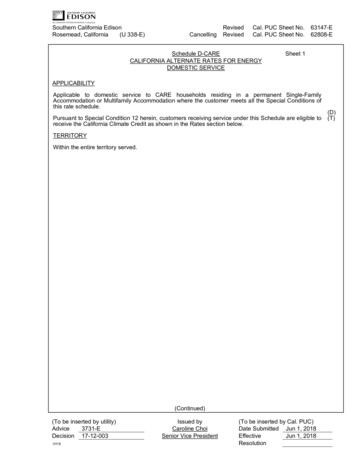
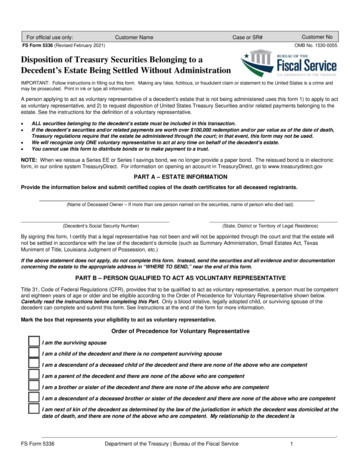
FACT SHEETSubject tab: This is where you enter in thetraining delivery location id, subject, unit ofcompetency or module details; once youhave entered all the subject enrolmentactivity in Select Next to continue.Details tab: The following message appearsat the top of this tab: “The fields below canbe entered at a later stage, but they needto be provided before you export yourdata”. This session can be saved andcompleted once the student completes theirtraining.If you are unsure which codes to use for anyof the fields, either select the drop down orplease consult the AVETMISS Data ElementDefinitions.If you select ‘13’ as the Funding source —national code, you will need to provide aSpecific funding id. If you are not sure whichSpecific funding id to use, please consultyour funding state training authority (STA).You will not need to provide a Specificfunding id unless you have selected ‘13’ forthe Funding source national— code.You will need to Select Next to continue tothe state field tab to save and close the enrolment.State fields tab: Leave blank as the DataEntry Tool is not suitable for state-specificreporting requirements i.e. where an RTOreceives funding from and reports to a stateor territory training authority (STA).This work has been produced by NCVER on behalf of the Australian Government and state and territory governments,with funding provided through the Australian Government Department of Education, Skills and Employment
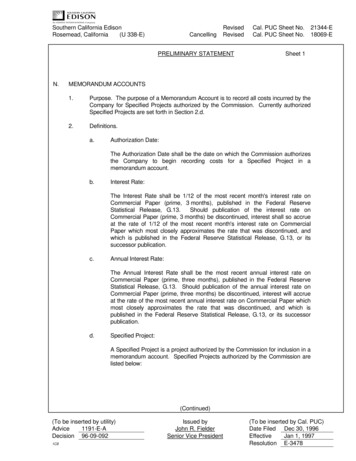
FACT SHEETStep 5: Client training activity detailsAfter clicking Save and close in the Client subject enrolment maintenance window, you will be brought back tothe client enrolment maintenance screen. From here, you have the following options:1. Click on the pencil to edit a Client subject enrolment record (this is also how you fix errors) to modifyexisting records.2. Click on the New client subject enrolmentbutton to enrol the same client into anothersubject. For example, if you are enrolling aclient into 8 subjects you would repeat this 8times (re-start process from Step 3).3. Click on the Save and close to finish and saveyour client enrolment record(s) you have justbeen working on. Important: If you do notselect Save and close your Client subjectenrolment data will not be saved.4. Click on the Save and new to go back to yourlist of clients to begin enrolling a new client(re-start process from Step 2).Step 6: Fixing errorsIf you accidently miss a field or enter an invalidentry, you cannot save until you have fixed theerror. See the screen shot on the right to assistin locating and identifying your errors.Once the error has been fixed tab through untilyou can select Save and close.This work has been produced by NCVER on behalf of the Australian Government and state and territory governments,with funding provided through the Australian Government Department of Education, Skills and Employment
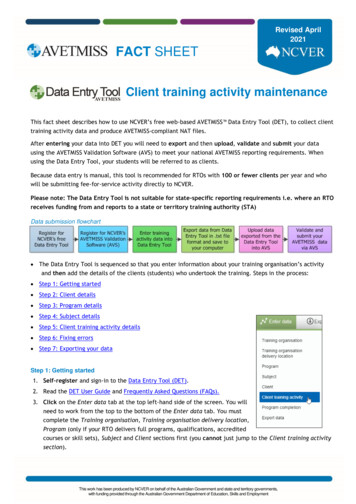
FACT SHEETStep 7: Exporting your dataOnce you have finished enrolling all of your clients, you can move on to the final section of DET. If you haveclients who completed a full program, qualification, accredited course or skill set during the collection year,you will need to enter them into the Program completion section. If your RTO does not offer full programs ordid not issue any full completions during the collection year, please leave the Program completion sectionblank. Program completions must be for the specific submission period – forward dated program completionswill result in a validation error in AVS and will need to be removed from DET to pass validation.Now you can export your data by clicking on the Export tab located to the right of the Enter data tab. This willbring you to the Export Data Files screen (see screen shot below):1. Select your Collection period. For RTOsreporting fee-for-service or Commonwealthfunded data directly to NCVER on an annualbasis, it is important that you select Jan—Decand the relevant year. If reporting quarterly,select the relevant quarter e.g. Jan-Mar YEAR2. Selecting this option will produce a NAT00085file.3. Select the funding source — it is recommendedyou select All data as this will then capture anyerrors that may have been made during dataentry.4. Select Text file (.txt) as the format. AVS cannotaccept any other file formats.5. Click the Verify export criteria button6. Once your export criteria have been verified you will be able to click on the Export button. This will exportyour data (into AVETMISS compliant NAT files) as a zip file to your computer. Where your zip file is saved isdetermined by individual computer/ web-browser configuration: typically, the zip file is saved to adownloads folder. We recommend saving the zip file to your desktop or somewhere easy to remember asyou will need to upload this zip file into AVS to complete your AVETMISS reporting requirements.7. Please note to complete your AVETMISS reporting you will need to export your data from DET and validateand submit it via the AVETMISS validation software (AVS).For a step-by-step guide on the how to report your AVETMISS data using AVS, please see our AVETMISS reportingin 8 steps fact sheet.What help is available?NCVER has a dedicated Client Support team to help you with your AVETMISS related queries and can becontacted a number of ways:Contacting the AVETMISS support teamFill out our contact formEmail: support@ncver.edu.auPhone: 08 8230 8400Toll free: 1800 649 452This work has been produced by NCVER on behalf of the Australian Government and state and territory governments,with funding provided through the Australian Government Department of Education, Skills and Employment
Step 1: Getting started Step 2: Client details Step 3: Program details Step 4: Subject details Step 5: Client training activity details Step 6: Fixing errors Step 7: Exporting your data Step 1: Getting started 1. Self-register and sign-in to the Data Entry Tool (DET). 2. Read the DET User Guide and Frequently Asked Questions (FAQs).