Transcription
KNIME Workbench GuideKNIME AG, Zurich, SwitzerlandVersion 4.6 (last updated on 2022-04-20)
Table of ContentsWorkspaces . . . . . . . . . . . . . . . . . . . . . . . . . . . . . . . . . . . . . . . . . . . . . . . . . . . . . . . . . . . . . . . . . . . . 1KNIME Workbench . . . . . . . . . . . . . . . . . . . . . . . . . . . . . . . . . . . . . . . . . . . . . . . . . . . . . . . . . . . . . . . 2Welcome page . . . . . . . . . . . . . . . . . . . . . . . . . . . . . . . . . . . . . . . . . . . . . . . . . . . . . . . . . . . . . . . . 4Workflow editor & nodes . . . . . . . . . . . . . . . . . . . . . . . . . . . . . . . . . . . . . . . . . . . . . . . . . . . . . . . 5KNIME Explorer . . . . . . . . . . . . . . . . . . . . . . . . . . . . . . . . . . . . . . . . . . . . . . . . . . . . . . . . . . . . . . 13Workflow Coach . . . . . . . . . . . . . . . . . . . . . . . . . . . . . . . . . . . . . . . . . . . . . . . . . . . . . . . . . . . . . 35Node repository . . . . . . . . . . . . . . . . . . . . . . . . . . . . . . . . . . . . . . . . . . . . . . . . . . . . . . . . . . . . . . 37KNIME Hub view . . . . . . . . . . . . . . . . . . . . . . . . . . . . . . . . . . . . . . . . . . . . . . . . . . . . . . . . . . . . . 38Description . . . . . . . . . . . . . . . . . . . . . . . . . . . . . . . . . . . . . . . . . . . . . . . . . . . . . . . . . . . . . . . . . . 40Node Monitor . . . . . . . . . . . . . . . . . . . . . . . . . . . . . . . . . . . . . . . . . . . . . . . . . . . . . . . . . . . . . . . . 40Outline. . . . . . . . . . . . . . . . . . . . . . . . . . . . . . . . . . . . . . . . . . . . . . . . . . . . . . . . . . . . . . . . . . . . . . 41Console. . . . . . . . . . . . . . . . . . . . . . . . . . . . . . . . . . . . . . . . . . . . . . . . . . . . . . . . . . . . . . . . . . . . . 41Customizing the KNIME Workbench . . . . . . . . . . . . . . . . . . . . . . . . . . . . . . . . . . . . . . . . . . . . . . . 42Reset and logging . . . . . . . . . . . . . . . . . . . . . . . . . . . . . . . . . . . . . . . . . . . . . . . . . . . . . . . . . . . . 42Show heap status . . . . . . . . . . . . . . . . . . . . . . . . . . . . . . . . . . . . . . . . . . . . . . . . . . . . . . . . . . . . 42Configuring KNIME Analytics Platform . . . . . . . . . . . . . . . . . . . . . . . . . . . . . . . . . . . . . . . . . . . . . 43Preferences . . . . . . . . . . . . . . . . . . . . . . . . . . . . . . . . . . . . . . . . . . . . . . . . . . . . . . . . . . . . . . . . . 43Setting up knime.ini. . . . . . . . . . . . . . . . . . . . . . . . . . . . . . . . . . . . . . . . . . . . . . . . . . . . . . . . . . . 48KNIME runtime options . . . . . . . . . . . . . . . . . . . . . . . . . . . . . . . . . . . . . . . . . . . . . . . . . . . . . . . 50KNIME tables . . . . . . . . . . . . . . . . . . . . . . . . . . . . . . . . . . . . . . . . . . . . . . . . . . . . . . . . . . . . . . . . . . 56Data table . . . . . . . . . . . . . . . . . . . . . . . . . . . . . . . . . . . . . . . . . . . . . . . . . . . . . . . . . . . . . . . . . . . 56Column types . . . . . . . . . . . . . . . . . . . . . . . . . . . . . . . . . . . . . . . . . . . . . . . . . . . . . . . . . . . . . . . . 57Sorting . . . . . . . . . . . . . . . . . . . . . . . . . . . . . . . . . . . . . . . . . . . . . . . . . . . . . . . . . . . . . . . . . . . . . 60Column rendering . . . . . . . . . . . . . . . . . . . . . . . . . . . . . . . . . . . . . . . . . . . . . . . . . . . . . . . . . . . . 60Table storage. . . . . . . . . . . . . . . . . . . . . . . . . . . . . . . . . . . . . . . . . . . . . . . . . . . . . . . . . . . . . . . . 62
KNIME Workbench GuideThis guide describes the first steps to take after starting KNIME Analytics Platformand points you to the resources available in the KNIME Workbench for buildingworkflows. It also explains how to customize the workbench and configure KNIMEAnalytics Platform to best suit specific needs. In the last part of this guide weintroduce data tables.WorkspacesWhen you start KNIME Analytics Platform, the KNIME Analytics Platform launcher windowappears and you are asked to define the KNIME workspace, as shown in Figure 1. The KNIME workspace is a folder on the local computer to store KNIMEworkflows, node settings, and data produced by the workflow.Figure 1. KNIME Analytics Platform launcherThe workflows and data stored in the workspace are available through the KNIME Explorer inthe upper left corner of the KNIME Workbench. 2021 KNIME AG. All rights reserved.1
KNIME Workbench GuideKNIME WorkbenchAfter selecting a workspace for the current project, click Launch. The KNIME AnalyticsPlatform user interface - the KNIME Workbench - opens.It is typically organized as shown in Figure 2.Figure 2. KNIME WorkbenchIn the next few sections we explain the functionality of these components of the workbench: Welcome Page Workflow Editor & nodes KNIME Explorer Workflow Coach Node Repository KNIME Hub view Description 2021 KNIME AG. All rights reserved.2
KNIME Workbench Guide Node Monitor Outline Console 2021 KNIME AG. All rights reserved.3
KNIME Workbench GuideWelcome pageThe welcome page shown in Figure 3 is located in the middle of the KNIME Workbench.Figure 3. Welcome pageThis page links to information, for example available updates and the latest KNIME news,upcoming events, and tips and tricks.After closing the welcome page, if no previously created workflows are available, you need tocreate an empty workflow editor, as explained in the next section. 2021 KNIME AG. All rights reserved.4
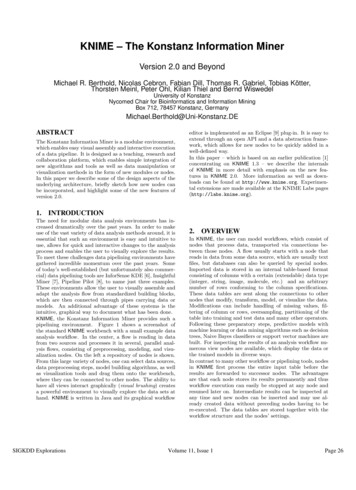
KNIME Workbench GuideWorkflow editor & nodesThe workflow editor is where workflows are assembled. Workflows are made up of individualtasks, represented by nodes.Create a new workflow editor going to File New and selecting the New KNIME Workflowoption in the window that opens. Then click Next and give the new workflow a name in thefield next to Name of the workflow to create: and click Finish. Other options are available asexplained in the Building workflows section.In the new empty workflow editor, create a workflow by dragging nodes from the noderepository to the workflow editor, then connecting, configuring, and executing them.NodesIn KNIME Analytics Platform, individual tasks are represented by nodes. Nodes can performall sorts of tasks, including reading/writing files, transforming data, training models, creatingvisualizations, and so on.Facts about nodesFigure 4. Node ports and node status Each node is displayed as a colored box with input and output ports, as well as a status,as shown in Figure 4 The input port(s) hold the data that the node processes, and the output port(s) hold theresulting datasets of the operation The data is transferred over a connection from the output port of one to the input portof another node. 2021 KNIME AG. All rights reserved.5
KNIME Workbench Guide For simplicity we refer to data when we refer to node input and output ports, butnodes can also have input and output ports that hold a model, a databasequery, or another type explained in Node Ports. 2021 KNIME AG. All rights reserved.6
KNIME Workbench GuideChanging the status of a nodeThe status of a node can be changed, either configuring, executing, or resetting it. All theseoptions can be found in the context menu of a node shown in Figure 5.Open the context menu by right clicking a node. From the context menu it is also possible toopen output tables and views, as well as copy nodes, along with some more advanced nodeoptions.Figure 5. Context menu of a nodeIdentifying the node statusThe traffic light below each node shows the status of the node. When a node is configured,the traffic light changes from red to yellow, i.e. from "not configured" to "configured".When a new node is first added to the workflow editor, its status is "not configured" - shownby the red traffic light below the node.Configuring the nodeThe node can be configured by adjusting the settings in its configuration dialog.Open the configuration dialog of a node by either: Double clicking the node Right clicking a node and selecting Configure in the context menu Or, selecting the node and pressing F6 2021 KNIME AG. All rights reserved.7
KNIME Workbench GuideIn addition to the task specific settings, each node configuration dialog has a: "Memory Policy"-tab: here it is possible to define whether tables are attempted to bekept in memory, or if all tables are written to disk (see the section on In-MemoryCaching for details). "Flow Variables"-tab: flow variables are explained in the Flow Control GuideExecuting the nodeSome nodes have the status "configured" already when they are created. These nodes areexecutable without adjusting any of the default settings.Execute a node by either: Right clicking the node and selecting Execute Or, selecting the node and pressing F7If execution is successful, the node status becomes "executed", which corresponds to agreen traffic light. If the execution fails, an error sign will be shown on the traffic light, and thenode settings and inputs will have to be adjusted as necessary.Right click the node and select one of the last options in the menu to inspect the outputs,such as data tables, and views of an executed node. If the node produces an (interactive)view in its output, like all JavaScript based nodes, select (Interactive) View: from thecontext menu to open it.Canceling execution of the nodeTo cancel the execution of a node, right click it and select Cancel or select it and press F9.Resetting the nodeTo reset a node, right click it and select Reset or select it and press F8. Resetting a node also resets all of its subsequent nodes in the workflow. Now,the status of the node(s) turns from "executed" into "configured", the nodes'outputs are cleared. 2021 KNIME AG. All rights reserved.8
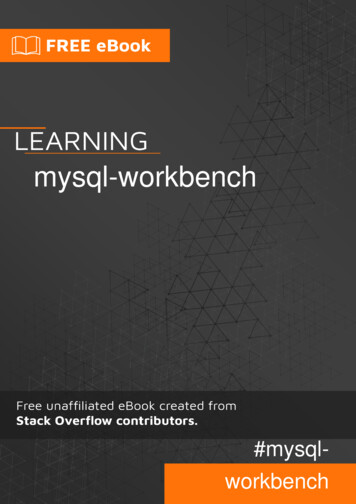
KNIME Workbench GuideNode portsA node may have multiple input ports and multiple output ports. A collection ofinterconnected nodes, using the input ports on the left and output ports on the right,constitutes a workflow. The input ports consume the data from the output ports of thepredecessor nodes, and the output ports provide data to the successor nodes in theworkflow.Besides data tables, input and output ports can provide other types of inputs and outputs. Foreach type the pair of input and output port looks different, as shown in Figure 6.An output port can only be connected to an input port of the same type - data to data, modelto model, and so on.Some input ports can be empty, like the data input port of the Decision Tree View node inFigure 6. This means that the input is optional, and the node can be executed without theinput. The mandatory inputs, shown by filled input ports, have to be provided to execute thenode.Decision Tree ViewIntegerConfigurationModelImageDecisionTree LearnerFlow variableDataPartitioningDecision TreePredictorSQLite ConnectorDB Table SelectorDatabaseConnectionDatabaseQueryFigure 6. Common port typesA tooltip gives a short explanation of the input and output ports. If the node is executed, thedimensions of the outcoming data are shown in its data output port. A more detailedexplanation of the input and output ports is in the node description.How to select, move, copy, and replace nodes in a workflowNodes can be moved into the workflow editor by dragging and dropping them. To copy nodes 2021 KNIME AG. All rights reserved.9
KNIME Workbench Guidebetween workflows, select the chosen nodes, right click the selection, and select Copy in themenu. In the destination workflow, right click the workflow editor, and select Paste in themenu.To select a node in the workflow editor, click it once, and it will be surrounded by a border. Toselect multiple nodes, either press "Ctrl" and select nodes by mouse click, or draw a rectangleover the nodes with the mouse.Replace a node by dragging a new node onto an existing node. Now the existing node will becovered with a colored box with an arrow and boxes inside as shown in Figure 7. Releasingthe mouse replaces the node.Figure 7. Replacing a node in a workflowComments and annotationsYou have two options in the workflow editor to document a workflow (as shown in Figure 8): Add a comment to an individual node by double clicking the text field below the nodeand editing the text Add a general comment to the workflow, right click the workflow editor and select NewWorkflow Annotation in the menu. Now a yellow box will appear in the workflow editor.You can do the following actions on the workflow annotation box. To move the workflow annotation box inside the workflow editor, first activate it fromthe top left corner, and then drag the box. To resize the box drag any of its edges. To edit the text inside double click the top left corner of the annotation box and typenew text in the text field. 2021 KNIME AG. All rights reserved.10
KNIME Workbench Guide To change the properties of the text and the border double click the top left corner andthen right click inside the box. A menu opens showing the available editing options.Double-click to writeorRight-click to changepropertiesMy first File ReaderDouble-click to writeRead salesdataFigure 8. Writing a node comment and creating a workflow annotation The video Annotations & Comments gives you a few hints about how todocument a workflow. 2021 KNIME AG. All rights reserved.11
KNIME Workbench GuideWorkflow editor settingsChange the visual properties of the workflow editor by clicking the "Workflow Editor Settings"button in the toolbar shown in Figure 9.Figure 9. Changing visual properties of the workflowIn the dialog that opens you can change the size of the grid or remove the grid linescompletely. You can also change the connection style from angular to curved, and make theconnections thicker or narrower.The changes will only apply to the currently active workflow editor. To change the defaultworkflow editor settings, go to File Preferences KNIME KNIME GUI WorkflowEditor.Keyboard shortcutsTo view a full list of keyboard shortcuts, choose Help Show Active Keybindings from thetoolbar. Here, it is also possible to modify the bindings, and create personalized shortcuts. 2021 KNIME AG. All rights reserved.12
KNIME Workbench GuideKNIME ExplorerThe KNIME Explorer is where you can manage workflows, workflow groups, and serverconnections. By default only the local workspace, the EXAMPLES server and the link toconnect to your personal KNIME Hub space are visible in the KNIME Explorer.Mount pointLocalworkspaceWorkflowGroupData fileSharedcomponentWorkflowFigure 10. KNIME ExplorerMount pointsMount points are workflow repositories that are accessible from KNIME Analytics Platform.They can be displayed as root directories in the KNIME Explorer view.Each mount point consists of the location of the workflow repository, and a mount ID. For alocal workflow repository, the location is the path to the folder, and for a server it is theaddress of the server. The mount ID is used to reference files and workflows under the mountpoint. 2021 KNIME AG. All rights reserved.13
KNIME Workbench GuideKNIME Explorer toolbarAt the top of the KNIME Explorer are several icons arranged in a toolbar shown in Figure 11.Figure 11. KNIME Explorer toolbarThe functions of the icons are explained in Table 1 below:Table 1. Functions of the KNIME Explorer toolbar icons ( ) expands the selected workflowgroup showing its content (-) collapses the element collapses all elements in the KNIMEExplorer showing only the mount pointsRefreshes the view, in case it is out of syncwith the underlying file systemSelects the workflow that is open in theworkflow editorAdd text to the field and press "Enter". TheKNIME Explorer will only show items thatcontain the text in their name or are in aworkflow group containing the text in itsname.Opens the explorer preference page, allowingto add/remove/edit mount points 2021 KNIME AG. All rights reserved.14
KNIME Workbench GuideKNIME Explorer contentThe types of content that you can see in the KNIME Explorer are described in Table 2.Table 2. Types of Items in KNIME ExplorerWorkflowWorkflow Group A collection of nodes used to analyze data in KNIMEA folder within the KNIME Explorer, which can be usedto store workflows, data files, components, andmetanodes.Data FileDragging a data file from the KNIME Explorer to theworkflow editor automatically creates the correct nodeto read the file type. Storing data files in the currentlyactive workspace allows for defining file paths relativelyto their location in the KNIME Explorer.Component/metanodeComponents and metanodes contain a pre-configuredsub-workflow, which can be integrated in any part of aworkflow. Components are nodes that encapsulate andabstract functionality. Metanodes, instead, are used toorganize the workflow, collapsing part of it to hide thatpart of the workflow’s functionality.A more comprehensive overview on components and metanodes is available inthe KNIME Components Guide. 2021 KNIME AG. All rights reserved.15
KNIME Workbench GuideExplorer operationsDragging and dropping elementsIn the KNIME Explorer, elements can be moved between the repositories in the same way asin any other file explorer. Besides that, operations can be applied that affect the workflowsstored in the KNIME Explorer: create nodes to read different file types and use a componentor a metanode within a workflow. These operations are summarized in Table 3.Table 3. Drag and Drop Operations in the KNIME ExplorerMoveTo move an item, simply drag it and drop it to the desired locationCopyCopying an item is the same process as moving it. Keep the "Ctrl"-keypressed during the drag and drop step. A small plus-sign next to themouse cursor indicates the copy operation. Additionally, "Ctrl" "c"/"v"shortcuts can be used to copy and paste elements from one repositoryto another.Node creationDrop a data file into the workflow editor. KNIME will create theappropriate file reading node automatically and preconfigures the node.Component/met A component or a metanode can be saved in the KNIME Explorer foranode usagelater reuse. To do this, right click any component or metanode andselect Component (or Metanode) Share . The resulting dialog givesyou the possibility to choose a destination and the link type. To use acomponent or metanode stored in the KNIME Explorer, drag and drop itto the workflow editor. 2021 KNIME AG. All rights reserved.16
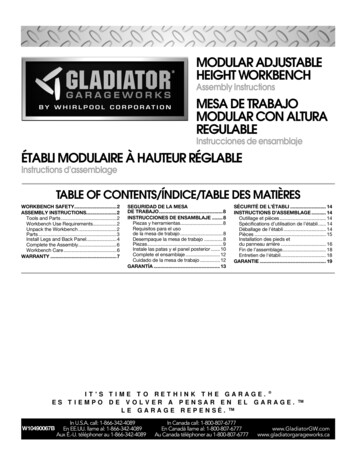
KNIME Workbench GuideContext menuOther useful operations you can do in the KNIME Explorer are available in the context menu.Right click the KNIME Explorer or an item of the view to open the menu shown in Figure 12.12131415161718191101Figure 12. KNIME Explorer Context MenuThe menu items shown in Figure 12 are the operations available for workflows that arestored in your local workspace, without any remote workspace available. The possibleoperations are listed below:1 Opens the workflow2 Creates a new, empty workflow, places it in the selected workflow group and opens it in theworkflow editor3 Creates a new, empty workflow group and places it in the selected workflow group ordirectly under the "LOCAL" mount point4 Opens the workflow import or export wizard5 Deletes or renames the selected item. If a workflow is currently opened in the workfloweditor, or a workflow group contains an open workflow, it is locked and cannot be renamednor deleted.6 Opens the meta information editor, where it is possible to write a description associatedwith the selected workflow or workflow group7 Refreshes the workflow (group), in case it is out of sync with the underlying file system8 Expands a menu for different file path types to copy the path to the item9 Compares two selected items 2021 KNIME AG. All rights reserved.17
KNIME Workbench Guide10 Cuts/copies the selected itemCreating a new workflowTo create an empty workflow, right click anywhere in the local workspace, and select NewKNIME Workflow in the menu, or use one of the options explained in Building Workflows.Give the workflow a name, and define the destination of the new workflow.Click Finish, and the new workflow will appear in the selected workflow group in the KNIMEExplorer.To learn how to build a workflow, take a look at the next section Building Workflows, followthe steps in the Quickstart Guide, or check the video Workflows and Workflow Groups. 2021 KNIME AG. All rights reserved.18
KNIME Workbench GuideBuilding workflowsTo create a workflow, you need an empty workflow editor. To create a new empty workfloweditor take any of these actions: Navigate to File New , and select New KNIME Workflow Click the leftmost icon in the toolbar Right click in the local workspace and select New KNIME Workflow A workflow is built by dragging nodes from the node repository to the workflow editor andconnecting them. To add a node from the node repository or from the workflow coach to theworkflow editor, you have two options as shown in Figure 13: Drag and drop the node into the workflow editor Double click the node 2021 KNIME AG. All rights reserved.19
KNIME Workbench Guide Drag & dropordouble-clickFigure 13. Adding a node into the workflow editorOnce two nodes are added to the workflow editor, they can be connected in any of thesethree ways: Click the output port of the first node and release the mouse at the input port of thesecond node. Now, the nodes are connected. Select a node in the workflow editor, and then double click the next node in the noderepository. This double click creates a new node, and connects it to the selected nodein the workflow editor. Select the nodes to connect in the workflow editor and press "Ctrl L" 2021 KNIME AG. All rights reserved.20
KNIME Workbench GuideTo add a node between two nodes in a workflow, drag the node from the node repository, andrelease it at its place in the workflow when the connector has turned red, as shown in Figure14. The red connection means that it is ready to accept the new node. Release the mouseand the node is put in place.Figure 14. Add a node in the middle of a workflowWorkflow groupsMultiple workflows can be organized into workflow groups. Workflow groups are folders inthe KNIME workspace that can include multiple workflows, as well as associated datafiles,shared components and metanodes, and even other workflow groups.The workflow groups are in the currently active local workspace under the LOCAL mount pointin the KNIME Explorer.You have three ways to create a new, empty workflow group: Right click in the local workspace in the KNIME Explorer, and select New WorkflowGroup in the menu Click the arrow next to the leftmost icon in the toolbar and select New KNIME WorkflowGroup Navigate to File New , select New KNIME Workflow Group in the list, and click Next.In the dialog that opens, give the folder a name, and define where to save the folder in thelocal workspace. Click Finish. Now the new folder will appear in the selected destination inthe KNIME Explorer. 2021 KNIME AG. All rights reserved.21
KNIME Workbench GuideImport/export workflows and workflow groupsYou have three options to export a workflow or a workflow group: Export it as a file Save it into your personal KNIME Hub space, either in your public or in your privatespace Or, deploy it to a server (requires a license) To save workflows into your personal KNIME Hub space you need to first signin. In the KNIME Explorer right click My-KNIME-Hub (hub.knime.com) and clickConnect to KNIME Hub. Please, be aware that when saving a workflow group toyour public folder on the KNIME Hub including data they become publiclyavailable.In the same way, you can import a workflow to your local workspace in the following ways: Import a file containing a workflow to your local workspace Save a workflow that is on a server to your local workspace. For example, you canaccess the EXAMPLES server (no credentials required) and save any workflow locatedthere to your local workspace.How to import and export a workflow (or workflow group)You can import or export a workflow or a workflow group in the following ways: Right click anywhere in the local KNIME workspace, and select Import(Export) KNIMEWorkflow , as shown in Figure 15.Figure 15. Importing and exporting workflow (groups) 2021 KNIME AG. All rights reserved.22
KNIME Workbench Guide Go to File menu and select Import (Export) KNIME Workflow The dialog shown in Figure 16 opens.Importing a workflowIn the upper part of the "Import" dialog, select the items to import, i.e define the file or folderpath to import. In the "Destination" field underneath, define the destination folder in theKNIME workspace to import to.Importing a workflow group will show a list of elements inside the workflow group in thelower part of the dialog. Here you can select single elements to import them. 2021 KNIME AG. All rights reserved.23
KNIME Workbench GuideExporting a workflowIn the upper part of the "Export" dialog, select the workflow (or group) to export. In the"Destination" field underneath, define the path to the destination folder on the local system,and the name of the file.In "Options" you can choose to reset the workflow(s) before exporting. After resetting a node,the node status changes from "executed" to "configured", and the output of the node is nolonger available. When exporting a workflow in an executed state, the data used in theworkflow are exported as well. See the section on Reset and Logging for more information.When exporting a workflow group, you can select the elements that you want the exportedfile to contain.Figure 16. Defining settings for importing and exporting workflow (groups) Importing and exporting workflows are also introduced in this video:Import/Export Workflows. The file extension for a KNIME workflow, is .knwf (KNIME workflow file) The file extension for a workflow group, is .knar (KNIME archive file) 2021 KNIME AG. All rights reserved.24
KNIME Workbench GuideKNIME Workflow ComparisonThe Workflow Comparison feature provides tools and views that compare workflowstructures and node settings. Workflow Difference allows you to view changes in differentversions of a workflow. The feature allows users to spot insertions, deletions, substitutionsor similar/combined changes of nodes. The node settings comparison makes it possible totrack changes in the configuration of a node.A Workflow Comparison can be triggered from every view that shows multiple workflows,e.g. KNIME Explorer and Server History.In order to compare two workflows, select them in the KNIME Explorer, with "Ctrl" click, andselect Compare from the context menu, as shown in Figure 17.Figure 17. Compare two workflows in KNIME Explorer 2021 KNIME AG. All rights reserved.25
KNIME Workbench GuideIt is also possible to compare a workflow with itself. With this option, you are given a list ofnodes from which you can choose the two nodes you want to compare (see Nodecomparison section below).The comparison of two workflows or of a workflow with itself, opens a tab in the KNIMEWorkbench, as shown in Figure 18.Figure 18. The Workflow Comparison tabTo make it easier to see which changes have been identified there are three buttons in theupper right corner of the Workflow Comparison view.These buttons (from left to right) filter the list to: Perform a node comparison of the selected nodes (see Node comparison sectionbelow) Show the added or removed nodes only Hide the nodes with equal settingsAdditionally you can use the search field, to check a special node or node type for changes.The last icon clears the search field and displays all nodes.Workflow Comparison is structure based. This means, that not only workflows, but also 2021 KNIME AG. All rights reserved.26
KNIME Workbench Guidecomponents, snapshots, metanodes, i.e. all items that act as a workflow can be comparedwith each other. This basically includes everything that can be seen in KNIME Explorer andServer History (except data).Workflow comparison focuses on the functional structure of a workflow. When comparingshared components (Figure 19) or metanodes (Figure 20) they are expanded.Component InputColumn FilterRow FilterRule-basedRow Filter Component OutputFigure 19. Components comparison with an expanded component for referenceColumn Filter Row FilterRule-basedRow FilterFigure 20. Metanodes comparison with an expanded metanode for referenceComponents inside a workflow, when comparing workflows, on the other hand, are treated asnormal nodes, and their content does not appear in the view. This is not true instead formetanodes inside a workflow that are expanded when comparing the workflow. In Figure 21,the comparison between two workflows containing a component and a metanode,respectively, is shown. 2021 KNIME AG. All rights reserved.27
KNIME Workbench GuideFigure 21. Workflow comparison of two workflows containing a component and a metanodeOn the left column the component contained in the first workflow is shown as a node whilethe metanode contained in the second workflow, on the right column, is expanded.If a component has been changed, it is highlighted in the Workflow Compare view, and thenode comparison will show two additional entries: "Component Content Hash" and"Component Internal Settings Hash". These two numbers change whenever the content of theComponent (e.g. node insertion/substitution) or the settings of an internal node change,respectively. The structural comparison is based on a sequential alignment with respect tothe attributes (neighborhood, settings, etc.) of a node. It is designed to identifychanges in a workflow. It might still be used to find similarities/common partsin any two workflows, however the usefulness of the results of thesecomparisons
When you start KNIME Analytics Platform, the KNIME Analytics Platform launcher window appears and you are asked to define the KNIME workspace, as shown in Figure 1. The KNIME workspace is a folder on the local computer to store KNIME workflows, node settings, and data produced by the workflow. Figure 1. KNIME Analytics Platform launcher