Transcription
3CX PHONE SYSTEMADMIN MANUALVersion 12.5
Copyright 2006 2015, 3CX Ltd.http://www.3cx.comE mail: info@3cx.comInformation in this document is subject to change without notice. Companies’ names and data used in examples herein are fictitiousunless otherwise noted. No part of this document may be reproduced or transmitted in any form or by any means, electronic ormechanical, for any purpose, without the express written permission of 3CX Ltd. 3CX Phone System for Windows is copyright of 3CXLtd. 3CX is a registered trademark, and 3CX Phone System for Windows and the 3CX logo are trademarks of 3CX Ltd. in Europe, theUnited States and other countries. Version 12.5 – Last updated June 2015.
Section 1 Introduction & Installation01. Introduction, Licensing & Support02. Installing 3CX Phone SystemSection 2 Extension / Endpoint management03. Configuring the clients: 3CXPhone04. Configuring & Managing IP Phones & Endpoints05. Extension ManagementSection 3 Trunk Management06. Configuring VoIP Providers / SIP trunks07. Configuring VoIP Gateways08. Trunk ManagementSection 4 PBX Services09. Configuring Digital Receptionist / IVR10. Configuring Ring Groups / Paging / Intercom11. Configuring Call Queues12. Configuring Fax Server13. Configuring Web / Call ConferencingSection 5 Advanced Features14. Delegating 3CX Management Console Access15. Connecting 3CX Bridges16. The Phone Book / Directory service17. Call Reporting18. Monitoring your Phone SystemSection 6 Firewall & Network19. Firewall & Router Configuration20. The 3CX Tunnel / Session Border Controller
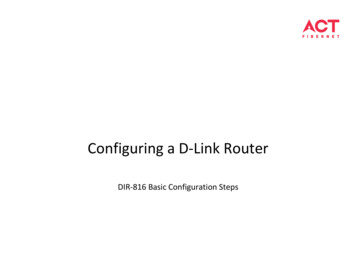
Introduction, Licensing, SupportWhat is 3CX Phone System for Windows?3CX Phone System is a software based PBX for Windows that works with SIP standard based IPPhones, SIP trunks and VoIP Gateways to provide a full PBX solution – without the inflated costand management headaches of an ‘old style’ PBX. The IP PBX supports all traditional PBXfeatures but also includes many new mobility and productivity features. An IP PBX is also referredto as a VoIP Phone System, IP PBX or SIP server.Calls are sent as data packets over the computer data network instead of the traditional phonenetwork. Phones share the network with computers so no separate phone wiring is required. Withthe use of a VoIP/PSTN gateway, you can connect existing phone lines to the IP PBX to makeand receive phone calls via a regular PSTN line. You can also use a VoIP Provider, whichremoves the requirement for a gateway.3CX Phone System interoperates with standard SIP softphones, IP phones or smartphones, andprovides internal call switching, as well as inbound and outbound calling via the standard phonenetwork or via a VoIP service.How an IP Phone System WorksA VoIP Phone System generally consists of the IP PBX server, one or more SIP based phonesand a VoIP/PSTN Gateway or a VoIP service provider. The IP PBX server is similar to a proxyserver. SIP clients, being either softphones or hardware based phones, register with the IP PBXserver.When they wish to make a call they ask the IP PBX to establish the connection. The IP PBX has adirectory of all phones/users and their corresponding SIP address and connects an internal call orroutes an external call via either a VoIP/PSTN gateway or a VoIP service provider.Figure VoIP Phone System OverviewThe image illustrates how an IP PBX integrates with the network and how it uses the PSTN
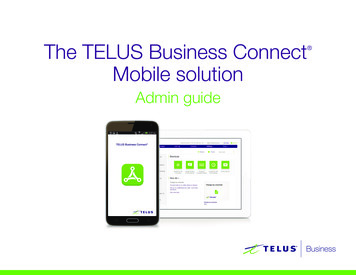
and/or the Internet to connect calls.SIP PhonesA VoIP phone system requires the use of SIP phones. These phones are based on the SessionInitiation Protocol (SIP), an industry standard to which all modern IP PBXs systems adhere to.The SIP protocol defines how calls should be established and is specified in RFC 3261. SIPallows the possibility to mix and match IP PBX software, phones and gateways. This protects yourinvestment in phone hardware. SIP phones are available in several versions/types:Software (based) SIP phones3CXPhone for Windows (left), 3CXPhone for Mac (right)A software based SIP phone is a program which makes use of your computer's microphone andspeakers, or an attached headset to allow you to make or receive calls. Examples of software SIPphones are 3CXPhone or X Lite from Counterpath.Hardware (based) SIP PhonesHardware IP Phones: snom 760 left, Yealink T46 (with sidecar) rightHardware based SIP phones look and behave like a normal phones. They are actually mini
computers that connect directly to the computer network. They have an integrated mini hub,allowing them to share a network connection point with a computer, eliminating the need for anadditional network point for the phone.Smartphones (iPhone and Android)Using an Android Smartphone with 3CXiPhones and Android phones can be used as clients for 3CX Phone System, using the freelyavailable 3CXPhone for Android and 3CXPhone for iPhone. Using 3CXPhone, your smartphonebecomes a wireless desk phone in the office, and can be used to answer and receive companycalls while out of the office via WiFi or 3G (Providing your mobile service provider supports VoIPover 3G).3CX Phone System LicensingLicensing is based on the number of simultaneous calls that your company requires, includingboth external and internal calls. Each 3CX Phone System allows you to create an UNLIMITEDnumber of extensions. To arrive at the correct number of simultaneous calls that you will need youmust usually take the projected number of extensions and divide by two to four times dependingon how much your organisation uses the phone.3CX Phone System Editions3CX Phone System is available in three different editions – Free, Standard and Pro. The Proedition adds the following features: Advanced call center features Supervisors can get real time statistics from agentsphones. Besides monitoring queue status and which agents are logged on, you can alsosee the number of callers in queue, the number of answered/unanswered calls, callaverage and the longest wait times, the time an agent logged in / out of queue and more. Additional queue strategies including Call Back, Longest Wait, Least Used. Whisper – Whisper functionality on queue calls. Listen in to monitor Agent responses, andif an Agent responds wrongly you can provide feedback, that only the Agent can hear,allowing him / her to correct their answers. Listen in – Allows supervisors to listen in on calls to monitor Agent responses. Wrap up time – Wrap up time gives agents a configurable amount of time to enter notes in
the customer record or follow up tasks before they have to take another call. Wrap up timecan be configured per queue.Wallboard feature – A web page which can be displayed on a large screen with totalnumber of calls waiting, number of answered and unanswered calls and average waittimes.Alerts to file and email when a call is in the queue beyond a certain time. You can nowenforce SLA requirements and get notifications whenever a call is in a queue beyond acertain time. An email notification can be sent and the alert is also logged.Ability to logout an agent from the queue.More extensive reporting features.Find out more about the differences between version from our Features Comparison Page .Support3CX Technical Support is available via our Support Portal for 3CX Partners (free) or with a 3CXSupport package (Extra charge). Review our Support Procedures and Pricing . We also haveCommunity Forums from where you can obtain user to user support for our products.Request Support via our Support SystemIf you are a 3CX Partner or have purchased a support package from 3CX, you can contact the3CX support department via the Support Portal .Login details would have been provided to you by email.3CX Phone System can automatically generate a file which includes all relevant supportinformation. When requesting support, include the “Support info” data. NO PASSWORDS TOPHONES OR VoIP PROVIDERS WILL BE INCLUDED. The data will NOT be sent automatically.You will be prompted for a location to save the data, so you can check what data will be sent to usbefore you send it.To generate the support info file:1. Log in to the 3CX Management Console.2. Go to “Help” (top right) “Generate Support Info” .3. You will be prompted for a location to save the data. Enter the filename for the support zipfile to be generated. Click “Save” .4. Login to the 3CX support system, and attach the information to your support request.5. Include a detailed problem description. It should clearly indicate what the problem is, andwhen it occurs. Mention what hardware or VoIP provider you are using with 3CX PhoneSystem. Indicate also what tests have been performed to isolate the problem.Getting additional informationSupport Page / Configuration Guides / Knowledge Base3CX maintains a knowledge base / help page. Be sure to follow the configuration guides for themake and model of your VoIP gateway, SIP phone or Firewall. The configuration guides can befound in the main Support Page .
3CX Phone System BlogWe highly recommend that you follow our product blog to keep up to date with the latest updateson 3CX Phone System. The 3CX Blog . You can Subscribe to receive email alerts for new blogentries.Find us on FacebookLike us on Facebook and stay up to date with our product news and how to’s.Feature RequestsIf you would like to request a new feature, you can do this on our Feature Requests Page , whichcan be found atGet 3CX Certified – Free Online Video TrainingThe free 3CX Certification program is designed to boost 3CX Partners and users productivity aswell as their profitability by giving them the resources and knowledge they need to sell, deployand support the award winning 3CX Phone System for Windows.3CX has two new certification levels and training videos: 3CX Certified Engineer 3CX Advanced CertifiedThese are a complete series of online training videos which gives 3CX Partners all the informationthey need to prepare for both certification levels.Taking the 3CX Certification TestAfter you have watched the videos, create a 3CX Academy account or login to take the 3CXCertification test. You will need to have gained the 3CX Certified Engineer certification beforetaking the 3CX Advanced Certified test.Community Support ForumsIf you are evaluating 3CX or using the free edition, you can visit the 3CX Community Forums todiscuss questions with other 3CX users.Please note that 3CX does not provide technical support via the forums. Official 3CX Technicalsupport requires you to have a support package or be a 3CX Partner .
Installing 3CX Phone System for WindowsSystem RequirementsSupported Operating Systems3CX Phone System v12.5 is supported on the following operating systems: Windows 7 Professional (x64)Windows 7 Ultimate (x64)Windows 7 Enterprise (x64)Windows 8 Pro (x64)Windows 8 Enterprise (x64)Windows 8.1 Pro (x64)Windows 8.1 Enterprise (x64)Windows 2008 R2 Foundation (x64 only)Windows 2008 R2 Standard (x64 only)Windows 2008 R2 Enterprise (x64 only)Windows 2008 R2 Datacenter (x64 only)Windows 2012 Foundation (max. 15 presence connections on IIS installations)Windows 2012 Essentials (max. 25 presence connections on IIS installations)Windows 2012 StandardWindows 2012 DatacenterWindows 2012 R2 Essentials (max. 25 presence connections on IIS installations)Windows 2012 R2 StandardWindows 2012 R2 DatacenterInstallations on Microsoft Windows server Core versions are not supported. Installations on SmallBusiness Server 2008 are not recommended. However if you wish to use SBS, ensure that youuse Abyss as a web server.Supported Hardware and VM platformsThe 3CX Phone System is extensively tested to be run as a VM which eliminates the cost ofseparate hardware and adds high availability solutions based on the hypervisor infrastructure.Supported hypervisor platforms are: VMware ESX 5.X and above. Microsoft HyperV 2008 R2 and above. See Hyper V Page for the specific settings forrunning 3CX Phone System.Avoid using the 3CX Phone System on converted VMs (P2V) because a converted virtualmachine might have timing issues, which causes the guest operating system not to sync with thetimer of the hypervisor.System performance depends on five key factors: How many simultaneous calls will the system handle? How many people will simultaneously connect to the presence server? Is call recording used?
Are VoIP Providers used? Are call routings build mainly around queues and IVRs?Based on these factors the hardware can vary from Intel Atom CPUs with 4Gb or RAM up to amulti socket/core system. General guidelines can be found online in these article: Recommended Hardware Specifications for 3XC Phone System Large Enterprise DeploymentsFirewall & Network ConsiderationsThe Firewall & Router Configuration Guide provides details on which ports to open.Other requirements Latest version of Firefox, Google Chrome or Internet ExplorerMicrosoft .NET Framework version 4.5 or higher.You will need to have a good basic understanding of Windows Networking.A constant internet connection to erp.3cx.com on port 443.On demand connection to downloads.3cx.com/* on port 80 for 3CX Management Consoledownloads and additional information.Note: Internet Explorer does not currently support the WebRTC/WebMeeting features.Preparing the Windows host machine for installationTasks that MUST be completed before installing 3CX Phone System: Assign a static internal IP address to the host machine’s network adapter. Install all available Windows updates & Service packs before installing the 3CX PhoneSystem. Reboots after installing Windows updates may reveal additional updates. Payparticular attention to install all updates for Microsoft .Net before running the 3CX PhoneSystem installation. Antivirus Software should not scan the following directories to avoid complications andwrite access delays: C:\Program Files\3CX PhoneSystem\* C:\ProgramData\3CX\* In case the 3CX Phone System host machine has multiple network adapters: Disable unused network interfaces / WiFi adapters. One active network interface MUST have a default gateway configured. It isnot recommended to have multiple network interfaces all with default gatewaysconfigured. Prioritize the network interface used for SIP to the first position from: ControlPanel In the search box type: adapter Click “View network connections” Press the Alt key, to reveal the menus, and select “Advanced” “AdvancedSettings” “Adapter and Bindings” tab Connections section. Ensure that all power saving options for your System and Network adapters aredisabled (Set the system to High Performance). Do not install TeamViewer VPN Option on the host machine.
Do not use the host machine as a VPN dial in endpoint (Inbound or Outbound). Disable Bluetooth adapters if it is a client PC. 3CX Phone System must not be installed on a host which features DNS, MS SharePoint orExchange services. See Ports used by 3CX Phone System for the list of required ports that need to always beavailable (not used by any other service).Download and Install 3CX Phone System1. Download the latest version of 3CX Phone System .2. Double click on the 3CXPhoneSystem file. Read the system requirements and click“Next” .3. Read our configuration recommendations and click “Next” .4. You will be asked to review and accept the license agreement.5. Select the installation folder path, 3CX Phone System will need a minimum of 10GB freehard disk space. You will need to reserve additional space to store voicemail files,recordings & voice prompts. Choose the location to install and click “Next” .6. You will be asked whether you wish to use IIS or the in built web server, Abyss. For allserver operating systems we recommend choosing IIS.7. Carefully choose the HTTP and HTTPS ports that you want to use. If you are upgrading from a previous version of 3CX Phone System, or already run awebserver on your machine, use ports 5000/5001. Alternatively use the default ports80/443 and resend the Provisioning Welcome Emails. Make sure that the ports you choose are forwarded to the 3CX Phone System machine.Read our guides below for more information regarding 3CX Phone system Requirements andFirewall / Router configuration. Firewall Router Configuration Guide .
Selecting HTTP/HTTPS Ports to Use for 3CX Phone System8. You will then be prompted to create your SSL certificate for HTTPS. Fill in your companyname, internal/external FQDNs and certificate password.Important Note: In the Internal / External FQDN fields you need to specify your FullyQualified Domain Names, for example: “pbx.interobit.local” and “pbx.interobit.com”. This isrequired for the creation of your SSL certificate.Make sure that you meet the following Requirements: FQDNs must resolve to the correct IP addresses. Your internal FQDN must resolve to the local IP of your PBX server. The external FQDN must resolve to the public IP.If you do not have FQDNs you need to create them in your local DNS or use an Internet DNSService.Read our guides on How to create an internal FQDN How to create an external FQDNIf you do not have a DNS server, You can enter your internal and external IP addresses in thecorresponding fields.Note: This is only for testing purposes and it is NOT recommended for use in a production PBX.9. Click “Next” .10. If you wish to review installation settings click “Back” , otherwise click “Install” to start the
installation of 3CX Phone System. Setup will now copy all files and install the necessary Windows services.11. Once the install is complete you can proceed to configure your system by clicking“Finish” . The configuration wizard will open automatically.3CX Phone System Configuration WizardThe 3CX Phone System configuration wizard will walk you through a number of essential tasksthat you need to do in order to get your system up and running. You will be asked to select thelanguage that you want to use for 3CX Phone System.The 3CX Configuration Wizard1. The wizard will proceed and ask for the Static Public IP, and Local IP address which 3CXwill use.Note: If you do not have a Static Public IP, VoIP Providers, remote extensions and WebRTC callswill not work.2. If you are upgrading or moving your 3CX Phone System installation, the wizard will giveyou the option to restore settings from a backup. (Backup created from your previousversion or another installation of 3CX).3. The wizard will then ask you for the digit length of your extension numbers. This is a veryimportant decision since it cannot be altered later without re installing andre configuring the PBX from scratch.4. You will then be asked to add your mail server name, reply to address, if necessaryauthentication details (username/password) and whether the connection should be madevia a secure channel (TLS). These settings are used to send email notifications, voice mailand faxes.
5. The 3CX Wizard will then ask you for a username and password to be used to login to the3CX Phone System Management Console and manage the phone system. Make sure touse a strong password to prevent unauthorised access to your PBX. Username andpassword are both case sensitive.6. Confirm that the selected country, International Dialing code (exit code) and time zonesettings are correct. The wizard auto selects settings based on your Windows regional settings.7. The wizard will ask you to create one extension which will be used as the Operatorextension. Additional extensions can be created at a later stage using the 3CXManagement Console.8. The wizard will then prompt you to specify the countries and regions to which calls can bemade. Calls to countries which are not selected, will be blocked. This feature reduces therisk of VoIP toll fraud.9. Click “Next” . The 3CX Phone System Wizard will start services and and configure 3CXPhone System.10. You will be asked whether you would like to receive a quote for a complete 3CX PhoneSystem. Fill in your details and a 3CX partner will send you a detailed quote. You can skipthis step if you do not need a quote at this stage or if you have already purchased alicense key for the system.11. Click “Finish” . Your browser will launch and open the 3CX Management Console webpage.Logging into the 3CX Phone System Management ConsoleWhen the installation is completed, point your web browser to the 3CX Management Console byentering the name of the machine. For example: HTTP: http://pbx.interobit.com/management HTTPS: https://pbx.interobit.com/managementIf you are not using the default HTTP and HTTPS ports, you need to include your selected portsin the URL. For example, if you chose 5000 for HTTP and 5001 for HTTPS your links should beas follows: HTTP: http://pbx.interobit.com:5000/management HTTPS: https://pbx.interobit.com:5001/managementEnter the username and password that you specified during setup, select the language you wouldlike to use and click the “Login” button. Note that the username and password are both casesensitive.Activating 3CX Phone SystemAfter installation, you must activate your license by going to the “Settings” “Activate License”page in the 3CX Management Console.
Activating Your LicenseEnter your license key, Company, Contact Name, E mail, Telephone, Country and the name ofyour Reseller (The company who you bought 3CX from) and click on “Activate” to activate yourlicense. This information will be sent to our license key server and your license key and installationwill be activated. A service restart will be required at this point so please keep that in mindwhen you activate your license. Please note that in order to be entitled to your first year of free upgrade insurance yourdetails must be inserted correctly. These details are reviewed at the 3CX HQ and if theyare not correct the upgrade insurance will not be activated.You will need to do this each time you re install 3CX Phone System on a new machine or when achange in the local network topology or hardware occurs (for example the local MAC addresschanges).Note: Packets between the 3CX Phone System server and erp.3cx.com should not be filtered orinspected. If you run DPI (Deep Packet Inspection), license key activations will be rejected.System Prompts Language3CX Phone System ships with a US English prompt set by default. Prompts are recorded voicefiles that are played by the system to callers and users of the system. For example, when a userpicks up their voice mail, the system prompts will instruct the user what buttons to press in orderto hear or delete voice messages. To change the system prompts to a different language:1. Go to “Updates” “System prompt sets” node, select the prompt set you wish to useand click on “Download Selected” . The prompt set will be downloaded to your machine.Note: Download only the prompt set that you need.
2. Go to “Settings” “System prompts” “Manage Prompt sets” at the top of thescreen.3. Select the prompt set that you have downloaded and click on “Set As Current PromptSet” . The system will now use this new prompt set.Upgrading from a Previous Version of 3CX Phone SystemIf you are running a previous version of 3CX Phone System (version 3.1, 5, 6.0, 6.1, 7.0, 7.1, 8, 9,10) you must upgrade to v11 SP 4a, and then to v12 SP 6.1 before following this upgradeprocedure.If you are running v12 SP 6.1, you can proceed with the upgrade procedure:1. Make a backup of your current configuration using the 3CX Backup and restore tool.2. Uninstall the current version from the Windows Control Panel Programs andFeatures .3. Download and install 3CX Phone System Version 12.5.4. Proceed with the installation and when prompted by the 3CX Wizard, restore your backup.Backup and Restore3CX Phone System includes a convenient backup and restore utility that allows you to create acomplete backup of your phone system configuration and data to a file. To backup your 3CX Phone System data, run the “3CX Backup and Restore Tool”located in the 3CX Phone System Start menu Program group: Select “Backup 3CXPhone System” .Backup & Restore UtilityChoose which components you would like to backup. For a full backup select all checkboxes.Select the path and filename to save the backup to. Click “Next” .The tool will proceed to backup your PBX. A zip file will be created containing your 3CX PhoneSystems data, store this file in a safe place.
To restore the phone system data, start the 3CX Backup and Restore utility:1. Select “Restore 3CX Phone System backup” .2. Locate the backup of the 3CX Phone System, select it and click “Next” . The tool willproceed to restore your backup. Note that the current configuration will beOVERWRITTEN with the backup data, and any changes that you have made sinceperforming the backup will be lost . You must also close the management consoleBEFORE making a restore.Scheduling a BackupUsing the Windows scheduler you can easily schedule a daily phone system backup. To do this:1. Go to Windows Start Menu and search for “Task Scheduler”.2. Run the Task Scheduler and click “Create Basic Task”.3. Select when this task will run and click “Next” .4. Select “Start a program”, click “Next” and browse to the 3CX Backup program. Thedefault path is: “C:\Program Files\3CX PhoneSystem\Bin\3cxbackup.exe”5. In the “Add arguments” entry field, include the command line parameters that you need: Hidden runs the process hidden so it will close automatically after completion Backup will backup the database Restore will restore the database Filepath is the location of the database to restore from or backup to /callhist will include the call history database /voiceprompts will include system prompts /voicemails – will include voice mails /callrecordings will include call recordings. /exit – to exit the utility after backup is done. /firmware – backup the firmwares of the IP Phones also /ssl backup HTTPS configurationExample of an argument for a complete hidden backup of 3CX Phone System to path“c:\backup.zip”:hidden backup c:\backup.zip /callrecordings /voicemails /voiceprompts /callhist /ssl /exitYou can then direct your backup solution, to also include the backup.zip file and store it on yourbackup media.Moving 3CX Phone System to a New MachineFollow this guide on how to Move 3CX Phone System to a New Machine .
Configuring the Clients – 3CXPhoneIntroduction3CXPhone is a SoftPhone that allows users to easily manage their extension with a few mouseclicks – rather than via a cryptic and limited hardware phone interface. 3CXPhone can workalongside an existing supported IP Phone or you can use the inbuilt softphone (3CXPhone).3CXPhone is available for multiple platforms including Windows, Android, iOS and Mac.3CXPhone3CXPhone provides the following functions:1. Call Pop up – Upon receiving a call, 3CXPhone will allow you to reject the call, transferthe call to another person or to voice mail with a single mouse click or by using drag anddrop.2. Easy Call Transfer / Park – When on a call, you can transfer or park a call with a mouseclick or via drag and drop, no need to learn dial codes or call transfer procedures on aphone.3. Presence – The status of other extensions is displayed, allowing you to avoidunnecessary calls or call transfers to colleagues that are busy. 3CXPhone will display different information based on whether you are astandard user or a manager and the customisation of your Group Rights withinyour extension settings. In the Manager role, you can see calls from anyone in your department. Theserights are set by the 3CX Phone System Administrator, from the 3CXManagement Console. For additional information about Group Rights, refer tothe Extension Management section of this manual.4. Click to Call – Launch calls with a couple of mouse clicks. Click on an extension to bringup the extension options to make a call, leave a voicemail, or chat. The call will beautomatically launched without you needing to dial the number. Calls can also belaunched directly from your contact management software when using 3CXPlugins .5. Hotkey Dialling – Place, answer or control calls with ease, using configurable keyboard
6.7.8.9.shortcuts.Queue Monitoring – View the status of queues that you are a member or a manager of.See callers waiting in queue and be able to pick up a call from the queue.Text Chat – Message other users one to one or create multi user chat using the in builtchat options.Record Calls – You can record a call or conference call by clicking the record button.Phonebook – 3CXPhone provides easy access to the company and personalphonebook’s. It allows users to initiate calls by searching for contacts. Double clicking on acontact offers users the option of calling, leaving a voicemail, conferencing and otheralternative functions. When the call option is selected, it will automatically resolve thenumber and launch the call.Supported Client Operating Systems3CXPhone v12.5 for Windows3CXPhone for Windows runs on x86 and x64 hosts as a WOW64 application. Windows XP ( Not Supported) Windows 7 (Tested and Supported) Windows 8 (Tested and Supported) Windows 8.1 (Tested and Supported)Additional requirements: Microsoft .Net 4.0 or 4.5. Microsoft Visual C 2010 x86 (on both x86 and x64 hosts).Microsoft Terminal Services 2008 / 2008 R2 Server with terminal services installed. 2012 / 2012 R2 Server with terminal services installed.3CXPhone for Windows can run in SIP or CTI mode on Microsoft Terminal Servers and allowsmultiple runtime instances. When in CTI mode it will drive the IP Phone on your desk. When in SIP mode audio calls will be routed through the terminal session (RDP) to theendpoint where the default microphone and headset of the client’s sound card will bechosen as input and output device accordingly.However, in order to enable SIP mode on a terminal server, desktop experience must be installedas a role on the terminal server itself and mapped in the remote des
phones are 3CXPhone or X Lite from Counterpath. Hardware (based) SIP Phones Hardware IP Phones: snom 760 left, Yealink T46 (with sidecar) right Hardware based SIP phones look and behave like a normal phones. They are actually mini