Transcription
Unitrends Virtual BackupInstallation GuideVersion 8.0Release June 2014 7 Technology Circle, Suite 100Columbia, SC 29203Phone: 803.454.0300
Contents Chapter 1 Getting Started .1Version 8 Architecture . 2The Virtual Backup Appliance . 2Backup Storage . 5CIFS/SMB Shares . 5NFS Shares. 5How much storage do I need? . 5Hard Links and Virtual Full Backups . 6Backup Storage Notes . 6Web-Based Interface . 7System Requirements . 8Hyper-V Clustering and High Availability . 8UVB Licensing . 9Chapter 2 Installing Unitrends Virtual Backup. 10Installing UVB for Microsoft Hyper-V. 11Installing Unitrends Virtual Backup for VMware vSphere . 16Installing Unitrends Virtual Backup for Citrix XenServer . 18Completing the Quick Setup Wizard . 20Installing and Configuring the UVB Plugin . 23 Chapter 3 UVB Administration Tasks . 26Deploying Appliances . 27Deploying appliances for Hyper-V . 27Deploying appliances for VMware vSphere Client. 27Deploying appliances for Citrix XenServer . 27Configuring Appliance Networking . 28Adding Appliances to your Environments . 30Adding Storage . 32Adding an Attached Disk to an Appliance . 37Adding Additional Environments . 46Configuring Multi-Host Environments for Hyper-V . 48Configuring Email Reports and Alerts . 50Removing the Unitrends Hyper-V Services . 52Removing the UVB Plugin . 52ii
Chapter 1Getting Started Unitrends Virtual Backup version 8.0 lets you protect all of the virtual machines in your HyperV, vSphere, or XenServer environments, providing backup, replication, and archive functionalityfrom a single, web-based interface.Version 8.0 includes an upgraded architecture and enhanced functionality that build upon theVirtual Backup Appliance (VBA) technology – further improving the scalability and reliability ofthe award-winning virtualization protection software.This guide provides an overview of the new architecture and detailed steps for installing andconfiguring Unitrends Virtual Backup in a VMware, XenServer, or Hyper-V environment. For additional information and up to date details about the product and latest releases, refer tothe Unitrends Website and Knowledge Base.1
Version 8 ArchitectureThe latest version of Unitrends Virtual Backup takes full advantage of the flexibility andefficiency of the virtual backup appliance. By distributing these small virtual machines you canmanage your data protection requirements to fit your needs and you can scale your UVBinstallation along with your ever-growing virtual environment by simply deploying additionalVBAs.Within UVB version 8.0, you will manage your data protection within Environments – eachEnvironment consists of a single standalone host, a VMware vCenter, a Citrix XenServerResource Pool, or a Microsoft Hyper-V host or group of hosts. You can manage multipleenvironments from the same web interface, providing a single pane of glass view to manage allof your virtual data protection. Configuring environments is described as part of the installationand configuration steps in the next chapter, Installing Unitrends Virtual Backup.The Virtual Backup ApplianceThe Virtual Backup Appliance (VBA) is the core of Unitrends Virtual Backup’s data protectionsolution. Each VBA is a small, Linux-based virtual machine that runs right within your hypervisorenvironment, alongside the VMs they protect. The VBAs perform all of the backup, restore,replication, archive, and sync processing including source-side deduplication and compression.The number of VBAs you deploy in your environment depends on a few factors, including thehypervisor types, the total size of the environment, the number of hosts, how distributed yourarchitecture is, and the number of VMs you will be protecting.Appliance RolesWith the latest version of UVB, appliances are configured with one or more roles, dependingon your requirements. Each deployed appliance can be dedicated to a single role or a singleappliance can have multiple roles configured.Presentation (P) – The Presentation appliance is the appliance running the web-based interfaceyou use to configure and manage your installation. Only one presentation appliance isnecessary per installation, across all configured environments (including across all hypervisortypes). All management and configuration of UVB occurs through the Presentation Appliance’sweb interface.Management (M) – Each Environment requires one appliance designated as the ManagementAppliance, for example for each vCenter you want to protect, you’ll need at least one applianceconfigured with the Management role. This is done when you add the Environment within theweb interface or initially via the Quick Setup wizard. The Management appliance performsinventory and other hypervisor-specific tasks and manages the work of the Engine appliances.The Presentation Appliance can also be designated as a Management Appliance.2 Engine (E) – Engine appliances perform the actual data processing and send data to theirconfigured data stores. Engine is the most common role an appliance will take on in yourdeployment. Appliances with the Presentation and Management role can also be configuredwith the Engine appliance.
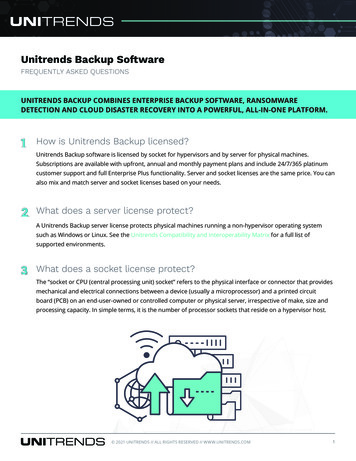
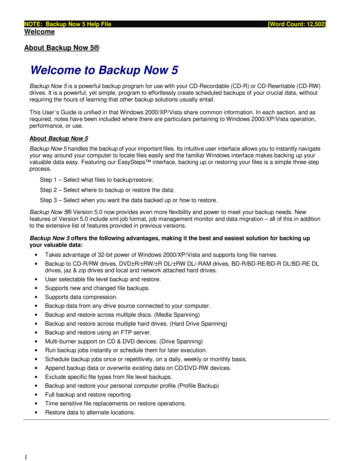
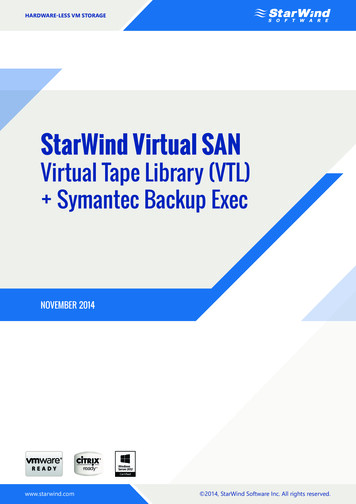
Note: As a general recommendation, you will need at least one Engine appliance for every10 TB of source data you will protect (or every 1 TB of data if using XenServer or 5 TB isusing CIFS backup storage).By deploying at least one appliance into each environment you would like to protect, you canmanage your data protection from a single web interface. The figure below represents twostandalone hosts configured as two separate environments accessible from the same webinterface. The presence of at least one appliance with the Management (M) role on a hostdesignates that as a separate environment. Each host could be of the same hypervisor ordifferent hypervisors (a single vSphere host and a Hyper-V host for example). Figure 1 – Multiple environments consisting of individual hosts.3
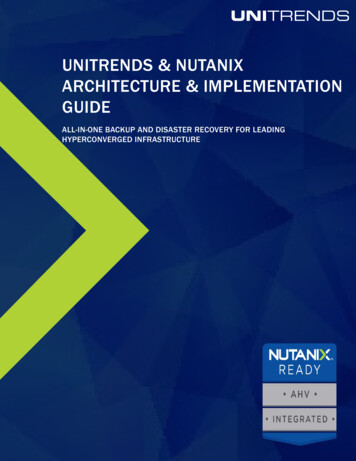
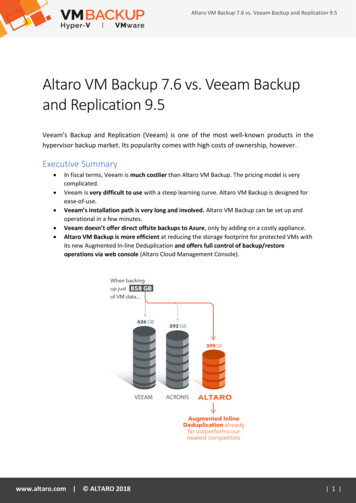
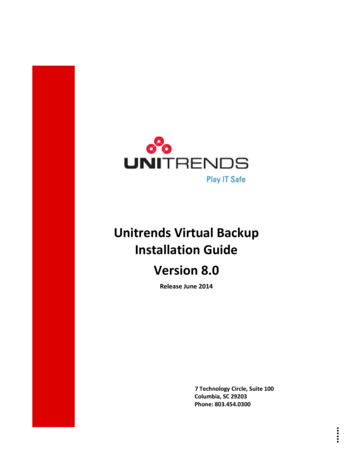
In Figure 2, below, multiple appliances are deployed to a single environment that consists oftwo hosts. Each host in this example has at least one appliance deployed (this is required whenusing Hyper-V). The first appliance in the figure (VBA 1) has both the Presentation (P) andManagement (M) roles enabled while the second and third appliances (VBA 2 on Host 1 andVBA 3 on Host 2) have only the Engine (E) role enabled – these are the appliances performingthe actual backup processing, writing data to their configured backup data stores (BDS 1 andBDS 2).4 Figure 2 – Environment consisting of multiple hosts.
Backup StorageUnitrends Virtual Backup can take advantage of storage available via the hypervisor (like iSCSIor Fibre Channel) or network storage (CIFS or NFS shares) to store your backup data. When youdeploy a Unitrends VBA, you configure the backup storage by either adding one or more virtualdisks to the Unitrends VBA virtual machine or by specifying a network storage location (eitheran NFS or CIFS share).When using attached disks, they can be created on local or shared hypervisor storage. Using avirtual disks attached to the Unitrends VBA is the recommended method for storing yourbackup data.Detailed instructions for configuring backup storage are included as part of the installationsteps in this guide.CIFS/SMB SharesThe CIFS service account must have full permissions (read/write/delete) for the share used asthe backup target. Also, antivirus software should not be configured to analyze or scan theUnitrends VBA CIFS storage repository.Note: When creating Full/Incremental backups, CIFS storage is recommended.NFS SharesThe Unitrends VBA requires direct write access to the NFS export. During backup, the UnitrendsVBA will directly mount and copy files to the NFS share. It is important to configure the exportto allow this behavior. The following is an example export line: /export/share *(no root squash,insecure,rw,sync)How much storage do I need?Due to data deduplication and compression, you can store, on average, one month of backupsfor each VM by allocating backup storage equal to the total size of the VM data you would liketo back up. For example, if you have 500 GB of virtual machines, you should allocate at least500 GB of storage space. Additional details on determining how much backup storage spaceyou will need can be found the white paper Backup Storage Sizing Guide available on theUnitrends web site. For even more information and scenarios, refer to the Unitrends VirtualKnowledge Base.Note: As a general recommendation, you will need at least one Engine appliance for every10 TB of source data you will protect (or every 1 TB of data if using XenServer or 5 TB isusing CIFS backup storage). Your backup retention policy determines how many backups are kept for each VM. Retentionsettings can be configured per-VM using the Protect page in the Unitrends Virtual Backup webinterface.5
Hard Links and Virtual Full BackupsA hard link is essentially a reference to a file or directory on a file system. Unitrends VirtualBackup makes use of hard links when deduplicating Virtual Full backup data on the backup datastore. Because of this, hard links must be supported and enabled (if necessary) on any storagedevice used as a backup target for Virtual Full backups. By default, most storage device filesystems support hard links and have them enabled - if your storage device supports hard linksbut does not have them enabled, refer to your vendor's documentation for details on enablingthem.Note: Storage used for Full/Incremental backups does not require hard link support.If hard links are not supported or enabled for your backup storage location, a warning messageis logged after defining the backup storage and restarting the Unitrends VBA. If you attempt torun a Virtual Full backup with storage configured that does not support hard links, you willencounter the following error, "BDS incompatible with virtual-full job: Hard links are notsupported."Backup Storage Notes 6 In most environments, using an attached virtual disk to store backups will result in thebest overall performance.Backup storage cannot be shared by multiple Unitrends VBAs. Each VBA must write toits own unique backup data store. When using multiple Unitrends Virtual BackupAppliances with network storage, the same backup target destination can be used onlyif you create separate shares for each appliance. For example, you could send backupsfor UVB-1 to \\StorageServer\backupshare\vba1 and send backups for UVB-2 to\\StorageServer\backupshare\vba2.
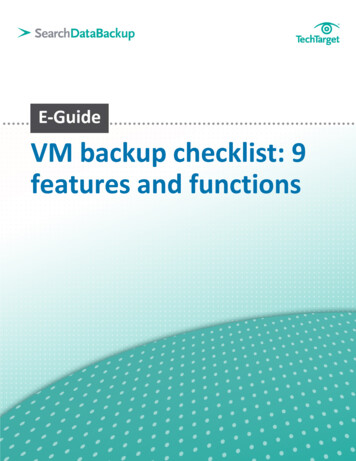
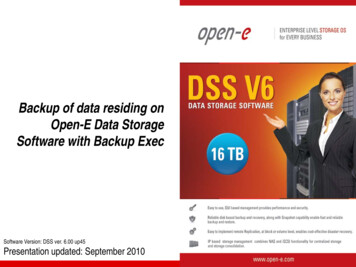
Web-Based InterfaceThe Unitrends Virtual Backup web-based interface lets you manage your data protectionsettings from a single location across all hypervisor environments from anywhere you havenetwork access.Figure 3 – UVB web-based interface.The new and improved interface includes a new dashboard that provides an at-a-glanceoverview of the current state of your environment, updated reporting, and the ability toconfigure and manage all of your virtual data protection from a single location. For additional details about the different areas of the new interface, refer to the online help orUnitrends’ online Knowledge Base.7
System RequirementsThe following requirements must be met to install and use Unitrends Virtual Backup version 8.System RequirementsBrowsersMozilla Firefox(For web-based interface)Google ChromeFor optimal performance, the web interface shouldbe accessed from a machine with at least 1dedicated CPU, 1GHZ or faster Intel or AMDprocessor, at least 1 GB of available memory, agigabit or faster network connection, and viewedwith a minimum resolution of 1280x1024.HypervisorVMware vSphere 5.0 up to 5.5Windows Server 2012 or Windows Server 2012 R2(Standard and DataCenter editions) with the HyperV role enabledHyper-V Server 2012 and Hyper-V Server 2012 R2(free versions)--Citrix XenServer 6.x and laterHyper-V Clustering and High AvailabilityWhen using Hyper-V, a Unitrends appliance must be installed on each Hyper-V host machine toperform backups. In a clustered environment, as long as an appliance is installed andconfigured on each host, all virtual machines on that host can be protected. If VMs that werebacked up on one host move to a host without a Unitrends appliance deployed, you must havean appliance running on that host to continue performing backups.8 Since a Unitrends appliance must be deployed to each host, to ensure all of your VMs will beprotected, the Unitrends appliance should remain on the host. Therefore, Unitrends appliancesshould not be configured for High Availability. If an appliance were to move off of a host due toLive Migration, the VMs on that host would no longer be protected.
UVB LicensingUnitrends Virtual Backup is installed with a trial license. After the trial period expires, apply avalid license to continue running backups and replicating virtual machines. Licensing is on a per-socket basis. Use the Licensing tab of the Configure page to select thehosts on which you will be performing backup and replication. The total available socket countis displayed at the top of the page and decreases as you select available hosts in yourenvironment.9
Chapter 2Installing Unitrends Virtual Backup Note: The installation steps for Unitrends Virtual Backup differ depending on your hypervisorenvironment. Review the correct section for your specific hypervisor. Installing UVB for Microsoft Hyper-V on page 11 Installing Unitrends Virtual Backup for VMware vSphere on page 16 Installing Unitrends Virtual Backup for Citrix XenServer on page 18 Completing the Quick Setup Wizard on page 20 Installing and Configuring the UVB Plugin on page 23 This chapter contains the following topics:10
Installing UVB for Microsoft Hyper-VFollow the steps below to install Unitrends Virtual Backup for Microsoft Hyper-V.Note: UVB can be installed to hosts running Microsoft Windows Server 2012 and 2012 R2 withthe Hyper-V Server role enabled as well as hosts running the free version of Hyper-V Server 2012and 2012 R2. The installation steps below cover both cases and notes are included where anydifferences exist.Prerequisites Download and unzip the Unitrends Virtual Backup for Hyper-V installation package toyour Hyper-V host.To ensure proper functionality, the host’s firewall should be configured to allow trafficin/out on ports 5672 and 15672.To install the Unitrends Hyper-V Services and deploy a UVB appliance1Log in to your Hyper-V host machine and navigate to the location where you copiedand unzipped the installation package.2Run the UVB installation program UVB Hyper-V Services Installer.exe. The UnitrendsHyper-V Services Setup wizard opens.3Click Next to begin the installation. The setup wizard will select the install location automatically (by default,“%PROGRAMFILES%\Unitrends\Hyper-V Service”).11
4Next, the installation program will check for required prerequisites, RabbitMQ andErlang. If not available, you will be prompted to install them. These are required forcommunicating with the Unitrends appliances and other hosts.12 If unsupported versions of either of these prerequisites are already installed, you willbe prompted to close the installation wizard and remove these to allow the wizard toinstall the supported versions.5Click Next to either install the required prerequisites or if these are already installed,continue with the wizard.6Click Finish when all required installations have completed. Next you will be promptedto configure the services.
The Hyper-V Host FQDN is filled in automatically. In the Message Queue IP Addressfield, enter the IP address you will use to communicate with this host. This is typicallythe IP address associated with your host’s primary network adapter.8In the Hyper-V Services Credentials area, for Unitrends User Name and UnitrendsPassword, enter the credentials to use when communicating with the Unitrends HyperV Services. You will use these credentials when adding the environment within theUnitrends web-based interface later.9Click Next. The Unitrends Virtual Backup Appliance deployment options are displayed. 713
10 The last step of the setup lets you deploy a Unitrends Appliance.11 In the Source Disk Location click Browse to navigate to the location of the UnitrendsAppliance disks that were included with the Unitrends Virtual Backup installationpackage.Note: When installing to the free version of Hyper-V you will need to manually type thepaths – Browse options are not available.12 Next, enter a name for your appliance and then in the VM Location text box enter alocation for the appliance files.13 In the RAM text box, enter the amount of memory you would like to allocate to theappliance.14 Next, from the Virtual Switch dropdown menu, select a virtual switch to use.Note: When running the free version of Hyper-V, the Connection option is not availableas a network card is not included with the deployed appliance VM. You must manuallyadd a network card to the appliance VM after it has been deployed.15 In the Network area, assign an IP address to the appliance by either selecting DHCP orStatic. If Static, click Configure Network to enter the IP address, gateway, netmask,and DNS servers to use.Note: It is recommended that you manually configure a static IP address or assign areservation on the DHCP server.16 If you plan to store backups on this appliance, select Add Backup Data Store Disk andenter a size. If you plan to use another storage type (NFS or CIFS), leave this optionunselected.17 Next select Power On to start the appliance after deployment.18 Click Deploy VBA. The deployment progress is displayed. When complete, you candeploy another appliance or close the wizard.Note: When running the free version of Hyper-V you must add and configure a networkcard to the appliance VM to finish the configuration. Use Hyper-V manager (connectedvia another Windows machine for example) or another method to modify the deployedappliance VM.Follow the steps above to setup Unitrends Virtual Backup on all additional Hyper-V hosts youwill be protecting.You can use the Hyper-V Services tool to deploy any additional appliances you require. You canaccess the tool via the desktop shortcut or on free versions of Hyper-V in the followinglocation:14 C:\Program Files\Unitrends\Hyper-V Services\Phd.HyperV.Ui.exe
To configure a single environment that consists of multiple Hyper-V hosts, see ConfiguringMulti-Host Environments for Hyper-V on page 48. You’re now ready to connect to the appliance and complete the Quick Setup wizard. SeeCompleting the Quick Setup Wizard on page 20 for detailed steps.15
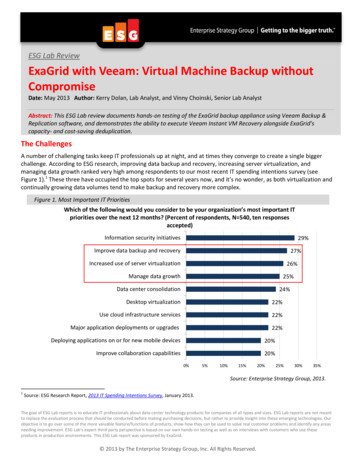
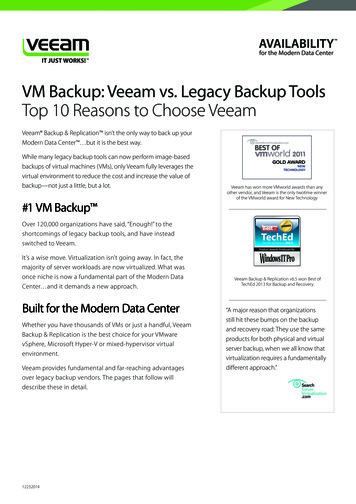
Installing Unitrends Virtual Backup for VMware vSphere Follow the steps below to install Unitrends Virtual Backup for VMware vSphere.Prerequisites The Unitrends Virtual Appliance OVF file extracted from the Unitrends Virtual Backupinstallation package. A Windows computer with vSphere Client installed that has access to your VMwareenvironment.Deploying a Virtual Backup Appliance on VMware vSphere1Open vSphere Client and select File Deploy OVF Template 16 The Deploy OVF Template wizard opens
2Enter the location where you downloaded and unzipped the UVB Install package.Within that location unzip the UVB.ovf file from the extracted contents of theUnitrends Virtual Backup zip file, and then click Next.3Use the wizard to enter the name, datastore location, and network information for theUnitrends VBA, and then click Finish.4When the deployment completes, power on the Unitrends Virtual Backup Appliancevirtual machine.5Finally, ensure the Unitrends VBA has a valid IP address assigned (within vSphere client,select the Unitrends VBA virtual machine and click the Summary tab). If DHCP isenabled in your environment, the appliance will obtain an IP address automatically. IfDHCP is not enabled, you can assign a static IP address using the VM’s console which isaccessible within vSphere client. For details, see Configuring Appliance Networking.Note: It is recommended that you manually configure a static IP address, or assign areservation on the DHCP server.Follow the steps above to deploy any additional appliances you require. You’re now ready to connect to the appliance and complete the Quick Setup wizard. SeeCompleting the Quick Setup Wizard on page 20 for detailed steps.17
Installing Unitrends Virtual Backup for Citrix XenServerFollow the steps below to install Unitrends Virtual Backup to your XenServer environment.Prerequisites The Unitrends Virtual Backup Appliance XVA file (UVB.xva) extracted from theUnitrends Virtual Backup Installation packageA Windows computer with XenCenter installed that has access to your XenServerenvironmentDeploying a Virtual Backup Appliance on Citrix XenServer1From the extracted zip file contents, double click UVB.xva.XenCenter launches and the Import Wizard opens.2Make sure the path to the correct XVA is displayed, then click Next.3Use the wizard to select where you want to deploy the Unitrends VBA and the networksettings to use, then click Finish.4Finally, ensure the Unitrends VBA has a valid IP address assigned (within XenCenter,select the Unitrends VBA virtual machine and click the Network tab). If DHCP isenabled in your environment, the appliance will obtain an IP address automatically. IfDHCP is not enabled, you can assign a static IP address using the VM’s console which isaccessible within XenCenter. For details, see Configuring Appliance Networking.18 Note: It is recommended that you manually configure a static IP address, or assign areservation on the DHCP server.
Follow the steps above to deploy any additional appliances you require. You’re now ready to connect to the appliance and complete the Quick Setup wizard. SeeCompleting the Quick Setup Wizard on page 20 for detailed steps.19
Completing the Quick Setup WizardThe Quick Setup wizard will guide you through the steps required to configure UVB. You accessthe Quick Setup wizard by connecting to the IP address of a deployed appliance (typically, thefirst VBA you deployed). You only need to complete the Quick Setup wizard one time.Completing the Quick Setup wizard configures your first appliance as the PresentationAppliance while guiding you through the deployment process using the standard best practicesettings. You will use this Presentation Appliance’s web interface to perform all additionalconfiguration, including setting up backup jobs and adding additional appliances.If you are using multiple hypervisors you still need only one appliance configured as thePresentation Appliance. As long as you have network connectivity between your hypervisorenvironments, the Presentation Appliance’s web interface can be used to configure UVB for allaccessible hypervisor environments.Tip: Deploy all appliances you plan to use before beginning Quick Setup, making sure theyhave a network address and that you’ve attached any virtual disks you will be using to storebackups.20 To complete your UVB configuration with the Quick Setup wizard1Connect to the Presentation appliance using a web browser and the appliance’s IPaddress. The un-configured appliance web page is displayed.2Click Yes to begin the Quick Setup. If you do not plan to use this appliance as yourPresentation appliance, click No. This will take you to a page where you can enter anexisting Presentation Appliance address. Clicking Go will then bring you to thatappliances configure page (after logging in if needed).
3Next, select the scenario that most closely resembles your environment. For example,if you have about 10 TB or less of source data within a single vCenter, you would selectSingle environment.For more than 10 TB, you would select Single large environment.If you will be protecting more than one hypervisor environments, for example aXenServer Pool along with your development Hyper-V cluster, you would selectMultiple Environments.4At the next step, create your account details and enable the Presentation role on thisappliance. The credentials you enter here are what you will use to access the UVB webinterface.Note: You can exit Quick Setup at any time by clicking Save and Exit (you will then needto complete the configuration manually).When finished entering the account details, click Next. 521
6Next, enable the Management role and enter your Hypervisor Details. If you would liketo use a separate appliance as your management appliance, exit the Quick Setupbefore completing this step. Friendly Name – this is the name you will use to identify this hypervisorenvironment, for example ‘NY vCenter5.’ Server: Enter the IP address or FQDN of your host server (vCenter server,XenServer Pool master, Hyper-V host or other standalone host address). User Name and Password: Hyper-V: Enter the user name and password you created whenyou configured the Unitrends Hyper-V Services on your host. VMware and XenServer: Enter the administrative credentialswith access to your hypervisor environment. The appliancerequires these credentials to perform backup and restores.7Click Next.8At this point, if you selected a Single Large Environment or a Multi Environment asyour deployment scenario, you are presented with a summary page withrecommendations and additional steps. Click Finish to exit the Quick Setup and use theConfiguration page to complete your configuration.If you selected the Single Environment as your scenario, continue with the steps belowto configure attached disk storage.9At the Enable Engine - Backup Storage step, enter a name for the backup storagetarget and select the virtual disk to use to store your backups.Note: Quick Setup allows you to configure attached disk storage only. To configureanother backup storage type (CIFS or NFS, for example), exit Quick Setup and use theConfigure – Environments tab in the web interface.A list of all available virtual disks attached to the selected appliance is displayed. If youdid not attach a virtual disk to your engine appliance during the appliance deployment,you can do that now using your hypervisor client. See Adding an Attached Disk to anAppliance. Click the refresh button to display any newly added attached disks.10 Select the disk to use then click Next.22 11 Unitrends Virtual Backup is now configured. Click Start Using UVB to open the webinterface and begin protecting your environment.
Installing and Configuring the UVB PluginNote: The UVB Plugin is available for vSphere client and XenCenter only.To access Unitre
When using Hyper-V, a Unitrends appliance must be installed on each Hyper-V host machine to perform backups. In a clustered environment, as long as an appliance is installed and configured on each host, all virtual machines on that host can be protected. If VMs that were