Transcription
If you have questions or comments, contact us.Si tiene dudas o comentarios, contáctenos.1-888-394-3392INSTRUCTION MANUALMANUAL DE INSTRUCCIONESDXAEPS14Power StationFuente de energíaBCRD020221DXAEPS14 ManualENSP 020221.indd 56-12/2/2021 10:56:29 AM
WARNING: Read all instructions before operating product.Failure to follow all instructions listed below may result in electricshock, fire and/or serious injury. ADVERTENCIA: Lea todas las instrucciones antes de utilizarel producto. No seguir todas las instrucciones que aparecen acontinuación pueden provocar descargas eléctricas, incendiosy/o lesiones graves.ADVERTENCIA: Este producto o su cable de alimentación contieneplomo, una sustancia química reconocida por el Estado de Californiacomo causante de cáncer, defectos de nacimiento u otros problemasreproductivos. Lávese las manos después de utilizarlo. Para másinformación, visite www.P65Warnings.ca.govThe definitions below describe the level of severity for each signalword. Please read the manual and pay attention to these symbols.DANGER: Indicates an imminently hazardous situation which,if not avoided, will result in death or serious injury.WARNING: Indicates a potentially hazardous situation which,if not avoided, could result in death or serious injury.CAUTION: Indicates a potentially hazardous situation which,if not avoided, may result in minor or moderate injury.NOTICE: Indicates a practice not related to personal injurywhich, if not avoided, may result in property damage.WARNING: WHEN USING ELECTRICAL APPLIANCES, BASICPRECAUTIONS SHOULD ALWAYS BE FOLLOWED, INCLUDING THEFOLLOWING:1. Keep these instructions.2. Heed all warnings.3. Follow all instructions.4. Avoid dangerous environments. Don’t use this unit in damp or wetlocations; or in the rain or snow.5. Clean only with a dry cloth.6. The jump starter and supplied charging adapter are not toysand cannot be played with as toys. To reduce the risk of injury,close supervision is necessary when these units are used nearchildren.7. Store indoors. When not in use, this unit should be stored indoorsin a dry and high or locked-up place – out of the reach of children.8. Stay alert. Use common sense. Do not operate this equipmentwhen you are tired or impaired.9. Only use attachments/accessories specified by the manufacturer.The use of any accessory or attachment not recommended foruse with this appliance may result in a risk of fire, electric shock,or injury to persons.10. Use only on a flat, level surface. If a cart isused, use caution when moving the cart/apparatus combination to avoid injury fromtip-over.IF YOU HAVE ANY QUESTIONS OR COMMENTS ABOUT THISDeWALT TOOL, CALL US TOLL FREE AT: 1-888-394-3392.Power StationThe DXAEPS14 Power Station is a DeWALT power station that featuresa jump starter, digital compressor, dual 120V AC power outlets, fourUSB ports and LED area lights.EnglishWARNING: This product or its power cord contains lead, a chemicalknown to the State of California to cause cancer and birth defect orother reproductive harm. Wash hands after handling. For moreinformation go to www.P65Warnings.ca.govImportant SafetyInstructionsDefinitions: Safety Guidelines3DXAEPS14 ManualENSP 020221.indd 2-32/2/2021 10:56:29 AM
READ ALL INSTRUCTIONSSpecific Safety Instructions for Chargingthis Unit Don’t abuse the cord. Protect the extension cord from being walkedon or pinched particularly at plugs, convenience receptacles, and thepoint where it connects to the unit. Never carry the unit by the cordor yank it to disconnect from receptacle. Pull by the plug rather thanthe cord when disconnecting from the unit.English4DXAEPS14 ManualENSP 020221.indd 4-5 Ground fault circuit interrupter (GFCI) protection should beprovided on the circuits or outlets to be used. Receptacles areavailable having built in GFCI protection and may be used for thismeasure of safety. IMPORTANT: This unit is delivered in a partially charged state. Fullycharge unit with a household extension cord for a full 40 hours or untilthe battery status icon shows 4 solid bars before using for the firsttime. You cannot overcharge the unit using the AC charging method. To recharge this unit, use only the supplied AC charging adapter.Plug in the charging adapter at the unit first, then plug into thecharging source. All functions should be turned off when the unit is charging or notin use. Make sure all functions are turned off before connection to apower source or load. Position the charging adapter cord so it does not become entangledor become a safety hazard. Keep the charging adapter cord awayfrom sharp edges. Do not crush, cut, pull or expose charging adapter cords to extremeheat. Use in a dry location only. Do not attempt to charge the unit if the charging adapter is damaged –return the charging adapter to manufacturer for repair or replacement. After charging/recharging, disconnect charging adapter and wait 5minutes before use. Only charge the unit in a well ventilated area.CAUTION – To reduce the risk of injury or property damage: Pullby plug rather than cord when unplugging the charging adapter.will draw. An undersized cord will cause a drop in line voltage resultingin loss of power and overheating. The following table shows the correctsize to use depending on cord length and nameplate ampere rating.If in doubt, use the next heavier gauge. The smaller the gauge number,the heavier the cord.MINIMUM GAGE FOR CORD SETSTotal Length of Cord in 15.2m)(15.2-30.4m)(30.4-60.9m)(60.9-91.4m)Ampere RatingExtension Cord Length0’-25’26’-50’51 ’-100 ’101’ -150 ’MoreNot moreThanThanAmerican Wire Gage (AWG)0 - 6181616146101816141210 121616141212 161412Not RecommendedVolts120VEnglishNOTE: This equipment has been tested and found to comply withthe limits for a Class B digital device, pursuant to Part 15 of the FCCRules. These limits are designed to provide reasonable protectionagainst harmful interference in a residential installation. This equipmentgenerates, uses and can radiate radio frequency energy and, if notinstalled and used in accordance with the instructions, may causeharmful interference to radio communications. However, there is noguarantee that interference will not occur in a particular installation. Ifthis equipment does cause harmful interference to radio or televisionreception, which can be determined by turning the equipment off andon, the user is encouraged to try to correct the interference by one ormore of the following measures: Reorient or relocate the receiving antenna. Increase the separation between the equipment and thereceiver. Connect the equipment into an outlet on a circuit differentfrom that to which the receiver is connected Consult the dealer or an experienced radio/TV technicianfor help.NOTICE: Per FCC Part 15, changes or modifications to this equipmentnot expressly approved by DeWALT could void your authority to operatethis equipment.11. To reduce risk of electric shock, disconnect the unit from anypower source before attempting maintenance or cleaning. Turningoff controls without disconnecting will not reduce this risk.12. Check for damaged parts. Any part that is damaged should beproperly repaired or replaced by manufacturer unless otherwiseindicated elsewhere in this instruction manual before furtheruse. Servicing is required when the unit has been damaged inany way, such as power-supply cord or plug is damaged, liquidhas been spilled or objects have fallen into the unit, the unit hasbeen exposed to rain or moisture, does not operate normally, orhas been dropped. Do not operate the charger if it has receiveda sharp blow, been dropped or otherwise damaged in anyway. Contact the manufacturer at 1-888-394-3392 for moreinformation.13. Do not use appliance that is damaged or modified. Damaged ormodified batteries may exhibit unpredictable behavior resultingin fire, explosion or risk of injury.14. Do not disassemble the appliance, there are no user serviceableparts inside. Incorrect reassembly may result in a risk of fire orelectric shock.15. This unit is intended to be used in an upright position. The unitMUST be kept upright during use.16. Unit shall not be exposed to dripping or splashing and no objectsfilled with liquids, shall be placed on the unit.17. Do not operate this unit near flammable liquids or in gaseous orexplosive atmospheres. Motors in these tools normally spark,and the sparks might ignite fumes.18. This unit employs parts (switches, relays, etc.) that produce arcsor sparks. Therefore, if used in a garage or enclosed area, theunit MUST be placed not less than 18 inches above the floor.19. Do not overcharge the battery – refer to the appropriate sectionof this manual.When an extension cord is used, make sure that: the pins of extension cord are the same number, size and shape asthose in the charger, the extension cord is properly wired and in good electrical condition,and the wire size is large enough for the AC rating of the charger.Outdoor use extension cords: When the unit is charged outdoors,use only extension cords intended for use outdoors and so marked.Specific Safety Instructions forJump StartersExtension CordsWARNING: Use of an improper extension cord could result in arisk of fire and electric shock, and will void warranty. Make sure yourextension cord is in good condition. When using an extension cord,be sure to use one heavy enough to carry the current your productWARNING – Burst hazard: Do not use the unit for charging dry-cellbatteries that are commonly used with home appliances. Thesebatteries may burst and cause injury to persons and damage property.Use the unit for charging/boosting a lead-acid battery only. It is not52/2/2021 10:56:30 AM
English When using this unit close to the vehicle’s battery and engine, standthe unit on a flat, stable surface, and be sure to keep all clamps, cords,clothing and body parts away from moving vehicle parts. Make sure to connect the clamps with correct polarity. Damagecaused by improper connection is not covered by the Warranty. Do not expose battery to fire or intense heat since it may explode.Before disposing of the battery, protect exposed terminals withheavy-duty electrical tape to prevent shorting (shorting can resultin injury or fire). Place this unit as far away from the battery as cables permit. Never allow battery acid to come in contact with this unit. Do not operate this unit in a closed area or restrict ventilation in anyway. This system is designed to be used only on vehicles with a 12 volt DCbattery system. Do not connect to a 6 volt or 24 volt battery system. This system is not designed to be used as a replacement for avehicular battery. Do not attempt to operate a vehicle that does nothave a battery installed. Excessive engine cranking can damage a vehicle’s starter motor. Ifthe engine fails to start after the recommended number of attempts,discontinue jump-start procedures and look for other problems thatmay need to be corrected. Do not use this jump starter on a watercraft. It is not qualified formarine applications. Although this unit contains a non-spillable battery, it is recommendedthat unit be kept upright during storage and recharging. To avoidpossible damage that may shorten the unit’s working life, protect itfrom direct sunlight, direct heat and/or moisture.6DXAEPS14 ManualENSP 020221.indd 6-7Specific Safety Instructions forCompressors Disconnect any appliance plugs from the inverter outlets beforeattempting any repairs to the appliance. Observe all Safety Instructions in the “Specific Safety Instructionsfor Power Cords” section of this Instruction Manual when using theinverter outlets. When an appliance plugged into this unit is usedoutdoors, use only extension cords intended for use outdoors andso marked. Do not attempt to connect the inverter while operating your vehicle.Not paying attention to the road may result in a serious accident. Always use the inverter where there is adequate ventilation. Always turn the inverter off when not in use. Keep in mind that this inverter will not operate high wattage appliancesor equipment that produce heat, such as hair dryers, microwaveovens and toasters. Do not use this inverter with medical devices. It is not tested formedical applications. Operate this inverter only as described in this Instruction Manual.CAUTION – Rechargeable devices Certain rechargeable devices are designed to be charged by pluggingthem directly into an AC receptacle. These devices may damage theinverter or the charging circuit. When using a rechargeable device, monitor its temperature for theinitial ten minutes of use to determine if it produces excessive heat. If excessive heat is produced, this indicates the device should notbe used with this inverter. This problem does not occur with most of the battery-operatedequipment. Most of these devices use a separate charger ortransformer that is plugged into an AC receptacle. The inverter is capable of running most chargers and transformers.IMPORTANT: Some laptop computers may not operate with thisinverter.WARNING – Burst hazard: Bursting articles can cause seriousinjury. Carefully follow instructions on articles to be inflated. Never exceed the recommended pressure listed in instructionson articles to be inflated. If no pressure is given, contact articlemanufacturer before inflating. Always monitor the pressure on the LCD screen.CAUTION: To reduce the risk of property damage: Never leave the compressor unattended while in use. Do not operate compressor continuously for longer than 10 minutes.This could damage the compressor. Follow the instructions in the“Portable Compressor” section.Specific Safety Instructions forInvertersWARNING – To reduce the risk of electric shock: Do not connect to AC distribution wiring. Do not make any electrical connections or disconnections in areasdesignated as IGNITION PROTECTED. This inverter is NOT approvedfor ignition protected areas. Never immerse the unit in water or any other liquid, or use when wet.WARNING – To reduce the risk of fire: Do not operate near flammable materials, fumes, dust or gases. Do not expose to extreme heat or flames.CAUTION – To reduce the risk of injury or property damage: Do not insert foreign objects into the inverter outlets. Do not attach AC outlet taps or multi-outlet extension cords, or attachmore than one electrical appliance to each inverter outlet.Englishintended to supply power to a low-voltage electrical system other thanin a starter-motor application.WARNING: To reduce the risk of electric shock, never immerse thisunit in water or any other liquid, or use when wet.WARNING – Risk of explosive gases: Working in the vicinity of a lead acid battery is dangerous. Batteriesgenerate explosive gases during normal battery operation. For thisreason, it is of the utmost importance that each time before usingthe jump-starter you read this manual and follow instructions exactly. To reduce the risk of battery explosion, follow these instructions andthose published by the battery manufacturer and manufacturer ofany equipment you intend to use in the vicinity of the battery. Reviewcautionary markings on these products and on the engine.WARNING – Risk of serious injury or property damage: Never allow red and black clamps to touch each other or anothercommon metal conductor — this could cause damage to the unitand/or create a sparking/explosion hazard.WARNING – To reduce the risk of fire: Do not operate near flammable materials, fumes, dust or gases. Do not expose to extreme heat or flames.CAUTION – To reduce the risk of injury or property damage: NEVER ATTEMPT TO JUMP-START OR CHARGE A FROZENBATTERY. Vehicles that have on-board computerized systems may be damagedif vehicle battery is jump-started. Before jump-starting, read thevehicle’s owner’s manual to confirm that external-starting assistanceis suitable. Jump-start procedures should only be performed in a safe, dry,well-ventilated area. Always store battery clamps properly when not in use.72/2/2021 10:56:30 AM
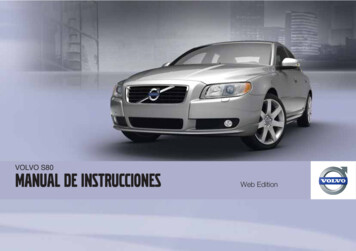
WARNING – Battery fluid is a diluted sulphuric acid and maycause personal injury or damage to property. In case of skin or eyecontact, follow the instructions below. Skin: If battery acid comes in contact with skin, rinse immediatelywith water, then wash thoroughly with soap and water. If redness,pain, or irritation occurs, seek immediate medical attention. Eyes: If battery acid comes in contact with eyes, flush eyesimmediately, for a minimum of 15 minutes and seek immediatemedical attention. Avoid touching the eyes while working with abattery. Acid, acid particles or corrosion may get into the eyes. Always have protective eyewear when using this product: contact withbattery acid may cause blindness and/or severe burns. Be aware offirst aid procedures in case of accidental contact with battery acid. LCD Liquid Crystal Display: If liquid crystal comes in contact withyour skin: Wash area off completely with plenty of water. Removecontaminated clothing. If liquid crystal gets into your eye: Flush theaffected eye with clean water and then seek medical attention. If liquidcrystal is swallowed: Flush your mouth thoroughly with water. Drinklarge quantities of water and induce vomiting. Then seek medicalattention. Do not insert foreign objects into the USB Ports. Do not attach USB hubs or more than one personal electronic deviceto each USB Port. Do not use this unit to operate appliances that require more than 6.2amps in total to operate from the USB Ports.First AidPERSONAL SAFETY: When working with lead acid batteries, always make sure immediateassistance is available in case of accident or emergency. Have plenty of fresh water and soap nearby in case battery acidcontacts skin. Never smoke or allow a spark or flame in vicinity of vehicle battery,engine or power station. Stay clear of fan blades, belts, pulleys, and other parts that cancause injury to persons. Remove personal metal items such as rings, bracelets,necklaces and watches when working with a lead acid battery. Alead acid battery can produce a short circuit current high enough toweld a ring, or similar metal object, to skin, causing a severe burn. Do not wear vinyl clothing when jump-starting a vehicle. Friction cancause dangerous static-electrical sparks. Do not wear loose clothing or jewelry. They can be caught inmoving parts. Rubber gloves and substantial, non-skid footwear arerecommended when working outdoors. Wear protective hair coveringto contain long hair. Be extra careful to avoid dropping a metal tool onto the battery. Itmight spark or short-circuit the battery or another electrical part andcould cause an explosion.SAVE THESEINSTRUCTIONSFOR FUTURE USEA. Backlit LCD ScreenB. Compressor Power ButtonC. Decrease CompressorPressure Control Button ( )D. Increase CompressorPressure Control Button ( )Components (Fig. 2)A. Air Hose and Sure Fit Nozzle on Hose WrapB. Boost Cables WrapC. HandleD. Control Panel (see Fig. 1)E. Area Light Power ButtonF. USB Power ButtonG. Alternator Check ButtonH. AC Power ButtonAE. Battery Clamp Tabs andBattery ClampsF. USB Ports (with USBPower/Fault Indicators)G. Dual 120 Volt AC OutletsCBDBCEDEGAFHFG8DXAEPS14 ManualENSP 020221.indd 8-9Control Panel (Fig. 1)EnglishEnglishSpecific Safety Instructions for USB Ports92/2/2021 10:56:30 AM
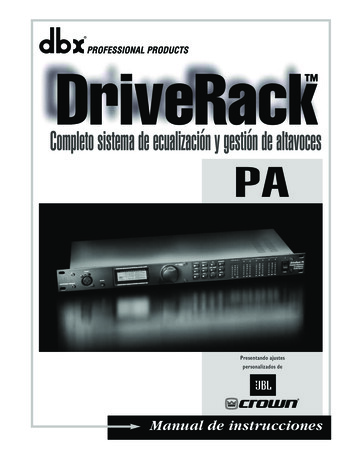
EnglishH. 120V AC Charging Port(under protective cover)I. LED Area Light (two banksof two LEDs)J. 12 Volt AC ChargingAdapterLCD Display Detail (Fig. 4)Battery StatusIconDigital Display (varies byfunction)Voltage IndicatorCompressorPressure IndicatorUSB IconEnglishBattery Clamps Stored On /Removed From Battery Clamp Tabs(Fig. 3)HIIAlarm IconJNOTE: Clamp tabs rotate down for easy storage.Alternator IconReverse Polarity IconsAlternator Good/Fault IndicatorsClamp Icons10DXAEPS14 ManualENSP 020221.indd 10-11Fault IconCompressor IconJump Starter Icon112/2/2021 10:56:31 AM
Press the USB PowerButton. (Refer to the "USBPorts" section.)COMMON ACTIONS AND UNIT RESPONSESThe following actions turn the unit on and activate the LCD screen:Press the LED Area LightPower Button. (Refer to the"LED Area Light" section.)Press the AlternatorCheck Button. (Refer to the"Alternator Check" section.)A beep will sound and the AreaLight will turn on. The backlightwill turn on for 10 seconds (only).The LCD screen will continueto display the Battery StatusIcon and Battery Voltage Indicator.The unit remains on until the LEDArea Light Power Button is pressedagain to turn it off.Press the CompressorPower Button. (Refer tothe "Portable Compressor"section.)A beep will sound and the backlitLCD screen will display the BatteryStatus Icon, and the AlternatorIcon will flash. The unit remains onuntil the Alternator Check Button ispressed again to turn it off.Press the AC Power Button. A beep will sound and the backlit(Refer to the “120V AC Power LCD screen will display the BatteryOutlets” section.)Status Icon; and the Digital Displayshows “AC”, indicating the dualAC outlets are ready to use. Theunit remains on until the AC PowerButton is pressed again to turnit off.Whenever the clamps areproperly connected to abattery (refer to the "JumpStarter" section) 12DXAEPS14 ManualENSP 020221.indd 12-13A beep will sound and thebacklight will turn on for 10seconds (only). The LCD screenwill display the Battery Status Icon,Battery Voltage Indicator, and theUSB Icon; and the USB Power/Fault Indicators will light solid blueindicating the four USB Ports areactive. The unit remains on untilthe USB Power Button is pressedagain to turn it off.A beep will sound and the backlitLCD screen will display the BatteryStatus Icon, "XXX" PSI and theCompressor Icon. If no furtheractions are taken after 1 minute,the unit will display the BatteryStatus Icon and Battery VoltageIndicator for 10 seconds beforeautomatically turning off. a beep will sound and thebacklit LCD screen will displaythe Battery Status Icon, BatteryVoltage Indicator, the Clamp Icons,and the “ ” and ”–” signs, aswell as the flashing Jump StarterIcon. The unit remains on until theclamps are disconnected from thebattery.If the red and black clampstouch each other (refer tothe "Jump Starter" section) the backlit LCD screen willdisplay the Battery Status Iconand Battery Voltage Indicator. TheClamp Icons, “ ” and ”–” signs andthe Alarm Icon will flash. The unitwill sound a two-second warningevery ten seconds continuouslyuntil the clamps are separated.If the clamp connectionsto the battery’s positiveand negative terminals arereversed (refer to the "JumpStarter" section) the backlit LCD screen willdisplay the Battery Status Icon,Battery Voltage Indicator, and theClamp Icons. The Alarm Icon, the“ ” and ”–” signs and the ReversePolarity Icons will flash and the unitwill sound a warning continuouslyuntil the clamps are disconnectedfrom the battery.When the unit is chargingor recharging using thesupplied Charging Adapter(refer to the "Charging/Recharging" section) the backlight will turn on for 10seconds (only). The LCD screenwill continue to display the BatteryStatus Icon and Battery VoltageIndicator. The bars on the BatteryStatus Icon will change from emptyto solid (bottom to top) repeatedly.Viewing Battery StatusThe Battery Status Icon and Battery Voltage Indicator indicate thebattery charge level as follows.EnglishEnglishOverview If the battery charge level is at full capacity, four solid bars will display. If the battery is partially charged, two or three solid bars will display. If the battery is nearly empty, one solid bar will display. The unit shouldbe charged at this time. If the battery is completely empty, four blank bars will display. Theunit MUST be charged at this time or the unit’s built-in low voltageprotection will activate. The empty Battery Status Icon will flash fora short period of time before automatic shut down. The unit will notoperate until the battery is recharged.Charging/RechargingLead-acid batteries require routine maintenance to ensure a full chargeand long battery life. All batteries lose energy from self-discharge overtime and more rapidly at higher temperatures. Therefore, batteries needperiodic charging to replace energy lost through self-discharge. Whenthe unit is not in frequent use, manufacturer recommends the batteryshould be recharged at least every 30 days and after each use.NOTE: The unit will automatically power off once ALL the functionsand the charging process are turned off.Important Charging Notes1. This unit is delivered in a partially charged state – you must fullycharge it before using it for the first time. Initial AC charge shouldbe for 40 hours or until the Battery Status Icon shows 4 solid bars.132/2/2021 10:56:31 AM
English2. Charge for approximately 40 hours or until the Battery Status Iconshows 4 solid bars.3. When charging is complete, disconnect the AC charging adapter –first unplug the adapter from the AC power source, then disconnectthe barrel connector from the unit.Jump-StarterA. For negative-grounded systems (most common), connect thepositive (red) clamp to the positive ungrounded battery postand the negative (black) clamp to the vehicle chassis or engineblock away from the battery. Do not connect the clamp to thecarburetor, fuel lines or sheet-metal body parts. Connect to aheavy gage metal part of the frame or engine block.B. For positive-grounded systems, connect the negative (black)clamp to the negative ungrounded battery post and the positive(red) clamp to the vehicle chassis or engine block away from thebattery. Do not connect the clamp to the carburetor, fuel lines orsheet-metal body parts. Connect to a heavy gage metal part ofthe frame or engine block.IMPORTANT: . All featuresmust be turned off with theexception of the area lightwhen jump-starting. The unitis intended to be used only inthe upright position. The unitmust be kept upright duringuse. See the illustrationto the right for correctorientation. Charging/Recharging Using theSupplied Charging Adapter1. Lift the protective cover of 12V DC Charging Port located on theback of the unit (refer to Fig. 2 to locate). Insert the barrel connectorof the AC charging adapter into the DC charging port. Insert theplug end into a (powered) standard North American 120 volt 60Hzoutlet. When the unit is properly connected to an AC power source,the LCD screen will display the following:The bars on the Battery Status Icon represent the charge level ofthe unit’s internal battery. The bars on the Battery Status Icon willchange from empty to solid (bottom to top) repeatedly to indicatethe unit is charging. The backlight will turn on for 10 seconds (only).The Battery Status Icon and Battery Voltage Indicator light solid. Thealarm icon and Jump Starter Icon will flash. Allow the unit to cool for10-30 minutes before use. Always disconnect the negative (black) jumper cable first, followed bythe positive (red) jumper cable, except for positive grounded systems.PROCEDURETake the following steps, observing all cautions and warnings in the“Important Safety Instructions” section at the front of this manual.1. Turn off vehicle ignition and all accessories (radio, A/C, lights,connected cell phone chargers, etc.). Place vehicle in “park” andset the emergency brake.2. Remove jumper clamps from clamp tabs. Connect the red clampfirst, then the black clamp.3. Procedure for jump-starting a NEGATIVE GROUNDEDSYSTEM (negative battery terminal is connected to chassis)(MOST COMMON)3a. Connect positive ( ) red clamp to vehicle battery’s positiveterminal.3b. Connect negative (–) black clamp to chassis or a solid, nonmoving, metal vehicle component or body part. Never clampDisconnect the clamps and reconnect to battery with correct polarity. Never touch red and black clamps together. This can causedangerous sparks, power arcing, and/or explosion.If the red and black clamps touch each other, the unit will sound acontinuous two-second alarm every ten seconds until the clamps areseparated. The backlit LCD screen will display the following:The Battery Status Icon and Battery Voltage Indicator light solid.The Alarm Icon, Clamp Icons and the “ ” and”–” signs will flash.14DXAEPS14 ManualENSP 020221.indd 14-15Immediately separate the clamps and do not allow them to touchagain. If the unit is overheated during the jump starting process, the thermalprotection will activate and the backlit LCD screen will display thefollowing:WARNING – To reduce the risk of serious injury or propertydamage: Follow all safety instructions found in the “Specific Safety Instructionsfor Jump Starters” section of this instruction manual. If the clamps are connected incorrectly with regard to polarity, the unitwill sound a continuous alarm until the clamps are disconnected. Thebacklit LCD Screen will display the Battery Status Icon, the BatteryVoltage Indicator and the Clamp Icons. The “ ” and”–” signs abovethe Clamp Icons, the Arrow Icons and the Alarm Icon will flash. Thebacklit LCD screen will display the following:English2. Recharging the battery after each use will prolong battery life;frequent heavy discharges between recharges and/or overchargingwill reduce battery life.3. Make sure all other unit functions are turned off during recharging,as this can slow the recharging process.CAUTION – Risk of property damage: Failure to keep the batterycharged will cause permanent damage and result in poor jump startingperformance.IMPORTANT: If you know the unit is discharged, but the battery icondisplays four solid bars as if the unit is fully charged when connected toa charging power source, this may be due to the internal battery havinghigh impedance. The manufacturer suggests leaving the unit chargingfor a period of 40 hours using the supplied AC charger before use.152/2/2021 10:56:31 AM
English6. Turn on the ignition and crank the engine in
if vehicle battery is jump-started. Before jump-starting, read the vehicle’s owner’s manual to confirm that external-starting assistance is suitable. Jump-start procedures should only be performed in a safe, dry, well-ventilated a