Transcription
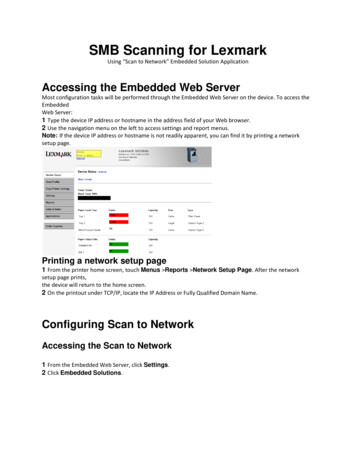
SMB Scanning for LexmarkUsing “Scan to Network” Embedded Solution ApplicationAccessing the Embedded Web ServerMost configuration tasks will be performed through the Embedded Web Server on the device. To access theEmbeddedWeb Server:1 Type the device IP address or hostname in the address field of your Web browser.2 Use the navigation menu on the left to access settings and report menus.Note: If the device IP address or hostname is not readily apparent, you can find it by printing a networksetup page.Printing a network setup page1 From the printer home screen, touch Menus Reports Network Setup Page. After the networksetup page prints,the device will return to the home screen.2 On the printout under TCP/IP, locate the IP Address or Fully Qualified Domain Name.Configuring Scan to NetworkAccessing the Scan to Network1 From the Embedded Web Server, click Settings.2 Click Embedded Solutions.
3 From Installed Solutions, click Scan to Network.4 Click Configure4 Under Scan Destination, click Add
Configuring destination settingsNameType a name for the destination.LocationSelect Network FolderNetwork FolderUse ToAddress Type the server name or IP Address of the network folder in the \\server\share format.Domain Type the Windows domain for the destination if the destination resides within a different Windowsdomain than the printer.WINS Server Type the WINS Server address if the printer has difficulty connecting with a network folderdestination.FileNote: To avoid errors, make sure you select either Append time stamp or Over-write existing file.Use ToName Type a default base name for the scan file. The file extension is generatedautomatically according to the value of the Format field in the Scan Settingssection. (ex. “DOC ” or “Scan ”)Allow user to enter file name Allow users to override the default file name.Append time stamp Add a time signature to the file name when saving a file.Over-write existing file Automatically replace an existing file of the same name.
Authentication Options:GuestUse MFP authentication credentialsPrompt for username and passwordUse static username and passwordUsername:Password:**Use Static Username and PasswordScan Settings:The selected settings can be changed by the MFP userAuto Size SensePaper t:Sides (Duplex):PDFFormat:Resolution:Color:On150 dpiOff150 dpi
Custom Job:OnEdge to Edge:OffOnOffBest for contentContrast:5Darkness:Shadow Detail:0Background Removal:Scan Preview:0Off* File:Note: Filename has a 255 character limit.Name:docAllow user to enter file nameAppend time stampOver-write existing fileOther Options:Enable basic XML index fileAllow user to navigate through foldersAllow user to create folder
Start in username folder (create if it doesn't exist)Scan Confirmation Page:Print Confirmation Page:* Required fieldsOKAllow user to chooseCancel
setup page. Printing a network setup page 1 From the printer home screen, touch Menus Reports Network Setup Page. After the network setup page prints, the device will return to the home screen. 2 On the printout under TCP/IP, locate the IP Address or Fully Qualified Domain Name. Configuring Scan to Network Accessing the Scan to Network