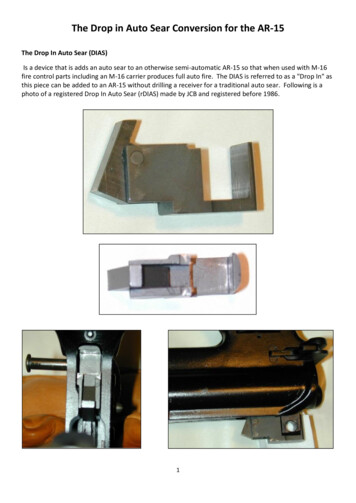
Transcription
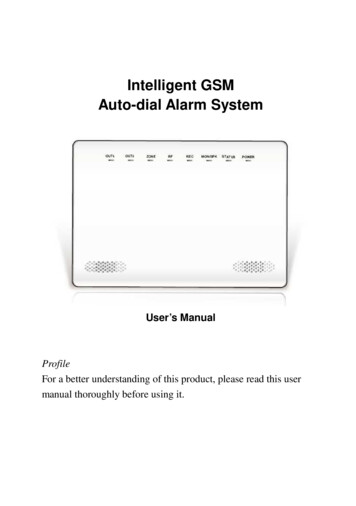
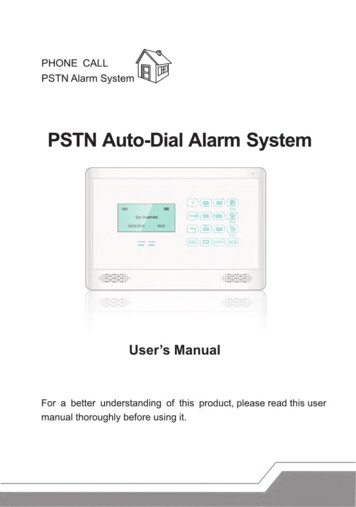
PHONECALLPSTN Alarm SystemPSTN Auto-Dial Alarm System7E ушаCOG9G9 (Во)NS)t ) (f)ÂagoceUser’s ManualFor a better understandingof this product, please read this usermanual thoroughly before using it.Ў2ш
CONTENTSІ. FunctionIl. SystemІпѕгисіоп.-.---.өнө 1InstallatlODIll. SystemeeeeteSetting EMIL231.Initialization «nmnшнын Ны ыныр; 32.Indicating Telle нанаана3.LED ооо4.5.6.Епіег Setting ————————7.Quit Setting іден8.System Setting �а4SystemDisarm �и4(1) Remoteроваанана 3анаНезаконнінаДорісрнControl Setting gavin AnaisM e(3) AlarmPhoneNumber Settingmван5MÀ5eL5n(2) Defense Zone Setting ———————4Ó6ÁÁMÁAÁ9(4) Time Setting «нн11(5) Voice Recording and 6) Wireless Control setting «mmn(7)SystemParametersSetting PEIV. Operation InstructionsинPOTE ETERNI14ем15211. Амау Ата24Э.Home Ара223.Disarm224.Emergency aid eseeensnaseensae:225. Emergency calling аннынан ннн 226. Alarm receiving and handling - ---------------------ннне227. Remote Боенанон EHE bp mana23
8.СМ5соппесіїо й erret23V.Technical.24VI.Package ComponentsMA24ParametersVII. MaintenanceCare--.25
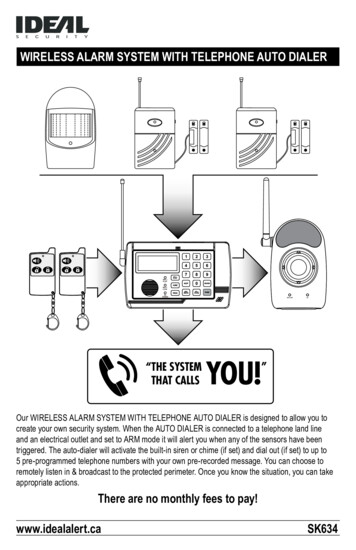
FeaturesІ Еипсбіоп Instruction* 100 defense zones: Emergency zone (0), 96 wireless zones (1-96), 2wired zones (98-99), anti-tamper zone (97).Ж Remote control: maximum supports 9 wireless remote controls.x Display: 128*64 Lattice LCD screen.* Alarm phone number: 6 phone numbers and 1 center number.зх Clock: inner clock with calendar.ўс Voice recording: 10 seconds voice recording and broadcasting.ус Arm mode: Remote control, System keypad, remotely calling.* Zone mode: all zone can be programmed as: Real-time, Delay, 24hour, bypass zone modes.* Timing Arm/disarm: system can set up timing arm and timing disarm.ўс Siren sound setting: can set siren make sound or not in any singledefense zone.їх System memory: system will back to former status(Arm or Disarm)after power cut-off.зх History record: system will record latest 30 alarming history forchecking.x Alarm priority: alarming call is prior to normal call even when thephone is busy.* Phone line cut alert: system will start alarm if PSTN telephone linecut off.yx Number checking: if no alarm number exists, system screen willremind when alarm happens.x Remote control: user can dial the system connected telephone set toArm, Disarm and listen-in.** System can match with rechargeable Lithiumbattery.* Compatible with wolf-guard and CID protocol, can connected withCMS.шину7 дн
System Installationll. System InstallationAlarm panel better to be put in the centre of the defense area to work wellwith all wireless sensors. Please make sure to keep away from large-sizedmetal objects and high-frequency home appliances, also avoid reinforcedconcrete and fire-proof door such shielding materials.Front side viewMIC for leaving . Voice messagew&)1.LCD screeni— 3.Touch Keypadfm)(9)(n)(aj(б)(uj(ё)(в)2.Status LEDSpeaker for voiceprompt and intercomBack side view:Tamper Alarm ButtonDC 12V InputPower SwitchLead Wire SlotTelephone lineWired Ports-—— У Р днm
System SettingsWire connecting ports indication:No.Portindication1SIREN-Siren negative2SIREN Siren positive3GNDGround4512VGND12V outputGround677221Wired input 1Wired input 28GNDGroundШ. System Setting1.InitializationCheck the battery of wireless sensors, then use the telephone wire inthe package to connect the telephone set, wired sensors and externalsiren with alarm panel. Plug system with DC12V adapter and turn onthe system power switch, system start initialization. If battery lowvoltage the battery icon will flash on the LCD screen to remind, andafter power on the system, B ] icon will flash if telephone wire not wellconnected or being cut off, and siren will make sound.2.Indicating voiceWire connecting ports indication: Voice Refer to Bi Effective touch bi bi bi Ineffectiveey7 7 ДЕ
System Settings disarm System enter disarm status arm System enter arm status Home arm System enter home arm status Refer to3.LED indication LEDPOWERon: system under normal workingstatusALARMFlashing: delay alarm low flashing;alarming fast flashing4.System DisarmPress& on remote control, or input “123456 Enter " on the systempanel keypad, voice indicate system disarmed.5.System PasswordSystem has two passwords: Operation password (defaulted 123456)and Program password (defaulted 123123). Operation passwordused to disarm and remotely control system, Program password usedto enter setting status. If you forget the password, please inputcommand “95175308246 Enter” under standby status (arm or disarmstatus), system will back to Factory defaulted password setting.6.Enter SettingOnly enter Setting status can program the system, input programpassword (defaulted 123123) under Disarm status.eyу 27 дн
System Settings7.Quit SettingSetting finished, press ESC to quit (if under sub-menu,first), andif no operationover 30 second,need to quitsystem will automaticallyback to standby status.8.System Setting(1)Remote Control SettingSetting finished, press ESCfirst), and if no operationto quit (if under sub-menu,over 30 second,systemneed to quitwill automaticallyback to standby status.a. Input programpasswordto enter setting status, chooseRemotecontrol menu.b. Choose Pair or Delete.c. PressEnterto confirm,after confirmPair menu,pleasepressremote control to emit signal, system will receive the signal, thenyou can press Enter to save it or press ESC to quit.Remote control pairing diagramsFig 1: input program password under Fig 2: choose remote control menu,disarm status, then Enterthen Enter ШШ]Fig 3: choose Pair, then pressEnterRemote controlSys disarmedDelete123123Fig 4: trigger remote control to emit,Fig 5: receive effective signal,system wait remote control signalpairing completedPlease send Send okFig 6: receive coincident codeRepeated code
System SettingsFig 7: press Enter to save or pressESC to quitSave?Remote control deletion diagramsFig 1: input program password underFig 2: choose remote control menu,disarm status, then Enterthen Enter pun] Fig 3: choose Delete, then pressEnterRemote controlRemote 1CodingSys disarmedDelete123123ExitEnterFig 4: press Enter to finish thedeleteDelete ok(2)Defense Zone SettingDefense zone setting including: Zone pairing, zone delete, siren soundtime, delay alarm,alarmingor not under(arm, homearm,disarm)status, total 99 defense zones.a. Input program password to enter setting status, choose Zone menu.b. Choose zone number (can choose by leftwards / rightwards key orinput numberdirectly,max99 zones),thenchoosezonemode(press upwards or downwards key).ey7 2 дн
System Settingsc. a.After chooseany specific zonemode,pressEnter to do nextcorresponded sub-settings below:Zone Pairing diagramsFig 1: input program password underdisarm status, then EnterEFig 2: choose Zone menu, thenEnterюшFig 3: choose zone number andthen Pair, press EnterZoneSys disarmedZone01Number 123123ExitEnterFig 4: wait effective signal fromFig 5: receive effective signal andFig 6: receive coincident sensorsensorspairing completedcodePlease send»»»»»send okRepeated codeFig 2: choose Zone menu, thenEnterFig 3: choose zone number andDelete menuFig 7: press Enter to save or pressESC to quitSave?Delete zone diagramsFig 1: input program password underdisarm status, then Enter ЕШSys disarmed123123ZoneDeleteArm: EnableExit01
System SettingsFig 4: press Enter to deleteDelete okZone Arm setting diagramsFig 1: input program passwordFig 2: choose Zone menu, thenFig 3: choose System Arm menu,under disarm status, then EnterEnterthen press Enter to switch Enableor Disable 2опе01Sys disarmedArm:Enable123123ExitEnterZone Home Arm Setting diagramsFig 1: input program passwordunder disarm status, then EnterFig 2: choose Zone menu, thenEnterFig 3: choose Home Arm menu,then press Enter to switch Enableor Disable «тойНоте:ЕпаріеSys disarmedArm:Disable123123ExitZone Disarm Setting diagramsFig 1: input program passwordFig 2: choose Zone menu, thenFig 3: choose System disarm menu,under disarm status, then EnterEnterthen press Enter to switch Enableor Disable шш2опе2опеSys nterExitEnter7 y дн
System SettingsZone Siren Time setting diagramsFig 1: input program passwordunder disarm status, then EnterEFig 2: choose Zone menu, thenEnterЕШFig 3: choose siren setting menu,then press Enter to switch Enableor Disable2опеSys disarmedZone01Siren:1min Delay:Disable123123ExitEnterExitZone Delay setting diagramsFig 1: input program password underdisarm status, then EnterFig 2: choose Zone menu, thenEnterFig 3: choose Delay setting menu,then press Enter to Enable orDisable шщZone01Siren:1minSys m Phone Number SettingAlarm system can set maximum6 alarm called phone numbers and 1CMS number.a. Input programpasswordto entersettingstatus,chooseAlarmNumber menu.b. Choose phone number serial (by leftwards or rightwards key).c. Press Enter to number edit menu, input phone numbers and pressEnter to save it or press ESC to quit.
System SettingsAlarm phone numbers setting diagramsFig 1: input program passwordFig 2: choose alarm phone numberFig 3: choose phone numberunder disarm status, then Entermenu, then Enterserial, then Enter gun]Phone number1135123456789ESys disarmedPhone number123123Fig 4: input phone number, thenpress Enter to savePlease input:ExitEnterDelete phone number setting diagramsFig 1: input program passwordFig 2: choose alarm phone numberFig 3: choose phone number serial,under disarm status, then Entermenu, then Enterthen choose delete menu cn]Phone numberSys disarmedPhone number 12123123ExitFig 4: press Enter to deleteDelete okEnterExitEnter
System Settings(4)Time SettingSet system Date, Time, Timing Arm and Timing Disarm functions.a. Put program password to enter setting status, choose Time menu.b. Choose setting menu (Date, Time, Timing Arm, Timing Disarm).c. PressEnter to start correspondedsettings,pressEnter to save,ESC to quit.Alarm Date setting diagramsFig 1: input program passwordFig 2: choose Time menu, thenFig 3: choose Date menu, thenunder disarm status, then EnterEnterEnter- mSys disarmed05/02/2014123123Fig 4: input current date, thenpress Enter to saveInput Please:20 4Alarm Time Setting diagramsFig 1: input program passwordFig 2: choose Time menu, thenFig 3: choose Time sub-menu,under disarm status, then EnterEnterthen Enter ШШ]Sys disarmed123123Time
System SettingsFig 4: input current time, thenpress Enter to saveTiming Arm setting diagramsFig 1: input program passwordFig 2: choose Time menu, thenFig 3: choose Timing arm menu,under disarm status, then EnterEnterthen Enter ]Timely armSys disarmedDisableса[Ext к Fig 4: input timetable for timingarm, then EnterInput Please:Timing Disarm setting diagramsFig 1: input program passwordFig 2: choose Time menu, thenFig 3: choose timing disarm menu,under disarm status, then EnterEnterthen Enter lTimely disarmSys disarmed123123ExitEnter
System SettingsFig 4: input timetable for timingdisarm, then press Enter to saveInput Please:(5)Voice Recording and Broadcastinga. Input programpasswordto enter settingstatus,chooseRecordmenu.b. Choose start or playback.c. Press Enter to start Record or Playback (record time is 10 seconds)Alarm Date setting diagramsFig 1: input program passwordFig 2: choose record menu, thenunder disarm status, then EnterEnter au)Sys disarmed123123Fig 4: 10 second recordingRecording: 9secFig 3: choose Start menu, thenEnterRecordingRecording
System SettingsPlayback setting diagramsFig 1: input program passwordFig 2: choose record menu, thenFig 3: choose Playback menu,under disarm status, then EnterEnterthen Enter ШШRecordingRecording Sys disarmed0Start123123ExitEnterFig 4: start playbackRecording: 9sec(6)Wireless Control settinga. Input program password to enter setting status, choose Wirelesscontrol menu.b. Choose Address or Control.c. Press Enter again to enter corresponded setting.Wireless address setting diagramsFig 1: input program passwordFig 2: choose wireless controlFig 3: choose address menu,under disarm status, then Entermenu, then Enterthen Enter иш)Sys disarmed123123Wireless controlEYWireless controlAddressControl:DisableExitEnter
System SettingsFig 4: input 4 address number,press Enter to save, ESC to quitWireless controlInput Please:ExitEnterWireless Control setting diagramsFig 1: input program passwordFig 2: choose wireless controlFig 3: choose control selection,under disarm status, then Entermenu, then Enterpress Enter to Enable or Disable ]шщWireless controlWireless controlAddressÈSys disarmedControl:Disable123123ExitEnter(7)System Parameters r ID, Delay Arm, Delay Alarm, Siren alert forRing time, Alarm record, Language selection, backto factory setting.a. Input programpassword to enter setting status, choose parametersetting menu.b. Choose corresponded parameters selection.c. Press Enter to choose every selection, start correspondedand press Enter to save it or press ESC to quit.setting
System SettingsSet Operation Password diagramsFig 1: input program passwordFig 2: choose Setting menu, thenFig 3: choose Operation password,under disarm status, then EnterEnterthen Enter ШШSettingsSys disarmedOperate passwordФ123123ExitEnterFig 4: input 6 program passwordnumbers, then press Enter to saveor ESC to quitOperate passwordInput Please:Set Program Password diagramsFig 1: input program passwordFig 2: choose Setting menu, thenFig 3: choose program password,under disarm status, then EnterEnterthen Enter иш)Sys disarmed123123Fig 4: input 6 number programpassword, press Enter to saveor ESC to quitProgram passwordInput Please:SettingsProgram passwordФ123123
System SettingsUser ID setting diagramsFig 1: input program passwordFig 2: choose Setting menu, thenunder disarm status, then EnterEnterEШШFig 3: choose User ID, then EnterSettingsSys disarmedUser IDФ123123ExitEnterFig 4: input 4 number user ID,press Enter to save or ESC toquitUser IDInput Please:BackSaveDelay Arm setting diagramsFig 1: input program passwordFig 2: choose Setting menu, thenunder disarm status, then EnterEnterШшESys disarmedFig 3: choose delay arm and EnterDelay armSettings“Ф123123ExitFig 4: input delay arm time (2numbers), then press Enter tosave or ESC to quitDelay armInput Please:BackSaveEnter
System SettingsDelay Alarm setting diagramsFig 1: input program passwordFig 2: choose Setting menu, thenFig 3: choose delay alarm andunder disarm status, then EnterEnterEnter кш)Delay alarmSettingsSys disarmedФ123123ExitEnterFig 4: input delay alarm time (2numbers), press Enter to saveor ESC to quitDelay alarmInput Please:Siren sound for Arm/Disarm setting diagramsFig 1: input program passwordFig 2: choose Setting menu, thenFig 3: choose siren sound for arm/under disarm status, then EnterEnterdisarm selection, press Enter toEnable or Disable ЫШ]SettingsSys disarmedФEnable123123ExitEnterExitAlarming Siren setting diagramsFig 1: input program passwordFig 2: choose Setting menu, thenunder disarm status, then EnterEnter ЫШ]Sys disarmed123123Fig 3: choose alarming sirenselection, press Enter to Enableor DisableSettingsRemote siren EnableExit ШУУ У 7 Ma
System SettingsSiren Ring Time setting diagramsFig 1: input program passwordFig 2: choose Setting menu, thenFig 3: choose ring time selection,under disarm status, then EnterEnterthen Enter ][aeSys disarmedФ01123123ExitEnterFig 4: input 01-12 ring time number,press Enter to save or ESC to quitInput please:Alarm Record checking diagramsFig 1: input program passwordFig 2: choose Setting menu, thenFig 3: choose alarm record selection,under disarm status, then EnterEnterthen EnterEШШSys disarmedФ123123Fig 4: checking latest alarm recordAlarm record 012опе:0002/05/2014ExitSettings16:43Enter00
System SettingsSiren Ring Time setting diagramsFig 1: input program passwordSm)under disarm status, then EnterFig 2: choose Setting menu, thenFig 3: choose language selection,Enterpress Enter to choose[ smsSys disarmedФdox123123Back to factory setting diagramsFig 1: input program passwordunder disarm status, then EnterFig 2: choose Setting menu, thenEnterFactory settingSettingsшщ Fig 3: choose back to factoryselection, then EnterSys disarmedФE123123ExitEnterExitEnterFig 4: wait for system back tofactory settingFactory settingOperation password: defaulted 123456 (6 numbers)Program password:defaulted 123123 (6 numbers)User ID: defaulted 0000 (from 0000-9999)Delay Arm: defaulted 00s (from 00-99 second)Delay Alarm: defaulted 60s (from 00-99 second)Ring time: defaulted 01 (from 01-12)Siren for Arm/disarm: defaulted EnableSiren for Alarm:defaulted EnableAlarm record: preserve latest 30 records (content: zone number, dateand time)Language version:English/Chineseшланг;
Operation InstructionsAfter reset to factory setting, some parameters as follows:Remote control: clearedCalled numbers:clearedOperation password:Program password:123456123123User ID: 0000Delay arm: 005Delay alarm: 60sTiming disarm:DisabledTiming arm: DisabledRing time: 01Siren for Arm/disarm:Siren for Alarm:Language:EnabledEnabledEnglishSystem status: DisarmedWireless control address:1111, defaulted OFFZoneArmHome arm DisarmSiren Delay01effectiveeffective e1minute ineffective98,99effectiveineffective ineffective1minute ineffectiveineffectiveIV. Operation Instructions1.Away ArmAway Arm refers to nobody at home, all sensors and detectors underworking status. Any causes (theft, intrusion, fire, gas leak, etc.) willtrigger sensors and the alarm system will start alarm.Press ARM on the alarm panel, system will voice prompt System Armafter delay time and buzzer sound. And you can also press the ӨayУ Р ДЕ
Operation Instructionson remote control to Arm the system.2.Home ArmHome Arm refers to somebody stay at home, need part of sensors anddetectors(Door, window,balconyetc) underworkingstatus,whilesome part of sensor (hall, room) do not working.Press STAY on the alarm panel, system will enter Homearm statusimmediately.And you can also press the «ї» оп remote control to Home Arm thesystem.3.DisarmDisarm refers to stop system alarming, or set the system into disarmedstatus, sensorsand detectors triggered will not start alarm(24-hourzone and Emergency alarm excepted) .Input Operation Password and press ENTER.And you can also press the & on remotecontrol to Home Arm thesystem.4.Emergency aidUnder some emergent situations ( sudden illness of the seniors or kids,catch fire, robbery etc), press SOS button on system keypad or remotecontrol / wireless panic button, system will start alarm and dial thepreset phone numbers.5.Emergency callingUnderemergency,input phonenumberandpressCALLbuttononsystem keypad, system will dial this phone number to make an alarm.6.Alarm receiving and handlingWhen alarm happens, system will dial the preset phone numbers andsound siren, if no one answers the call or line is busy, system will dialnext number.System will rotationally dial each preset numbers for 3ml-—У Р a
Operation Instructionstimes, after pick-up and get through the calling, system will broadcastthe recorded voice for 3 times, within each interval there will be 5second time for user to operate. If user get through the calling andarm/disarmit, system will end current alarming. System will hang upthe calling automatically at 60 secondif user do not hang up it, thencan carry out following operations over the phone keypad:Input 1#--ArmInput 2#--DisarmInput 3# -- Listen-in (30 second, press 3# again to start anotherlistening-in period if needed)Input *#--hang up7.Remote controlUser can dial the systemphone number,system will get it through,then input operation password (defaulted 123456) and press ENTER,after 60 second system will hang up the calling automatically, then usercan carry out following operations over the phone keypad:Input 1#--ArmInput 2#--DisarmInput 3#-- Listen-in (30 second,press 3# again to start anotherlistening-in period if needed)Input *#--hang up8.CMS connectionSystem support CMSuploading function after user set center phonenumber and user ID, system will call center phone number first whenalarm happens, and upload alarm event to CMS.Note: Please do not set the center phone number if you don't need thealarm system work with CMS,or it will lengthen alarming time whenalarm happens.ÉNУ Р дн
7Technical ParametersАГCID uploading functions and code : Zone numberAlarm informationCID code 00System arm3400 000097System disarmedMedicalTamper1400 1100 113798,99Polling loop open 114101-96General Alarm 1140V. Technical ParametersPower Supply: DC12V/500mAStatic Current: 50mAAlarm Current: 450mAOutput Current: DC12V 150mAWireless frequency: 433MHz 0.5MHzSiren volume: 110dbBackup battery:7.4V Lithium batteryWorking Temperature: 5 C 45 CHumidity: 90%МІ. Package ComponentsSystem panel1 pc,Remote control2 pcs,Siren1 pc,Radio PIR sensor1 pc,Radio Door sensor1 pc,Power adapter1 pc,Telephone wire1 pc,User manual1 pc,ÉNУ Р ДЕ
Maintenance CareVII. Maintenance CareCorrect usage and regular maintenance will make alarm system workswell and stable.System inspection and test periodically (every three months) is highlyrecommended.System main panel (every three months):1. Whether it can arm/disarm normally;2. Whether it can dial out phone numbers normally;3. Whether it can receive wireless signal normally from sensors;4. Whether the back-up battery can work normally.Sensors & detectors (every month):1. Trigger wireless detectors to see if system can alarm normally;2.Check all detectors' battery;3.Check whether wireless detectors can send signal to systemnormally.
Extra AccessoriesThe following sensors are optional:iSignal boosteriireless K Keypat аWirelSolarPowerFlash Siren4f Door SensorўE]Panic Button1RemoteівSy3-Smoke Detector-Gas DetectorPIR DetectorOptional sensors/detectors are packed separately. You can chooseaccording to your specific requirements.Typical house configurationСеExternal Sirens3[3оРІК МометепіiNNWRMp\агар ÉNxWireless Door / WindowoGap DetectorRemote ControlУ Р дн
PHONE CALLV3.0-EN 2014.06.12PSTN Alarm System
зх History record: system will record latest 30 alarming history for checking. x Alarm priority: alarming call is prior to normal call even when the phone is busy. * Phone line cut alert: system will start alarm if PSTN telephone line cut off. yx Number checking: if no alarm number exists, system screen will remind when alarm happens.