Transcription
A5 bk0.book Page 1 Thursday, February 10, 2011 8:34 PMDell PowerEdgeRAID Controller (PERC) S100,PERC S300User’s Guide
A5 bk0.book Page 2 Thursday, February 10, 2011 8:34 PMNotes, Cautions, and WarningsNOTE: A NOTE indicates important information that helps you make better use ofyour computer.CAUTION: A CAUTION indicates potential damage to hardware or loss of data ifinstructions are not followed.WARNING: A WARNING indicates a potential for property damage, personalinjury, or death.Information in this publication is subject to change without notice. 2008—2011 Dell Inc. All rights reserved.Reproduction of these materials in any manner whatsoever without the written permission of Dell Inc.is strictly forbidden.Trademarks used in this text: Dell , the DELL logo, PowerEdge , and OpenManage aretrademarks of Dell Inc. Intel is a registered trademark of Intel Corporation in the U.S. and othercountries. AMD is a registered trademark and AMD Opteron , AMD Phenom , and AMDSempron are trademarks of Advanced Micro Devices, Inc. Microsoft , Windows , and WindowsServer are either trademarks or registered trademarks of Microsoft Corporation in the United Statesand/or other countries.Other trademarks and trade names may be used in this publication to refer to either the entities claimingthe marks and names or their products. Dell Inc. disclaims any proprietary interest in trademarks andtrade names other than its own.Models: UCS61, UCS60February 2011Rev. A01
A5 bk0.book Page 3 Thursday, February 10, 2011 8:34 PMContents1WARNING: Safety Instructions .SAFETY: General .2. . . . . . . .7. . . . . . . . . . . . . . . . . . . . .8SAFETY: When Working Inside Your System. . . . . . .8Protecting Against Electrostatic Discharge. . . . . . .9Overview. . . . . . . . . . . . . . . . . . . . . . . . .Introduction. . . . . . . . . . . . . . . . . . . . . . .General Information, Intended Audience, andPrerequisites for Use . . . . . . . . . . . . .Related Documentation11. . . . . . . . . . . . . . . . .12. . . . . . .12. . . . . . . . . . . . . . . . . . . . . . .17RAID Terminology3Features . . . . . . . . . . . . . . . . . . . .18. . . . . . . . . . . . . . . . . . . . . . . . .21General Features .Specifications411. . . . .PERC S100 Adapter or PERC S300 AdapterDescriptions . . . . . . . . . . . . . . . .About RAID .11. . . . . . . . . . . . . . . . . . . .21. . . . . . . . . . . . . . . . . . . . . .29Hardware InstallationBefore You Begin. . . . . . . . . . . . . . .31. . . . . . . . . . . . . . . . . . . .31Contents3
A5 bk0.book Page 4 Thursday, February 10, 2011 8:34 PMGeneral Considerations. . . . . . . . . . . . . . . . .Installing the PERC S300 Adapter. . . . . . . . . . . .Connect Physical Disks to the PERC S300 AdapterComplete the Hardware Installation5Installing the Drivers .35. . . . . . . . . .35. . . . . . . . . . . . . .RAID Configuration andManagement . . . . . . . . .Troubleshooting .37. . . . . . . . . . . . .47. . . . . . . . . . . . . . . .Warning Messages: Dell Inc. PERC S100Adapter or Dell Inc. PERC S300 AdapterBIOS Screen . . . . . . . . . . . . . . .Virtual Disk-Related ErrorsAppendix A .Controller Tasks. . . . . . . . . . . . . . .70. . . . . . . . . . . . . .757777. . . . . . . . . . . . . . . . . . . . .78Virtual Disk TasksContents61. . . . . . . . . . . . . . . .Physical Disk Tasks46164. . . . . . . . . . . . . . . . . . . . . .Controller Specifications47. . . . . . . .Physical Disk-Related Errors8. . . . . . . . . . . . . . . . . . . . . . .System Startup Problems37. . . . . . .Configuring the Controller: Using the PERCVirtual Disk Management Utility . . . . . .732. . .Installing the Microsoft Windows Drivers631. . . . . . . . . . . . . . . . . . .78. . . . . . . . . . . . . . . . . . . .79
A5 bk0.book Page 5 Thursday, February 10, 2011 8:34 PMSupported RAID LevelsVirtual Disk Specifications9Appendix B. . . . . . . . . . . . . . .80. . . . . . . . . . . . . . . . . . . . . . .81RAID Technology - Understanding Disk Arraysand Virtual Disks . . . . . . . . . . . . . . . . .10 Appendix C. . . .81. . . . . . . . . . . . . . . . . . . . . . .89Regulatory Notices90. . . . . . . . . . . . . . . . .Industry Canada Notice (Canada Only). . . . . . . . .92. . . . . . . . . . . . . .92. . . . . . . . . . . . . . . . . . . . .94. . . . . . . . . . . . . . . . . . . . . . .95CE Notice (European Union) .CE Mark NoticeContacting DellIndex89. . . . . . . . . . . . . . . . . . .FCC Notice (U.S. Only) .11 Appendix D79. . . . . . . . . . . . . . . . . . . . . . . . . . . . . . . . . . . . .95. . . . . . . . . . . . . . . . . . . . . . . . . . . . . . .97Glossary. . . . . . . . . . . . . . . . . . . . . . . . . . . .103Contents5
A5 bk0.book Page 6 Thursday, February 10, 2011 8:34 PM6Contents
A5 bk0.book Page 7 Thursday, February 10, 2011 8:34 PM1WARNING: Safety InstructionsUse the following safety guidelines to help ensure your own personal safetyand to help protect your system and working environment from potentialdamage.WARNING: Do not expose the Dell PowerEdge Expandable RAID Controller(PERC) S300 adapter to liquids. To reduce risk of fire hazard, do not cover orobstruct the ventilation openings of the system in which it is installed. Do notinstall the controller in a zero-clearance compartment. This could result inoverheating.WARNING: Do not operate the controller if it has been dropped or damaged inany way.WARNING: The controller, like every other electronic part of a system, can bedamaged by static electricity. Be sure that you are properly grounded. It isrecommended that you wear a grounded antistatic strap and that the system isunplugged before you install the controller.CAUTION: Cable connectors must be mated carefully with the connectors on thePERC S300 adapter. The connectors are keyed to prevent them from being insertedincorrectly.CAUTION: Ensure that the current RAID controller (if any) is not currently workingon any pending tasks (such as a rebuild) before it is turned off to conduct a systemupgrade.CAUTION: During a firmware update, do not reboot the system that contains thePERC S300 adaper. An update might take up to five minutes per controller.WARNING: Safety Instructions7
A5 bk0.book Page 8 Thursday, February 10, 2011 8:34 PMSAFETY: GeneralObserve and follow service markings: Do not service any product except as explained in the user documentation.Opening or removing covers that are marked with a triangular symbol witha lightning bolt might expose you to electrical shock. Components insidethese compartments must be serviced only by a trained service technician. Use the product only with Dell-approved equipment. Operate the product only from the type of external power source indicatedon the electrical ratings label. If you are not sure of the type of powersource required, consult your service provider or local power company.SAFETY: When Working Inside Your SystemBefore you remove the system covers, perform the following steps in thesequence indicated.WARNING: Only trained service technicians are authorized by Dell to removecovers from the system, and access any of the internal components, unless theDell documentation expressly states otherwise.CAUTION: To help avoid possible damage to the system board, wait five secondsafter turning off the system before disconnecting the controller.1 Turn off the system and any devices.2 Wear grounding straps that are properly grounded before touchinganything inside the system.3 While you work, periodically touch an unpainted metal surface on thechassis to dissipate any static electricity that might harm internalcomponents.4 Disconnect your system and devices from their power sources. To reducethe potential of personal injury or shock, disconnect anytelecommunication lines from the system.8WARNING: Safety Instructions
A5 bk0.book Page 9 Thursday, February 10, 2011 8:34 PMIn addition, take note of these safety guidelines when appropriate: When you disconnect any cable, pull on its connector or on its strain-reliefloop, not on the cable itself. Some cables have a connector with lockingtabs. If you are disconnecting this type of cable, press in on the lockingtabs before disconnecting the cable. As you pull connectors apart, keepthem evenly aligned to avoid bending any connector pins. Also, before youconnect a cable, make sure that both connectors are correctly oriented andaligned. Handle the controller with care. Do not touch the components or contactson the controller.Protecting Against Electrostatic DischargeElectrostatic discharge (ESD) events can harm electronic components insideyour system. ESD, or electrostatic discharge, is the process by which staticelectricity can build up within a person or an object, and then discharge intoanother object. ESD events can harm your PERC S300 adaper, your system,and other electrical components. To prevent ESD damage, you mustdischarge static electricity from your body before you interact with any of thesystem’s internal electronic components. You can protect against ESD bytouching a metal grounded object (such as an unpainted metal surface onyour system’s I/O panel) before you interact with anything electronic. Inaddition, as you work inside the system, periodically touch an I/O connectorto remove any static charge your body might have accumulated.You can also take the following steps to prevent damage from electrostaticdischarge: When unpacking the controller from its shipping carton, do not removethe controller from the antistatic packing material until you are ready toinstall it. Just before unwrapping the antistatic package, be sure todischarge static electricity from your body. Handle all electrostatic sensitive components in a static-safe area. Ifpossible, use anti-static floor pads and work bench pads.WARNING: Safety Instructions9
A5 bk0.book Page 10 Thursday, February 10, 2011 8:34 PM10WARNING: Safety Instructions
A5 bk0.book Page 11 Thursday, February 10, 2011 8:34 PM2OverviewIntroductionThe Dell PowerEdge RAID Controller (PERC) S300 provides an integratedsoftware RAID solution for Dell PowerEdge Value Servers. The PERC S300controllers support SAS and SATA interfaces. Containing two internalconnectors with four ports each, the PERC S300 adapter featureseight ports for connecting drives with a maximum burst speed of up to3 Gbps per port.The PERC S100 adaper is targeted as a low-cost RAID solution for DellPowerEdge Value Servers. The PERC S100 adapter solution supports SATAHard Disk Drives (HDD) and Solid State Disk (SSD) drives. The PERC S100adapter requires no additional hardware; it runs from the I/O Controller HUB(ICH) or Platform Controller Hub (PCH) chipset on the platformmotherboard.The PERC S100 adapter and PERC S300 adapter offer the same RAID levelsupport and functionality, including the support of up to eight physicaldrives.General Information, Intended Audience, andPrerequisites for UseThis document provides information about: The PERC S100 adapter and PERC S300 adapter, including server,operating system, and software support Controller configuration and startup procedures Controller operating modesOverview11
A5 bk0.book Page 12 Thursday, February 10, 2011 8:34 PMThis document is intended for use by system administrators and technicianswho are familiar with the storage system installation and configuration.Prerequisites for configuring and using the controller include familiarity with: Servers and computer networks RAID technology Storage-interface technology, such as SAS and SATARelated DocumentationFor more information about the PERC S100 adapter or PERC S300 adapterand its relationship to the Dell OpenManage Server Administrator StorageManagement documentation, see the Storage Management documentationavailable on the Dell Support website at support.dell.com/manuals.PERC S100 Adapter or PERC S300 AdapterDescriptionsThe following list describes each type of controller:12 The PERC S300 Adapter has two internal connectors with x4 SAS ports. The PERC S300 Modular has two internal connectors with x4 SAS ports. The PERC S100 adapter runs on the ICH or PCH chipset on the platformmotherboard.Overview
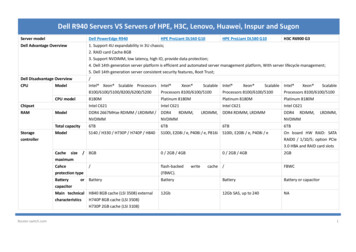
A5 bk0.book Page 13 Thursday, February 10, 2011 8:34 PMSupported PlatformsTable 2-1. Dell Systems and Support Matrix for the PERC S100 Adapter andPERC S300 AdapterPowerEdge ServerPERC Controller, with Chipset and Adapter Support per PlatformPowerEdge R210PERC S100 adapter – Intel Ibex Peak chipsetsPERC S300 adapter – Dell 3Gb/s SAS AdapterPowerEdge R210 IIPERC S100 adapter – Intel Cougar Point chipsetsPERC S300 adapter – Dell 3Gb/s SAS AdapterPowerEdge R310PERC S100 adapter – Intel Ibex Peak chipsetsPERC S300 adapter – Dell 3Gb/s SAS ModularPowerEdge R410PERC S100 adapter – Intel ICH10R chipsetsPERC S300 adapter – Dell 3Gb/s SAS ModularPowerEdge R415PERC S300 adapter – Dell 3Gb/s SAS Modular,AMD SP5100 South Bridge chipsetsPowerEdge R510PERC S100 adapter – Intel ICH10R chipsets,PERC S300 adapter – Dell 3Gb/s SAS AdapterPowerEdge R515PERC S300 adapter – Dell 3Gb/s SAS Adapter,AMD SP5100 South Bridge chipsetsPowerEdge T110PERC S100 adapter – Intel Ibex Peak chipsetsPERC S300 adapter – Dell 3Gb/s SAS AdapterPowerEdge T110 IIPERC S100 adapter – Intel Cougar Point chipsetsPERC S300 adapter – Dell 3Gb/s SAS AdapterPowerEdge T310PERC S100 adapter – Intel Ibex Peak chipsetsPERC S300 adapter – Dell 3Gb/s SAS AdapterPowerEdge T410PERC S100 adapter – Intel ICH10R chipsetsPERC S300 adapter – Dell 3Gb/s SAS AdapterOverview13
A5 bk0.book Page 14 Thursday, February 10, 2011 8:34 PMPlatform Requirements for the PERC S100 Controller and PERC S300ControllerTable 2-2. Platform Requirements — PERC S100 Controller or PERC S300 ControllerComponent RequirementsProcessorx86, 32-bit compatible processor greater than 500 MHz.Memory512 MB or greater.PhysicaldiskAt least one Hard Disk Drives (HDD) or Solid State Disk (SSD) Drives.NOTE: The PERC S100 controller supports cabled configurations of up to4 SATA HDD or 4 SA
PowerEdge Server PERC Controller, with Chipset and Adapter Support per Platform PowerEdge R210 PERC S100 adapter – Intel Ibex Peak chipsets PERC S300 adapter – Dell 3Gb/s SAS Adapter PowerEdge R210 II PERC S100 adapter – Intel Cougar Point chipsets PERC S300 adapter –