Transcription
Create Expense Report – Travel ReimbursementsCreate Expense Report – Travel ReimbursementsThe Create Expense Report task in Workday is used to reimburse an employee for out- of-pocket expenses,and/or reconcile an employee’s Travel Card charges for any business-related expenses incurred for businesstravel.For more detailed information on FGCU Travel Policy and Procedures, refer to the following webpages: Section 10: Travel Procurement Services: Travel Website*NOTE: Create Expense Report is used AFTER the trip/expense has been incurred. A Spend AuthorizationRequest must be created and APPROVED prior to travel and before you create an Expense Report for tripexpenditures. See the Create Spend Authorization Job Aid for details.Creating an Expense Report: Create an Expense Report no later than 10 days from the date you return from travel Multiple Expense Reports may be submitted for one Spend Authorization (Example: Vicinity Mileage or aTravel Card expense is in dispute).*NOTE: Do not click “Final Expense Report for Spend Authorization” (See #2 below) if multiple Expense Reportsare needed.Supporting documentation required: Receipts for expenses incurred (Hotel, Car, Airline, etc) Agenda Round trip map for mileage Justification form (if needed)*NOTE: All attachments must be legible and in pdf format.CREATE EXPENSE REPORT FOR TRAVEL REIMBURSEMENT1. On the Workday Home Page, enter “Create Expense Report” in the Search field and select the Task from thesearch results; OR from the Home Page Applications, click the Expenses Worklet, and select the CreateExpense Report option under Actions.Updated June 2021Page 1 of 13
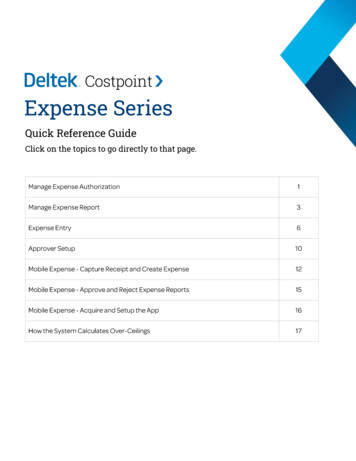
Create Expense Report – Travel Reimbursements2. On the Create Expense Report screen, review Instructions as appropriate. From Create Options, select CreateNew Expense Report from Spend Authorization. Click the Menu icon and select the Spend Authorizationassociated with the travel expense.*NOTE: This allows you to create a new Expense Report based on an APPROVED SpendAuthorization Request. Refer to the Create Spend Authorization Request Job Aid for moreinformation on creating a Spend Authorization.3. If this is the final expense submission for the Spend Authorization, click Final Expense Report for SpendAuthorization.*NOTE: If an additional Expense Report is needed, DO NOT CLICK “Final ExpenseReport ”; selecting Final Expense Report for Spend Authorization will close out theassociated Spend Authorization.4. Complete the following fields: Company: Defaults to FGCU Florida Gulf Coast University Expense Report Date: Auto-populates with current date Business Purpose: Auto-populates with Business Purpose indicated in Spend Authorization Travel Designation: Click the menu and select Travel Designation; select theappropriate designationfrom the options displayed.Updated June 2021Page 2 of 13
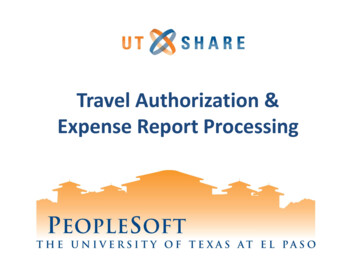
Create Expense Report – Travel Reimbursements Activity: Identifies which Cost Center, Fund, and Program will pay for theitem/service; auto-populates from Spend Authorization Cost Center: Identifies the Cost Center that will pay for the item/service. Thisfielddefaults to the employee’s Cost Center (Department) based on the Activity Additional Worktags: Identifies Fund and Program the item/service is charged to.Thisfield defaults to the Worktags associated with the employee’s Activity.5. Scroll down and select Credit Card Transactions (T-Card) related to the SpendAuthorization that are to beadded to the Expense Report; click OKUpdated June 2021Page 3 of 13
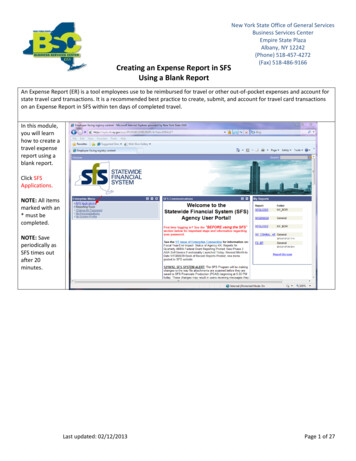
Create Expense Report – Travel Reimbursements6. The next screen defaults to the Expense Lines tab. If credit card transactions wereselected, they will display. To add additional expense lines, click Add.If no credit card transactions were selected, the screen will default to the Expense Lines; click Add.7. Complete the following fields for Expense Lines: *NOTE: Create a separate line for each individual Expense. Ifcredit card transactions were selected, they will automatically displayas individual expense lines; click eachexpense line.a. Date: Defaults to current date. Enter the date of the expense. (Credit CardTransactions will autopopulate with the transaction date)b. Expense Item: Select the classification of the expense (anything travel-related such as airfare, meals,hotel, etc.).Updated June 2021Page 4 of 13
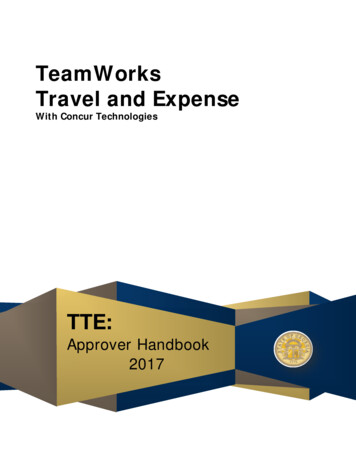
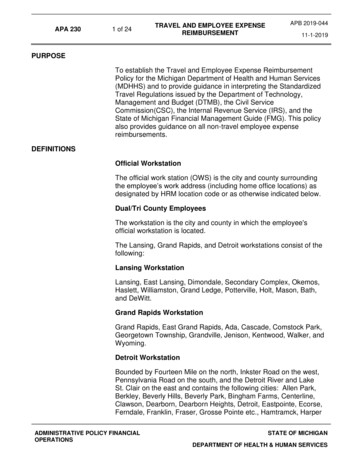
Create Expense Report – Travel Reimbursements*NOTE: When entering Airfare, airline name and ticket number are required. (Thisinformation may autopopulate from the Credit Card transaction Total Amount: Total amount of expense for the item. (Credit Card Transactions will auto-populatewith transaction amount)Memo: For Hotel/Lodging Expense, place the Hotel name in the memo field; otherwise, enter a briefdescription of the Expense.Click Select Files to upload receipts or other supporting documentation. *NOTE: If attaching areceipt for the Expense item, select the Receipt Included checkbox under ItemizationItemization: Required only when there are personal expenses included in areceipt paid with the TCard.*NOTE: The Expense Report may be saved for later, but if it is closed, the Credit Card transactions willno longer be available to auto-populate when you return to complete the Expense Report. (If there arecredit card transactions to be added, enter them by clicking the Add button and selecting “Credit CardTransactions”)Credit Card Transaction Example:An error message will remain until supporting document(s) has/have been uploaded and ReceiptIncluded box has been checked.Hotel/Lodging Example:Updated June 2021Page 5 of 13
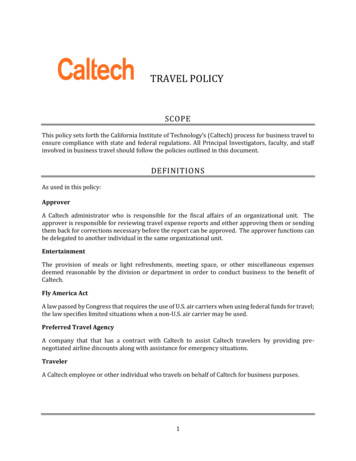
Create Expense Report – Travel ReimbursementsMeal Allowance (Per Diem) Example:When Meal Allowance (Per Diem) or Meal Allowance with Last Day Per Diem is selected as the ExpenseItem, Item Details must be included as follows: Departure Date, DepartureTime, Arrival Date, Arrival Time.Completion of these fields generates an auto- populated Travel Journal. To open additional fields, clickView Details.* NOTE: When entering meal allowance/per diem, the start/end date and departure/returntimes are criticalto accurately calculate the allowanceUpdated June 2021Page 6 of 13
Create Expense Report – Travel ReimbursementsFor each day of travel listed, indicate which meals, if any, were provided by selecting the appropriatecheckbox (Breakfast, Lunch, Dinner). Repeat this process for each day listed on the Expense Report(scroll downto access each day); when completed, click DoneUpdated June 2021Page 7 of 13
Create Expense Report – Travel Reimbursements8. For expenses that include both business and personal items or those that will be funded by multipleactivities/cost centers, utilize the Itemization section located to the right of the Expense Line section;this is the only time itemization is necessary.Updated June 2021Page 8 of 13
Create Expense Report – Travel Reimbursements9. Attach any documents relevant to the expense item in the Attachments section for each expense line. If theattachment includes a receipt, click the Receipt Included check box.Updated June 2021Page 9 of 13
Create Expense Report – Travel Reimbursements10. If there are additional expense items, repeat steps 5-8. Once all expense items are entered, click Submit.*NOTE: If you select Save for Later, you can access the saved version of the Expense Report fromyour Workday Inbox Archive folder. If the Close option is selected, it will cancel out the processentirely11. Once submitted, the Expense Report will be routed to your immediate supervisor for review, then to theExpense Partner for approval. It is then routed to the Cost Center Manager and Accounts PayableManager to be paid.VIEW AN EXISTING EXPENSE REPORT1. On the Workday Home Page, enter “My Expense Reports” in the Search field; select theappropriate Report from the results displayed, OR select the Expense Worklet in the Applicationscard, and under the View tab select Expense Reports.Updated June 2021Page 10 of 13
Create Expense Report – Travel ReimbursementsEDIT AN EXISTING EXPENSE REPORT1. On the Workday Home Page, enter “My Expense Reports” in the Search field and select the Report.2. Filter the results if necessary and/or click OK.3. Locate the appropriate Expense Report and select Change Expense Report.*NOTE: When an Expense Report is changed, it is routed through all approvals again. Oncean Expense Report is approved, it cannot be edited.VICINITY MILEAGEWhen submitting an Expense Report for Vicinity Mileage: Do not mark the Expense Report as ‘Final’ until the end of the Fiscal Year or you have reached your SpendAuthorization Total. Each travel day is a separate Expense Line Roundtrip map mileage is attached to each Expense Line as a PDFUpdated June 2021Page 11 of 13
Create Expense Report – Travel ReimbursementsUpdated June 2021Page 12 of 13
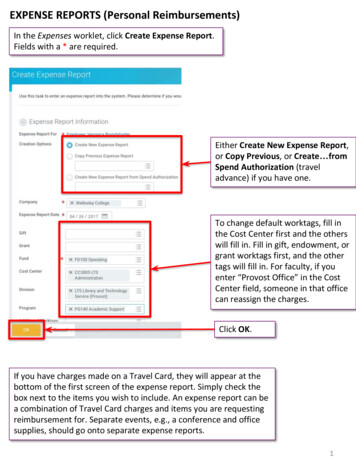
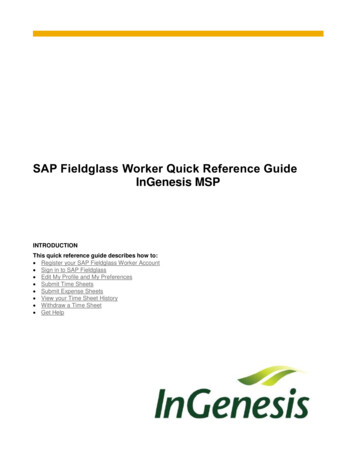
Create Expense Report – Travel ReimbursementsNON-EMPLOYEE TRAVEL PROCESS FLOWT-Card Utilized?No - Employeeresponsible for this travelcompletes TARYes - SpendAuthorizationPerson TravelsPerson TravelsA Travel ReimbursementRequest submittedExpense Report Event toreconcile T-CardA Travel ReimbursementRequest submitted-Spend AuthorizationNumber & ExpenseReport Number must bereferencedUpdated June 2021Page 13 of 13
Create Expense Report - Travel Reimbursements Updated June 2021 Page 3 of 13 Activity: Identifies which Cost Center, Fund, and Program will pay for the item/service; auto-populates from Spend Authorization CostCenter: Identifies theCenter that will pay for item/service. Thisfield defaults to the employee's Cost Center (Department) based on the Activity