Transcription
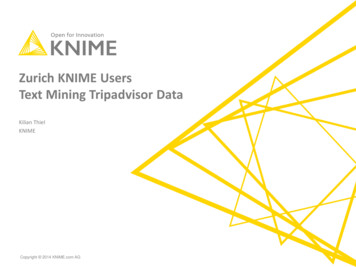
ossimPlanet OSX documentationossimPlanet UsersManualAn accurate 3D Global Visualization SystemVersion 0.8 15 Aug 2007OverviewossimPlanet is an accurate 3D global geo-spatial viewer that is build on top ofthe OSSIM, OpenSceneGraph, and Trolltech QT open source software libraries. It provides native geo-spatial access to a wide range of commercialand government data formats with high the high performance visualizationand collaboration capabilities. ossimPlanet is one of the key components ofthe Large Data Joint Capabilities and Technology Development project. Thisdocument describes the installation and use of ossimPlanet.ossimPlanet provides accurate 3D global visualization and collaboration. Instances of ossimPlanetcan be synchronized for distributed collaboration. Native file access, on the fly elevation tree topography, and online access to OGC WMS and Worldwind sites is provided.RequirementsossimPlanet currently requires a 3 button mouse for navigation.ossimPlanet DocumentationPage 1
ossimPlanet OSX documentationMac OS 10.4 or later is required. ossimPlanet is a universal binary that runs natively on both PowerPC and Intel-based Macs. The installer provides all of the required frameworks and dependencies.Installing ossimPlanetBinary installers are available for various platform including MacOSX, Windows, and Linux. Doubleclick on the Installer package and follow the instructions. The binary installer contains all of thedependencies need to run the program. It installs three double clickable applications in/Applications/ossim. Frameworks and supporting files are installed in appropriate system locations /Library/Frameworks and /Library/Applications Support/ossim. Additionally, several command lineutilities are installed in /usr/local/bin. Under Linux the root directory is .ossim instead of /Library/Applications Support .Supported Data SetsOSSIM Geo-Spatial FormatsGDAL Geo-Spatial FormatsOGC WMS InterfaceWorldWind ServersPixia NUI formatkml/kmz filesPrecision Lightworks UrbanModelsOperating ossimPlanetRunning ossimPlanetossimPlanet is installed as a double clickable application in the Applications folder in an ossim subfolder. Navigate to /Applications/ossim/ossimPlanet and double click the ossimPlanet icon to startthe program.ossimPlanet DocumentationPage 2
ossimPlanet OSX documentationStarting ossimPlanet from the FinderossimPlanet startupIf the program is properly installed, a display similar to the one shown above will appear after doubleclicking the ossimPlanet icon in the Applications/ossim directory. The ossimPlanet splash screen isinitially displayed. Click on the splash screen to dismiss it after the program has started up.ossimPlanet DocumentationPage 3
ossimPlanet OSX documentationgetting some dataSome sample data sets are available at http://ossim.telascience.org/ossimdata . ossimPlanet can alsofetch data from OGC WMS servers or NASA Worldwind servers. If you installed with the binaryinstaller a copy of earth.xml has been installed in /Library/Applications Support/ossim/files/WorldWind - alternatively you can download the same file from the link above and the Data directory. Drag and drop this xml file into the legend area of the planet to trigger the setup for multipleWorldWind layers. By default all of the layers are enabled, you will want to deselect and view thelayers one at a time to fetch and load various imagery and map layers from the remote server. Youwill need internet access for this to work.Improved Blue Marble Next Generation backdrops are available athttp://telascience.sdsc.edu/tela data/BM/These larger data sets can replace the earth backdrops in the ossim preferences folder. /Library/Applications Support/ossim/images/reference/Global elevation and bathymetry is available in the general raster format load the srtmplus.tar.gz file, uncompress and install in /Library/Applications Support/ossim/elevation/general raster/ossimPlanet DocumentationPage 4
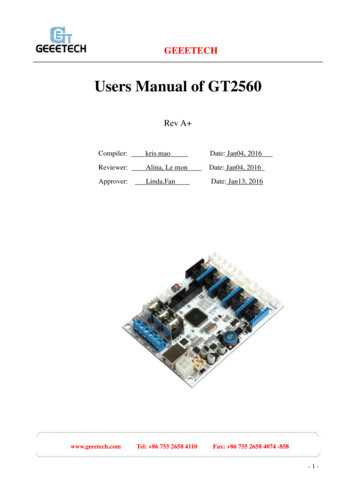
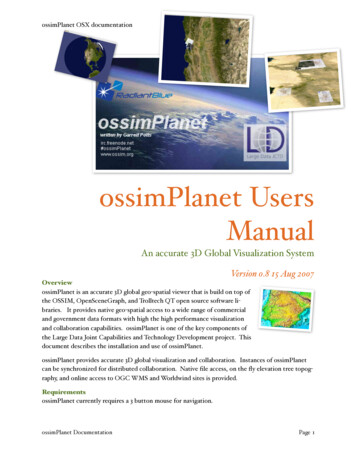
ossimPlanet OSX documentationSRTMPlus general raster elevation with the enhanced Blue Marble Next Generation backdrops available fordownload. Elevation is exa"erated in this example.ossimPlanet DocumentationPage 5
ossimPlanet OSX documentationNavigatingThe current version requires an external 3 button mouse for three dimensional navigation of theplanet.Note: You will want to disable dashboard activation on mouse clicks from the SystemsPreferences Dialog. Under the Apple menu, select the Dashboard and Expose dialog tochange the default settings. Make sure the Dashboard isn’t invoked on mouse clicks asit will intercept navigation controls to ossimPlanet. Also set the mousebutton mapping inthe mouse control to a standard 3 mouse button configuration.EventActionLeft mouse dragrotates the globeMiddle mouse dragRotate around center of interestRight mouse dragZoom in and out to center of interestShift Middle mouse dragMoves up and down (elevator mode)Shift Left mouse dragPivots around eye pointSpace BarResets view to default position‘w’ keyToggles between textured, wire frame, and point modes‘l’ key (lower case L)Toggles directed light source (currently disabled)Apple fToggles full screen modeApple ,Brings up preferences panelArrow keysStarts constant rotation (accumulates with additional keypresses)Return KeyFreezes all motionossimPlanet DocumentationPage 6
ossimPlanet OSX documentationMenus and Menu ItemsThis section describes each of the menus and menu items in ossimPlanet.ossimPlanetUnder the ossimplanet menu the following items are available:About ossimplanetThe About box will display the current version and build date.ossimPlanet DocumentationPage 7
ossimPlanet OSX documentationPreferencesThe preferences modal dialog allows the user to enable various features of ossimPlanet. The preferences has multiple tabs at the top to select the available views.General tab displays the following options:Enable HUD Enables the Heads Up Display (HUD) for ossimPlanet. The HUD includes the cross hairs at thecenter of the image and the latitude, longitude, elevation, and height readout at the bottom lefthand corner of the display.Enable elevationTurns on or off elevation processing for topographic relief and visualization in ossimPlanet. Elevation processing requires that elevation data sets be staged through the Application Support directory for ossim. DTED and SRTM file structures for elevation can be automatically parsed and retrieved by the software. See the section on staging supporting data sets in this document for setupdetails.Auto Highlight Layers Based on Line of Site IntersectionEnabling this option will show which data sets are intersecting with the cross hairs in the center ofthe screen. Intersected layers will be highlighted in the layer legend to the left of the globe.Elevation MultiplierA pull down menu applies an elevation scaling factor. The higher the number, the more exaggeratedthe topography. The value is persistent and will be automatically saved.ossimPlanet DocumentationPage 8
ossimPlanet OSX documentationSync TabAuto View Sync - this checkbox enables automatic transmission of navigation commands. Whenselected the position of the view will be automatically transmitted when it changes through thenavigation ports in the Broadcast panel. The frequency of this transmission can be adjusted in thefield shown on the right. If Auto View Sync is deselected it will only transmit navigation if the usersends a specific go to command. This controls all Broadcast navigation channels that are enabled.ossimPlanet DocumentationPage 9
ossimPlanet OSX documentationListener TabThe Listener allows the user to open up ports for remote control and messages. ossimPlanet willlisten on these channels for commands and respond accordingly. The plus and minus buttons at thebottom of the panel will add or remove channels. Data in this dialog is persistent - it will be automatically stored and retrieved in future ossimPlanet runs.The simplest use is to sync up the navigation of multiple planets - the broadcast channel will transmit position information to the IP address ossimPlanet application listening on the same channel.Name - a user defined name for the listening channel. Only used to help the user identify the channel.Port - this is the communication port where the computer is listening for messages. It must be thesame value as the port identified in the remote transmitting computer. It will be necessary for theport to be open (not blocked by a firewall) for communications to occur.Type - A pull down menu to select the communication type:Navigation - listens for navigation commands (udp protocol)Data - listens for data transmissions (tcp protocol)Enabled - this checkbox enables and disables listening on the communications channelossimPlanet DocumentationPage 10
ossimPlanet OSX documentationBroadcast TabThe broadcast tab reveals the set up for ossimPlanet command broadcasting. Position and orientation commands are transmitted to all listening ossimPlanets through these open channels.Channels can be added or removed in this dialog. The ( ) and ( - ) buttons add and delete broadcast channels in the dialog. The state of this dialog is persistent and automatically saved for futureuse.Name - a user defined name for the channel. It is used only to help the user identify what the channel is being used for.IP Address - this is the IP address of dns name of the remote machine you are sending to.Port - the port number to use for communications.Type - pull down menuNavigation - used for sending navigation commands (uses udp protocol)Data - used for sending data transmissions (tcp protocol)Enabled - Enables or disables the portossimPlanet DocumentationPage 11
ossimPlanet OSX documentationFile MenuThe file menu contains the menu items for loading imagery into ossimPlanet.Open ImageThe Open Image menu item is used to access and load geo-spatial data files into the planet. Mostcommercial and government geo-spatial data formats are supported. ossimPlanet also supports dragand drop capabilities from the operating system onto the layer panel. For a complete list of supported files refer to the ossim and GDAL project documentation.ossimPlanet DocumentationPage 12
ossimPlanet OSX documentationOpen WMSThe OGC Web Mapping Services interface is supported in ossimPlanet. The menu item will open adialog box for getting WMS access to online servers.ossimPlanet DocumentationPage 13
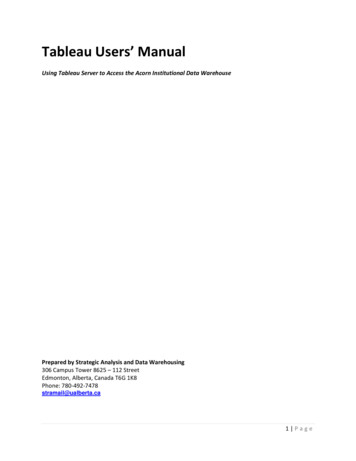
ossimPlanet OSX documentationDialog for setting up WMS servers and layers.This dialog helps the user construct OGC WMS (Web Mapping Services) requests for online dataretrieval. The default installation includes several WMS servers that can be selected from the popup menu. New servers will be added to the pop up menu for future selection.ConnectThis button will make a WMS GetCapabilities request to the server selected in the pop up. A GetCapabilities request determines what data layers and capabilities are available.ossimPlanet DocumentationPage 14
ossimPlanet OSX documentationossimPlanet DocumentationPage 15
ossimPlanet OSX documentationossimPlanet DocumentationPage 16
ossimPlanet OSX documentationNewThe New button will allow the user to enter a URL for a new OGC Web Mapping Server. ThatURL and name will be added to the popup list.ossimPlanet DocumentationPage 17
ossimPlanet OSX documentationNew or Edit buttons will provide this dialog for setting up WMS serversThis dialog is used for entering the parameters for a new OGC WMS web server. Support is is available for direct access or access through a proxy server.EditEdits the currently selected WMS server in the pop up list.ossimPlanet DocumentationPage 18
ossimPlanet OSX documentationDeleteDeletes the currently selected WMS server in the pop up list.Add default serversA list of default servers is distributed with the initial installation. Pressing the Add default serversbutton will add them to the pop up list.SyncPressing the sync button will transmit the setup information for the currently selected WMS serverthrough any enabled broadcast data channels.Sync AllPressing the Sync All button will transmit all of the available WMS server setups through any enabled broadcast data channels.Cache Dir:The Cache Dir: specifies the path where the retrieved data is to be stored on the local machine.Once image tiles are fetched from the internet they are stored locally in the cache directory. Beforeretrieving a new tile from the WMS server, ossimPlanet first checks to see if it is locally available inthe cache.ossimPlanet DocumentationPage 19
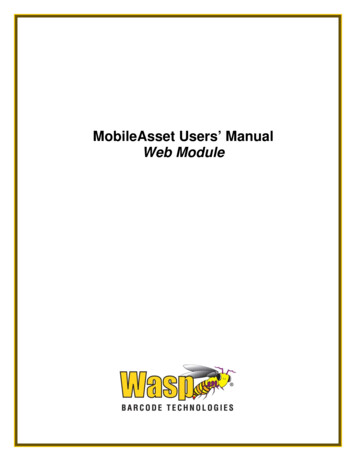
ossimPlanet OSX documentationImage encodingOptions for file format and image encoding will appear in this area after the server responds. Forexample, a server may provide pngs, jpgs, geotiffs as options.LayersWhen the connect button is pressed a WMS GetCapabilities request is made to the remote server.It will answer back with the layers and capabilities that can be provided. The following examplesshows the response from the NASA WMS server:Select the layers that you wish to work with. The Add button will add those layers to ossimPlanet.AddAfter selecting the layers that you wish to work with, press the Add button to add them to the Layers Legend in the left panel of the main window.CloseThis button closes the dialog.ossimPlanet DocumentationPage 20
ossimPlanet OSX documentationReturning to the main window the WMS layers will be displayed in their own category. Disclosetriangles can be opened to drill down into the selected layers. By default, added layers are not enabled. Enable the check box to make them active.WMS Layers need to be enabled with the checkboxossimPlanet DocumentationPage 21
ossimPlanet OSX documentationImage layers are also used to display associated meta data. Meta data tags are automatically parsedand displayed with their associated values in the legend area. Simply open the reveal triangles nextto the ima
Requirements ossimPlanet currently requires a 3 button mouse for navigation. ossimPlanet OSX documentation. ossimPlanet Documentation Page 1. Mac OS 10.4 or later is required. ossimPlanet is a universal binary that runs natively on both Pow- erPC and Intel-based Macs.