Transcription
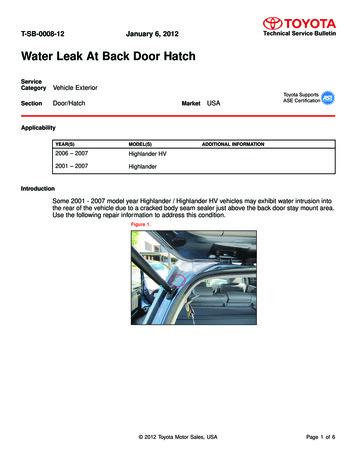
T-SB-0008-12January 6, 2012Water Leak At Back Door HatchServiceCategoryVehicle R(S)MODEL(S)2006 – 2007Highlander HV2001 – 2007HighlanderADDITIONAL INFORMATIONIntroductionSome 2001 - 2007 model year Highlander / Highlander HV vehicles may exhibit water intrusion intothe rear of the vehicle due to a cracked body seam sealer just above the back door stay mount area.Use the following repair information to address this condition.Figure 1. 2012 Toyota Motor Sales, USAPage 1 of 6
January 6, 2012T-SB-0008-12Page 2 of 6Water Leak At Back Door HatchWarranty InformationOP CODEDESCRIPTIONTIMEOFPT1T2BD1126Inspect the Left and Right Back DoorUpper Stay Mount Area*0.26172#-480#06668* Use typical body shop sublet claim practice for preparation, welding, sealing, and painting of the rear hatch panel seam.APPLICABLE WARRANTY This repair is covered under the Toyota Comprehensive Warranty. This warranty is in effect for36 months or 36,000 miles, whichever occurs first, from the vehicle’s in-service date. Warranty application is limited to occurrence of the specified condition described in thisbulletin.Repair Procedure1. Visually inspect the left and right rear hatch seams above the upper back door stay mountingbracket.Figure 2.A. If separation is present, proceed to step 2 of the repair procedure.B. If no separation is present, STOP. The source of water is coming from a different location.This TSB does NOT apply. Continue diagnostics per the Repair Manual.2. Send the vehicle to the body shop.3. Repair the back door seam area by removing the left and right rear hatch stays, backdoor weatherstrip, and the interior left and right roof side rail garnish sub-assembly in therecommended repair procedures below.Refer to the Technical Information System (TIS), applicable model and model year RepairManual: 2012 Toyota Motor Sales, USA
January 6, 2012T-SB-0008-12Page 3 of 6Water Leak At Back Door HatchRepair Procedure (Continued) 2001 / 2002 / 2003 / 2004 / 2005 Highlander:Vehicle Exterior – Engine Hood/Door – “Back Door Stay Assy: Replacement” 2006 Highlander HV:Vehicle Exterior – Engine Hood/Door – “Back Door Support: Components / Removal /Installation” 2007 Highlander HV:Vehicle Exterior – Engine Hood/Door – “Back Door Support: Components / Removal /Installation” 2001 / 2002 / 2003 / 2004 / 2005 Highlander:Vehicle Interior – Exterior/Interior Trim – “Roof Headlining Assy: Components” 2001 / 2002 / 2003 / 2004 / 2005 Highlander:Vehicle Interior – Exterior/Interior Trim – “Roof Headlining Assy: Replacement” 2006 Highlander:Vehicle Interior – Interior Panels/Trim – “Roof Headlining: Components / Removal /Installation” 2007 Highlander:Vehicle Interior – Interior Panels/Trim – “Roof Headlining: Components / Removal /Installation” 2006 Highlander HV:Vehicle Interior – Interior Panels/Trim – “Roof Headlining (w/ Rear No. 2 Seat): Components/ Removal / Installation” 2007 Highlander HV:Vehicle Interior – Interior Panels/Trim – “Roof Headlining (w/ Rear No. 2 Seat): Components/ Removal / Installation” 2006 Highlander HV:Vehicle Interior – Interior Panels/Trim – “Roof Headlining (w/o Rear No. 2 Seat):Components / Removal / Installation” 2007 Highlander HV:Vehicle Interior – Interior Panels/Trim – “Roof Headlining (w/o Rear No. 2 Seat):Components / Removal / Installation” Toyota Fundamental Body Repair Procedures manual (Pub. No. 00400-BRM02-0U) Complete set of Collision Repair Manuals Toyota Fundamental Painting Procedures manual (Pub. No. 00400-BRM33-U)NOTEPublication documents may be ordered from the Material Distribution Center (MDC) throughDealer Daily – Dealer Support Materials Orders. 2012 Toyota Motor Sales, USA
January 6, 2012T-SB-0008-12Page 4 of 6Water Leak At Back Door HatchRepair Procedure (Continued)4. Record radio presets.5. Disconnect the cable from the negative battery terminal BEFORE welding.CAUTIONWait at least 90 seconds after disconnecting the cable from the negative (-) battery terminal toprevent airbag and seat belt pretensioner activation.6. Remove the seam sealer from the left and right upper rear hatch seam located just abovethe rear hatch upper stay mount.7. Adjust the deformed area by using a woodenhammer.Figure 3.NOTELightly tap the deformed panel with a woodenhammer from point A to B and make it flushwith the opposing panel. (left side imageshown as reference).AB 2012 Toyota Motor Sales, USA
January 6, 2012T-SB-0008-12Page 5 of 6Water Leak At Back Door HatchRepair Procedure (Continued)8. Mark the location for an additional plug weld on the left and right side as shown in Figure 4 (leftside image shown as reference).Figure 4.3124416mm Down and Centered38mm24mm4Original Spot WeldsNOTELocation of original spot welds are 4mm and 8mm from edge of the metal. Additional 5mm holeshould be centered between the original 4mm and 8mm spot welds. Location of additionalweld should be 6mm from the top edge of the sheet metal.9. Drill a 5mm hole in the area shown in Figure 5.Figure 5.NOTE5mm hole should be centered between theoriginal spot welds.10. Add a plug weld to the location as shown in Figure 5 to the left and right stay mount area (rightside shown for reference).11. Apply an epoxy primer in between seams prior to adding seam sealer. 2012 Toyota Motor Sales, USA
January 6, 2012T-SB-0008-12Page 6 of 6Water Leak At Back Door HatchRepair Procedure (Continued)12. Apply seam sealer to the weld location and repaint the rear hatch area according to the paintmanufacturer’s recommendations.13. Inspect and replace any deformed rear hatch staybrackets as shown in Figure 6.Figure 6.121Correct2Incorrect14. Reassemble the interior roof side rail garnish, back door weatherstrip, and hatch stays inreverse order.15. Confirm leak is eliminated by water testing.16. Connect the battery and reset radio as necessary. 2012 Toyota Motor Sales, USA
2006 - 2007 Highlander HV 2001 - 2007 Highlander Introduction Some 2001 - 2007 model year Highlander / Highlander HV vehicles may exhibit water intrusion into the rear of the vehicle due to a cracked body seam sealer just above the back door stay mount area. Use the following repair information to address this condition. Figure 1.