Transcription
ADEMCO VISTA-10PADEMCO VISTA-10PSIASecurity SystemsUser GuideK0736V4 10/08 Rev. E
IMPORTANT!PROPER INTRUSION PROTECTIONFor proper intrusion coverage, sensors should be located at every possible point of entry to ahome or commercial premises. This would include any skylights that may be present, and theupper windows in a multi-level building.In addition, we recommend that radio backup be used in a security system so that alarm signalscan still be sent to the Central Monitoring Station in the event that the telephone lines are out oforder (alarm signals are normally sent over the phone lines).EARLY WARNING FIRE DETECTIONEarly warning fire detection is important in a home. Smoke and heat detectors have played a keyrole in reducing fire deaths in the United States. With regard to the number and placement ofsmoke/heat detectors, we subscribe to the recommendations contained in the National FireProtection Association's National Fire Alarm Code (NFPA 72). These recommendations can befound on page 43 of this manual.SYSTEM COMPATIBILITY NOTICEYour Honeywell security system is designed for use with devices manufactured or approved byHoneywell for use with your security system. Your Honeywell security system is not designed foruse with any device that may be attached to your security system's keypad or othercommunicating bus if Honeywell has not approved such device for use with your security system.Use of any such unauthorized device may cause damage or compromise the performance ofyour security system and affect the validity of your Honeywell limited warranty. When youpurchase devices that have been manufactured or approved by Honeywell, you acquire theassurance that these devices have been thoroughly tested to ensure optimum performance whenused with your Honeywell security system.About This ManualThis manual is a step-by-step guide that will acquaint you with the system's features and benefits.It defines the components and their functions, describes their operation, and provides clear stepby-step instructions for normal and emergency procedures. Keep this manual in a convenientplace so that you can refer to it as necessary.–2–
Table of ContentsSystem Overview . 5Introduction . 5System Basics . 5Using the Voice Message Center . 7About The Keypads. 8General Information . 8Functions of the Keypads . 10Entry/Exit Delays . 12Exit Delay . 12Entry Delay. 12Exit Alarms . 13Checking For Open Zones. 14Using the [ ] Key . 14Arming the System . 15Stay Mode: Arms Perimeter Only, Entry Delay On. 15Night-Stay Mode: Arms Perimeter Only, Plus Selected Zones . 15Instant Mode: Arms Perimeter Only, Entry Delay Off. 15Away Mode: Arms Entire System, Entry Delay On . 15Maximum Mode: Arms Entire System, Entry Delay Off. 15Arming Commands . 16Single Button Arming . 17Step Arming Feature . 17Using the Keyswitch. 18Using the Keyswitch . 18Disarming and Silencing Alarms . 19Using the [OFF] key . 19Bypassing Protection Zones . 20Using the BYPASS Key . 20Quick Bypass . 21Chime Mode . 22Date and Time . 23Viewing the Current Date and Time . 23Setting the Date and Time . 23–3–
Table of ContentsPanic Keys . 24Using Panic Keys . 24Macro Key Programming & Usage . 25About Macro Keys . 25Example of Macro Programming. 26Using a Programmed Macro Key . 26Using Device Commands . 27About Device Commands . 27Paging Feature . 28About Automatic Paging . 28Manual Paging . 29Latch Key Paging . 29Security Codes & Authority Levels . 30About Security Codes . 30Authority Level Definitions . 30How to Assign Security Codes and Attributes . 31Scheduling . 32About Scheduling . 32Creating Schedules . 32Event Logging Procedures . 34About Event Logging. 34Viewing the Event Log . 34Table of Event Log Codes . 35Testing the System (To Be Conducted Weekly) . 36About Testing the System . 36Trouble Conditions . 37Maintaining Your System . 40Fire Alarm System (If Installed) . 41Quick Guide to Basic System Functions . 45Summary of Audible/Visual Notifications . 46Regulatory Statements and Warnings . 48Charts of Your System’s Features. 50–4–
System OverviewIntroductionCongratulations on your ownership of a Honeywell Security System. You've made awise decision in choosing it, for it represents the latest in security protectiontechnology today. This system provides: Three forms of protection: burglary, fire* and emergency At least one keypad which provides control of system and displays system status Various sensors for perimeter and interior burglary protection Smoke or combustion detectors* designed to provide early warning in case of fire.Your system may also have been programmed to automatically send alarm or statusmessages to a Central Monitoring Station.* Commercial installations and some residential systems may not include fireprotection – check with your installer.NOTE: The features and procedures described in this manual apply to the ADEMCOVISTA-10P and ADEMCO VISTA-10PSIA. Differences are noted where applicable.System BasicsBurglary Protection Several modes of burglary protection: Stay, Night-Stay, Away, Instant, Maximum.STAY: arms perimeter zones only and entry delay is onINSTANT: same as STAY, except entry delay is offNIGHT-STAY: arms perimeter zones and selected interior zones; entry delay onAWAY: arms perimeter and all interior zones, entry delay is onMAXIMUM: same as AWAY, except entry delay is off You can BYPASS selected zones while leaving the rest of the system armed. CHIME mode alerts you to the opening of protected doors and windows while thesystem is disarmed.Fire Protection and Carbon Monoxide Protection Fire and carbon monoxide protection is always active (if installed) and an alarmsounds if a fire or carbon monoxide condition is detected If necessary, you can manually initiate a fire alarm using the keypad (ifprogrammed). Refer to the Fire Alarm System section for information regarding fire protection,carbon monoxide protection, smoke detectors and planning emergency exit routes.Security Codes You were assigned a 4-digit security code (master code) during installation. Use your security code when arming and disarming the system, and whenperforming other system functions. Other users can be assigned different security codes, each with differentauthority levels, which define the system functions a particular user can perform.–5–
System Overview (Continued)Zones The system sensing devices have been assigned to various “zones,” which arespecific areas of protection (e.g., front door, kitchen window, etc.). Zone numbers are displayed at the keypad when an alarm or trouble conditionoccurs on a sensor.Arming, Step-Arming and Disarming Burglary Protection The system must be armed before the burglary protection can sense intrusions. To arm your system, enter your security code followed by the desired arming key. If programmed, the [#] key can be pressed in place of your security code whenarming the system (e.g., instead of entering your 4-digit security code [3-STAY]to arm the system in STAY mode, you can press [#] [3-STAY] ). You can also use the step-arming key, if programmed, to arm the system, whichlets you use a function key to arm the system in one of three modes by simplypressing the key repeatedly. To disarm the system, enter your security code then press the [OFF] key.Alarms When an alarm occurs, the keypad sounds and displays the zone(s) causing thealarm. For most alarms, the external sounder also sounds. If your system is connected to a Central Monitoring Station, an alarm messagewill also be sent. (Delayed Reporting Note: By default, message reporting isnot delayed. If desired, reporting can be delayed 15, 30, or 45 seconds to helpreduce false alarms. See your installer if you want the delay time changed.) To stop the alarm sounding, simply disarm the system.Memory of Alarm When an alarm condition occurs, the keypad displays the number(s) of thezone(s) that caused the problem, and displays the type of alarm (e.g., “fire”). The message remains displayed even after disarming the system, but can becleared with another “off” sequence.Phone Access If included, a phone module permits you to access the system via a touch-tonephone, either on-premises or by calling-in when away. You can receive synthesized voice messages over the telephone regarding thestatus of the security system. You can arm and disarm the system and perform most function commandsremotely via the telephone, with voice confirmation provided after each commandentry. Complete information regarding the use of this feature is provided in a separatemanual entitled “Phone Access User's Guide” that is supplied with the voicemodule.–6–
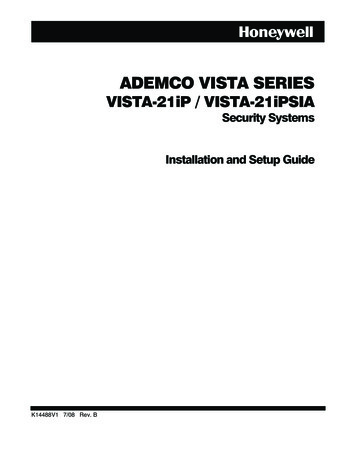
System Overview (Continued)Paging Feature If programmed, the system can automatically send certain system conditionmessages to a pager. The display consists of code numbers that indicate the type of condition that hasoccurred.Function Keys The “A”, “B”, “C”, and “D” keys on the keypad can be programmed to performvarious functions. Functions include: activate a Panic alarm; arm the system; provide step arming;switch lights on/off; send a message to a pager; display Time/Date; start a MacroScheduling Your system can be programmed to automatically perform certain functions (e.g.,arm the system) at a predetermined time each day.Using the Voice Message Center (if Voice Keypad is installed)The Voice Keypads feature a voice message centerthat lets you record and playback one message.SPEAKERLCDDISPLAYPLAY KEYANDUP VOLUMEVOLUMEKEYRECORDKEY The message can be up to 2.5-minutes long The volume control of the message is adjustable. Refer to the procedures below when using theMessage Center ONFUNCTIONKEYDOWNVOLUME6160V-00-005-V0 The message remains in the keypad’s memoryuntil a new message is recorded.Message Center FunctionsTo record amessageendrecordingplay amessageadjust thevolumePress these keys Notes The red MESSAGE LED lights.Message remains in memoryuntil a new message is recorded.The red MESSAGE LED flashes,[1] RECORDindicating message waiting.The recorded message plays and[#] FUNCTION [0] VOICE [3] PLAYthe red MESSAGE LED turns off.[#] FUNCTION [0] VOICE [2] VOLUME keys, Adjusting message volume alsoadjusts status volume. Volumethen press volume key [3] (up) or [6] (down)cannot be adjusted while playing.[#] FUNCTION [0] VOICE [1] RECORD–7–
About The KeypadsGeneral InformationYour keypads allow you to control all system functions. The keypads feature thefollowing: A telephone style (digital) keypad Liquid Crystal Display (LCD) which shows the nature and location of alloccurrences Built-in sounder which will sound during alarms and troubles. The sounder also"beeps" during certain system functions and when depressing any of the keys (toacknowledge the key press). Backlighting of the LCD display windows. Backlighting turns on when any key ispressed, and when opening an entry/exit door while the system is armed. Thisfeature is helpful when a keypad is located in a dimly lit area.IMPORTANT: If the keypad beeps rapidly upon entering the premises, it indicatesthat an alarm has occurred during your absence and an intruder may still be on thepremises. LEAVE IMMEDIATELY and CONTACT THE POLICE from a nearby safelocation.Your keypads are functionally the same, but may have different types of displays,depending on the type installed with your system.Alpha Display2-line alpha display keypads feature a 2-line, 32-characteralphanumeric LCD which can display system messages infriendly English. These keypads can also be programmed withcustom zone descriptors.Fixed-Word Display Fixed-Word display keypads are functionally identical to Alphadisplay keypads, but the LCD display uses pre-designatedwords to identify the nature and location of occurrences.Voice Keypads–8–Voice Keypads (if installed), are functionally the same as otherkeypads, except that these keypads can provide the following: Voice announcements of system status (see Checking forOpen Zones section) Voice chime, which can alert you to the opening of doors andwindows while the system is disarmed (see Voice Chime inChime mode section) Message center, which lets you record and playbackmessages (see Using the Voice Message Center in theSystem Overview section).
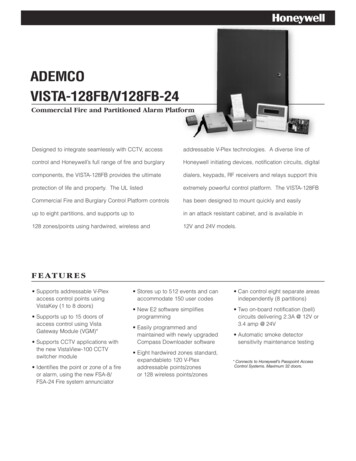
About The Keypads (Continued)Fixed-Word Display KeypadAWAY:STAY:INSTANT:All burglary zones, interior andperimeter, are armed.Perimeter burglary zones, such asprotected windows and doors, arearmed.Entry delay is turned off:Lit with STAY Instant modeLit with AWAY Maximum modeAWAYNIGHT NO ACPHONE TESTNOT READYCHIME BATINSTANT CANCELEDBYPASSALARM STAYFIRE CHECK6150dispFIXED-WORD DISPLAY (6150 shown)BYPASS:This appears when one or more burglary protection zones have beenbypassed.NOT READY:Appears when burglary portion of the system is not ready for arming(due to open protection zones). The system is ready to arm when thismessage disappears and the READY indicator light comes on.Appears when AC power has been cut off. System is operating onbackup battery power.Appears when AC power is present.Appears when the CHIME feature is activated.Low battery condition in a wireless sensor (if zone number displayed)or low system battery (if no zone number displayed).Appears when an intrusion has been detected and the system is armed(also appears during a fire alarm or audible emergency alarm).Accompanied by the protection zone in alarm.Appears when a malfunction is discovered in the system at any time orif an open is detected in a FIRE zone at any time or a fault in aDAY/NIGHT burglary zone during a disarmed period. Accompanied bya display of zone number in trouble.NO pears when a fire alarm is present. Accompanied by a display of thezone in alarm.A FIRE display also appears when a fire alarm is manually activated,accompanied by a display of emergency key zone number programmedfor fire.Appears with “STAY” when the system is armed in Night-Stay mode(perimeter burglary zones and pre-selected interior zones set by yourinstaller are armed).Appears when an alarm has been canceled (see Exit Alarm section formore information on canceled alarms and displays).–9–
Functions of the KeypadsNOTE: The functions printed directly on thekeys indicate their primary purpose; thefunctions printed under some of the keys(shown in brackets under the respective key),indicate their alternate or secondary purpose.DISPLAY WINDOWAlpha Display Keypads:2-line, 32-characterLiquid Crystal Display (LCD) keypads that displayprotection points, system status, and messages.Fixed-Word Display Keypads: Displayprotection zone ID and system status messages usingpre-designated words in the LCD display area.[VOICE] On Voice keypads, enables the RECORD,VOLUME and PLAY functions.Disarms burglary portion of the system,silences alarms and audible trouble indicators, andclears visual display after problem's correction.[RECORD] On Voice keypads, used in conjunctionwith the FUNCTION and VOICE keys to record upto a 2.5-minute message.2 AWAYArms the entire burglary system,perimeter and interior.[VOLUME] On Voice keypads, used in conjunctionwith the FUNCTION and desired volume controlkeys [3] or [6] to adjust the volume of a recordedmessage or voice system status.3 STAYArms perimeter portion of burglarysystem only. Interior protection is not armed,allowing movement within premises without causingan alarm. If pressed twice in succession, armssystem in Night-Stay mode.[PLAY] On Voice keypads, used in conjunction withthe FUNCTION and VOICE keys to play therecorded message.[ ] On Voice keypads, used in conjunction with theFUNCTION and VOLUME keys to raise themessage and voice system status volume.4 MAXIMUMArms the entire burglary system,perimeter and interior, but without entry delay.Entering via an entry/exit door will cause an alarm.5 TESTTests the system and alarm sounder ifdisarmed. Refer to Testing The System section fortest procedures.– 10 –7 INSTANT Arms in manner similar to the STAYmode, but without the entry delay feature.8 CODEUsed to assign additional security codesand attributes for other users of the system.9 CHIMETurns CHIME mode on and off. When on, theopening of windows or doors while the system is disarmedsounds 3 beeps at the keypad(s).01 OFF6 BYPASS Removes individual protection zones frombeing monitored by the system.[ ] On Voice keypads, used in conjunction with theFUNCTION and VOLUME keys to lower the messageand voice system status volume.KEYS 0–9: Used to enter the security code(s) and toperform their associated system functions. READY Used to display all open protection zones.[STATUS]: On Voice keypads, a momentary press of theSTATUS key annunciates the current system status.Pressing the STATUS key a second time annunciates anddisplays system and/or zone faults (if they exist).#This key can be used for "Quick Arming" ofthe system without use of a security code (ifprogrammed).[FUNCTION] On Voice keypads, enables the desiredvoice or volume function.FUNCTION KEYS: Keys A, B, C, D may have beenprogrammed for a variety of functions, including panic(emergency) functions. For details, see the Function Keyssection.ARMED LED INDICATOR: (RED) Lit when thesystem has been armed.READY LED INDICATOR: (GREEN) Lit when thesystem is ready to be armed (no faults present). While thesystem is disarmed, this indicator will go on and off asprotection zones are closed and opened.MESSAGE LED INDICATOR: (RED) On Voicekeypads, flashes red when message waiting or lights red(steady) when in record mode.MIC: On voice keypads, microphone for Message Centerrecordings.INTERNAL SPEAKER: The built-in speaker mimicsthe alarm sounder during alarms, and will also "beep"during certain system functions. The speaker alsoprovides voice playback for any recorded messages.
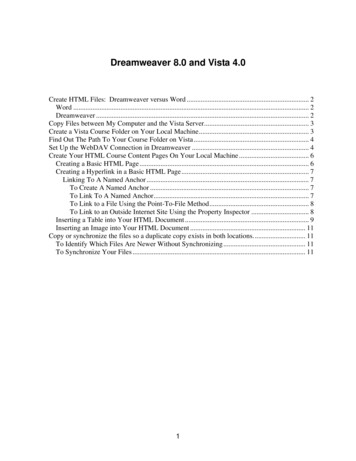
Functions of the Keypads V-003-V0SPEAKERFUNCTIONKEYSVoice-capable 2-line Alpha keypad(shown with flip-down front door removed)IMPORTANT! When entering codes and commands, sequential key depressions must be madewithin 4-5 seconds of one another. If 4-5 seconds elapse without a key depression, theentry will be aborted and must be repeated from its beginning. Be sure to observethis precaution when performing any of the procedures in this manual. If you make a mistake while entering a security code, stop, press the [ ] key, andthen start over. If you stop in the middle while entering a code, and thenimmediately start the entry over, an erroneous code might be entered.Wireless Key FobsYour system may also include one or more wireless key fobs, which can performvarious functions as programmed by your installer.IMPORTANT SECURITY NOTICEYour key fob is similar to your keys or access card. If lost or stolen, anotherperson can compromise your security system. Immediately notify yourDealer/Installer of a lost or stolen key fob. The Dealer/Installer will then removethe key fob programming from the security system.– 11 –
Entry/Exit DelaysYour system has preset time delays, known as exit delay and entry delay.Exit DelayExit delay gives you time to leave through the designated exit door(s) withoutsetting off an alarm. Exit delay begins immediately after arming your system in anyarming mode and Alpha Display keypads display the message “You May Exit Now.”When “You may exit now” disappears, the system is fully armed. If programmed, aslow beeping will sound during the exit delay period until the last 10 seconds, whichthen changes to fast beeping (alerting you to the end of exit delay). If you cannotleave by this time, you should stop, disarm the system, and start over to avoid a falsealarm.Exit Delay Restart/Reset. If you wish to open the entry/exit door to let someone inafter arming STAY, you can re-start the exit delay at any time – simply press the[ ] key, then let that person in (the perimeter zones remain armed). The systemautomatically re-arms the entry/exit door when exit delay expires, which avoidshaving to disarm the system and then re-arm it again.In addition, when the system is armed AWAY, reopening and closing the entry/exitdoor before exit delay time expires (e.g., reentering to get a forgotten item) will resetthe exit delay time once.Entry DelayEntry Delays give you time to disarm the system when you re-enter through thedesignated entrance door. There are two entry delays (if programmed). The first is foryour primary entrance and the second can be used for a secondary entrance, where alonger delay is required to walk to the keypad to disarm the system.You must disarm the system before the entry delay period ends, or an alarm willoccur. The keypad beeps during the entry delay period, reminding you to disarm thesystem. The beeps stop when a code is entered, but will restart after about 15 secondsif an invalid code is entered.You can also arm the system with no entry delay at all by using the INSTANT orMAXIMUM arming mode. This mode provides greater security while on thepremises or while away for extended periods of time.See your installer for your delay times.Exit Delay:– 12 –secondsEntry Delay 1:secondsEntry Delay 2:seconds
(Continued)Entry/Exit Delays (Continued)Exit AlarmsExit Error ConditionsWhenever you arm the system, the exit delay begins. If an entry/exit door or interiorzone is faulted before exit delay expires and remains faulted (e.g., exit door left open),the system sounds an alarm and starts the entry delay timer. If you disarm thesystem before the entry delay ends, the alarm sound stops and the message "ALARMCANCELED " or "CA" is displayed on the keypad, along with a zone numberindicating the faulted zone. No message is sent to the Central Monitoring Station.To clear the exit error condition, the open zone must be made intact; to clear thedisplay, enter your code plus OFF.If you do not disarm the system before the entry delay ends and the faulted zoneremains open, the alarm sound continues and an "exit alarm" message is sent to theCentral Monitoring Station (after the installer-programmed dial delay expires). Themessage "EXIT ALARM" or "EA" is displayed on the keypad, along with a zonenumber indicating the faulted zone. To stop the alarm, the system must be disarmed(your code plus OFF); to clear the display, enter your code plus OFF a second time.An “exit alarm” also results if an entry/exit door or interior zone is faulted within twominutes after the end of the exit delay.Your system may have been programmed for this feature to minimize false alarms sent to the CentralMonitoring Station. Ask your installer if "Exit Alarm" is active in your system. If so, check this box.VISTA-10PSIA: The Exit Error condition works the same as described above, except that inaddition to the “EXIT ALARM” message, a “zone alarm” message is also sent to the CentralMonitoring Station. In addition, if an entry/exit door or interior zone is faulted within twominutes after the end of the exit delay, a “Recent Closing” condition occurs instead of the “exitalarm.” Refer to the next paragraph for details.“Recent Closing” Condition (VISTA-10PSIA only)A Recent Closing condition is similar to the Exit Error condition described above, but occurs ifan entry/exit door or interior zone is faulted within two minutes after the initial exit delayexpires. If you disarm the system within the two minutes, the alarm sound stops and themessage "ALARM CANCELED " or "CA" is displayed on the keypad, a
ADEMCO VISTA-10P ADEMCO VISTA-10PSIA Security Systems User Guide K0736V4 10/08 Rev. E - 2 - IMPORTANT! PROPER INTRUSION PROTECTION For proper intrusion coverage, sensors should be located at every possible point of entry to a home or commercial premises. This would include any skylights that may be present, and the