Transcription
KUSBBACKREPLYNEXTAUX 1AUX 2PHONESEJECTRCX-1500Owner’s ManualManual de InstruccionesManuel de ngManuale di istruzioniИнструкция пользователяInstruktionsbokRCX1500 ENG SPA FRE GER DUT ITA RUS SWE.indb 1Stereo Compact Disc ReceiverReceptor Estereofónico con Reproductorde Discos Compactos IncorporadoAmpli-tuner lecteur de CDMultimedia-Audio-ReceiverStereo re CDСтерео CD-ресиверCD-receiver27/8/10 13:52:23
RCX-1500 Stereo Compact Disc Receiver2IMPORTANT FOR LASER PRODUCTS1. CLASS 1 LASER PRODUCT2. DANGER: Visible laserradiation when open andinterlock failed or bypassed.Avoid direct exposure to beam.3. CAUTION: Do not open the top cover. There are no userserviceable parts inside the player; leave all servicing toqualified service personnel.WARNING!To reduce the risk of electrical shock, fires, etc.:1. Do not remove screws, covers or cabinet.2. Do not expose the unit to rain or moisture.3. Do not touch the power cord or plug with wet hands.DABRotel products are designed to comply with internationaldirectives on the Restriction of Hazardous Substances(RoHS) in electrical and electronic equipment andthe disposal of Waste Electrical and ElectronicEquipment (WEEE). The crossed wheelie bin symbolindicates compliance and that the products must beappropriately recycled or processed in accordancewith these directives.RCX1500 ENG SPA FRE GER DUT ITA RUS SWE.indb 227/8/10 13:52:23
EnglishNoticeThe COMPUTER I/O connection should be handled by authorized persons only.FCC Information3Important Safety InstructionsWARNING: There are no user serviceable parts inside. Refer all servicing to qualified servicepersonnel.This equipment has been tested and found to comply with the limits for a Class B digital device,pursuant to Part 15 of the FCC Rules. These limits are designed to provide reasonable protection againstharmful interference in a residential installation. This equipment generates, uses and can radiate radiofrequency energy and, if not installed and used in accordance with the instruction, may cause harmfulinterference to radio communications.WARNING: To reduce the risk of fire or electric shock, do not expose the unit to moisture or water.Do not expose the unit to dripping or splashing. Do not place objects filled with liquids, such as vases,on the unit. Do not allow foreign objects to get into the enclosure. If the unit is exposed to moisture,or a foreign object gets into the enclosure, immediately disconnect the power cord from the wall. Takethe unit to a qualified service person for inspection and necessary repairs.However, there is no guarantee that interference will not occur in a particular installation. If thisequipment does cause harmful interference to radio or television reception, which can be determinedby turning the equipment off and on, the user is encouraged to try to correct the interference by oneor more of the following measures:Keep this manual so you can refer to these safety instructions. Reorient or relocate the receiving antenna.(TV, radio, etc.)Do not use this unit near water. Increase the separation between the equipment and receiverYou must allow a minimum 10 cm or 4 inches of unobstructed clearance around theunit. Connect the equipment to an outlet on circuit different from that to which the receiver isconnected.Do not place the unit on a bed, sofa, rug, or similar surface that could block the ventilation openings.If the unit is placed in a bookcase or cabinet, there must be ventilation of the cabinet to allow propercooling. Consult the dealer or an experienced radio/TV technician for additional help.Keep the component away from radiators, heat registers, stoves, or any other appliance thatproduces heat.CautionWARNING: The rear panel power cord connector is the mains power disconnect device. The apparatusmust be located in an open area that allows access to the cord connector.This device complies with part 15 of the FCC Rules. Operation is subject to the following toconditions: (1) This device may not cause harmful interference, and (2) this device must accept anyinterference received, including interference that may cause undesired operation.NOTE TO CATV SYSTEM INSTALLER: Call the CATV system or antenna installer’s attention toArticle 820-40 of the NEC. This provides guidelines for proper grounding and, in particular , specifiesthat the cable ground shall be connected to the grounding system of the building, as close to thepoint of cable entry as practical. See installation diagram.NOTE: This equipment has been tested and found to comply with the limits for a Class B digitaldevice, pursuant to Part 15 of the FCC Rules. These limits are designed to provide reasonableprotection against interference in a residential installation. This equipment generates and canradiate radio frequency energy and, if not installed and used in accordance with the instructions,may cause interference to radio or TV communications. There is no guarantee that interference willnot occur in a particular installation. If this equipment does cause interference to radio or televisionreception, which can be determined by turning the equipment off and on, try to correct theinterference by one or more of the following measures: Reorient or relocate the receiving antenna. Increase the separation between the unit and the television tuner. Connect the unit to an AC power outlet on a different electrical circuit. Consult your authorized Rotel retailer for assistance.Read all the instructions before connecting or operating the component.Heed all warnings and safety information in these instructions and on the product itself. Follow alloperating instructions.Clean the enclosure only with a dry cloth or a vacuum cleaner.The unit must be connected to a power supply only of the type and voltage specified on the rear panel.(USA: 120 V/60Hz, EC: 230V/50Hz)Connect the component to the power outlet only with the supplied power supply cable or an exactequivalent. Do not modify the supplied cable. A polarized plug has two blades, with one wider thanthe other. A grounding plug has two blades plus a third grounding prong. These are provided foryour safety. Do not defeat grounding and/or polarization safety provisions. If the supplied plug doesnot fit your outlet, please consult an electrician for replacement of the obsolete outlet. Do not useextension cords.The main plug of the power cord set is a disconnect device of the apparatus. In order to completelydisconnect the apparatus from the supply mains, the main plug of the power cord set should beunplugged from the mains (AC) outlet. The stand-by LED indicator will not be lit up to show the powercord is unplugged. The disconnect device shall remain readily operable.Do not route the power cord where it will be crushed, pinched, bent, exposed to heat, or damagedin any way. Pay particular attention to the power cord at the plug and where the cord exits the backof the unit.Main plug is used as the main disconnect device and shall remain ready accessible.The power cord should be unplugged from the wall outlet during a lightning storm or if the unit is tobe left unused for a long period of time.This apparatus shall be connected to a main socket outlet with a protective earth connection.Use only accessories specified by the manufacturer.Use only with a cart, stand, rack, bracket or shelf system recommended by Rotel. Use cautionwhen moving the unit in a stand or rack to avoid injury from a tip-over.Use Class 2 wiring for speaker connections to ensure proper installation and minimize the risk ofelectrical shock.Immediately stop using the component and have it inspected and/or serviced by a qualified serviceagency if: The power supply cord or plug has been damaged Objects have fallen or liquid has been spilled into the unit The unit has been exposed to rain The unit shows signs of improper operation The unit has been dropped or damaged in any wayThe batteries in remote control shall not be exposed to excessive heat such as sunshine, fire or thelike.RCX1500 ENG SPA FRE GER DUT ITA RUS SWE.indb 327/8/10 13:52:23
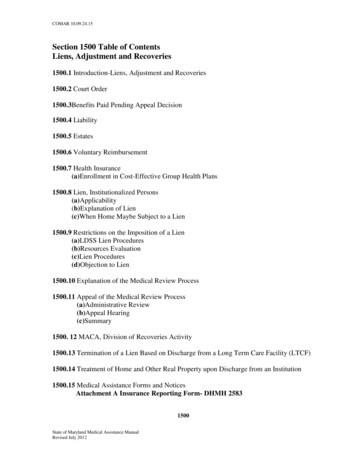
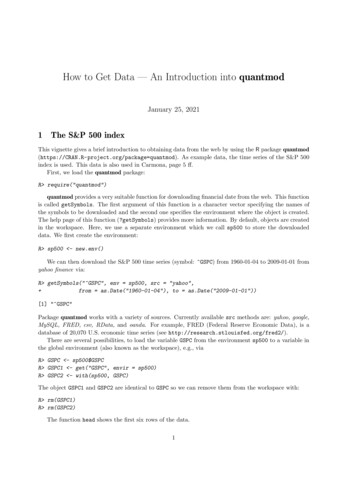
RCX-1500 Stereo Compact Disc Receiver4Figure 1:Controls and Connections1 24 5 6738 KUSBBACKREPLYNEXTAUX 1AUX 2PHONESAEJECT9BCDEIFGRCX1500 ENG SPA FRE GER DUT ITA RUS SWE.indb 4HJ27/8/10 13:52:24
English5ONOFFMUTEVOLUME- SETUPQUEUE5412 BACKREPLYSELDIM786EXIT1234567890 10MEM09REPTSCANTIMECLEARREVPROGFMDABi-RADIOCDAUX 1AUX 2NETWORK USBRANDOMButton Series Function Explanation1,2 : STANDBY mode button, are used to switch the STANDBY mode on or off.3: Source selection buttons, are used to switch your desire source.4: Back to upper level menu5: Call out preset/memorized list of tracks, songs, stations, etc against specified mode.6: To call out special Internet Radio menu on Internet Radio mode.7,8 : Navigation keys and confirm buttons, are used to navigate and enter menus.9: Playback buttons,are used mainly control the playback under USB and CD mode. It hasspecified functions against specified modes.0: Numeric buttons , offer alternated numeric related selection.: Extra functionality buttons, are used to set individual machine’s configuration and makeit more convenience for your using. : Volume control buttons.Front & Rear InterfacesA: USB socket, is used to connect with USB music storage devices, such as MP3, USBstick Mobile,iPod/iPhone etc , can be connected directly or through USB adaptor.B: PHONE jack, is used to connect with 3.5mm headphone.C: Antenna connector, is used to connect with supplied DAB/FM antennaD: Analog AUX input jacks, are used to connect with other device’s analog signal outputE: PRE OUT jacks, are used to connect with other amplifier’s input and sendanalog signal to the amplifier.F: Ethernet sockets, is used to connect with supplied Wi-Fi dongle or USB LAN adaptor.G: Digital AUX input jacks, are used to connect with other device’s digital signal outputH: Computer I/O sockets, is used to connect with computer to upgrade this device firmwareI: Speaker connectors, are used to directly connect with speakers.J: Power connector, is used to connect with AC mains and outlet.3RR-CX91RCX1500 ENG SPA FRE GER DUT ITA RUS SWE.indb 527/8/10 13:52:24
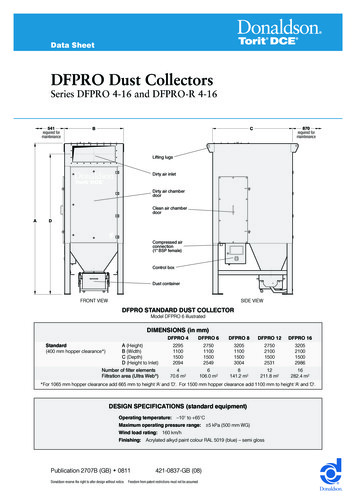
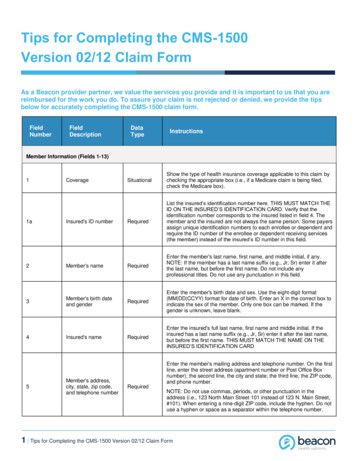
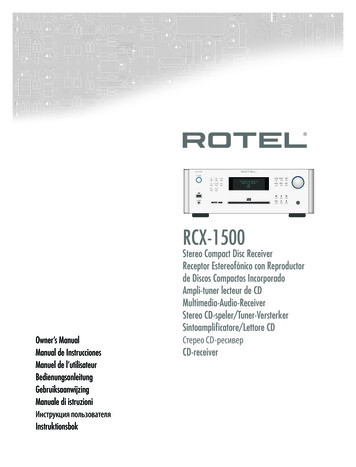
RCX-1500 Stereo Compact Disc Receiver6Figure 2:Hook-up PREVCDNETWORKUSBBACKREPLYNEXTAUX 1AUX 2PHONESEJECTWEGLONIDI-FAMPLIFIERImportant NotesWhen making connections be sure to:4 Turn off all the components in the systembefore hooking up any components,including loudspeakers.4 Turn off all components in the system beforechanging any of the connections to thesystem.DIGITAL AUDIO DEVICEIt is also recommended that you:OUTPUT4 Turn the volume control of the amplifier all theway down before the amplifier is turned onor off.RCX1500 ENG SPA FRE GER DUT ITA RUS SWE.indb 627/8/10 13:52:24
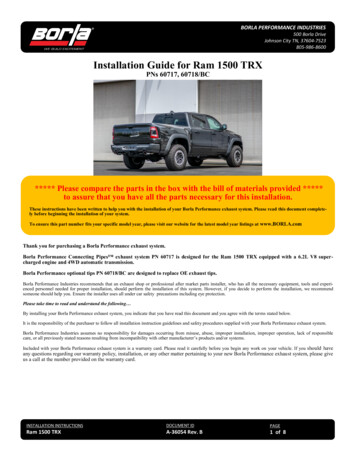
English7ContentsImportant Safety Instructions. . . . . . . . . . . . . . . . . . . . . . . . . . . . . . . . . . . . . . . . 3Figure 1: Controls and Connections4-5Figure 2: Hook-up Illustration6Important Notes . . . . . . . . . . . . . . . . . . . . . . . . . . . . . . . . . . . . . . . . . . . . . . . . . 6About Rotel. . . . . . . . . . . . . . . . . . . . . . . . . . . . . . . . . . . . . . . . . . . . . . . . . . . . . 8Getting Started. . . . . . . . . . . . . . . . . . . . . . . . . . . . . . . . . . . . . . . . . . . . . . . . . . 8Features8A Few Precautions8Placement8Overview – the Rotel internet radio tuners/digital gateway products. . . . . . . . . . 9DAB and FM radio9Internet radio9Network access9The Rotelradio website – managing your stations9Playback from iPods, mp3 players and flash drives9Playback from network servers9AC Power and Control . . . . . . . . . . . . . . . . . . . . . . . . . . . . . . . . . . . . . . . . . . . . 10AC Power Input10Standby Switch and Indicator Light10Connection Overview. . . . . . . . . . . . . . . . . . . . . . . . . . . . . . . . . . . . . . . . . . . . . 10USB Connection10PHONES Connection10DAB/FM Broadcasting10ANALOG INPUT-AUX 210PRE OUT10Network Connection10DIGITAL INPUT-AUX 110Computer I/O10Speaker Connections10Speaker Selection10Speaker Wire Selection10Polarity and Phasing11Speaker Wire Connections11Internet Radio Quick Start . . . . . . . . . . . . . . . . . . . . . . . . . . . . . . . . . . . . . . . . . 11What you need before starting11First Time Connection To The Network11Choosing A Radio Station12Internet Radio Station Playing12Storing a radio station in a preset12Playing a preset radio station12Media Player Quick Start. . . . . . . . . . . . . . . . . . . . . . . . . . . . . . . . . . . . . . . . . . 13UPnP Servers13Setting up UPnP Server in PC13Play media files using UPnP Server.13Clear Queue14Playback Mode14iPod/USB Connection Quick Start. . . . . . . . . . . . . . . . . . . . . . . . . . . . . . . . . . . . 14USB Storage Device Connection14iPod/iPhone Connection14PlayBack Control Buttons14FM RADIO Quick Start. . . . . . . . . . . . . . . . . . . . . . . . . . . . . . . . . . . . . . . . . . . . 15FM Radio Station Playing15Storing a radio station in a preset15Playing a preset radio station15DAB RADIO Quick Start . . . . . . . . . . . . . . . . . . . . . . . . . . . . . . . . . . . . . . . . . . . 15DAB Radio Station Playing15Storing a DAB station in a preset15Playing a preset DAB station15Radio Station Presets15JEABCDHSETTINGS OVERVIEW. . . . . . . . . . . . . . . . . . . . . . . . . . . . . . . . . . . . . . . . . . . . .Configure “My Stuff”. . . . . . . . . . . . . . . . . . . . . . . . . . . . . . . . . . . . . . . . . . . .Configure “My Stations”. . . . . . . . . . . . . . . . . . . . . . . . . . . . . . . . . . . . . . . . . .Configure “My Streams”. . . . . . . . . . . . . . . . . . . . . . . . . . . . . . . . . . . . . . . . . .CD Control Buttons. . . . . . . . . . . . . . . . . . . . . . . . . . . . . . . . . . . . . . . . . . . . . . .PLAY ButtonSTOP ButtonPAUSE ButtonTRACK ButtonsDIRECT ACCESS ButtonsSEARCH ButtonsEJECT ButtonAdditional Features . . . . . . . . . . . . . . . . . . . . . . . . . . . . . . . . . . . . . . . . . . . . . .PROGRAM ButtonREVIEW ButtonCLEAR ButtonRANDOM ButtonREPEAT ButtonSCAN ButtonTIME ButtonRemote Unit Advanced Buttons. . . . . . . . . . . . . . . . . . . . . . . . . . . . . . . . . . . . . .Troubleshooting. . . . . . . . . . . . . . . . . . . . . . . . . . . . . . . . . . . . . . . . . . . . . . . . .Glossary. . . . . . . . . . . . . . . . . . . . . . . . . . . . . . . . . . . . . . . . . . . . . . . . . . . . . .Specifications . . . . . . . . . . . . . . . . . . . . . . . . . . . . . . . . . . . . . . . . . . . . . . . . . GIRCX1500 ENG SPA FRE GER DUT ITA RUS SWE.indb 727/8/10 13:52:25
RCX-1500 Stereo Compact Disc Receiver8About RotelGetting StartedOur story began nearly 50 years ago. Over the decades, we have receivedhundreds of awards for our products and satisfied hundreds of thousandsof people who take their entertainment seriously- like you!Thank you for purchasing the Rotel RCX-1500 CD Receiver. When usedin a high-quality music or home theater system, your Rotel CD Receiverwill provide years of musical enjoyment.Rotel was founded by a family whose passionate interest in music ledthem to manufacture high-fidelity components of uncompromising quality.Through the years, that passion has remained undiminished and the familygoal of providing exceptional value for audiophiles and music lovers,regardless of their budget, is shared by all Rotel employees.FeaturesRotel’s engineers work as a close team, listening to, and fine tuning,each new product until it reaches their exacting musical standards.They are free to choose components from around the world in order tomake that product the best they can. You are likely to find capacitorsfrom the United Kingdom and Germany, semiconductors from Japan orthe United States, while toroidal power transformers are manufacturedin Rotel’s own factory.We all have concerns about our environment. And, as more and moreelectronics are produced and later discarded, it is especially importantfor a manufacturer to do all it can to engineer products that have aminimum negative impact on landfill sites and water tables.At Rotel, we are proud to do our part. We have reduced the lead contentin our electronics by using special RoHS solder, while our new Class D(not digital) amplifiers are up to five times more efficient than our legacydesigns and still deliver power and performance. These products runcool, give minimum wasted energy, are good for the environment andgive better sound too.Finally, we have printed this brochure on recycled paper stock.While we understand that these are small first steps, they are still importantones. And we continue to pursue new methods and materials for a cleanerand greener manufacturing process.All of us at Rotel thank you for buying this product. We are sure it willbring you many years of enjoyment. Wireless or wire connection to access internet radio. Access LAN PCs and music with ‘Media Player’ Mode Connect with iPod/MP3/media music player for homeenjoyment. Listen to DAB, FM broadcasting station. Playback of conventional CD, MP3 or WMA encoded disc. Two amplifier channels at 100 watts per channel.A Few PrecautionsPlease read this manual carefully. In addition to basic installation andoperating instructions, it provides valuable information on various RCX1500 system configurations as well as general information that will helpyou get optimum performance from your system. Please contact yourauthorized Rotel dealer for answers to any questions you might have. Inaddition, all of us at Rotel welcome your questions and commentsSave the RCX-1500 shipping carton and all enclosed packing materialfor future use. Shipping or moving the RCX-1500 in anything other thanthe original packing material may result in severe damage to your unit.Fill out and send in the owner’s registration card packed with the RCX1500. Also be sure to keep the original sales receipt. It is your bestrecord of the date of purchase, which you will need in the event warrantyservice is ever required.PlacementPlace the RCX-1500 on a solid, level surface away from sunlight, heat,moisture, or vibration.Don’t stack other components or objects on top of the RCX-1500. Don’tlet any liquid fall into the unit.Note the weight and size of the RCX-1500. If placing the unit on ashelf, cabinet or rack, make sure the full weight of the RCX-1500 canbe supported.The RCX-1500 generates heat during normal operation. Do not blockventilation openings. Allow a minimum of 10 cm or 4 inches of unobstructedspace around the unit. If installed in a cabinet, make sure that there isadequate ventilation.RCX1500 ENG SPA FRE GER DUT ITA RUS SWE.indb 827/8/10 13:52:25
EnglishOverview – the Rotel internet radio tuners/digital gateway products.This product does not operate without the Wi-Fi or Wired dongle beingconnected. We recommend that you read this introduction first. FAQs willbe found on the Rotel website www.rotel.com/NA/support/FAQ.htmThis Rotel product brings together conventional radio reception facilitiesfor FM and DAB, plus from the world of computers the ability to accessliterally thousands of radio stations available on the internet. In additionto this, this new range of Rotel tuners/digital gateways offers the facilityto interface with personal audio players (iPods and mp3 players) andyour music files stored on a network server.These notes expand on the ‘quick start’ notes later in this manual.9The next requirement is to enable your tuner to ‘log-on’ to your networkand you allow this by entering the wireless ‘WEP key’ (or WPA, WPA2key) appropriate to your network. It is likely that you will have used thekey code when setting up a computer to log onto your network and itis often contained in the instructions for your router. This is a first-timeonly setting, so just carefully scroll though the alpha-numeric charactersselecting the correct upper or lower case characters to create your WEPkey. When completed, scroll through to and select END or simply pressthe REPLY button to complete the process.You can use the Previous and Next keys of the handset to help you enterthis information. Do not confuse the letter ‘O’ with the numeral ‘0’.When successfully logged on to your network, the tuner will automaticallylog in to the website where you to be able to select the area of the world thatinterests you and choose radio stations by country, genre and name.Firstly, it does not matter if a wired or Wi-Fi network is not available touse – however it is essential that the Wi-Fi or wired dongle is inserted intoit’s socket on the rear panel of the product for it to work. Use an extensioncable to relocate the dongle if space is limited at the rear of the tuner.Registering the radio at www.rotelradio.com will allow you to searchfor and save internet radio stations, as well as set up other musicservices when available for your region.Each time that the product is turned on, it will be locked into search modefor about 15/20 seconds. Once this has being accomplished other radiomodes can be used.Managing the thousands of radio stations available via the internet wouldbe impossible without being able to organise and manage stations to suityour particular needs. Rotel have provided an easy way to accomplish thisby means of a dedicated website where you can pre-select stations.The Rotelradio website – managing your stationsThe USB input is active from turn on.DAB and FM radioThis is the most conventional part of the product and if you have previousexperience of tuning, memorizing and selecting radio stations from thepresent DAB and FM radio services you will be familiar with the waythe tuner is operated to receive these services. All of this is explainedunder relevant quick start sections. Keep in mind to select the antenna(aerial) input socket to use, find this option in the set-up menu. This doesnot obviate the need to install correctly designed antenna (aerials) tomaximise reception on FM and DAB services.Internet radioUsing internet radio requires the use of two additional services – accessto the internet via a computer network and once this works a feed viaone of the internet-based services which allows access to internet radiostations. This latter requirement is built into the tuner; we will deal withaccess to your network first.Network accessThe installation of computer networks are beyond the scope of these notes,so we assume that you have a working Wi-Fi network in your home. Ifyou are using a wired network please refer to Network Config. under“Settings Overview” section. (Wired networks will provide the most reliableEthernet streaming. Ethernet over powerline adaptors are available from3rd parties if running an Ethernet cable is otherwise impractical.)At start-up, the unit looks for Wi-Fi networks, and once the search has beencompleted you will find one or more listed networks listed in the display tochoose from. You need to select the network name which applies to yourinstallation. This will have been assigned when your network was installedand is often pre-allocated by the router central to your network.RCX1500 ENG SPA FRE GER DUT ITA RUS SWE.indb 9The URL for this site is http://rotelradio.com.Like many websites you will need to register a user name and passwordin order to create an account on the site. Before you can do so, you willneed to register the product on the site and there is a special registrationkey in the Rotel which you will need to copy to the website registration form.This registration key will be found under the settings register menu. Youneed to be connected to the internet to access this one time only key.After registration, the website will show the radio serial number of yourRotel unit. This is different from the serial number of your Rotel unit. Theradio serial number can be found in the menu of the Rotel unit underSettings -- Version.Note that to update the display of the Rotel to indicate your choices, youwill need to power-cycle and re-select ‘internet radio’. Your new list of‘My Stuff’ will be updated automatically.Playback from iPods, mp3 players and flash drivesMost iPod and mp3 players can be plugged into the USB socket on thefront panel to replay the music files stored within. The display will updateto show the file structure and will list the files which can be played. Filescopied to a standard flash drive will also behave in the same way.Playback from network serversMusic playback from computers configured as music servers providesanother opportunity to link replay via the Rotel unit and thus make use ofthe audiophile decoding stages designed into these products.As with internet radio, a prerequisite is a working network, plus the musicserver connected to it. Please follow the instructions shown under ‘MediaPlayer Quick Start’ later in the manual.27/8/10 13:52:25
RCX-1500 Stereo Compact Disc Receiver10AC Power and ControlAC Power Input JYour RCX-1500 is configured at the factory for the proper AC line voltagein the country where you purchased it (USA: 120 volts/60 Hz, Europe:230 volts/50 Hz). The AC line configuration is noted on a label on theback panel.The RCX-1500 is supplied with the proper AC power cord. Use only thiscord or an exact equivalent. Do not modify the supplied cord. Do notuse an extension cord.Be sure the power switch on the front panel of the RCX-1500 is turnedoff. Then, plug one end of the cord into the AC power connector onthe back panel of the amplifier. Plug the other end into an appropriateAC outlet.If you are going to be away from home for an extended period of time,it is a sensible precaution to unplug your receiver.Standby Switch and Indicator Light 1 2The Standby Switch is located on the left side of the front panel. TheStandby Indicator ring will illuminate when the AC mains are connected.This indicates the unit is in Standby mode.To turn the unit ON, push the Standby switch once, the front displaywill illuminate, indicating the unit is out of Standby mode and readyfor operation.Connection OverviewBefore continuing further to other sections in the manual, please makesure all the cable connections are made properly. Refer to figure 2.USB Connection AThe socket on the front panel below the STANDBY switch is for USBconnection. Music storage devices can be accessed by the RCX-1500through this input. Music storage devices such as MP3 players, iPod, USBmemory sticks or any other form of memory devices with USB interfacecan be connected to the RCX-1500 through the front USB socket. RCX1500 will automatically search music files from the connected storagedevice.NOTE: You must insert the Wi-Fi dongle (or wire adaptor) to the ETHERNETport on the rear panel. The unit will first search for available networksbefore allowing access to DAB and FM functions. If networks are notavailable, the unit will display “Network Error”. FM and DAB functionswill operate normally after the initial network search.ANALOG INPUT-AUX 2 DThe RCX-1500 can receive analog music signals from other sources, suchas your CD players analog outputs. Connect the LEFT and RIGHT outputsof the source to the LEFT and RIGHT input of the AUX 2 Input.PRE OUT EThe RCX-1500 can send analog signals to a second amplifier throughthe connectors labeled PRE OUT. Use this connection if you wish to useanother power amplifier to drive your speakers.Network Connection FConnect the Rotel supplied USB Wi-Fi dongle to the USB port on the RCX1500 rear panel labeled ETHERNET. The RCX-1500 has been configuredto work with the supplied USB Wi-Fi dongle. No additional software/setup is required. The RCX-1500 is now ready to connect to your wirelessLAN. Refer to Internet Radio section for detailed setup.NOTE: Not all USB Wi-Fi/Wired dongles will operate with the RCX-1500.Please use the one supplied by Rotel.DIGITAL INPUT-AUX 1 GThe RCX-1500 can play digital music signal from other sources, such asyour CD player’s digital output. There are two connectors on the AUX1 Digital Input area on the rear panel, labeled with coaxial and optical.Connect the coaxial or optical output of your source to the coaxial oroptical input of the RCX-1500.Computer I/O HThis RCX-1500 can be operated from a computer with audio systemcontrol software from third-party developers. This control is accomplishedby sending operating codes from the computer via a hard-wired RS-232serial connection. In addition, RCX-1500 can be updated using specialsoftware from Rotel.For additional information on the connections, cabling, software, andoperating codes for computer control or updating of the unit, contactyour authorized Rotel dealer.NOTE: RCX-1500 use USB 2.0 standard to access music files. The unitcan playback music files stored on storage devices that are compliantwith USB 2.0 standard. However, it will not operate with devices thatrequire additional drivers.Speaker Connections IPHONES Connection BSpeaker Wire SelectionThe socket on the front panel below the USB socket is for headphones.Plug a 3.5mm headphone jack into the socket to listen to music throughheadphones. Connecting headphones will automatically turn off theoutput to the loudspeakers.DAB/FM Broadcasting CPlease use supplied indoor antenna to connect the DAB and FM connectoron the rear panel. To receive the best FM signal, make sure there is enoughroom for the T-shaped indoor antenna to fully extend. Eyelets at bothends of the T allow tacking the antenna to a wall if desired. Experimentwith different positions to maximize reception.RCX1500 ENG SPA FRE GER DUT ITA RUS SWE.indb 10Speaker SelectionThe nominal impedance of the loudspeakers connected to each channelof the RCX-1500 should be no lower than 4 ohms.Use insulated two-conductor stranded wi
6 RCX-1500 Stereo Compact Disc Receiver Important Notes When making connections be sure to: 4 Turn off all the components in the system before hooking up any components, including loudspeakers. 4 Turn off all components in the system before changing any of the connections to the system. It is also recommended that you: 4 Turn the volume control of the amplifier all the