Transcription
PATHWAY CTS 1500CONTINENCE EVALUATION and TRAINING SYSTEMOPERATOR’S GUIDECopyright 2013THE PROMETHEUS GROUPOne Washington Street, Suite 303Dover, New Hampshire 03820FOR ASSISTANCE, CALL YOUR LOCAL SALES REPRESENTATIVE, DISTRIBUTOR, OR THE PROMETHEUS GROUP AT800.442.2325 IN THE U.S. AND CANADA OR 603.749.0733 INTERNATIONAL. FOR TELEPHONE TECHNICAL SUPPORT CALL800.272.8492 IN THE U.S. AND CANADA OR 603.742.6053 INTERNATIONAL.WEBSITE: www.theprogrp.comE-MAIL: info@theprogrp.com52 055PTgEN
Pathway CTS 1500 Operator’s GuidePage 2 of 74CONTENTSNOMENCLATURESERVICE INFORMATIONTECHNICAL SUPPORTINDICATIONS FOR USEMuscle Activity MeasurementCONTRA-INDICATIONS FOR USEWarningsCautionsEQUIPMENT & ACCESSORIESCONTENTSCHAPTER 1: PHYSICAL-MECHANICAL OVERVIEW & SETUPThe Pathway CTS 1500 ModuleConnecting the Pathway CTS 1500 ModulePowering the Pathway CTS 1500 ModuleEMG A/Stim ChannelEMG B ChannelCHAPTER 2: PATHWAY CTS 1500 SOFTWARE SETUPInitial Startup ProcessThe First Time Startup Opening ScreenCreate an AssociateCreate a LocationCreate Unique IdentifiersCHAPTER 3: CTS 1500 TOOLSIntroductionView System SetupCreate/Edit/View AssociatesCreate/Edit/View LocationsView Associate ActivitiesPelvic Muscle RehabilitationCreate a PatientSelect an Existing PatientCreate a Patient VisitAttachmentsLaunch CTS 1500 EMG/StimA 2EMGs, EnduranceH Stim, 50Hz, 5on10off, 15minDiagnosis and Plan of CareSession EvaluationExercise PrescriptionOpening DocumentsReview Current VisitReview Previous VisitsReview Patients By DateActive Treatment Screen Changes AddendumModify ProtocolChannelsDisplay TypeColorsTiming/SoundStim 656585860616365
Pathway CTS 1500 Operator’s GuideGoalsNamesMarkersUtilitiesDelete ProtocolSOFTWARE LICENSE AGREEMENTSTANDARD WARRANTY SERVICE AGREEMENTPage 3 of 7465676769707374 2013 THE PROMETHEUS GROUP. All rights reserved. This document contains confidential and proprietary information that is the property of THEPROMETHEUS GROUP and is protected by the copyright laws of the United States, international copyright treaties, and all other applicable nationallaws. Any unauthorized use, reproduction or transfer of any information in this document is strictly prohibited. This document contains informationregarding technology that is protected under one or more United States patents and other pending United States and foreign patents. THEPROMETHEUS GROUP logo and combinations thereof, Prometheus are trademarks of THE PROMETHEUS GROUP, One Washington Street,Suite 303, Dover, NH 03820. Pathway is a registered trademark of THE PROMETHEUS GROUP. All other brand and product names are used foridentification only and are the property of their respective holders. Specifications are subject to change without notice. Printed in U.S.A.www.theprogrp.com
Pathway CTS 1500 Operator’s GuidePage 4 of 74NOMENCLATUREIn this Operator’s Guide, NOTES, CAUTIONS, and WARNINGS are included, which have the followingimplications:NOTE: A procedural emphasis - usually something regarding preparation for a process or a reminder thatsome bit of information recorded here will be used later for another purposeCAUTION: A hazard to a piece of equipment or property – for example, potential for an electricalshort, water damage, or some other danger to the equipment but not the operator or patient. WARNING: A hazard to a person - a potential danger to the operator or patient such as electricalshock or some other potential danger.SERVICE INFORMATION WARNING: There are no serviceable parts within this device. The user should not attempt toservice the instrument beyond that described in the Pathway CTS 1500 Device Operator’s Guide.Refer all other servicing to qualified service personnel. Please call 1-800-272-8492 in the U.S.A. andCanada, or 1 (011) 603-742-6053 international, or e-mail support@theprogrp.com The instrument should be serviced by qualified service personnel when: Any cable, cord, or plug has been damaged. The instrument does not appear to operate normally or exhibits a marked change inperformance. The instrument has been dropped, or the casing is damaged. Fluid has been spilled on the instrument, or it has been immersed, and it appears that fluidhas entered the housing.TECHNICAL SUPPORTTo contact THE PROMETHEUS GROUP Technical Support for assistance: Telephone: 800-2728492 U.S.A. and Canada; 1 (011) 603-742-6053 international; e-mail: support@theprogrp.com.www.theprogrp.com
Pathway CTS 1500 Operator’s GuidePage 5 of 74INDICATIONS FOR USEMuscle Activity Measurement Muscle re-education, strengthening, endurance building, and relaxation of skeletal muscles, specificallythe pelvic floor muscles. Assessment of pelvic floor dysfunctions, monitoring the muscle activity associated with the performanceof Kegel exercises. Assessment of conditions including stress incontinence, mixed incontinence, and urge incontinence.CONTRA-INDICATIONS FOR USE Active Infection or Genital DiseaseSevere Pelvic PainPregnancyPostpartum or Post Surgical (6 weeks)Atrophic VaginitisDyspareuniaMenstrual PeriodPacemaker or Cardiac ArrhythmiaPresence of Any Known MalignancyHistory of Severe Urine RetentionProlapseDiminished sensory perceptionWarnings device is not intended for use with anesthetic gases mixed with air, oxygen or nitrous oxide. Danger of Thiselectrical ignition. Use only electrodes from THE PROMETHEUS GROUP with the Pathway CTS 1500. Any other electrodesmay not be compatible with the Pathway CTS 1500. Do NOT immerse any part of this system in any fluid. reduce the risk of electrical shock, Do NOT connect any preamplifier, lead wire, electrode, or any other Tocomponent to a wall outlet. Do NOT leave electrodes attached when device is not in use. reduce the risk of electrical shock, Do NOT open the instrument’s housing. Refer servicing to qualified Topersonnel only. Disassembly of equipment by unauthorized personnel will void the instrument’s warranty. following practices may be dangerous and void any guarantee(s) and obligations for THE ThePROMETHEUS GROUP: (1) The device is not used according to the enclosed manuals and otheraccompanying documentation; (2) The device is modified by persons other than THE PROMETHEUS GROUP Service Technicians; (3) Do not use accessories, consumables and components not supplied orapproved by THE PROMETHEUS GROUP. Discontinue use if bleeding develops. Be sure stimulation is off while inserting or removing sensors/electrodes. Skin irritation may develop beneath or around electrode sites.www.theprogrp.com
Pathway CTS 1500 Operator’s GuidePage 6 of 74CautionsPrior to using this device, be sure to read the CTS 1500 Device Operator’s Guide for installation,maintenance, cleaning, technical data, service, and warranty information.Federal law (USA) restricts this device for sale by or on the order of a licensed medicalpractitioners, licensed by law in the state in which they practice.Use only the approved power supply supplied with this device.Be sure that USB Serial Interface Cable is no longer than 3 meters.HIPAA requires safeguards to protect patient privacy. Connecting this system to a network isdone at your own risk.EQUIPMENT & ACCESSORIESBefore setting up the Pathway CTS 1500 system for the first time, carefully open the packing cartonsand confirm that all Pathway CTS 1500 equipment and accessories listed below are included andagree with the packing list/invoice. If there are questions about the contents or you wish to orderadditional supplies, call Customer Service, Toll-Free: 1.800.442.2325 in the U.S.A. and Canada, 1(011) 603.749.0733 international, or Fax: 1.603.749.0511. Customer Service Representatives are onduty between 9:00 a.m. and 5:00 p.m., Eastern Standard Time.CONTENTSPathway CTS 1500 Continence Evaluation and Training SystemOne Pathway CTS 1500 Module consisting of two channels of EMG and one channel of electricalstimulation with Pathway CTS 1500 Software.Includes: One Notebook Computer with Operator’s Guide, Color Printer with Operator’s Guide, PowerSupply, USB Serial Interface Cable, Pathway CTS 1500 Operator’s Guide.Starter Accessory Package:Part Number(Quantity)Description7400(4)Disposable Lead Wire Electrodes Sample Packets6750(4)Pathway Electrodes Sample Packets7300(1)Ch A 10’ Interface Cable for 7400 Disposable Lead Wire Electrodes2583E(1)Ch B Extended Pathway Preamplifier6330(4)Pathway Vaginal EMG/Stimulation Sensor6340(2)Pathway Rectal EMG/Stimulation SensorSupport Services:(1) Unlimited hardware and software telephone Technical SupportNOTE: P.O./Quote dictates what accessories are included; The Packing slip/Invoice is generated fromthe P.O./Quote.www.theprogrp.com
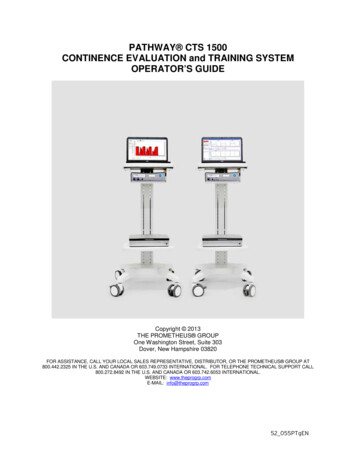
Pathway CTS 1500 Operator’s GuidePage 7 of 74PATHW AY IS A REGISTERED TRADEMARK OF THE PROMETHEUS GROUP. THE PATHW AY CTS 1500 SOFTW ARE AND THIS MANUAL ARE COPYRIGHT 2013, THE PROMETHEUS GROUP.CHAPTER 1:PHYSICAL-MECHANICAL OVERVIEW & SETUPThe Pathway CTS 1500 ModuleFigure 1Figure 2Figure 3Figure 4Figure 1. Complete Pathway CTS 1500 system with optional Point of Care Cart. Figure 2 Top. Front panel of Pathway CTS1500 Module. Input EMG A/Stim for Part Numbers 7300, 6330 and 6340. EMG B for Part Number 2583E. Large, illuminated blueOn/Off Power Button. Figure 2 Bottom. Left-12V DC Power Input. Center-blank panel. Right-USB Cable Interface. The Pathway CTS 1500 Module is powered by an external medical grade power supply. Units for use in the U.S.A. are configured for 115-120 V,60 Hz AC. Figure 3. Part Number 7300. Figure 4 Part Number 2583ENOTE: Before using the Pathway CTS 1500 system, the Pathway CTS 1500 software MUST beconfigured and patient information entered into the system. See Chapter 2: Pathway CTS 1500SOFTWARE SETUP for software configuration and Chapter 3: USING Pathway CTS 1500SOFTWARE for entering patient information.CONNECTING THE PATHWAY CTS 1500 MODULE1.Connect the USB cable to the USB Cable Interface2. Connect the other end of the USB Cable to the Notebook Computer.www.theprogrp.com
Pathway CTS 1500 Operator’s GuidePage 8 of 74POWERING THE PATHWAY CTS 1500 MODULE1. Connect the Power Supply to the 12VDC Power Input.2. Connect the Line Power Cord to the Power Supply.3. Connect the Line Power Cord to an electrical wall outlet.NOTE: It is recommended that the Line Power Cord be connected DIRECTLY to an available walloutlet and NOT a power strip. Nongrounded power strips can creat electrical interference with thePathway CTS 1500 Module operation. If necessary, use a heavy duty extension cord with multipleoutlets.4. Turn the Pathway CTS 1500 Module ON by pressing the blue On/Off Power Button on the frontpanel.5. When the Pathway CTS 1500 Module is ON, the On/Off Power Button will illuminate. This indicatesthat the Pathway CTS 1500 Module is ready for operation. If the On/Off Power Button does notilluminate, press the On/Off Power Button again (turning it OFF) and follow these trouble-shootingsteps:a. Be sure the Power Supply is firmly connected to the 12VDC Power Input.b. Be sure the Line Power Cord is plugged firmly into the Power Supply.c.Be sure the Line Power Cord is connected to an electrical outlet and the electrical outlet isoperational.d. Be sure the green light on the Power Supply is illuminated.6. Press the Pathway CTS 1500 Module On/Off Power Button.NOTE: If the Pathway CTS 1500 Module still does not turn on, contact THE PROMETHEUS GROUP Technical Support for further assistance. Telephone: 800.272.8492 U.S.A. and Canada; 1(011) 603.742.6053 international; e-mail: support@theprogrp.com.www.theprogrp.com
Pathway CTS 1500 Operator’s GuidePage 9 of 74EMG A/STIM CHANNEL1. Pelvic Muscle EMG and Stimulation channel. Input for the intracavity #6330 Pathway VaginalEMG/Stimulation Sensor, the intracavity #6340 Pathway Rectal EMG/Stimulation Sensor or theexternal pelvic muscle EMG #7300 Ch A 10’ Interface Cable for 7400 Disposable Lead WireElectrodes. Make certain orientation of the connector matches the input jack (flat side of connectorfacing up), push firmly (do NOT twist). Refer to the instructions for use, cleaning and care enclosedwith each sensor or cable.#6330 Pathway Vaginal EMG/Stimulation Sensor#6340 Pathway Rectal EMG/Stimulation Sensor#7300 Ch A 10’ Interface Cable for 7400 Disposable Lead Wire Electrodes and #7400 Disposable Lead Wire Electrodes2. Match the colors of the #7300 Ch A 10’ Interface Cable for 7400 Disposable Lead Wire Electrodes tothe #7400 Disposable Lead Wire Electrodes and push the pins completely into the sockets. The twored lead wires, referred to as the “Active” electrodes, will be placed at a 10:00 and 4:00 o’clockposition perianally. The green lead wire, referred to as the “Reference” or “Ground” electrode will beplaced in a neutral location such as the Coccyx or Gluteal muscle.Positioning the #7400 Disposable Lead Wire Electrodes on the pelvic muscle.www.theprogrp.com
Pathway CTS 1500 Operator’s GuidePage 10 of 74EMG B CHANNEL1. Accessory muscle EMG channel. Input for #2583E Ch B Extended Pathway Preamplier.#2583E Ch B Extended Pathway Preamplifier and #6750 Pathway Electrode2. Attach a #6750 Pathway Electrode to the #2583E Ch B Extended Pathway Preamplifier. Align the snaps correctly and snap together. EMG B Channel will be used formeasurement of the accessory muscle. Place the #6750 Pathway Electrode on the right abdominals,to avoid the descending aorta, just above the pubic hairline.Positioning the #6750 Pathway Electrodes on the accessory muscle.NOTE: Accessory Muscles such as Abdominals, Leg Adductors and Gluteals are commonly monitoredby placing the active electrodes over the bulk of the muscle. Prepare the skin with an alcohol pad toavoid high impedance artifact. Wipe dry with a tissue or cloth.NOTE: Use only accessories, consumables and components supplied or approved by THEPROMETHEUS GROUP. Using off brand items may result in inaccurate readings, misdiagnosis, orpossible damage to the unit and void the unit’s warranty.www.theprogrp.com
Pathway CTS 1500 Operator’s GuidePage 11 of 74CHAPTER 2:PATHWAY CTS 1500 SOFTWARE SETUPFor general assistance, contact THE PROMETHEUS GROUP Technical Support: Telephone: 800272-8492 U.S.A. and Canada; 1 (011) 603-742-6053 international; e-mail:support@theprogrp.com.Initial Startup ProcessThe Pathway CTS 1500 Software comes preloaded on the Notebook Computer supplied with thesystem. Before operating the system for the first time, the software MUST be configured by entering theAssociate or Associates who will have access to the program and the level of access, the Location orLocations (if there are multiple clinics) of the practice, and how patients will be identified.To start, double click the CTS 1500 icon on the Windows Desktop.Read the Software License Agreement on Page 71 of this guide. Click OK.www.theprogrp.com
Pathway CTS 1500 Operator’s GuidePage 12 of 74THE FIRST TIME STARTUP OPENING SCREENClick Next.CREATE AN ASSOCIATE1. Create an Associate will appear. This is to create an associate with login permissions. Additionalassociates can be added later. Click Next.www.theprogrp.com
Pathway CTS 1500 Operator’s Guide2. Associate Profile will appear.www.theprogrp.comPage 13 of 74
Pathway CTS 1500 Operator’s GuidePage 14 of 743. Click on the fill-in boxes and key in the information. All red entry fields must be completed to satisfythe minimum description requirements. All black entry fields are optional.In the entry field, Is this profile a Provider, Office Staff or a Referring Physician? and othersimilar entry fields with drop down lists, click on the drop down arrow to open the list of options. Clickon the appropriate option. Note that only a Care Provider or Office Staff may have login privileges.In the example shown, Care Provider is selected.4. Select Yes for CTS 1500 System login capability.NOTE: This initial Associate MUST be given CTS 1500 System login capability and MUST be givena Username and Password. The program will not proceed until these steps are taken. The systemwill automatically assign Admin status to this initial Associate.5. Click Set Username/Password.6. Enter the information and click OK.www.theprogrp.com
Pathway CTS 1500 Operator’s GuidePage 15 of 747. Verify Password will appear. Re-enter the password and click OK. If the password is not enteredexactly as before, the program will prompt for the password to be re-entered correctly.NOTE: It is strongly recommended that the Username and Password be recorded in a secure locationfor future reference.8. OPTIONAL: Additional Associate information may be entered into Contact Information andAdditional Notes. This, and other optional information, can be added later.9. OPTIONAL: Associate Profile Edit History contains profile edit data. This data may be needed forcompliance with HIPAA and other legal requirements.10. There is now enough required information in the Associate Profile to satisfy the minimal associatedescription. Click the Close button to exit.11. Save the data that was updated will appear. Click YES.12. Saving Associate Data will appear.13. Associates List Screen will appear. The Associate just entered is listed. Additional associates maybe entered at this time but are not required, click Close to continue the Initial Startup Process.www.theprogrp.com
Pathway CTS 1500 Operator’s GuidePage 16 of 74CREATE A LOCATION1. Create a Location will appear. The purpose of this is to create a place of service. Additionallocations, if necessary, can be added later. Click Next.NOTE: The red entry field Business Name MUST be filled in. While additional information may beentered later, entering the address and phone number of this location now will complete the headersection of the documents.www.theprogrp.com
Pathway CTS 1500 Operator’s GuidePage 17 of 742. There is now enough required information in the Location Profile to satisfy the minimal locationdescription. Click Close.3. Save the data that was updated will appear. Click YES.4. Saving Location Data will appear.5. Locations List Screen will appear. Note that the Location just entered is listed. Additional Locationsmay be entered at this time but are not required. Click Close to continue the Initial Startup Process.www.theprogrp.com
Pathway CTS 1500 Operator’s GuidePage 18 of 74CREATE UNIQUE IDENTIFIERS1. Create Unique Identifiers will appear. This is the method by which patients will be identified in thepatient database. This feature ensures that the practice is compliant with HIPAA requirements forpatient privacy. Click Next.2. Click on the appropriate box or boxes to choose one or more Unique Patient Identifiers. Clicking ona box with a check mark ( ) removes the check mark and that method of identifying the patient. Theexample shows Full Name checked. Click OK.3. Congratulations will appear. The Initial Startup Process is now complete. Click Next.www.theprogrp.com
Pathway CTS 1500 Operator’s GuidePage 19 of 744. LOGIN will appear. Enter the Username and Password to use the program now. Click the dropdown arrow to select the Location of Service. Click on the correct Location of Service. ClickLOGIN. Click Cancel to exit the program.CHAPTER 3:CTS 1500 TOOLSIntroduction1. Launch the Pathway CTS 1500 Software by double clicking on the CTS 1500 icon on the WindowsDesktop.2. After the Pathway CTS 15000 Software loads, the login window will appear. Input the Usernameand Password and select the Location of Service entered during the Initial Startup Process. ClickLOGIN.3. The Pathway CTS 1500 software has two main components:www.theprogrp.com
Pathway CTS 1500 Operator’s GuidePage 20 of 74a. Administrative functions, which are accessed from the Opening Screen by clicking CTS 1500Tools.b. Clinical functions, including patient treatments and documents, which are accessed by clickingStart Here.NOTE: Access to the CTS 1500 Tools section is restricted to Administrators only and is used toCreate/Edit/View Associates and Locations, change Unique Patient Identifiers, or View AssociateActivities. If not adding or changing these proceed directly to the clinical functions Start Here.4. Click CTS 1500 Tools.5. The CTS 1500 Tools window will appear.VIEW SYSTEM SETUP1. Click View System Setup.2. System Setup will appear.www.theprogrp.com
Pathway CTS 1500 Operator’s GuidePage 21 of 74a. Unique Patient identifiers. Select from the four options. Unique ID will provide the option toenter any sequence of letters and numbers while Full Name, Social Security Number and Dateof Birth will use the patient’s existing information.b. Database Location. A default location for the database is automatically provided. Click Browseto change the location of the database. A Windows Browse window will appear allowing fornavigation to the location on the computer or network where the database is to be located. Follow standard Microsoft procedure to create a new folder at the location, and then click Exit andchange to new Database location to enable the CTS 1500 software to automatically navigate tothe location selected.c. Database Backup. Select a location for the database backup file; for example, on a LAN or WANserver. Click Backup Database Now to perform an immediate backup of the database manually.The database backup schedule may be set to Manual (user maintained) or Automatic (softwaremaintained with user prompts) backup by clicking on the appropriate button. The daily intervalbetween automatic backups may be set by using the up/down arrows next to the entry box toincrease or decrease the interval. Automatic backups on a daily basis are recommended. Uponcompletion of changes to the System Setup options, click OK to save changes. Clicking Cancelwill delete any changes and exit to CTS 1500 Tools.CREATE/EDIT/VIEW ASSOCIATES1. Click Create/Edit/View Associates.www.theprogrp.com
Pathway CTS 1500 Operator’s GuidePage 22 of 742. Associates List Screen will appear.3. Click Create new Associate.4. Associate Profile will appear. Complete as instructed in the Initial Startup Process.5. Click Close on the Associate Profile when complete.6. Click YES on Save the data that was updated.7. Associates List Screen will appear with the new entry.8. To view and/or edit an associate profile, double click an associate name. Associate Profile willappear with the information available for viewing/editing. Click Close when viewing/editing iscomplete. Click YES on Save the data that was updated.www.theprogrp.com
Pathway CTS 1500 Operator’s GuidePage 23 of 749. Click Close on the Associate List Screen when creating/editing/viewing associates is complete.CREATE/EDIT/VIEW LOCATIONS1. Click Create/Edit/View Locations.2. Locations List Screen will appear.3. Click Create new Location.4. Location Screen will appear. Complete as instructed in the Initial Startup Process.www.theprogrp.com
Pathway CTS 1500 Operator’s GuidePage 24 of 745. Click Close on the Location Screen when complete.6. Click YES on the Save the data that was updated.7. Locations List Screen will appear with the new entry.8. To view and/or edit a location on the Locations List Screen, double click on the Business Name.www.theprogrp.com
Pathway CTS 1500 Operator’s GuidePage 25 of 749. Location Screen will appear with the information available for viewing/editing.10. Click Close when viewing/editing is complete.11. Click YES on the Save the data that was updated.12. Click Close on the Location List Screen when creating/editing/viewing of Locations is complete.VIEW ASSOCIATE ACTIVITIES1. Click View Associate Activities.www.theprogrp.com
Pathway CTS 1500 Operator’s GuidePage 26 of 742. View Associate Activities will appear.3. Select Search Type is used to Search by Associate or Search by Patient. Click the drop downarrow to expand the list and click an option.4. A list of associates or patients will appear. Double click on the associate or patient name. Activitieswill then populate with options depending on whether an Associate or Patient is selected and also thewww.theprogrp.com
Pathway CTS 1500 Operator’s GuidePage 27 of 74Associate’s permissions. Click on an option. In the example shown below, Search by Associate,Leonard Phillips MD, and ALL Activity is selected. Additionally, Custom Selection is selected and03/03/2005 is keyed into Begin Date and 03/27/2009 is keyed into End Date. All Dates will return allactivities for an associate or patient since the profile was created. Custom Selection can be used tonarrow the scope of the search. Click FIND.5. The search found 265 records for Leonard Phillips MD for the time period. The Search Resultslistbox displays 28 records within the window. To view additional records use the scroll bar at the rightof the window:6. Double clicking on a record displaying EDIT in the Activity column will open Patient Visit EditsDisplay showing the addition or edit that was made to that record. Click Print Preview to previewthe information in Adobe Reader. Click Print to print the information. Click OK to close.7. Click Print on View Associate Activity Screen to print the entire list of activities. Click PrintPreview to preview the information in Adobe Reader.www.theprogrp.com
Pathway CTS 1500 Operator’s Guide8. Click Close.9. Click EXIT on the CTS 1500 Tools window to return to the Opening Screen.Pelvic Muscle RehabilitationOn the Pathway CTS 1500 opening screen click Start Here.CREATE A PATIENTwww.theprogrp.comPage 28 of 74
Pathway CTS 1500 Operator’s GuidePage 29 of 741. Click Create New Patient to establish a new patient record. Go to the following section SELECT ANEXISTING PATIENT (page 29) to select an existing patient.2. Enter the patient data. Red entries MUST be completed. The Provider selected should be thepatient’s primary provider. Create an Associate Profile if the provider does NOT appear on the list.Click Save New Patient. The Patient Selection Screen is now populated with the information.NOTE: Red entries will vary depending on what is specified as Unique Patient Identifiers. In theexample below, Full Name was specified and Unique ID, Social Security Number and Date of Birthwere NOT specified.3. Click Create New Patient and repeat Step 2 to create additional new patients.4. To edit/review patient information click Edit/Review Additional Patient Information. The PatientInformation Screen will open.5. Patient information can be edited/reviewed as necessary. Click Print and Print Preview to print thepatient informationwww.theprogrp.com
Pathway CTS 1500 Operator’s GuidePage 30 of 746. Click Close when complete.7. Save the data that was updated will appear. Click YES to exit and save the changes. Click NO toexit without saving the changes. Click Cancel to make additional changes. Click YES.8. Saving Patient Data will appearSELECT AN EXISTING PATIENT1. Click the drop down arrow in the Patient Last and First Name line. Use the scroll bar to browse thelist and click on the patient or key in the patient’s last name in the Patient Last and First Namewindow. Key in the last name and then the first name if there is more than one patient with the samelast name.2. Patient Selection will automatically populate with the patient’s information.www.theprogrp.com
Pathway CTS 1500 Operator’s GuidePage 31 of 743. Click Reset Patient Selection to choose a different patient.4. To place a patient on the inactive list, populate the Patient Selection screen with the patient andclick Edit/Review Additional Patient Information. Click the drop down arrow in the Active/InActiveStatus box and click InActive. Click the Show InActive Patients box on the Patient Selectionscreen to show the inactive patient list. Follow the same steps from the inactive patient list to return apatient to the active list clicking Active in the Active/InActive Status box.CREATE A PATIENT VISITOnce a patient is selected Create Patient Visit is active and Attachments or Launch CTS 1500EMG/Stim Treatment can be selected.ATTACHMENTSwww.theprogrp.com
Pathway CTS 1500 Operator’s GuidePage 32 of 741. Three Attachments are available: Intake Medical Issues, Histories and Physical Exams.2. Intake Medical Issuesa.Double click Intake Medical Issues.b.Entry box for Select an Associate will appear. Click the drop down arrow to expand the list.Click the correct associate. Click OK.NOTE: Be sure to select the associate who is actually administering the patient care.3. Creating Patient Visit will appear.www.theprogrp.com
Pathway CTS 1500 Operator’s GuidePage 33 of 744. Issues and Histories provided this visit will appear. Enter the Written description of chiefcomplaint by keying in the window. Complete the remainder by clicking on the drop down arrow andclicking an option. Add comments by keying in the selected window.5. In the What causes you to leak? section use the scroll bar to access additional causes Click on thecause(s) to select. Click on the selected cause(s) to deselect.6. Click Enter Additional Cause and key in if the cause does not appear on the list. Click OK.7. Click Close.www.theprogrp.com
Pathway CTS 1500 Operator’s GuidePage 34 of 748. Click Yes.9. When the Patient Selection Screen reappears.a. Create Patient Visit becomes Current Patient Visit with a visit number, date and time.b. The status of Intake Medical Issues is now Cached (saved in memory).c. A Care Administered by box appears with the associate selected when accessing Intake MedicalIssuesNOTE: Once Intake Medical Issues is completed, future patient visits will become Current MedicalIssues.Attachments can be completed prior to or after Launch CTS 1500 EMG/Stim Treatment or at a futuretime.www.theprogrp.com
Pathway CTS 1500 Operator’s GuidePage 35 of 74LAUNCH CTS 1500 EMG/STIM1. Click Launch CTS 1500 EMG/Stim Treatment.2. Save the data that was
Pathway CTS 1500 Operator's Guide Page 6 of 74. www.theprogrp.com . Cautions . EQUIPMENT & ACCESSORIES . Before setting up the Pathway CTS 1500 system for the first time, carefully open the packing cartons and confirm that all Pathway CTS 1500 equipment and accessories listed below are included and agree with the packing list/invoice.