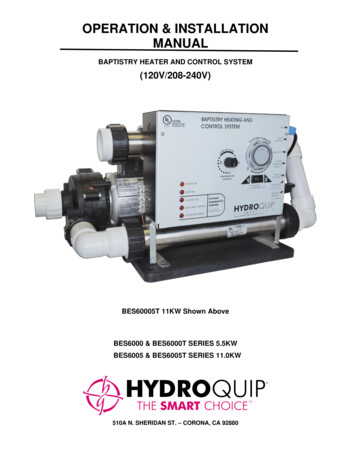
Transcription
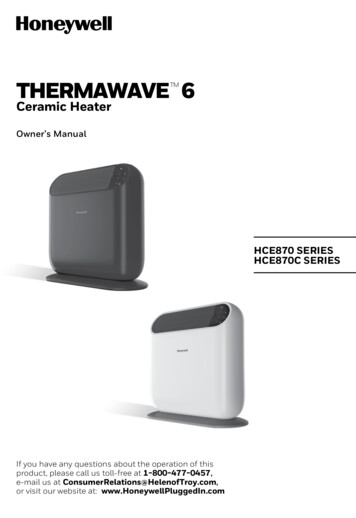
Air PurifierHeaterFan 6THERMAWAVETMCeramic HeaterOwner’s ManualHumidifierFilterAir PurifierHCE870 SERIESHCE870C SERIESIf you have any questions about the operation of thisproduct, please call us toll-free at 1-800-477-0457,e-mail us at ConsumerRelations@HelenofTroy.com,or visit our website at: www.HoneywellPluggedIn.com
IMPORTANT SAFETY INSTRUCTIONSREAD AND SAVE THESE SAFETY INSTRUCTIONS BEFOREUSING THIS HEATERWARNING – READ AND SAVE THESE OPERATING AND SAFETY INSTRUCTIONS BEFORE USINGTHIS HEATER. IF YOU DO NOT UNDERSTAND THESE INSTRUCTIONS OR PRODUCT LABELSPLEASE CALL OUR CUSTOMER REPRESENTATIVES AT (800) 477-0457 FOR ASSISTANCEBEFORE USING THIS PRODUCTWarning – Failure to follow any of these safety instructions could result in fire, injury or death.YOUR RESPONSIBILITIESElectrical appliances may expose people to hazardsthat can cause severe injury as well as death. Theuse of electrical products may create hazardsthat include, but are not limited to, injury, fire,electric shock and electrical system damage. Theseinstructions are intended to provide you with theinformation you need to use the product correctlyand to help avoid hazards.When using electrical appliances, basicprecautions should always be followed to reducerisk of fire, electric shock, and injury to personsincluding the following:1. Warning – Read all instructions before usingthis heater.2. Warning – This heater is hot when in use. Toavoid burns, DO NOT let bare skin touch hotsurfaces. Use handles when moving this heater.Keep combustible materials, such as furniture,pillows, bedding, papers, clothes, and curtainsat least 3 feet (0.9 m) away.3. Warning – Extreme caution is necessarywhen any heater is used by or near childrenor invalids. DO NOT leave operating andunattended.4. Warning – ALWAYS unplug heater when notin use.5. Warning – DO NOT operate any heater witha damaged cord or plug, any heater thatmalfunctions, or any heater that has beendropped or damaged in any manner.6. Warning – For residential use only.7. Warning – DO NOT use outdoors.8. Warning – This heater is not intended for usein bathrooms, laundry areas and similar indoorlocations. NEVER locate heater where it mayfall into a bathtub or other water container.9. Warning – DO NOT run cord under carpeting.DO NOT cover cord with throw rugs, runners, or10.11.12.13.14.15.16.2similar coverings. DO NOT route cord underfurniture or appliances. Arrange cord awayfrom traffic area and where it will not be atripping hazard.Warning – This appliance has a polarized plug(one blade is wider than the other). To reducethe risk of electric shock, this plug is intendedto fit in a polarized outlet only one way. If theplug does not fit fully in the outlet, reverse theplug. If it still does not fit, contact a qualifiedelectrician. DO NOT attempt to defeat thissafety feature.Warning – This heater draws 12.5 ampsduring operation. To prevent overloading acircuit, DO NOT plug the heater into a circuitthat already has other appliances working.Warning – It is normal for the plug to feelwarm to the touch; however, a loose fit betweenthe AC outlet (receptacle) and plug may causeoverheating and distortion of the plug. Contacta qualified electrician to replace loose or wornoutlet.Warning – To disconnect the heater, first turnoff the product, then grip the plug body andpull it from the wall outlet. NEVER pull by thecord.Warning – DO NOT insert or allow foreignobjects to enter any ventilation or exhaustopening as this may cause an electric shock orfire, or damage the heater.Warning – To prevent a possible fire, DO NOTblock air intakes or exhaust in any manner. DONOT use on soft surfaces, like a bed, or whereopenings may become blocked.Warning – A heater has hot and arcing orsparking parts inside. DO NOT use it in areaswhere gasoline, paint or flammable liquids areused or stored.
17. Warning – Use this heater only as described inthis manual. Any other use not recommendedby the manufacturer may cause fire, electricshock, or injury to persons.18. Warning – ALWAYS plug heater directly intoa wall outlet/receptacle. NEVER use withan extension cord or relocatable power tap(outlet/power strip).19. Warning – NEVER tamper with this productor attempt to fix it. Any tampering with, ormodification of this product can result inserious injury, death, or fire. DO NOT open. Riskof electric shock. There are no user serviceableparts inside.20. Warning – DO NOT remove product labels thatcontain warnings or safety instruction.21. Caution – The output of this heater may varyand its temperature may become intenseenough to burn exposed skin. Use of thisheater is not recommended for persons withreduced sensitivity to heat or an inability toreact to avoid burns.22. Caution – Before cleaning, or storage, or whennot in use, turn the product’s controls to theOFF position and unplug the heater from theelectrical outlet and allow to cool.23. Caution – Place the heater on a firm, level,open surface free from obstructions and atleast 3 feet (0.9 m) away from any combustiblematerials. DO NOT use on an unstable surfacesuch as bedding or deep carpeting. Be sure theheater is not in a position where it may be atripping hazard.24. Caution – If your home has aluminumwiring have a licensed electrician check yourreceptacle’s connections. When using a 1500watt heater, aluminum wire connections cancause a safety issue.25.SAVE THESEINSTRUCTIONS3
ABOUT CERAMIC TECHNOLOGYCeramic heaters generate heat by passing electricity through heating wires embedded in ceramic plates.This type of heating technology provides fast, even heating.The Thermawave 6 Heater was designed for maximum heat output.ASSEMBLYThis heater requires simple, no tool assembly.Unpack Main Body and Mounting Base (Fig. 1).Place Mounting Base on a firm surface. Place ThermaWaveTM 6 Heater Main Body on MountingBase so Mounting Tabs are aligned with Base Slots. Press Main Body onto the Base until Tabs snaps secureinto the Slots (Fig. 2).Fig. 1Fig. 2SET-UPPlace the heater on a firm, level, open surface free from obstructions and at least 3 feet (0.9 m) away fromany wall or combustible material. DO NOT use on an unstable surface such as bedding or deep carpeting.BE SURE THE HEATER IS NOT IN A POSITION WHERE IT MAY BE A TRIPPING HAZARD.For best result, place heater on the floor to create warming room convection and allow heater to run for 5-10minutes to reach maximum heat output.MOVING THE HEATERTurn off the heater.Allow it to cool for ten (10) minutes.Unplug heater and move. This heater is equipped with a Cool Touch Handle for your convenience.4
OPERATIONNOTE: NEVER LEAVE AN OPERATING UNIT UNATTENDEDWith the Power Button in the OFF position, plug the heater into a polarized 120V outlet.DO NOT FORCE THE POLARIZED PLUG INTO THE OUTLET; it will only fit one way.The ThermaWaveTM 6 Heater is versatile and designed to be placed in the center of the room or closer to thewall (at least 3 feet away) for maximum convection room heating.ThermaWaveTM 6 Heater OperationTurn heater on by pressing ON ( ) button. The heater will default to the low setting.Adjust Louver to give directional heat control.To turn the unit off, press the power until none of the heat settings are illuminated and the red power light isoff. The fan will continue running for 60 seconds after the power is shut off, in order to cool down the heatingelement. Unplug the heater when you are finished using it.The Settings ( ) Button is equipped with three (3) settings: Fan Only ( ) Low Heat ( ), High Heat ( ). TheLow ( ) heat setting uses 900 watts of power and the High ( ) heat setting uses 1500 Watts of power.The Fan Only ( ) setting uses very low power and does not provide heat. You can select the proper settingto accommodate your comfort level with the Settings Button ( ). Press the button until the setting you wantis illuminated. The Low ( ) heat setting does not require as much electricity to operate, it is more energyefficient and may be a better option if you are concerned about amperage draw on a circuit when the heateris on the High setting.The Adjustable Thermostat ( ) button is equipped withModel 870 Series4 pre-set Heat Levels. To set Thermostat to one ofthese levels, press the Thermostat ( ) button until thetemperature desired is illuminated. The heater will operateat the High setting until the room reaches the desiredPower Buttontemperature. The heater fan will run for 60 seconds and3 Settingsturn off until the room temperature goes below desiredAuto/LO/HItemperature it will then turn back on.AdjustableLouverThe Timer Button ( ) is equipped with three (3) settings:Adjustabletwo hours (2h) four hours (4h) ) and eight hours (8h). TheThermostattimer option will illuminate once selected. The timer is noton if none of those three (3) timer settings are illuminated.Timer Option565 70 75 80 2h4h8h
SAFETY FEATURESThe ThermaWave 6 Heater is equipped with several devices and features for added protection: A 360º tip-over switch that disables the heater if it is tipped in any direction. Two high temperature safety sensors prevents overheating. If activated, unplug the device and wait at least20 minutes or allow the unit to cool completely. Make sure the operating conditions are safe and then plugthe heater back in and follow the OPERATION instructions. Thermal insulated wiring for heat resistance and reinforced wire connections to help protect against looseconnections. Built using a high temperature plastic and has a cool to touch housing and handle. The 8 hour timer auto off is the default setting upon powering the unit on. To select another option, press timer.CLEANINGWe recommend that the ThermaWave 6 Heater be cleaned at least once a month and beforeoff-season storage. Turn the heater OFF ( ) and unplug it. Allow it to cool. Use a dry cloth only to clean the external surfaces of the heater. DO NOT USE WATER, WAXES,POLISHES OR ANY CHEMICAL SOLUTIONS.STORAGE Before storing, clean the ThermaWave 6 Heater using the above-mentioned steps. Wrap the cord aroundthe unit. Place in its original box and store it in a cool, dry place.TROUBLESHOOTINGIf your ThermaWave 6 Heater shuts off unexpectedly or fails to operate, one of your heater safety featuresmay have been activated to prevent overheating. Be sure it is plugged in and that the electrical outlet is working. Check for any obstructions. If you find an obstruction, turn the heater OFF and unplug it. Allow the heaterto cool completely, then remove the obstruction. Wait at least 20 minutes, then plug the heater back inand follow the OPERATION instructions. Make sure the heater is on a flat level surface so that the tip over switch is not engaged.6
PRODUCT SPECIFICATIONSModel(s)Unit DimensionsAmpsUnit VoltageMax WattsMax BTUs870 Series7.75” L x 17.8” W x 18.31” H (assembled)12.5120V, 60Hz15005118Operation Cost*To estimate the cost to operate this heater, multiply the watts used by 0.001 to convert into kilowatts thenmultiply the kilowatts used by your local kilowatt hour electric rate for however long you run the heater. Forexample, if your electric rate is 0.1326** per kilowatt hour and you ran this heater in constant high mode(1500 watts) for 4 hours, it would cost you 0.80 cents to run the heater (1500 watts x 4 hours x 0.001) x 0.1326 kwp 0.80 cents).NOTE: The Low setting does not require as much electricity to operate, it is more energy efficient and maybe a better option if you are concerned about the higher power consumption when the heater is on the Highsetting.*Calculation (Total Wattage x 0.001 x hours used) x Cost per Kilowatt Hour.**Average Retail Price of Electricity to Ultimate Customer by End-Use, US Energy InformationAdministration, July 2020.CONSUMER RELATIONSWe are here to help.Call us toll-free at: 1-800-477-0457E-mail: ConsumerRelations@HelenofTroy.com;Or visit our website at: www.HoneywellPluggedIn.comIn Canada visit: www.HoneywellPluggedIn.caPlease be sure to specify a model number located on the box and the back and bottom of your unit.NOTE: IF YOU EXPERIENCE A PROBLEM, PLEASE CONTACT CONSUMER RELATIONS FIRST OR SEE YOURWARRANTY. DO NOT RETURN TO THE ORIGINAL PLACE OF PURCHASE. DO NOT ATTEMPT TO OPEN THEMOTOR HOUSING YOURSELF, DOING SO MAY VOID YOUR WARRANTY AND CAUSE DAMAGE TO THE FANOR PERSONAL INJURY7
3 YEAR LIMITED WARRANTYYOU SHOULD FIRST READ ALL INSTRUCTIONSBEFORE ATTEMPTING TO USE THIS PRODUCT.B. At its option, Kaz will repair or replace thisproduct if it is found to be defective in materialor workmanship.A. This 3 year limited warranty applies to repair orreplacement of product found to be defectivein material or workmanship. This warranty doesnot apply to damage resulting from commercial,abusive, unreasonable use or supplemental damage.Defects that are the result of normal wear andtear will not be considered manufacturing defectsunder this warranty. KAZ IS NOT LIABLE FORINCIDENTAL OR CONSEQUENTIAL DAMAGESOF ANY NATURE, ANY IMPLIED WARRANTYOF MERCHANTABILITY OR FITNESS FOR APARTICULAR PURPOSE ON THIS PRODUCTIS LIMITED IN DURATION TO THE DURATIONOF THIS WARRANTY. Some jurisdictions do notallow the exclusion or limitation of incidental orconsequential damages or limitations on how longan implied warranty lasts, so the above limitationsor exclusions may not apply to you. This warrantygives you specific legal rights, and you also mayhave other rights which vary from jurisdictionto jurisdiction. This warranty applies only tothe original purchaser of this product from theoriginal date of purchase.C. This warranty does not cover damage resultingfrom any unauthorized attempts to repair orfrom any use not in accordance with theinstruction manual.Please go to:www.HoneywellPluggedIn.com/warrantyregistration to register your product and to sign upto receive new product information updates and newpromotional offers.8
FCC/ICES COMPLIANCEIn the USA:THIS DEVICE COMPLIES WITH PART 15 OF THE FCC RULESNOTE: This equipment has been tested and found to comply with the limits for a Class B digital device, pursuantto Part 15 of the FCC Rules. These limits are designed to provide reasonable protection against harmfulinterference in a residential installation. This equipment generates, uses, and can radiate radio frequency energyand, if not installed and used in accordance with the instructions, may cause harmful interference to radiocommunications. However, there is no guarantee that interference will not occur in a particular installation. If thisequipment does cause harmful interference to radio or television reception, which can be determined by turningthe equipment off and on, the user is encouraged to try to correct the interference by one or more of the followingmeasures: Reorient or relocate the receiving antenna. Increase the separation between the equipment and receiver. Connect the equipment into an outlet on a circuit different from that to which the receiver is connected. Consult the dealer or an experienced radio/TV technician for help. Please note that changes ormodifications of this product not expressly approved by the party responsible for compliance could void theuser’s authority to operate the equipment.ICES COMPLIANCEThis device complies with Industry Canada license exempt - RSS-210. Operation is subject to the following 2conditions: (1) This device may not cause interference and (2) This device must accept any interference includinginterference which may result in the undesirable operation of this device.9
10
Air PurifierHeaterFan 6THERMAWAVEMCRadiateur en céramiqueManuel d’instructionsHumidifierFilterAir PurifierSÉRIES HCE870SÉRIES HCE870CSi vous avez des questions sur le fonctionnement de ce produit, appelez-noussans frais, au 1-800-477-0457; vous pouvez également envoyer un courriel àConsumerRelations@HelenofTroy.com, ou visiter notre site Web, àwww.HoneywellPluggedIn.ca11
CONSIGNES DE SÉCURITÉ IMPORTANTESLISEZ ET CONSERVEZ CES MESURES DE SÉCURITÉ AVANTD’UTILISER CE RADIATEUR.AVERTISSEMENT – LISEZ ET CONSERVEZ CES MESURES DE SÉCURITÉ ET CE MODE D’EMPLOIAVANT D’UTILISER CE RADIATEUR. SI VOUS NE COMPRENEZ PAS CES INSTRUCTIONS OU LESÉTIQUETTES SUR L’APPAREIL, VEUILLEZ APPELER NOS REPRÉSENTANTS DU SERVICE À LACLIENTÈLE AU 1-800-477-0457 POUR OBTENIR DE L’AIDE AVANT D’UTILISER CET APPAREIL.AVERTISSEMENT – Le non-respect de ces consignes de sécurité pourrait entraîner un incendie, des blessuresou le décès de la personne.VOS RESPONSABILITÉSLes appareils électriques peuvent exposer à desrisques pouvant causer des blessures corporellesgraves ainsi que le décès de la personne. L’utilisationd’appareils électriques peut entraîner des risquescomprenant notamment, sans s’y limiter, desblessures corporelles, un incendie, des chocsélectriques et des dommages au système électrique.Ces instructions ont pour but de vous fournir lesrenseignements dont vous avez besoin pour utiliserl’appareil adéquatement et pour éviter de tels risques.Lorsque vous utilisez des appareils électriques,vous devez toujours prendre certainesprécautions élémentaires pour réduire les risquesd’incendie, de choc électrique ou de blessurecorporelle, notamment les suivantes :1. Mise en garde – Lisez toutes les instructionsavant d’utiliser ce radiateur.2. Mise en garde – Ce radiateur est chaudlorsqu’il fonctionne. Pour éviter les brûlures,ne laissez PAS la peau nue entrer en contactavec les surfaces chaudes. Utilisez les poignéespour déplacer l’appareil. Gardez les matièrescombustibles, comme les meubles, les oreillers,la literie, le papier, les vêtements et les rideauxà au moins 0,9 m (3 pieds) du devant duradiateur et loin des côtés de l’appareil.3. Mise en garde – Il faut faire extrêmementattention lorsqu’un radiateur est utilisé àproximité d’enfants ou de personnes invalides.Ne laissez JAMAIS l’appareil fonctionner sanssurveillance.4. Mise en garde – Débranchez TOUJOURS leradiateur lorsqu’il ne fonctionne pas.5. Mise en garde – N’utilisez PAS un radiateurdont le cordon ou la fiche sont abîmés, unradiateur qui ne fonctionne pas correctementou un radiateur qui a été échappé ou abîmé dequelque manière que ce soit.6.7.8.9.10.11.12.12Mise en garde – Pour un usage résidentielseulement.Mise en garde – N’utilisez PAS l’appareil àl’extérieur.Mise en garde – Ce radiateur n’est pas conçupour être utilisé dans une salle de bain, unesalle de lavage ni à aucun endroit semblableà l’intérieur. Ne placez PAS le radiateur àun endroit où il pourrait tomber dans unebaignoire ou un autre contenant d’eau.Mise en garde – Ne faites PAS passer lecordon d’alimentation sous un tapis. Nerecouvrez PAS le cordon d’une carpette, d’unchemin de couloir ou de tout recouvrementsimilaire. Ne faites PAS passer le cordon sousdes meubles ou des appareils. Placez le cordonloin de la circulation, de manière à éviter qu’ilfasse trébucher quelqu’un.Mise en garde – Cet appareil est muni d’unefiche polarisée (une des deux broches estplus large que l’autre). Pour réduire le risquede chocs électriques, cette fiche ne peuts’insérer que d’une seule manière dans uneprise polarisée. Si les broches n’entrent pascomplètement dans la prise, tournez la fichedans l’autre sens. Si elles n’entrent toujourspas, communiquez avec un électricien qualifié.N’essayez PAS d’altérer ce dispositif desécurité.Mise en garde – Ce radiateur tire 12,5ampères lorsqu’il fonctionne. Pour empêcherde surcharger un circuit, ne branchez PAS leradiateur dans un circuit qui a déjà d’autresappareils en marche.Mise en garde – Il est normal que la fiche soitchaude au toucher; toutefois, la présence d’unjeu entre la prise (le réceptacle) et la fiche peutcauser une surchauffe et une distorsion de celleci. Communiquez avec un électricien qualifiépour remplacer la prise usée ou instable.
20. Mise en garde – N’enlevez PAS les étiquettessur l’appareil contenant des avertissements oudes consignes de sécurité.21. Mise en garde – Le chauffage produit par cetappareil peut varier et sa température peutdevenir suffisamment intense pour brûler lapeau exposée. L’utilisation de ce radiateurn’est pas recommandée pour les personnes àsensibilité réduite à la chaleur ou incapables deréagir et d’éviter de se brûler.22. Mise en garde – Avant de nettoyer ou deranger l’appareil, ou lorsque vous ne l’utilisezpas, tournez les commandes à la positionOFF/ARRÊT, débranchez l’appareil de la priseélectrique et laissez-le refroidir.23. Mise en garde – Placez le radiateur à niveausur une surface ferme et ouverte, sansobstructions et à au moins 0,9 m (3 pieds)de tout matériau combustible. Ne l’utilisezPAS sur une surface instable comme un lit ouun tapis épais. Assurez-vous que le radiateurn’est pas dans une position qui risque de fairetrébucher quelqu’un.24. Mise en garde – Si les fils électriques de votremaison sont en aluminium, demandez à unélectricien qualifié de vérifier les connexions devotre réceptacle. Si vous utilisez un radiateurde 1500 watts, les connexions des filsd’aluminium peuvent causer des problèmescompromettant la sécurité.13. Mise en garde – Pour débrancher le radiateur,commencez par l’éteindre, puis saisissez lafiche et retirez-la de la prise électrique murale.Ne tirez PAS sur le cordon.14. Mise en garde – N’insérez PAS et ne insertlaissez PAS de corps étrangers pénétrerdans les ouvertures de ventilation oud’échappement, car ils risquent de causerun choc électrique ou un incendie, oud’endommager l’appareil.15. Mise en garde – Pour empêcher les risquesd’incendie, ne bloquez PAS les entrées ni lessorties d’air de quelque manière que ce soit.N’utilisez PAS l’appareil sur une surface molle,comme un lit, ou à un endroit où les ouverturespourraient être bloquées.16. Mise en garde – Un radiateur contient despièces qui deviennent chaudes et qui peuventproduire des arcs ou des étincelles. Ne l’utilisezPAS à un endroit où de l’essence, de la peintureou des liquides inflammables sont utilisés ourangés.17. Mise en garde – N’utilisez ce radiateur queselon les instructions contenues dans ceguide d’utilisation. Toute autre utilisation nonrecommandée par le fabricant peut causer unincendie, un choc électrique ou des blessurescorporelles.18. Mise en garde – Branchez TOUJOURS leradiateur directement dans une prise murale/réceptacle. N’utilisez PAS une rallongeélectrique ou une prise portable (prise/barred’alimentation multiprise).19. Mise en garde – N’essayez JAMAIS demodifier ce produit ou de le réparer. Toutefalsification ou modification de ce produitpeut causer des blessures graves, le décèsde la personne ou un incendie. N’ouvrez PASl’appareil. Risque de choc électrique. Cetappareil ne contient aucune pièce susceptibled’être réparée par l’utilisateur.25.13CONSERVEZ CESINSTRUCTIONS
À PROPOS DE LA TECHNOLOGIE DE LA CÉRAMIQUELes radiateurs en céramique produisent de la chaleur en faisant passer l’électricité par des câbleschauffants incorporés dans des plaques en céramique. Ce type de chauffage procure une chaleur rapideet constante.Le radiateur ThermaWaveMC 6 est conçu de façon à maximiser la production de chaleur.ASSEMBLAGECe radiateur est facile à assembler et ne requiert aucun outil.Déballez le radiateur et la base servant de support (Fig.1).Déposez la base à l’endroit sur une surface ferme (Fig. 1). Placez le radiateur ThermaWaveMC 6 sur la baseservant de support de façon que les pattes de fixation soient bien alignées sur les fentes de la base. Exercez unepression sur le boîtier du radiateur jusqu’à ce que les pattes s’enclenchent avec un clic dans les fentes (Fig. 2).Fig. 1Fig. 2INSTALLATIONPlacez le radiateur sur une surface rigide, plane et ouverte, libre de toute obstruction et à au moins 0,9 m(3 pieds) de tout mur ou matière combustible. N’utilisez PAS l’appareil sur une surface instable comme unlit ou un tapis épais.ASSUREZ-VOUS QUE LE RADIATEUR N’EST PAS DANS UNE POSITION POUVANT FAIRE TRÉBUCHERQUELQU’UN.Pour un résultat optimal, placez le radiateur au sol afin de créer un effet de convection et faites-lefonctionner de 5 à 10 minutes afin qu’il dégage un maximum de chaleur.DÉPLACEMENT DU RADIATEURÉteignez l’appareil.Laissez-le refroidir pendant dix (10) minutes.Débranchez l’appareil et déplacez-le à l’endroit désiré. Ce radiateur est muni d’une poignée isolée (CoolTouch) pour votre commodité.14
FONCTIONNEMENTREMARQUE : NE LAISSEZ JAMAIS L’APPAREIL FONCTIONNER SANS SURVEILLANCEAssurez-vous que le bouton de mise en marche est ÉTEINT, puis branchez l’appareil dans une fiche polariséede 120 V.NE FORCEZ PAS LA FICHE POLARISÉE DANS LA PRISE ÉLECTRIQUE : la fiche ne peut s’insérer qued’une seule manière.Le radiateur ThermaWaveMC 6 est polyvalent et conçu pour être placé au centre de la pièce ou plus près dumur (à au moins 3 pieds de distance) pour un chauffage maximal par convection de la pièce.Fonctionnement du radiateur ThermaWaveMC 6Mettez le radiateur en marche en appuyant sur le bouton ( ). L’appareil fonctionnera automatiquement enmode faible chaleur.Le volet réglable permet d’orienter le flux de chaleur.Pour éteindre l'appareil, appuyez sur le bouton de mise en marche jusqu'à ce que tous les voyants de réglagede chaleur soient éteints, de même que le voyant rouge du bouton de mise en marche. Le ventilateurcontinuera à fonctionner pendant 60 secondes après l'arrêt de l'appareil, afin de refroidir l'élément chauffant.Débranchez le radiateur lorsque vous avez fini de l'utiliser.Le bouton Réglages ( ) comporte trois (3) options : ventilation seulement ( ) faible chaleur ( ), et chaleurélevée ( ). Le réglage faible chaleur ( ) utilise 900 watts de puissance et le réglage élevé ( ) utilise 1500watts de puissance. Le réglage ventilation seulement ( ) consomme très peu d’énergie et ne fournit pasde chaleur. Pour obtenir le niveau de confort désiré, sélectionnez le réglage approprié au moyen du boutonRéglages ( ). Appuyez sur ce bouton jusqu’à ce que le voyant correspondant au réglage désiré s’allume.Comme le réglage faible chaleur ( ) ne requiert pas autant d’électricité pour fonctionner, il consomme peud’énergie et peut représenter une meilleure option si vous êtes préoccupé par l’ampérage utilisé par un circuitlorsque le radiateur est en mode chaleur élevée.Le thermostat ( ) offre 4 réglages de températureModèle, série 870Cpréétablis. Pour sélectionner un réglage, appuyez surle bouton Thermostat ( ) jusqu’à ce que le voyantcorrespondant à la température désirée s’allume. LeBouton de miseen marcheradiateur fonctionne en mode chaleur élevée jusqu’àce que la température sélectionnée soit atteinte. Le3 réglagesventilateur/ventilateur fonctionne pendant 60 secondes, puisFAIBLE/ÉLEVÉs’éteint; dès que la température de la pièce baisse enVolet réglabledeçà de la température désirée, il se remettra en marche.ThermostatLe bouton Minuterie ( ) comporte trois (3) réglages :réglabledeux heures (2h) quatre heures (4h) ) et huit heuresOption de(8h). Lorsque vous sélectionnez une option, le voyantminuteriepertinent s’allume. La minuterie n’est pas activée siaucun des trois (3) voyants n’est allumé.18 21 24 27 2h4h8h15
FONCTIONS DE SÉCURITÉLe radiateur ThermaWaveMC 6 est muni de plusieurs dispositifs et fonctions pour une protection accrue : Un interrupteur en cas de renversement de 360º qui désactive le radiateur s’il est renversé, peu importe ladirection. Un détecteur de sécurité en cas de température élevée qui empêche le surchauffage. S’il est activé,débranchez l’appareil et attendez au moins 10 minutes ou le temps requis pour que l’appareil refroidissecomplètement. Assurez-vous que l’appareil est en état de fonctionnement sécuritaire; rebranchez-le etsuivez les instructions de la section FONCTIONNEMENT. Des fils thermiques isolés pour résister à la chaleur et des raccords renforcés pour aider à protéger contreles connexions desserrées. Un boîtier fabriqué dans un plastique résistant à une température élevée; la poignée et le boîtier sont fraisau toucher. Dès que l’appareil est mis en marche, la fonction d’arrêt automatique se règle automatiquement à 8heures. Pour sélectionner une autre option, appuyez sur le bouton Minuterie.ENTRETIENNous recommandons de nettoyer le radiateur en céramique ThermaWaveMC 6 au moins une fois par mois etavant de le ranger à la fin de la saison. Éteignez ( ) l’appareil et débranchez-le. Laissez l’appareil refroidir. Utilisez un chiffon sec seulement pour nettoyer les surfaces externes de l’appareil. N’UTILISEZ PASD’EAU, DE CIRE OU DE SOLUTION CHIMIQUE.RANGEMENT Avant de ranger le radiateur ThermaWaveMC 6, nettoyez-le en suivant les étapes ci-dessus. Enroulez lecordon d’alimentation autour de l’appareil. Placez-le dans sa boîte originale et rangez-le dans un endroitfrais et sec.DÉPANNAGESi votre radiateur ThermaWaveMC 6 s’arrête subitement ou ne fonctionne pas, un des dispositifs de sécuritéde l’appareil peut avoir été activé pour empêcher une surchauffe. Assurez-vous que le radiateur est branché et que la prise électrique fonctionne. Vérifiez s’il n’y a pas d’obstructions. Si vous trouvez une obstruction, ÉTEIGNEZ l’appareil et débranchez-le.Laissez l’appareil refroidir complètement, puis enlevez l’obstruction. Attendez au moins 20 minutes, puisrebranchez l’appareil et suivez les instructions à la section FONCTIONNEMENT. Assurez-vous que le radiateur est placé sur une surface ferme et plane pour éviter que l’interrupteur en casde renversement soit activé.16
SPÉCIFICATIONS DU PRODUITModèle(s)Dimensions de l’appareilAmpèresVoltageWatts max.BTU maxsérie 870C19,68 cm L x 45,2 cm L x 46,5 cm H12,5120 V, 60Hz15005118SERVICE À LA CLIENTÈLENous sommes là pour vous.Téléphonez-nous sans frais au : 1 800 477-0457Courriel : ConsumerRelations@HelenofTroy.comOu visitez notre site Web au : www.HoneywellPluggedIn.comAu Canada allez à : www.HoneywellPluggedIn.caN’oubliez pas d’indiquer le numéro de modèle figurant sur la boîte, ainsi qu’en arrière et au bas del’appareil.REMARQUE : SI VOUS AVEZ UN PROBLÈME, VEUILLEZ COMMUNIQUER AVEC NOTRE SERVICE À LACLIENTÈLE OU RELIRE LA GARANTIE. NE RETOURNEZ PAS LE PRODUIT AU MAGASIN
The Thermawave 6 Heater was designed for maximum heat output. This heater requires simple, no tool assembly. Unpack Main Body and Mounting Base (Fig. 1). Place Mounting Base on a firm surface. Place ThermaWaveTM 6 Heater Main Body on Mounting Base so Mounting Tabs are aligned with Base Slots. Press Main Body onto the Base until Tabs snaps secure