Transcription
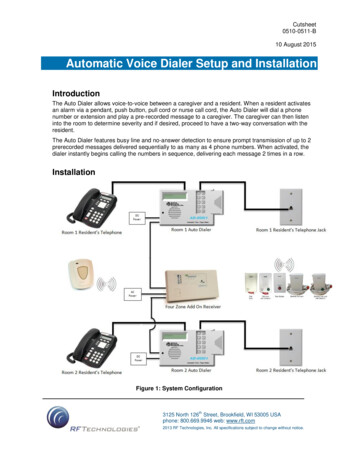
Cutsheet0510-0511-B10 August 2015Automatic Voice Dialer Setup and InstallationIntroductionThe Auto Dialer allows voice-to-voice between a caregiver and a resident. When a resident activatesan alarm via a pendant, push button, pull cord or nurse call cord, the Auto Dialer will dial a phonenumber or extension and play a pre-recorded message to a caregiver. The caregiver can then listeninto the room to determine severity and if desired, proceed to have a two-way conversation with theresident.The Auto Dialer features busy line and no-answer detection to ensure prompt transmission of up to 2prerecorded messages delivered sequentially to as many as 4 phone numbers. When activated, thedialer instantly begins calling the numbers in sequence, delivering each message 2 times in a row.InstallationFigure 1: System Configurationth3125 North 126 Street, Brookfield, WI 53005 USAphone: 800.669.9946 web: www.rft.com2013 RF Technologies, Inc. All specifications subject to change without notice.
Automatic Voice Dialer Setup and Installation1. First determine the optimal location for the Auto Dialer. The Auto Dialer can be mounted to the wall or be placed on a flat surface such as a nightstand or end table. The Auto Dialer must be within 6 feet of an AC outlet. If the distance to the nearest phone jack is greater than 6 feet, a phone extension cable willbe needed (not included). The Auto Dialer should not be placed in a location where any obstructions can be placed infront of it. If the Auto Dialer is placed in a multi-room dwelling, it is best to locate it where the speakercan best be heard. Although the volume can be adjusted, it is best to keep the distance to apotential conversation range of 25 feet. Consider the hearing ability of the resident. Avoid a location with extreme cold or hot, direct sunlight, excessive humidity and away fromequipment that generate strong magnetic fields. Avoid placing near large metal objects and areas that produce smoke, dust and mechanicalvibrations.2. Determine the location of the Four Zone Add-On Receiver If the Four Zone Add-On Receiver will only service one room, it can be placed either in thedwelling or in the hallway outside the dwelling. If the Add-On receiver is servicing two rooms,then it must be installed in the hallway. It must be located within 10 feet of an AC outlet. It can be wall mounted above or below a drop ceiling.3. Once the locations of the devices are determined, route the provided wire between each device.4. Terminate the Four Zone Add-On Receiver as follows: Remove cover from the Four Zone Add-On Receiver enclosure. Remove outer insulation from 22 G wire and strip the ends of the red and black wires. Into the terminal block connect the stripped red wire that leads to the Auto Dialer to “NO” ofCOM 1 Into the terminal block connect the stripped black wire that leads to the Auto Dialer to “COM1” When wiring a second room repeat this but place the wires into COM2 Leave the enclosure cover off. It will be reassembled following the final system test.0510-0511-BPage 2 of 10
Automatic Voice Dialer Setup and InstallationFigure 2: Four Zone Add-On Receiver5. Terminate the power to the Four Zone Add-On Receiver. Attach the 10 foot power cord byterminating the fork terminals onto the back side of the plug in power adaptor. Since polarity is notan issue either fork terminal can go into either termination screw. Next terminate the plug in poweradaptor into the Four Zone Add-On Receiver by attaching the stripped wires to “Vs” and “Ground”.Plug the plug in power adaptor into an AC wall socket.6. Reassemble the Four Zone Add-On Receiver enclosure and attach to wall at desired location.7. Terminate the Auto Dialer as follows: Remove the back panel to gain access to terminal blocks. Into the terminal block connect the stripped red wire to “1” Into the terminal block connect the stripped black wire to “C” This same wiring can be repeated for a second dwelling.Figure 3: Auto Dialer0510-0511-BPage 3 of 10
Automatic Voice Dialer Setup and Installation8. Terminate the power to the Auto Dialer. Since it is polarity sensitive make certain that the positivelead from the plug in power adaptor terminates to the “12V ” and the negative lead from the plugin power adaptor terminates to the “12V -” (see Figure 3). Plug the plug in power adaptor into anAC wall socket.9. Reassemble the back cover of the Auto dialer. It has knockouts that if removed allow the cover tobe reassembled. Place Auto Dialer in its desired location, either mounted to wall or resting on aflat surface.10. Disconnect the resident’s telephone cord from its wall jack. Run the telephone cord supplied withthe Auto Dialer from this jack to the jack on the topside of the Auto Dialer labelled “IN”.11. Plug the telephone cord to the jack on the topside of the Auto Dialer labelled “OUT”.Figure 4: Telephone Cord Plug InProgramming the Four Channel Add-On ReceiverOnce the wiring is completed, the installer/user must assign devices. For a single room, one canassign up to four devices and for two rooms one can assign up to two devices for each room. Toassign devices, you must remove the cover from the Receiver to access the circuit board. The circuitboard of the QR Plus Receiver has 3 buttons: Advance, Program and Reset. The program techniqueentails pressing the Advance button to index to the desired choice as indicated by the illuminated LEDaside the option to be programmed. This is then followed by pressing the Program button to lock inthat choice. If re-programming the receiver you must first perform a factory RESET to clear theReceiver.Factory Reset1.2.3.4.Disconnect the power.Simultaneously hold the RESET and ADVANCE button.While holding those buttons, reconnect power.Release the buttons; the Receiver will now be reset to its factory default configuration.Assign a Device to an OutputTo assign a device to an output refer to the Configuration Steps tables. Devices can only beadded one at a time so perform the steps in the table from top to bottom then moving right forthe next device. The first table is for configuring devices to the Four Channel Add-On Receiverfor a single room and the second is for two separate rooms.NOTE: Perform the steps, one device at a time.0510-0511-BPage 4 of 10
Automatic Voice Dialer Setup and InstallationSingle Room Configuration StepsStepsDevice 1Device 2Device 3Device 41234NoneNoneNoneNonePress ADVANCE to set the output relay. Press buttonuntil the lit LED matches the device value in the columnto the right. Once selected press PROGRAM.1111Press ADVANCE to set the output type. Press buttonuntil the lit LED matches the device value in the columnto the right. Once selected press PROGRAM. Allindicator lights will light and the programmed point willflash.FollowFollowFollowFollowReset the device. Depending on the device reset it byremoving and reinserting the battery or in the case of thePendant pressing the reset button. Observe that theindicator lights turn off and the lit LED that illuminatesmatches the appropriate device value in the column tothe right.1234Press ADVANCE button. Press button until the lit LEDmatches the appropriate device value in the column tothe right*. Press PROGRAM button to beginprogramming.Press ADVANCE to set supervision. Press button untilthe lit LED matches the device value in the column to theright. Once selected press PROGRAM.Repeat the above steps for each additional device.Two Room Configuration StepsStepsRoom 1Room 2Device 1Device 2Device 1Device 21234Press ADVANCE to set supervision. Press button untilthe lit LED matches the device value in the column to theright. Once selected press PROGRAM.NoneNoneNoneNonePress ADVANCE to set the output relay. Press buttonuntil the lit LED matches the appropriate device value inthe column to the right. Once selected press PROGRAM.1122Press ADVANCE to set the output type. Press buttonuntil the lit LED matches the appropriate device value inthe column to the right. Once selected press PROGRAM.All indicator lights will light and the programmed point willflash.FollowFollowFollowFollowReset the device. Depending on the device reset it byremoving and reinserting the battery or in the case of thePendant pressing the reset button. Observe that theindicator lights turn off and the lit LED that illuminatesmatches the appropriate device value in the column tothe right.1212Press ADVANCE button. Press button until the lit LEDmatches the appropriate device value in the column tothe right *. Press PROGRAM button to beginprogramming.Repeat the above steps for each additional device.0510-0511-BPage 5 of 10
Automatic Voice Dialer Setup and InstallationNOTE: * If a transmitter is already assigned, the DELETE light illuminates. Before continuingwith programming you must delete the point.To Delete a Device1. Select ADVANCE to select the point to delete.2. Select PROGRAM, the red DELETE light illuminates.3. Select ADVANCE again to delete the point.Programming the Auto DialerComplete the following sequence of steps on each Auto Dialer. Entering M twice will take you backinto or out of the Program Mode. Refer to the manufacturer’s Program and Install Manual for additionaldetail.To manage the Auto Dialer system, it is a best practice to log each Auto Dialer to maintain records oncontacts and configurations. Refer to Appendix A for an example of a log for each Auto Dialer.First Time Installation to Initialize Dialer1.2.3.4.5.Apply power to the Auto DialerThe LCD screen will read “NOT PROGRAMMED PRESS KEYPAD #1”Press 1 on the keypad.The LCD screen will read “PROGRAM: NUMBERS”Proceed to Programming Telephone and/or Pager NumbersProgramming Telephone and/or Pager Numbers0510-0511-BLCD Screen ReadoutSteps taken to program Auto DialerPROGRAM: NUMBERSPress 1 (YES)SELECT: 1 - 4Press 1PAGERPress 2 (NO)ENTER NUMBEREnter telephone number that Auto Dialer willcontact. Once entered hit *. Note that a 1 mustprecede the area code and that for outgoing callsmany systems require dialing 9SELECT: 1 - 4If escalation to a second telephone number isdesired press 2 and return to Step 3. The AutoDialer will allow up to four escalation telephonenumbers. If all numbers are entered press 0(DONE).Page 6 of 10
Automatic Voice Dialer Setup and InstallationProgramming the Telephone LineLCD Screen ReadoutSteps taken to program Auto DialerPROGRAM: T-LINEPress 1 (YES)PROGRAM: T-LINEPress 1 (TONE)PROGRAM: PBXPress 2 (OFF)PROGRAM: ATTEMPTSPress 1PROGRAM: MESSAGEPress 2Programming and Recording Your Outgoing MessagesLCD Screen ReadoutSteps taken to program Auto DialerPROGRAM: OGMSPress 1 (YES)OPT #1: NO OGMPress 2 (NO)OPT #1: 1 OGMPress 1 (YES)RECORD OGMPress and hold R on the keypad during recordingof message. Speak loud and clear 6-12 inchesfrom the microphone on the Auto Dialer. To endrecording release the R key.PLAY OGM (S)Press 1 (YES) to hear recorded messageACCEPTPress 1 (YES) to accept message or 2 (NO) todecline message. This will return you to Step 1DISABLE MICPress 2 (NO)Programming the Channels0510-0511-BLCD Screen ReadoutSteps taken to program Auto DialerPROGRAM: OGMSPress 1 (YES)SELECT: 1 - 4Press 1CH 1: ENABLEPress 1 (YES)CH 1: EXIT DELAYPress 2 (NO)CH 1: ENTRY DELAYPress 2 (NO)CH 1: N.O./N.C.Press 1 (N.O.)CH 1: MOM/CONTPress 1 (MOM)CH 1: DIAL #1Press 1 (YES)CH 2: DIAL #2Press 2 (NO)CH 1: OGM1Press 1 (YES)ACCEPTPress 1 (YES); Press M twice to exit programmode. The LCD screen will read OPERATEPage 7 of 10
Automatic Voice Dialer Setup and InstallationOperating the SystemThe Auto Dialer offers three operating features for communicating between the resident’s dwelling andthe caregiver’s telephone.Listen-InAfter receiving a call from the Auto Dialer, the caregiver can press "1" on the phone to listen into resident’s dwelling for one minute. The duration can be extended indefinitely by repeatedlypressing “1” to reset the one minute countdown timer. Note: The outgoing message will stopplaying as soon as "1" is pressed, and the listen-in period starts immediately.Two-WayOnce the listen-in capability is active, the caregiver can press "2" to begin a two-wayconversation. Note that only one person can talk at a time. This dialog lasts for one minute, butthe count-down timer can be reset by pressing “2” before the call disconnects. Once you are intwo-way mode you cannot go back to Listen-In.Remote Turn-OffIf in listen-in or two-way, simply press" #" twice in one second to disconnect the call when theconversation is completed. This will prevent the resident from hearing a dial tone on the AutoDialer.Testing the SystemWhen testing the system, the caregiver must be in a remote location from the auto-dialer to preventinterference. Test the system by having someone in the dwelling initiate an alarm using one of thedwelling’s alarming devices. Verify that the alarm reaches the telephone and once the telephone isanswered it plays the recorded message.Repeat for other configured alarming devices designated for that same dwelling.NOTE: System Test Instructions (Requires two people)StepsMake certain that the LCD screen on Auto Dialer reads OPERATE. If not hit M until it does.Make certain that the programmed telephone is remote to Auto Dialer, preferably outside the dwelling ofthe resident.Initiate an alarm on a NC device.The person on the telephone should hear the telephone ring in a little more than ten seconds.Answer the telephone and wait for the recorded message to play. After listening to the recorded messagethe person on the telephone must verify that the message is audible and easily understood. Press “1” onthe telephone.Have someone located at the Auto Dialer and have them say a test statement (e.g. “This is a test”). Theperson on the telephone must verify that the message is audible.0510-0511-BPage 8 of 10
Automatic Voice Dialer Setup and InstallationStepsAfter listening-in to the person at the Auto Dialer, the person on the telephone can press " 2" to begin atwo-way conversation lasting for one minute. After pressing “2” the person on the telephone and theperson at the Auto Dialer can have a short conversation lasting less than a minute. If the minute isexceeded the telephone connection will be terminated by the Auto Dialer. If the conversation needs to belonger than a minute the person on the telephone can press “2” again to get another 1 minute period.Once the conversation test is complete the person on the telephone must press" #" twice in one second fora remote turn-off.TEST COMPLETERepeat test for additional devices.If the Four Zone Add-On Receiver is not in its final mounting location, mount it and return the cover to theenclosure.0510-0511-BPage 9 of 10
Automatic Voice Dialer Setup and InstallationAppendix AAuto Dialer Program Parameters for RoomProgram: NumbersNumberTelephone NumberName of Party to be Reached1234Program: T-LineTonePulsePBXOnOffAttemptsMessage Repeat1 through 91 through 3Program: Outgoing MessagesOptionStyle1No message21 message32 messages4ID 2 messagesVoice Message in UseProgram: ChannelsCHEnableYNExit Delay(secs)YN1-99Entry Delay(secs)YN1-99ActivationNONCMOMDial NumberCONT123PlayMsg.412120510-0511-BPage 10 of 10
To manage the Auto Dialer system, it is a best practice to log each Auto Dialer to maintain records on contacts and configurations. Refer to Appendix A for an example of a log for each Auto Dialer. First Time Installation to Initialize Dialer 1. Apply power to the Auto Dialer 2. The LCD screen will read "NOT PROGRAMMED PRESS KEYPAD #1" 3.