Transcription
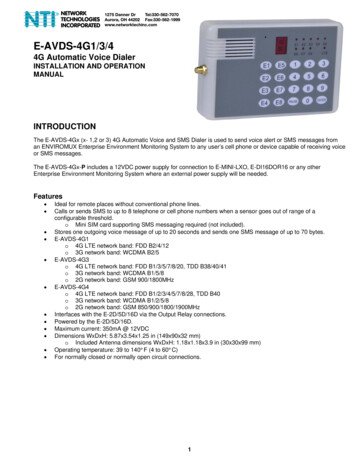
E-AVDS-4G1/3/44G Automatic Voice DialerINSTALLATION AND OPERATIONMANUALINTRODUCTIONThe E-AVDS-4Gx (x- 1,2 or 3) 4G Automatic Voice and SMS Dialer is used to send voice alert or SMS messages froman ENVIROMUX Enterprise Environment Monitoring System to any user’s cell phone or device capable of receiving voiceor SMS messages.The E-AVDS-4Gx-P includes a 12VDC power supply for connection to E-MINI-LXO, E-DI16DOR16 or any otherEnterprise Environment Monitoring System where an external power supply will be needed.Features Ideal for remote places without conventional phone lines.Calls or sends SMS to up to 8 telephone or cell phone numbers when a sensor goes out of range of aconfigurable threshold.o Mini SIM card supporting SMS messaging required (not included).Stores one outgoing voice message of up to 20 seconds and sends one SMS message of up to 70 bytes.E-AVDS-4G1o 4G LTE network band: FDD B2/4/12o 3G network band: WCDMA B2/5E-AVDS-4G3o 4G LTE network band: FDD B1/3/5/7/8/20, TDD B38/40/41o 3G network band: WCDMA B1/5/8o 2G network band: GSM 900/1800MHzE-AVDS-4G4o 4G LTE network band: FDD B1/2/3/4/5/7/8/28, TDD B40o 3G network band: WCDMA B1/2/5/8o 2G network band: GSM 850/900/1800/1900MHzInterfaces with the E-2D/5D/16D via the Output Relay connections.Powered by the E-2D/5D/16D.Maximum current: 350mA @ 12VDCDimensions WxDxH: 5.87x3.54x1.25 in (149x90x32 mm)o Included Antenna dimensions WxDxH: 1.18x1.18x3.9 in (30x30x99 mm)Operating temperature: 39 to 140 F (4 to 60 C)For normally closed or normally open circuit connections.1
Materials included with this kit: E-AVDS-4Gx Voice dialer4G AntennaURL slip with path to this manualIncluded with E-AVDS-4Gx-P Only: 100-240VAC @ 50\60Hz; 12VDC 1A AC Adapter ("-P" model only) Country-specific Line Cord 2 ea. WC-UR2 (CN1469) butt splice connectorsOPEN THE E-AVDS-4GxTo configure the E-AVDS-4Gx(-P) for operation and to access the mounting holes, you must first open the case of thedialer.There are four tabs that hold the case together. Two on the top side, and two on the bottom side. To open the case forjumper placement, press down firmly on the seam of the case near the tabs on one side of the case and snap the casehalves apart.With the rear of the case removed, two countersunk mounting holes are provided on the rearcover. Use these to secure the E-AVDS-4Gx toyour desired mounting location.Mounting HolesTabsRear Cover2
CONFIGURE THE JUMPERSConfigure the jumpers on the E-AVDS-4Gx to be triggered by either the Normally-Closed (N.C.)or Normally-Open (N.O.)relay contact on the E-xD. In the image below, the jumpers are set for connection to the N.O. terminal.To set the “normal” relay state to Normally-Open, apply the J1 jumper to the center and right pin, and J2 jumper to thecenter and left pin. In this configuration, a relay closure will trigger an alert state, activating the dialer.To set the “normal” relay state to Normally-Closed, apply the J1 and J2 jumpers to the center and left pins. In thisconfiguration, a relay open condition will trigger an alert state, activating the dialer.J1J1J2J2CAUTION: TO PRESS THE RESET BUTTON, INSERT A NON-CONDUCTIVE MATERIAL BETWEEN THECIRCUIT BOARDS WHILE THE UNIT IS ON AND PRESS THE BUTTON. USING A CONDUCTIVEMATERIAL MAY SHORT THE CIRCUIT BOARD AND DAMAGE YOUR DIALER, VOIDING THEWARRANTY.RESETBUTTONPRESS RESET BUTTONTO RESET PASSWORD TO“0911”NOTE: The “VOLTAGE” jumper position is not used in conjunction with the E-xD.With the jumpers properly set, and the rear panel securely mounted, re-assemble the case.3
WIRING METHODSConnect the cable from the E-AVDS-4Gx to the E-xD according to one of the following diagrams:Note: The attached cable is 700mm (27 inches) long but can be extended up to 100 feet with any 3-conductor22AWG (minimum) cable.4
5
FEATURES(1) Speaker(2) Microphone(3) LED 7-segment display- displays the signal strength, number input, and provides indicators for phone numbers When the dot of display blinks slowly, it means the FULL NETCOM module is working normally; When the dot of display blinks fast, it means the FULL NETCOM module is faulty.(4) “E1” – “E8” indicators: ON while setting E1-E8 phone/mobile phone numbers.Note: E1 through E8 indicators will illuminate while setting the password.(5): FULL NETCOM indicator: LED indicator OFF FULL NETCOM module is powered OFF or not working. 200ms ON and 200ms OFF data communication built. 800ms ON and 800ms OFF network register successful. LED indicator ON: sending alarm or data communication transmitting.(6) Connection Cablered (or orange)black (or brown)yellow 12V Negative (ground) Digital Contact(7) Buttons: used to enter programmingGENERAL INFORMATIONRecording Duration: 20 seconds,Telephone numbers and voice message programming remain intact even if the power is OFF.SMS Message: Up to 70 characters can be programmed.Telephone Number Storage: 8 telephone numbers and each can be a maximum of 16 digits.Private Password: 4-digit Private PasswordDefault Password: 09116
AUTO-DIALER OPERATIONPower ON Self-Test:The Dialer will perform a self-test checking signal connection when powered ON. After the self-test, if a connection ismade the number on the display will indicate the signal strength (1 weak, 5 strong), the decimal point at the lowerright corner on the 7 segment display will blink slowly and the dialer will be ready to work.Note: If no signal is found, the decimal point will blink rapidly and "0" will be displayed.If configuration (phone numbers and voice message) already exists, the AUTO-DIALER will alarm automatically uponreceiving an alarm signal. To setup or change the configuration, please follow the procedures below to save and checktelephone numbers and passwords as well as to record and play back recorded voice message:1. Log into the Programming Mode:First press PAUSE , then put in the Private Password (4 digits), then press ENTERNote: The Default Password is 0911For instance: Log into the Programming Mode as follows:PAUSE 0911 ENTERIf the password you entered in is correct, the LED will display "5", and then log into the Programming Mode,If the password you entered is incorrect, the LED will display “E” and return to the working mode.procedure to try again.Repeat the2. Program and Check SMS Center NumberIf you do not program the SMS Center number (your carrier's connection number) after powering ON the dialer, it willautomatically obtain the number by default.We recommend to allow the dialer to automatically obtain SMS center number in normal use.To view the current SMS Center number: Under programming state (in“5”state): press “3” and “0”; the dialer will displaythe SMS Center number, and user will hear a tone “Du”. If the number is not correct, perform the following to change it:Under programming state ( "5" on the display): press “0” and then input SMS center number, and press “ENTER”. (Youwill need to get this number from your carrier if the dialer does not obtain the number automatically)For example: 0 18965713028 ENTER.The dialer will display “ ”if it receives a correct input.To delete the SMS center number: under programming state, press “0” and then“ENTER”. The dialer will display " ” if itreceives a correct input.7
3. Program the Telephone numbers and Alarm methods for eachThis dialer supports two alarm methods: voice alarm and SMS alarmUnder programming state, press E1, E2, E3.E8 to save alarm receiving numbers and alarm methods.Example : number is 18965713028, choose voice alarm. Operation: E1 18965713028 ENTER 1 ENTER.The dialer saves the number when the 1st “ENTER” is pressed.Next enter the "1" for the alarm method, this chooses voice alarm. (For SMS alarm method, substitute a "2")Next press “ENTER” to save the alarm method.If " " and then “0” is displayed it means the input was correct and the dialer returns to a programming state “5”.can perform the operation again in state “5”.UserTo delete the 1st group number : Press E1 ENTER.4. Check the telephone numbers and corresponding alarm methodUnder programming state, press “3” and then E1-E8 . The numbers and corresponding alarm method will be displayed.Operation: “3” E1/E2/E3/E4 displayDisplayed: the alarm method(1 or 2) A phone number, then hear a “Du” voice after display.5. Save and playback the audio message1. This dialer supports a 20 second voice message. (A shorter message will have the best quality).Under programming state (“5” displayed), press “1” ( “『” displayed means begin recording), and then begin talking andrecording after which you will hear "Du" (The dialer will stop automatically and playback the voice message after ithas finished recording).The User can stop recording a message by pressing “ENTER” during recording.2. Playback the recorded message:Under programming state, press “3, 1” ( a “p” displayed means play), recorded message playback begins, and is endedwith a “Du” after finishing.6. Save short text message (maximum 70 bytes/letters can be entered)Under the programming state, press “2” then send an SMS message from a phone to the SIM card's phone number (nomore than 70 bytes/letters (phone number will be provided by the SIM card provider). If more than 70 bytes, it will onlyidentify the front 70 bytes.).If “ ” displays after the message has been sent and a "Du" is heard, it means the message has been input and will returnto state “5”;If “E” displays, it means timeout. You need to try again following the above steps after returning to state “5”.(Note: Keyboard is not operable when waiting for message reply. You will need to wait 2 minutes if the messagetimes out. If you send a message to the dialer the first time and dialer fails to receive it may because of anetwork fault. The User can send it again or start up the dialer again, allow the machine to search network or Escby pressing “ENTER”. For example: “2” ENTER. The Default message text is “DA-911LTE ALARM”)8
7. Program and Check number of times to repeat dialing in an alarm stateWith the dialer in a programming state: press “6” to input alarm dialing times (0-9), press "ENTER”.If “ ” displays it means the input was correct, and the dialer will return to state “5”.Program how many times dialing should be repeated during an alarm state (initial setting is 5 times)0 unlimited dialing;1-9: repeat dialing 1-9 timesTo find out how times the dialer is programmed to repeated dialing:While in a programming state, press “3” and then “6”,the 7-segment display will show the number of times it is programmed to repeat dialing, and then you will hear a“Du”.Note: for SMS alarm methods, the dialer will stop sending the message if the message is sent successfully. It isnot ruled by the programmed number of repeat dialing times.8. Save and Check password:To store a password (Initial password is 0911): the dialer supports a 4-digit private password.If the private password will be 1234, while operating in a programming state:press “PAUSE” “1” “2” “3” “4” “ENTER” and hear a tone “Du” which means the input is finished(the password must be 4 digits, if less than 4 digits, system will display “E” and enter state“5”.Inquire password; in programming state (state “5”), press “3” and then “PAUSE”, monitor display password, and hear atone “Du’ after display is done.Note: If user loses the password, they can open the back cover of the dialer, power the Dialer ON, and press the“RESET BUTTON" (see page 2). Password will be changed to the default one: 0911, but all other programmedinformation (data) will not be lost.CAUTION: TO PRESS THE RESET BUTTON, INSERT A NON-CONDUCTIVE MATERIAL BETWEEN THECIRCUIT BOARDS WHILE THE UNIT IS ON AND PRESS THE BUTTON. USING A CONDUCTIVEMATERIAL MAY SHORT THE CIRCUIT BOARD AND DAMAGE YOUR DIALER, VOIDING THEWARRANTY.9. Program and Check alarm trigger delayYou can control the delay time that the trigger must be present before the dialer will go into an alarm state and begindialing.In programming state, press “7” and enter the triggering delay (0 0.5 second,1 1 second, 2 2 seconds,.9 9seconds), and then press “ENTER”.If “ ” is displayed it means the input is correct and it will return to state 5.To determine the presently programmed delay time:In programming state, press “3” and “7” ,The 7-segment display will show triggering time , followed by a tone “Du”.Note: the default trigger delay time is 0.5 second.10. Stop Alarm Dialing on Dialer.While triggered, the AUTO DIALER will automatically alarm by dialing the numbers saved. If a user wants to stop it, inputprivate code while “0” displayed. Suppose code is 1234, “1234” will be displayed instead of “0” after input. If the code iscorrect, the alarm will be withdrawn followed by the “Du ”sound, and the dialer will return to standby mode.The User must input the 4 digit password correctly. An incorrect password will fail to withdraw the alarm.9
11. Reset to factory default settingsIn programming state (in state “5”), press “8”, input “911” and then “ENTER”If “ ” is displayed it means correct operation, and will return to state “5”.Note: Most of the settings can be restored to factory default, except for voice record and triggering method (jumpers)These need to be manually reset.TROUBLESHOOTING1. If the SIM card is not installed or antenna not connected or FULL NETCOM module faults, the auto dialer will not ableto finish initialization, the alarm will not be sent.2. Press “ENTER” to return to working state after finishing an operation. If “ENTER” is not pressed and the LED displays“5” (programming state), it will lead to alarm communication failure.3. Do not use the SIM card with PIN code protection function. If SIM card attached with the function, insert the card inother mobile phone to close the function(for example: using Nokia mobile phone, choose: Menu setting security setting PIN protection off).4. If not sure about SMS center number, user can contact their local SIM card service center.5. When setting the alarm mode to SMS alarm, be sure to enter the local country code in front of the phone number.10
SPECIFICATIONSVoltageDC 11V to 15VStatic current60mA (Based on operating voltage: DC 12V)Operating current350mA (MAX) (Based on operating voltage: DC 12V)Power SourcePowered by the E-2D/5D/16D unless "-P" model;"-P" model includes 12VDC 1A AC AdapterTriggering modeVoice recordingN.C or N.O20 seconds maximum; phone numbers and voice message will besaved after power offPhone numbersUp to 8 , 16 digits maximumPrivate password protection4-digit private password programmableDefault password 0911SMS Supportsystem supports SMS message alarm (70 characters maximum)Operating TemperatureDimensions(WxDxH)Included Antennadimensions (WxDxH)39 to 140 F (4 to 60 C)5.87x3.54x1.25 in (149x90x32 mm)1.18x1.18x3.9 in (30x30x99 mm)Part #Supported CountrySupported Bands*Supported Frequencies (in MHz)E-AVDS-4G1North America (AT&T)FDD-LTE: B2/B4/B121900/1700/700WCDMA: B2/B51900/850FDD-LTE: B1/3/5/7/8/202100/1800/850/2600/900/800TDD-LTE: B38/40/412600/2300/2500WCDMA: B1/5/82100/850/900GSM900/1800FDD-LTE: LTE: B402300WCDMA: S-4G3E-AVDS-4G4Europe / Middle East /Africa / South Korea /ThailandNew Zealand / Australia /South America*Check with your service provider to determine what band(s) must be supported by your dialer for your area to determinewhat model is right for you.MAN387 Rev 9/2/2011
This dialer supports two alarm methods: voice alarm and SMS alarm Under programming state, press E1, E2, E3.E8 to save alarm receiving numbers and alarm methods. Example: number is 18965713028, choose voice alarm. Operation: E1 18965713028 ENTER 1 ENTER. The dialer saves the number when the 1st "ENTER" is pressed.