Transcription
SEED Labs – DNS Rebinding Attack Lab1DNS Rebinding Attack LabCopyright 2019 - 2020 by Wenliang Du.This work is licensed under a Creative Commons Attribution-NonCommercial-ShareAlike 4.0 InternationalLicense. If you remix, transform, or build upon the material, this copyright notice must be left intact, orreproduced in a way that is reasonable to the medium in which the work is being re-published.1IntroductionThe objective of this lab is two-fold: (1) demonstrate how the DNS rebinding attack works, and (2) helpstudents gain the first-hand experience on how to use the DNS rebinding technique to attack IoT devices. Inthe setup, we have a simulated IoT device, which can be controlled through a web interface (this is typicalfor many IoT devices). Many IoT devices do not have a strong protection mechanism, if attackers candirectly interact with them, they can easily compromise these devices.The IoT device simulated in this lab is a thermostat, which controls the room temperature. To successfully set the temperature, the client needs to be able to interact with the IoT server. Since the IoT deviceis behind the firewall, outside machines cannot interact with the IoT device, and will therefore not be ableto control the thermostat. To defeat the firewall protection, the attacking code must get into the internalnetwork first. This is not difficult. Any time when a user from the internal network visits the attacker’swebsite, the attacker’s code (JavaScript code) actually runs from the user’s browser, and therefore runs inside the protected internal network. However, due to the sandbox protection implemented by browsers, theattacker’s code still cannot interact with the IoT device, even though it is now inside the internal network.The objective of this lab is to use the DNS rebinding attack to circumvent the sandbox protection, sothe JavaScript code from the attacker can successfully get the essential information from the IoT device andthen use the information to set the temperature of the thermostat to a dangerously high value. This lab coversthe following topics: DNS server setupDNS rebinding attackAttacks on IoT devicesSame Origin PolicyReadings and videos. Detailed coverage of the DNS protocol and attacks can be found in the following: Chapter 18 of the SEED Book, Computer & Internet Security: A Hands-on Approach, 2nd Edition,by Wenliang Du. See details at https://www.handsonsecurity.net. Section 7 of the SEED Lecture, Internet Security: A Hands-on Approach, by Wenliang Du. See detailsat https://www.handsonsecurity.net/video.html.Lab environment. This lab has been tested on the SEED Ubuntu 20.04 VM. You can download a pre-builtimage from the SEED website, and run the SEED VM on your own computer. However, most of the SEEDlabs can be conducted on the cloud, and you can follow our instruction to create a SEED VM on the cloud.
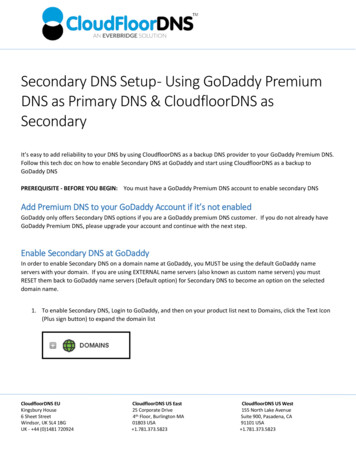
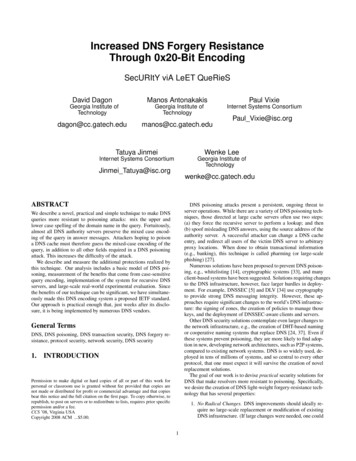
SEED Labs – DNS Rebinding Attack Lab22Background: IoTOur attack target is an IoT device behind the firewall. We cannot directly access this IoT device fromoutside. Our goal is to get an inside user to run our JavaScript code, so we can use the DNS rebinding attackto interact with the IoT device.Many IoT devices have a simple built-in web server, so users can interact with these devices via webAPIs. Typically, these IoT devices are protected by a firewall, they cannot be accessed directly from outside.Due to this type of protection, many IoT devices do not implement a strong authentication mechanism. Ifattackers can find ways to interact with them, they can easily compromise its security.We emulate such a vulnerable IoT device using a simple web server, which serves two APIs: passwordand temperature. The IoT device can set the room temperature. To do that, we need to send outan HTTP request to the server’s temperature API; the request should include two pieces of data: thetarget temperature value and a password. The password is a secret that changes periodically, but it can befetched using the password API. Therefore, to successfully set the temperature, users needs to first get thepassword, and then attach the password in the temperature API.The password is not meant for the authentication purpose; it is used to defeat the Cross-Site RequestForgery (CSRF) attack. Without this protection, a simple CSRF attack is sufficient; there is no need to usethe more sophisticated DNS rebinding attack. For the sake of simplicity, we hardcoded the password; in realsystems, the password will be re-generated periodically.3Lab Environment Setup Using ContainerDNS ServerIoT Server192.168.60.80Home Network: lDNS ServerRouter r10.9.0.153Attacker’sweb server10.9.0.180Figure 1: Lab environment setupWeb serverIn this lab, we will use six machines. The lab environment setup is illustratedDNSin serverFigure 1. Only the usermachine will be using VM, and the others are all containers. In the setup, we have two networks, a homenetwork and an outside network. The home network simulates a typical network at home. The User machineand the IoT services are connected to this network, which is protected by the firewall on the router container.The firewall blocks all traffic going to the 192.168.60.80. This way, outside machines cannot accessthe IoT device. We also set up a NAT server on the router, so the machines on the home network can accessoutside (and the reply packets can come back).The second network simulates the outside world. In addition to the router, there are three containers
SEED Labs – DNS Rebinding Attack Lab3attached to this network, one serving as the local DNS server, and the other two serving as the attacker’snameserver and web server. The attacker owns the attacker32.com domain, which is hosted by theattacker’s nameserver container. The web server hosts a malicious website used for the attack.3.1Container Setup and CommandsPlease download the Labsetup.zip file to your VM from the lab’s website, unzip it, enter the Labsetupfolder, and use the docker-compose.yml file to set up the lab environment. Detailed explanation of thecontent in this file and all the involved Dockerfile can be found from the user manual, which is linkedto the website of this lab. If this is the first time you set up a SEED lab environment using containers, it isvery important that you read the user manual.In the following, we list some of the commonly used commands related to Docker and Compose. Sincewe are going to use these commands very frequently, we have created aliases for them in the .bashrc file(in our provided SEEDUbuntu 20.04 VM). docker-compose build docker-compose up docker-compose down# Build the container image# Start the container# Shut down the container// Aliases for the Compose commands above dcbuild# Alias for: docker-compose build dcup# Alias for: docker-compose up dcdown# Alias for: docker-compose downAll the containers will be running in the background. To run commands on a container, we often needto get a shell on that container. We first need to use the "docker ps" command to find out the ID ofthe container, and then use "docker exec" to start a shell on that container. We have created aliases forthem in the .bashrc file. dockps docksh id // Alias for: docker ps --format "{{.ID}} {{.Names}}"// Alias for: docker exec -it id /bin/bash// The following example shows how to get a shell inside hostC dockpsb1004832e275 hostA-10.9.0.50af4ea7a3e2e hostB-10.9.0.69652715c8e0a hostC-10.9.0.7 docksh 96root@9652715c8e0a:/#// Note: If a docker command requires a container ID, you do not need to//type the entire ID string. Typing the first few characters will//be sufficient, as long as they are unique among all the containers.If you encounter problems when setting up the lab environment, please read the “Common Problems”section of the manual for potential solutions.3.2Configure the User VMWe need to provide further configuration on the User VM.
SEED Labs – DNS Rebinding Attack Lab4Step 1. Reduce Firefox’s DNS caching time. To reduce load on DNS servers and to speed up responsetime, Firefox browser caches DNS results. By default, the cache’s expiration time is 60 seconds. That meansthat our DNS rebinding attack needs to wait for at least 60 seconds. To make our life easier, we reduce thetime to 10 seconds or less. Type about:config in the URL field. After clicking through a warning page,we will see a list of preference names and their values. Search for dnsCache, find the following entry andchange its value:network.dnsCacheExpiration:change its value to 10 (default is 60)After making the change, we should exit from the Firefox browser, and restart it; otherwise the changewill not take effect.Step 2. Change /etc/hosts. We need to add the following entry to the /etc/hosts file. We willuse www.seedIoT32.com as the name for the IoT server. Its IP address is 192.168.60.80.192.168.60.80www.seedIoT32.comWe can now test the IoT server. Point the browser to the following URL on the User VM. If everythingis set up correctly, we should be able to see a thermostat. We can also change the temperature setting bydragging the sliding bar. Please provide a screenshot in your lab report.http://www.seedIoT32.comStep 3. Local DNS Server. We need to get the User VM to use a particular local DNS server. This isachieved by setting the local DNS server as the first nameserver entry in the resolver configuration file(/etc/resolv.conf). One challenge is that the provided VM uses the Dynamic Host ConfigurationProtocol (DHCP) to obtain network configuration parameters, such as IP address, local DNS server, etc.DHCP clients overwrite the /etc/resolv.conf file with the information provided by the DHCP server.One way to get our information into /etc/resolv.conf without worrying about the DHCP is toadd the following entry to the /etc/resolvconf/resolv.conf.d/head file (10.9.0.53 is theIP address of the local DNS server in our setup):nameserver 10.9.0.53The content of the head file will be prepended to the dynamically generated resolver configuration file.Normally, this is just a comment line (the comment in /etc/resolv.conf comes from this head file).After making the change, we need to run the following command for the change to take effect: sudo resolvconf -u3.3Testing the Lab Setup.After configuring the User VM, use the dig command to get the IP address of www.attacker32.comand ns.attacker32.com. You should get 10.9.0.180 and 10.9.0.153, respectively. If you donot get this, your lab environment is not set up correctly.We can now test the attacker’s website. Point the browser to the following URL on the User VM, andyou should be able to see the attacker’s website. Please provide a screenshot in your lab report.http://www.attacker32.com
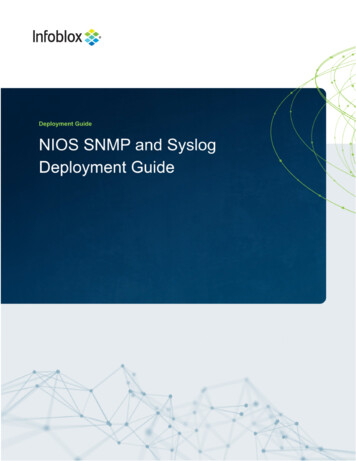
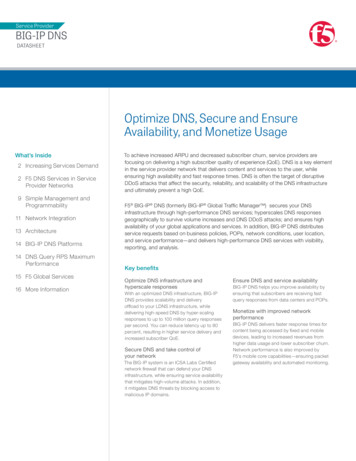
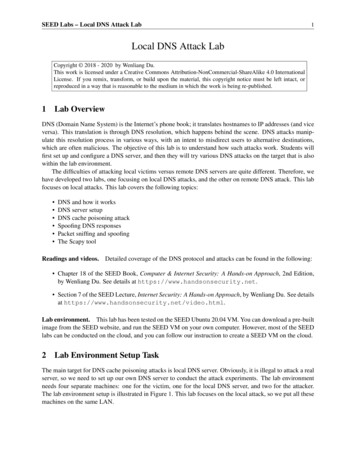
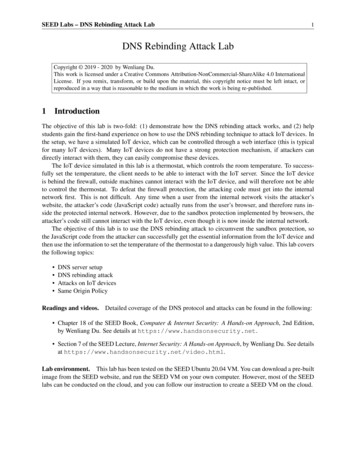
SEED Labs – DNS Rebinding Attack Lab45Launch the Attack on the IoT DeviceWe are ready to launch the attack on the IoT device. To help students understand how the attack works, webreak down the attack into several incremental steps.4.1Task 1. Understanding the Same-Origin Policy ProtectionIn this task, we will do some experiment to understand the same-origin policy protection implemented onbrowsers. On the User VM, we will browse the following three URLs. It is better to show these three pageson three different Firefox windows (instead of on three different tabs), so they are all visible.URL 1:URL 2:URL /changehttp://www.attacker32.com/changeThe first page lets us see the current temperature setting of the thermostat (see Figure 2.a); it fetches thetemperature value from the IoT server once every second. We should keep this page always visible, so wecan see the temperature setting on the thermostat. The second and third pages are identical (see Figure 2.b),except that one comes from the IoT server, and the other comes from the attacker’s server. When we clickthe button on both pages, a request will be sent out to the IoT server to set its temperature. we are supposedto raise the thermostat’s temperature to 99 Celsius.(b) http://www.seedIoT32.com/change andhttp://www.attacker32.com/change(The pages in these two URLs are identical)(a) http://www.seedIoT32.comFigure 2: The web pages from the three URLsClick the button on the second and third pages, and describe your observation. Which page can successfully set the thermostat’s temperature? Please explain why. To find the reason, click the following menusequence from Firefox. A console window will appear, which displays error messages if any. Hint: thereason is related to the same-origin policy enforced by browsers. Please explain why this policy causes oneof the pages to fail.Tools - Web Developer - Web Console
SEED Labs – DNS Rebinding Attack Lab4.26Task 2. Defeat the Same-Origin Policy ProtectionFrom the previous task, it seems impossible to set the thermostat’s temperature from the attacker’s page, dueto the browser’s same-origin policy protection. The objective of this task is to defeat such a protection, sowe can set the temperature from this page.The main idea for defeating the same origin protection comes from the fact that the policy enforcementis based on the host name, not on the IP address, so as long as we use www.attacker32.com in theURL, we are complying with the SOP policy, but that does not mean we are restricted to communicate withthe www.attacker32.com web server.Before the user’s browser sends out requests to www.attacker32.com, it first needs to know the IPaddress of www.attacker32.com. A DNS request will be sent out from the User’s machine. If the IP address is not cached at the local DNS server, a DNS request will eventually be sent to attacker32.com’snameserver, which is controlled by the attacker. Therefore, the attacker can decide what to put in the response.Step 1: Modify the JavaScript code. On the attacker’s web server, the JavaScript code running insidethe www.attacker32.com/change page is stored in the following file: /app/rebind server/templates/js/change.js. Since this page comes from the www.attacker32.com server, according to the same-origin policy, it can only interact with the same server. Therefore, we need to changethe first line of the code from http://www.seediot32.com to the following (we have installed asimple editor called nano in the container):let url prefix ’http://www.attacker32.com’After making the change, restart the attacker’s web server container (see the command below). Then goto the User VM, refresh the page, and click the button again. Do you still see the error message in the webconsole? Please explain your observation. docker ps.78359039627aattacker-www-10.9.0.180 docker container restart 7835Step 2: Conduct the DNS rebinding. Our JavaScript code sends requests to www.attacker32.com,i.e., the requests will come back to the Attacker’s web server. That is not what we want; we want therequests to go to the IoT server. This can be achieved using the DNS rebinding technique. We first mapwww.attacker32.com to the IP address of the attacker’s web server, so the user can get the actual pagefrom http://www.attacker32.com/change. Before we click on the button on the page, we remapthe www.attacker32.com hostname to the IP address of the IoT server, so the request triggered by thebutton will go to the IoT server. That is exactly what we want.To change the DNS mapping, students can modify the zone attacker32.com file inside attacker’snameserver container. The zone file can be found in the /etc/bind folder. The following shows thecontent of the zone file. The first entry is the default Time-To-Live (TTL) value (seconds) for the response,specifying how long the response can stay in the DNS cache. This value may need to be modified. Thefollowing is the content of the zone file: TTL 1000@INSOAns.attacker32.com. admin.attacker32.com. (
SEED Labs – DNS Rebinding Attack 2After making the changes to the zone file, run the following command to ask the nameserver to reloadthe revised zone data.# rndc reload attacker32.comBecause of the tasks conducted previously, the DNS mapping for the www.attacker32.com hasalready been cached by the local DNS server, it will not expire until 1000 seconds later. To shorten thewaiting, students are allowed to clean out the cache using the following command (on the local DNS server).However, this can only be conducted before the attack starts. Once the attack starts, students are not allowedto touch the local DNS server.// Do it on the local DNS server container# rndc flushIf both steps in this task are done correctly, clicking the button on the change page from www.attacker32.com should be able to change the thermostat’s temperature successfully. Please provideevidence in your report to demonstrate your success.4.3Task 3. Launch the AttackIn the previous task, the user has to click the button to set the temperature to the dangerously high value.Obviously, it is unlikely that users will do that. In this task, we need to do that automatically. We havealready created a web page for that purpose. It can be accessed using the following URL:http://www.attacker32.comOnce you have loaded this page into the User VM, you should be able to see a page with a timer, whichgoes down from 10 to 0. Once it reaches 0, the JavaScript code on this page will send the set-temperaturerequest to http://www.attacker32.com, and then reset the timer value to 10. Students need to usethe DNS rebinding technique, so once the timer reaches 0, the thermostat’s temperature is set to 88 Celsius.5SubmissionYou need to submit a detailed lab report, with screenshots, to describe what you have done and what youhave observed. You also need to provide explanation to the observations that are interesting or surprising.Please also list the important code snippets followed by explanation. Simply attaching code without anyexplanation will not receive credits.
SEED Labs - DNS Rebinding Attack Lab 3 attached to this network, one serving as the local DNS server, and the other two serving as the attacker's nameserver and web server. The attacker owns the attacker32.com domain, which is hosted by the attacker's nameserver container. The web server hosts a malicious website used for the attack.