Transcription
Acqueon Engagement Cloud(AEC) integration to AmazonConnectIntegration GuideJune 2018Acqueon Technologies IncContentsOverview . 2Acqueon Engagement Cloud (AEC) on AWS . 2Costs and Licenses . 3Architecture. 4Prerequisites . 5Specialized Knowledge . 5Technical Requirements. 6Deployment Options . 6Deployment Steps . 7Step 1. Prepare Your AWS Account . 7Step 2. Subscribe to the Acqueon Engagement Cloud (AEC) AMI. 7Step 3. Launch the Quick Start .8Step 4. Test the Deployment . 12Step 5. Configure the Integration . 12Best Practices Using AEC on AWS .34Security. 35Page 1 of 40
AEC on the AWS CloudJune 2018Key Features . 35FAQ. 37Additional Resources . 38Send Us Feedback . 40Document Revisions . 40This Quick Start deployment guide was created by Acqueon Technologies Inc.Quick Starts are automated reference deployments that use AWS CloudFormationtemplates to deploy key technologies on AWS, following AWS best practices.OverviewThis deployment guide provides step-by-step instructions for deploying AcqueonEngagement Cloud (AEC) on the Amazon Web Services (AWS) Cloud.This deployment guide is for IT infrastructure architects, administrators & DevOpsprofessionals who are planning to deploy an enhanced outbound voice dialer & proactiveomni channel platform that natively integrates with Amazon Connect by leveraging itsAgent skilling and voice infrastructure.Acqueon Engagement Cloud (AEC) on AWSAEC is an enhanced outbound voice dialer platform, that natively integrates with AmazonConnect by leveraging its Agent skilling and voice infrastructure. It provides real-time leadfiltering, segmentation, prioritization and scheduling. This helps significantly improve rightparty connect (RPC) and agent efficiency which aligns with business goals.The advanced feature includes all in one proactive engagement solution that enables thevoice platform with multi-channel communication toolsets including email, sms & in-appnotifications. This allows you to orchestrate engagements based on user preference,business goals and machine learning.The AEC platform has built in compliance module for TCPA & Ofcom along with DNCscrubbing.Page 2 of 40
AEC on the AWS CloudJune 2018Key Benefits: Dialing Strategy: Support every outbound engagement strategy with dialing andpacing options including: Preview, Progressive and Predictive modes. Adjustcampaign pacing for improved agent productivity, compliance with abandonmentrate laws and effective use of telephony resources. Multi-Channel Support: Provide personalized, proactive customer outreach viavoice, SMS (one and two-way), push notifications and email with business rules thatdefine when and how to contact them Regulatory & Compliance Adherence: Comply with increasingly complex regulatoryrequirements like TCPA, Ofcom and other governmental regulatory bodies DNC Filtering: Do Not Call filtering is supported across all channels (Voice, SMS &email) List & Campaign Management: Acqueon Engagement Cloud allows outboundcommunication to easily create, manage, and fine tune the outbound campaigns overtime. Allows to deploy smarter campaigns with options including microsegmentation, prioritization, auto pilot, centralized attempt, message and regionalcompliance controls Channel Blending: Ability to design campaigns to communicate across multiplechannels as part of a single customer interaction. This cross-channel communicationis achieved through escalation and blending strategies Right Party Connect Optimizer: Leverage right-time and right-mode to-contactcapabilities and track contact histories to help design and inform optimal outboundengagement strategies Security: End-to-End Encrypted data transmission of customer sensitive data toadhere with customer privacy and security needs. The underlying data storage at restis also encrypted.Costs and LicensesYou are responsible for the cost of the AWS services used while running this Quick Startreference deployment. There is no additional cost for using the Quick Start.The AWS CloudFormation template for this Quick Start includes configuration parametersthat you can customize. Some of these settings, such as instance type, will affect the cost ofPage 3 of 40
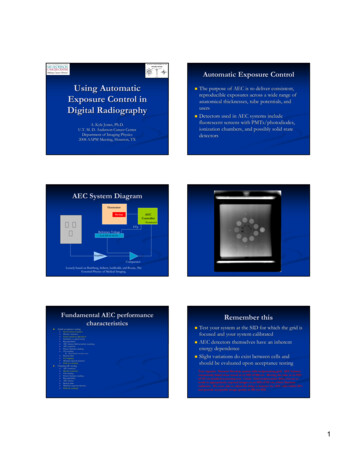
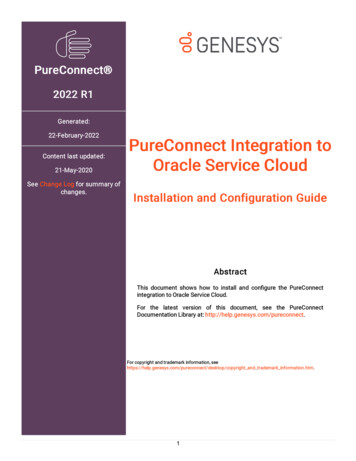
AEC on the AWS CloudJune 2018deployment. For cost estimates, see the pricing pages for each AWS service you will beusing. Prices are subject to change.Based on the usage and requirements the professional support can be availed throughsubscription by contacting support@acqueon.com .ArchitectureDeploying this Quick Start for a new virtual private cloud (VPC) with input parametersbuilds the following Acqueon Engagement Cloud (AEC) Multi – AZ (HA) environment inthe AWS Cloud.Figure 1: AEC architecture on AWSThe Quick Start sets up the following: A highly available architecture that spans multiple Availability Zones.An Amazon Elastic Compute Cloud (Amazon EC2) instance with Windows Server2012 R2, to host AEC core and web applications.An Amazon Relational Database Service (Amazon RDS) for SQL Server DB instanceto store, segment, enrich, and process the lead list; to store contact results forreporting and business intelligence; and to provide advanced analytics to optimizeRPC.An Amazon Simple Storage Service (Amazon S3) bucket for storing contact files.Page 4 of 40
AEC on the AWS Cloud June 2018Record set entries registered in Amazon Route 53 for Amazon CloudFrontdistribution.Creates VPC, Internet Gateway, Private, Public subnets, NAT gateways in eachavailability zones.The Stack creation will take up to 1 hour 30 minutes.Creates AEC AMIs in two availability zones with auto scaling group configured.Creates RDS MS SQL Server with Multi-AZ supportAEC comes with default tenant instance and ready to try Preview or Progressive typecalls.AEC instances consists of Multi-Channel Outbound List & Campaign managementsolutions installed and configured. All the necessary components get pre-installedand available for use.AEC console will facilitate the ‘Administrator’ to configure the system.If you have the Amazon Connect instance, the administrator can configure theAmazon Connect instance URL in the AEC-Console in system configuration.Similarly, white list the newly created EC2 instance “Public DNS” in AmazonConnect Application Integration.Sample Preview & Progressive Campaign created and the administrator can makeuse of the campaigns which is by default and later campaign can be created andconfigured based on requirements.AEC also supports for Voice Drop Campaigns like to dial a customer and play aprompt and hang-up.PrerequisitesSpecialized KnowledgeBefore you deploy this Quick Start, we recommend that you become familiar with thefollowing AWS services. (If you are new to AWS, see Getting Started with AWS.) Amazon VPC Amazon EC2 Amazon EBS Amazon Connect Amazon CloudFront Amazon Route 53 Amazon ACM Amazon RDS (MS SQL) Amazon S3Page 5 of 40
AEC on the AWS CloudJune 2018Technical RequirementsBefore deploying Acqueon Engagement Cloud, you must have the following: An AWS Account An Amazon EC2 Key pair Amazon Connect instance Hosted Zone in the AWS account where AEC stack is getting deployed. If you havehosted zone created in another AWS account which is active, you can still create adummy hosted zone in the AWS account for the AEC stack to create record sets andthen manually update the record sets in another AWS account hosted zone which isactive. If you no longer needed you can delete the dummy hosted zone. An SSL certificate managed by AWS Certificate Manager in the region where you aredeploying AEC. For any assistance please contact support@acqueon.comNote: Acqueon recommends domain names created in Amazon Route 53 & SSLcertificate generated from Amazon ACM. The AEC stack should be created in theAWS account which is having Hosted Zones configured for the domain. CloudFront certificate ARN needs to be created/imported in us-east-1 region ELB certificate ARN needs to be created/imported in stack deployment region. For Voice Drop Campaigns – CPaaS platform provider configurationsDeployment OptionsThis Quick Start provides below deployment options: Deploy AEC into a new VPC (end-to-end deployment). This option builds a newAWS environment consisting of the VPC, subnets, NAT gateways, security groups,bastion hosts, and other infrastructure components, and then deploys AcqueonEngagement Cloud with Multi-AZ (HA) into this new VPC.Page 6 of 40
AEC on the AWS Cloud June 2018AEC comes with SaaS deployment model and based on the EC2 instancetype selection the stack facilitates AEC resources accordingly. The SaaSdeployment model consists of Option-1: Up to 500 Agents 1000 contacts per minute across 100 activecampaigns. Max 1 instance (Tenant) Option-2: Up to 2000 Agents across all instances 2500 contacts per minuteacross 300 active campaigns across all instances. Max 6 instances (Tenants) Option-3: Up to 5000 Agents across all instances 5000 contacts per minuteacross 600 active campaigns across all instances.10 instances (Tenants)Please contact support@acqueon.com for the latest updates.The deployment guide provides separate templates for these options. It also lets youconfigure CIDR blocks, instance types, and AEC settings, as discussed later in thisguide.Deployment StepsStep 1. Prepare Your AWS Account1. If you don’t already have an AWS account, create one at https://aws.amazon.com byfollowing the on-screen instructions.2. Use the region selector in the navigation bar to choose the AWS Region where you wantto deploy AEC on AWS.3. Create a key pair in your preferred region.4. If necessary, request a service limit increase for the Amazon EC2 t2.xlarge instance type.You might need to do this if you already have an existing deployment that uses thisinstance type, and you think you might exceed the default limit with this referencedeployment.Note: Please contact support@acqueon.com for more details on the latest updates.Step 2. Subscribe to the Acqueon Engagement Cloud (AEC) AMI1. Log in to the AWS Marketplace at https://aws.amazon.com/marketplace.2. Open the page for Acqueon Engagement Cloud (AEC), and choose Continue.Page 7 of 40
AEC on the AWS CloudJune 20183. Use the Manual Launch option to launch the AMI into your account on Amazon EC2.This involves accepting the terms of the license agreement and receiving confirmationemail. For detailed instructions, see the AWS Marketplace documentation.4. Alternatively, AEC license subscription can be availed by using AEC UserRegistration Console URL & by registering your details with contact information.Please refer Step 5 Configure the Integration.Step 3. Launch the Quick StartNote You are responsible for the cost of the AWS services used while running thisQuick Start reference deployment. There is no additional cost for using this QuickStart. For full details, see the pricing pages for each AWS service you will be using inthis Quick Start. Prices are subject to change.1. Choose one of the following options to launch the AWS CloudFormation template intoyour AWS account. For help choosing an option, see deployment options earlier in thisguide.Option 1Deploy AEC into anew VPC on AWSLaunchEach deployment takes about 1 hour 30 minutes to complete.2. Check the region that’s displayed in the upper-right corner of the navigation bar, andchange it if necessary. This is where the network infrastructure for AEC will be built. Thetemplate is launched in the US East (N.Virginia) Region by default.3. On the Select Template page, keep the default setting for the template URL, and thenchoose Next.4. On the Specify Details page, change the stack name if needed. Review the parametersfor the template. Provide values for the parameters that require input. For all otherPage 8 of 40
AEC on the AWS CloudJune 2018parameters, review the default settings and customize them as necessary. When youfinish reviewing and customizing the parameters, choose Next.In the following tables, parameters are listed by category and described separately forthe two deployment options:– Parameters for deploying AEC into a new VPCOption 1: Parameters for deploying AEC into a new VPCView templateVPC Network Configuration:Parameter label(name)DefaultDescriptionAvailability Zones(AvailabilityZones)Requires inputThe list of Availability Zones to use for the subnets in the VPC.The Quick Start uses two Availability Zones from your list andpreserves the logical order you specify.VPC CIDR(VPCCIDR)10.0.0.0/16CIDR block for the VPC.Private Subnet 1 CIDR(PrivateSubnet1CIDR)10.0.0.0/19CIDR block for the private subnet located in Availability Zone1.Private Subnet 2 CIDR(PrivateSubnet2CIDR)10.0.32.0/19CIDR block for the private subnet located in Availability Zone2.Public Subnet 1 CIDR(PublicSubnet1CIDR)10.0.128.0/20CIDR block for the public (DMZ) subnet located in AvailabilityZone 1.Public Subnet 2 CIDR(PublicSubnet2CIDR)10.0.144.0/20CIDR block for the public (DMZ) subnet located in AvailabilityZone 2.Key Name(KeyPairName)Requires inputPublic/private key pair, which allows you to connect securelyto your instance after it launches. When you created an AWSaccount, this is the key pair you created in your preferredregion.Amazon EC2 Configuration:Parameter label(name)DefaultDescriptionAEC Type(AEC Installation Type)Requires inputSelect AEC installation type Voice or OmnichannelInstance Type(EC2InstanceType)Requires inputRefer 'AEC Capacity and Sizing section' of 'AECInstallation Guide' to select appropriate EC2 Instance TypeRDP From(RDPFrom)Requires inputThe CIDR IP range that is permitted to access AEC. Werecommend that you set this value to a trusted IP range. ForPage 9 of 40
AEC on the AWS CloudParameter label(name)June 2018DefaultDescriptionexample, you might want to grant only your corporate networkaccess to the software.Amazon RDS Configuration:Parameter label(name)DefaultDescriptionInstance Name(RDSDBInstanceName)Requires inputRDS DB Instance NameDB Master User(DBMasterUser)Requires inputRDS Master User NameDB Master PasswordRequires inputRDS Master Password(DBMasterPassword)Amazon Route53 Configuration:Parameter label(name)DefaultDescriptionHosted Zone(DomainHostedZone)Requires inputHosted Zone of the DomainCF DomainNameRequires inputAlternate domain name for CloudFrontRequires inputCertificate ARN for CloudFront. (Need to be created/importedin us-east-1 region)Requires inputCertificate ARN for ELB. (Need to be created/imported instack region)(CFDomainName)CF Certificate ARN(CFCertificate)ELB Certificate ARN(ELBCertificate)5. On the Options page, you can specify tags (key-value pairs) for resources in your stackand set advanced options. When you’re done, choose Next.6. On the Review page, review and confirm the template settings. Under Capabilities,select the check box to acknowledge that the template will create IAM resources.7. Choose Create to deploy the stack.8. Monitor the status of the stack. When the status is CREATE COMPLETE, the AECcluster is ready.9. Use the URLs displayed in the Outputs tab for the stack to view the resources that werecreated.Page 10 of 40
AEC on the AWS CloudJune 2018OutputOutputs Window URL Guide LinesAEC User Registration Console URL Click this URL to register user details. This ismandatory for license subscription.AEC Console Tenant URL Click this URL to login to AEC Tenant Console forcreating campaigns, upload contacts, Agent association to Campaigns, etc.Note: Refer AEC Console User Guide.pdf for more detailsAEC Console Host URL Click this URL to login to AEC Host Console for creatinginstances (Tenants), etc. By default AEC CF template creates instance1 (Tenant) whichis available and ready to use.Note: Refer AEC Console User Guide.pdf for more detailsAEC Agent Client URL Click this URL to login Agents to Amazon Connect and AEC.By using Amazon Connect streams API, AEC Agent Client integrates with AmazonConnect to handle AEC Campaign calls.Note: Refer AEC Client User Guide.pdf for more detailsAEC RDS Database Endpoint Address used for RDS identification & for futurereference.AEC Bastion Host Public IP used for RDP connections10. Use the Acqueon EC Registration URL to fill in the customer details and click on“Register” button.Note: Please contact support@acqueon.com for the assistance and extendedprofessional support.Page 11 of 40
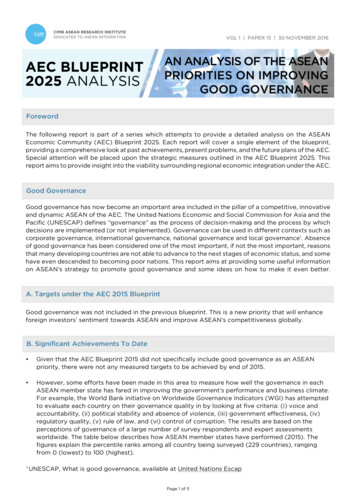
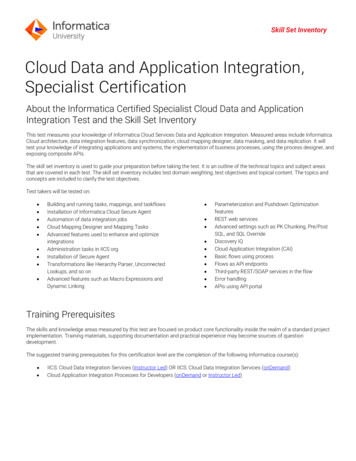
AEC on the AWS CloudJune 2018Step 4. Test the DeploymentNavigate to the public URL AEC Console Tenant URL as shown in the outputstab of the deployment stack.If the above page gets displayed then AEC is successfully installed.Step 5. Configure the IntegrationNavigate to the public URL AEC Console Tenant URL as shown in the outputs ofthe deployment stack.There are many features available within the AEC solutions which is running in theinstance. To start with, administrator can use the default configuration, understandthe features and make use the system. Steps in Summary:AEC Registration URL - Enter the details and RegisterIn AEC Console - Configure Amazon Connect instance URLIn Amazon Connect –Whitelist the Pubic DNSIn AEC Console - Configure Amazon Connect Agents & associate with CampaignsAEC Agent DesktopPage 12 of 40
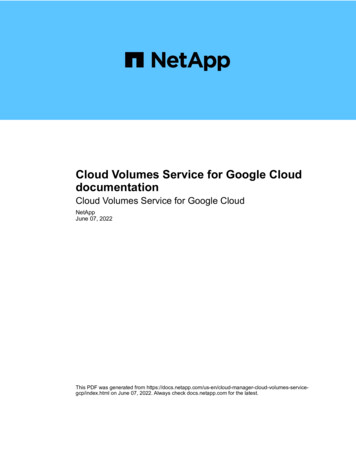
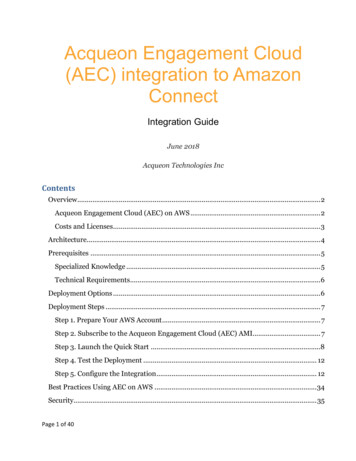
AEC on the AWS Cloud In AEC Console - Configure Voice Drop CampaignAEC Registration URL:Open AEC Registration URL: https:// Public DNS /AECInstanceConsole/#/ec2Register Customer details.Enter your Name, email, phone, Address, etc and Click on “Register”.The registration completes by displaying success message.Close this browser tab.User can now open AEC Tenant Console URL and start using AEC features. AEC console will facilitate the ‘Administrator’ to configure the system.Open AEC Console URL: https:// Public DNS /instance1LCMConsole/Username: instance1adminPassword: Acqueon5@ecPage 13 of 40June 2018
AEC on the AWS CloudAfter successful login, home displayed like belowAEC Console - Configure Amazon Connect instance URL On the left side, Menu pane Click the “System”.Page 14 of 40June 2018
AEC on the AWS Cloud Go to System Menu in the right corner and select URL.Page 15 of 40June 2018
AEC on the AWS Cloud Click on “AmazonProvider” icon. Under Action, select EditPage 16 of 40June 2018
AEC on the AWS Cloud June 2018In “Instance URL”, configure your Amazon Connect instance URL & Click Save.In Amazon Connect – Whitelist the Pubic DNS Login to Amazon Connect instance, in Application Integration white list the newlycreated EC2 instance “Public DNS(IPv4)”.Note: Whitelisting Public DNS is important, otherwise AEC Agent Desktop loginattempt will not be succeeded.In AEC Console - Configure Amazon Connect Agents On the left side, Menu pane Click “Agents”. Click Add Agent button in the right bottom this will open Agent Mapping screen.Enter Amazon Connect’s Agent Login Name, First Name, Last Name in Agent Detail.Page 17 of 40
AEC on the AWS Cloud June 2018Kindly ensure Amazon Connects Agent First Name is unique. AEC expects the AgentFirst Name to be unique to identify the agent.Associate campaigns with Agent.CampaignsCampaign GroupsPacing ModePage 18 of 40List of campaigns availableSet of campaign be grouped under a CampaignGroupPreview: Agent first view the customerdetails before connect to the customer. And
AEC on the AWS CloudJune 2018Agent can decide whether to call the customeror skip and proceed for the next customer.Progressive: AEC will automatically push acustomer contact to the Agent along withcustomer details. Save the Agent creation.Similarly, later when a new campaign is created, Agents can be associated from thecampaign as well. Sample Preview & Progressive Campaign created and the administrator can makeuse of the campaigns which is available by default.AEC Agent Desktop URL After Agent & Campaign association, from the agent desktop, open the below AECAgent Desktop URL. Add the https:// Public DNS as white listed origin in your Amazon connectinstance.Agent Desktop URL: https:// Public DNS /instance1lcmagentclient/ccad.htmPage 19 of 40
AEC on the AWS CloudJune 2018Note: Browser may block the CCP pop-up window, always allow popups fromhttps:// Public DNS / . If prompted Reload the page. This will open the AEC Agent Desktop & Amazon Connect CCP window. Enter the Amazon Connect Agent login credentials. Amazon Connect user should be logged in only in Agent Desktop’s CCP. If multipleAgent Desktops using the same Amazon Connect user then the working behavior isundefined as call eventing will not be as expected.Page 20 of 40
AEC on the AWS Cloud After successfully logged in, the below AEC Agent Desktop displays.Configure Voice Drop Campaign in AEC ConsolePage 21 of 40June 2018
AEC on the AWS Cloud June 2018AEC supports Voice Drop Campaigns in which the administrator upload contacts todial out and play some prompt and hang-up.AEC uses CPaaS platform to facilitate customer calling functionality and playingvoice messages.Note: please contact support@acqueon.com for configuring CPaaS platform providerand for testing Voice Drop Campaigns.Steps to test a Preview Campaign CallPre-requisite:1. Kindly ensure the Amazon Connect Agents, AEC Campaigns are associated correctly.2. For testing purpose, prepare a sample contact file in the below format.File Name: inia,USA,16095248772,16095248772,160952487723. By using “sample contact file” – the business can upload their customer contacts andconnect with the customer either Preview or Progressive pacing modes.4. In sample contact file, �� Representsupload file column headers where FName First Name, LName Last Name, etc 5. In 2nd line of sample contact 48772,16095248772”Shows the customer contact.6. COMMA is the delimiter between column headers and values. And we can changethis.SamplePreviewCampaignContact.txt7. The sample contact file is just a sample, we can have multiple business fields insample contact file.8. For e.g. customer can have multiple contact for e.g. Mobile, Office, Home, etc. Thebusiness can upload multiple contacts and using the call strategy business can decidewhen to reach the customer either in Mobile or Home or Office. Please contactsupport@acqueon.com for more details on how to use advance features.9. Once the contact file is ready, follow the below steps to upload to Campaign and dialsout.Page 22 of 40
AEC on the AWS CloudJune 2018Note: Ensure user uploads contact from the same time zone where the campaign isrunning.Upload Contacts to SamplePreviewCampaignImportant: Verify the Campaign execution status as “EXECUTING” before uploading thecontacts. Suppose the Campaign execution status is as “TIME SUSPENDED” on Saturdayand Sunday, then need to enable both days in Campaign Schedule. By default, Saturday andSunday is kept disabled/off for all the campaigns.1. Log in AEC Console, select Campaign Tab and click edit option ofSamplePreviewCampaign.Page 23 of 40
AEC on the AWS Cloud2. Click Contacts List tab and click on add button.3. Select Upload Contacts.Page 24 of 40June 2018
AEC on the AWS Cloud4. Click Choose File in Import File tab.Page 25 of 40June 2018
AEC on the AWS Cloud5. Select sample contact file.6. Select profile as PreviewProfile in Import File tab.Page 26 of 40June 2018
AEC on the AWS CloudJune 20187. We can see Zone name selected as Campaign Specific TimeZone in Field Mapping tab.8. In Mode Mapping tab, we can see Home, office and mobile as selected for thecorresponding mode.Page 27 of 40
AEC on the AWS Cloud9. And business fields are mapped to corresponding fields.10. Finally click on Upload button.11. If upload is success then we can see “Contact Uploaded successfully” message.Page 28 of 40June 2018
AEC on the AWS Cloud12. Click Refresh button.13. Now we can see list of uploaded contacts files.Page 29 of 40June 2018
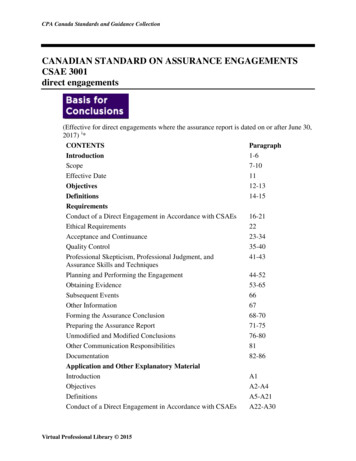
AEC on the AWS CloudJune 2018Upload Contacts to SampleProgressiveCampaignKindly follow the above steps by select the campaign “SampleProgressiveCampaign”.AEC Agent Desktop - Sample Preview Campaign Call1. After logged in to AEC Agent Desktop & Amazon Connect CCP window, For Previewcontact select agent status as “Ready for Preview” and click on “Get contact button”Page 30 of 40
AEC on the AWS Cloud2. Below screen shows agents get the available contact3. Agent can Click on Dial button to connect to Customer.Page 31 of 40June 2018
AEC on the AWS CloudJune 20184. Or Otherwise Agent can decide to Skip the customer contact by using “Skip” button.5. The Agent can also close the contact by using Close button.Page 32 of 40
AEC on the AWS CloudJune 20186. In some cases, if the Agent already contacted the customer and wants to close thestatus of customer contact can be done via “Close” button.7. After dialed to customer, both Agent and Customer are in call and Agent hang up thecall by using “End” button.8. Call Disposition: After the call was ended, Agent can set the call disposition by usingCall Outcome or Business Outcome.Call OutcomePage 33 of 40Outcomes like Busy, No Answer, InvalidNumber, Voice Mail, etc. all TelephonyOutcomes are classified under Call Outcome.
AEC on the AWS CloudBusiness OutcomeJune 2018Administrator can define Outcomes related totheir Business for e.g. Deal Success, or PaymentPending or etc. Success or Failure – all thesecustom defined outcomes comes underBusiness Outcome. Based on Business Outcomethe call strategy will be applied and rescheduledaccordingly.Note: Please refer the AEC Agent Desktop Guide for more options.Please contact support@acqueon.com for more details on how to use the advancefeatures or for any trainings or professional support.Best Practices Using AEC on AWSThe instance launched in the AWS Quick Start is for trial version with all in one EC2instance to familiarize with the AEC & the integration with Amazon Connect.High Availability is supported by AEC with the help of Amazon ELB & Amazon RDS.Configure your RDS MS SQL DB Retention period to at least 7 days.Page 34 of 40
AEC on the AWS CloudJune 2018Configure a maintenance window for your RDS MS SQL DB which is outside of your normalworking day.AEC Client User Guide.pdf – This document explains more about how to use AEC AgentDesktop.AEC Console User Guide.pdf – This document explains more about on variousconfigurations and features supported by AEC.To start with, go through the manuals, understand and better contactsupport@acqueon.com for any support, training, professional services.SecurityAcqueon recommends using domain name created in Amazon Route 53 and SSL certificategenerated from Amazon ACM. If the user has already domain name available with hostedzones & having valid SSL certificate, user can input the domain or sub-domain name & SSLCertificate ARN at the time of AEC stack (using CloudFormation template) creation.For e.g. if user has a domain named “abc.com” & having SSL certificate for “*.abc.com”. Atthe time of stack creation user can create a new subdomain named as “aec.abc.com” & typein the SSL Certificate ARN. AEC CF template adds the sub-domain in the “abc.com” hostedzone and configure the SSL certificate for CloudFront.If the user doesn’t have domain registered, still they can go ahead and create the AEC stackbut the user has to manually configure the SSL certificates & do re-launch the AECAutoScaling Launch configuration.For best practices, please contact support@acqueon.com for any support, training,professional services.Key Features Supported Pacing Modes:o Preview mode of diallingo Progressive mode of diallingPreview Campaign: Customer Contacts uploaded to Preview Campaign, When theAgent click on Get Contact from Agent Desktop, contacts get pushed to AgentDesktop displays customer details. Agent then decides whether to dial to thecustomer
AEC instances consists of Multi-Channel Outbound List & Campaign management solutions installed and configured. All the necessary components get pre-installed and available for use. AEC console will facilitate the 'Administrator' to configure the system. If you have the Amazon Connect instance, the administrator can configure the