Transcription
Jabra PanaCast 50User manual
2021 GN Audio A/S. All rights reserved. Jabra is a trademark of GN Audio A/S. The Bluetooth wordmark and logos are registered trademarks owned by the Bluetooth SIG, Inc. and any use of such marksby GN Audio A/S is under license.Made in MalaysiaMODEL: VSM020Declaration of Conformity can be found on www.jabra.com/doc
1. Welcome. 52. Overview. 62.1 Jabra PanaCast 50 overview2.2 Included accessories2.3 Optional accessories2.4 Dimensions3. Visual indicators. 114. Room setup guide. 125. Mounting options. 135.1 Wall Mount installation5.2 Screen Mount installation5.3 Table Stand installation5.4 Installation height6. Cabling. 177. Software. 197.1 Operating systems7.2 Jabra Direct (Windows or macOS)7.3 Jabra Xpress (Windows or macOS)7.4 Jabra Sound (iOS or Android)7.5 Microsoft Teams and Teams Rooms7.6 Zoom and Zoom Rooms7.7 Other compatible video conferencing applications8. Remote management setup. 258.1 Quick startup wizard in Jabra Direct9. Video conferencing features. 289.1 Camera controller in Jabra Direct and JabraSound 9.2 Intelligent Zoom9.3 Virtual Director6.1 Room system cabling9.4 Safety capacity settings6.2 Bring-your-own-device (BYOD) cabling9.5 Save Pan, Tilt, Zoom presets3
9.6 Image quality settings9.7 Video flicker9.8 Field of view9.9 Video stitching9.10 Update firmware11.2 How to use the remote control12.Support. 4312.1 FAQ and technical specifications12.2 How to care for your Jabra device12.3 How to factory reset10.Whiteboard. 3510.1 Position the whiteboard10.2 Set up whiteboard view10.3 Share the whiteboard in the main cameraview10.4 Share a separate view of the whiteboard inMicrosoft Teams Rooms10.5 Share a separate view of the whiteboard inZoom Rooms11.Remote control(optional accessory). 4111.1 How to pair the remote control4
1. WelcomeThank you for using the Jabra PanaCast 50. We hope you will enjoy it!Jabra PanaCast 50 features Inclusive meetings. Panoramic-4K video using three 13-megapixel cameras andpatented real-time video stitching to give 180 coverage, for a more natural viewof the huddle room. Intelligent video technology. Intelligent Zoom automatically includes everyonein the conversation, while Vivid HDR ensures the best video experience, evenunder widely varying lighting conditions. Instant collaboration. Plug-and-play technology lets you collaborate with othersquickly and easily, bringing hassle-free video and audio to your huddle room. Versatile compatibility. Compatible with all leading video and audio-conferencingsolutions. Certified for use with Microsoft Teams Rooms, Zoom and Zoom Rooms.5
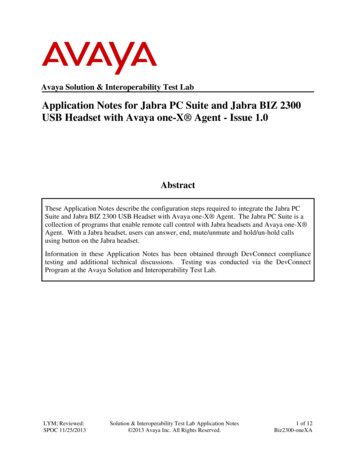
2. Overview2.1 Jabra PanaCast 50 overviewFRONT merasSpeakersLED6
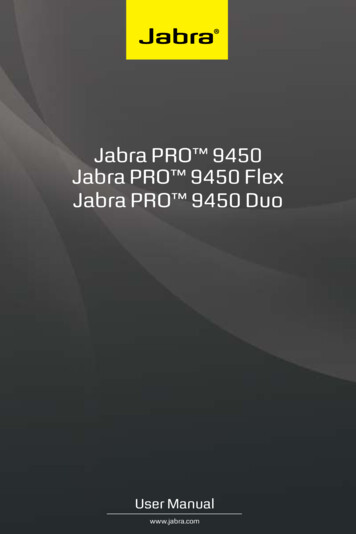
BACK SIDEAC powerBluetooth button (to pairremote control)3.5 mmAUX portPOWERAUXINRESETResetETHERNETAir ventsUSB CEthernet (forJabra Xpress)USB-CAdjustablemounting bracket7
2.2 Included accessoriesAdditional accessories can be purchased at jabra.com/accessories.AC power adapter (2m/6ft)AC power cable(1m/3ft)USB-C cable(2m/6ft)Wall Mount2 screws(M5x12)Hardware not included: Drywall screws andanchors Masonry screws8
2.3 Optional accessoriesAccessories can be purchased at jabra.com/accessories.Table StandScreen MountRemote controlUSB-C cable(5m/15ft)9
2.4 Dimensions144 mmm650 m80 mm125 mm80 mm108.6 mm120m98 mmm360mm10
3. Visual indicatorsLED STATUSOff or not streaming(LED off)Starting up(pulsing white)Connected(on for 3 seconds)In call or streaming video/mediaIn call, audio mutedRoom capacity notificationPairing remote controlFirmware updating(pulsing red)(flashing green and blue)(flashing pink)11
4. Room setup guideThe Jabra PanaCast 50 is designed for meeting rooms up to 4.5 meters x 4.5meters (15 feet x 15 feet) and can be mounted using the supplied Wall Mount orthe optional Screen Mount or Table Stand. If a whiteboard will be used in themeeting room, ideally it should be positioned on the adjacent wall for optimalviewing.View the Room setup guide PDF here: jabra.com/help/panacast50/getstartedBelow are some typical room setup scenarios.12
5. Mounting options5.1 Wall Mount installationView the Wall Mount assembly video or PDF here:jabra.com/help/panacast50/getstarted13
5.2 Screen Mount installationThe Screen Mount is designed for screens up to 220 centimeters (86 inches) andVESA mounts up to 600 millimeters.View the Screen Mount assembly video or PDF here:jabra.com/help/panacast50/getstarted14
5.3 Table Stand installationView the Table Stand assembly video or PDF here:jabra.com/help/panacast50/getstarted15
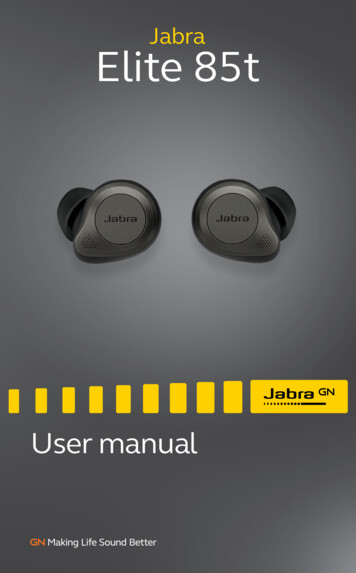
5.4 Installation heightIt is recommended to install the Jabra PanaCast 50 at eye-level of the meetingroom participants.When installing the PanaCast 50with the Wall Mount or Screen Recommended30-35 cm (12-14 in)Mount, the camera should bepositioned 8 centimeters (3 inches)below the screen and ideally 30-35centimeters (12-14 inches) above the Recommended1 m (3 ft)table top or 100 centimeters(3 feet) from the floor. If this height isnot possible, it is recommended toinstall the Jabra PanaCast 50 above the screen.Min.8 cm (3 in)Do not mount the camera facing direct sunlight as this may affect the preset whitebalance and compromise the image.16
6. CablingThe Jabra PanaCast 50 is versatile and can be used with a Microsoft Teams Room orZoom Room systems, or bring-your-own-devices (BYOD). It is recommended not touse USB extender cables.6.1 Room system cablingScreenHDMI (4K)AC powerEthernet (Jabra Xpress)Jabra PanaCast 50USB-CAC power17
6.2 Bring-your-own-device (BYOD) cablingScreenHDMI (4K)AC powerUSB-CEthernet (Jabra Xpress)Jabra PanaCast 5018
7. Software7.1 Operating systemsJabra PanaCast 50 supports Windows 10 or later, and macOS 10.15 or later, anddoes not require extra drivers.19
7.2 Jabra Direct (Windows or macOS)Jabra Direct is free desktopsoftware designed to support,manage and enable optimalfunctionality for Jabra devices.Jabra Direct features a cameracontroller that can be used asa remote control for the JabraPanaCast 50 (refer to section9.1 for more info).Download the latest free version from jabra.com/direct20
7.3 Jabra Xpress (Windows or macOS)Jabra Xpress is free desktop software designed to mass deploy and managemultiple Jabra devices across an organization. Jabra Xpress can track safetycapacity limits and provide detailed insights about device usage.Visit jabra.com/xpress to get access to Jabra Xpress21
7.4 Jabra Sound (iOS or Android)Jabra Sound is a free app for iOS or Androidphones that can be used as a remote controller forthe Jabra PanaCast 50.22
7.5 Microsoft Teams and Teams RoomsMicrosoft Teams or Microsoft Teams Rooms will automatically detect and set theJabra PanaCast 50 as the default video and audio device.To manually set the Jabra PanaCast 50 as the default video and audio device inMicrosoft Teams or Teams Rooms, follow the steps below.1. Launch Microsoft Teams or Microsoft Teams Rooms.2. Click your account profile icon in the top right corner of Microsoft Teams.3. Select Settings to open the settings menu.4. Select the Devices tab in the menu list.5. Under Camera and Audio devices, select Jabra PanaCast 50.For more help, refer to the Microsoft Teams help center.23
7.6 Zoom and Zoom RoomsZoom or Zoom Rooms will automatically detect and set the Jabra PanaCast 50 asthe default video and audio device.To manually set the Jabra PanaCast 50 as the default video and audio device inZoom or Zoom Rooms, follow the steps below.1. Launch Zoom or Zoom Rooms.2. Click your wheel icon in the top right corner of Zoom to open the settings menu.3. In the Video and Audio tabs, select Jabra PanaCast 50 as the camera and speaker.For more help, refer to the Zoom help center.7.7 Other compatible video conferencing applicationsWhen using the Jabra PanaCast 50 with other compatible video conferencingapplications, ensure it has been manually set as the default video and audio devicein the video/audio settings for the video conferencing application.24
8. Remote management setupWith Jabra Xpress and an ethernet connection, a Jabra PanaCast 50 can be remotelymanaged without the need of Jabra Direct or the need to be connected to acomputer. This means the Jabra PanaCast 50 will automatically apply managedsettings and will always be updated to the firmware selected.8.1 Quick startup wizard in Jabra DirectWhen first connecting a Jabra PanaCast 50 to a computer that has Jabra Directinstalled, a Quick startup wizard will automatically launch. This wizard will setupthe Jabra PanaCast 50 to be remotely managed by Xpress and will guide youthrough the steps of naming your device, enabling Xpress management through anethernet connection, and linking to a valid Xpress package URL. As an extra layer ofprotection, a password can be created to protect the Jabra PanaCast 50 settings.25
26
The Quick startup wizard settingscan be changed at any time usingJabra Direct.1. Launch Jabra Direct and ensurethe Jabra PanaCast 50 isselected.2. Select Settings to open thesettings menu.3. Change the appropriate settingsfor Jabra Xpress remotemanagement.4. Press Save to apply the changesto the Jabra PanaCast 50. TheJabra PanaCast 50 will rebootand the changes will take effect.27
9. Video conferencing features9.1 Camera controller in Jabra Direct and Jabra Sound The camera controller is a tool in Jabra Direct and Jabra Sound that enables usersto remotely control a Jabra PanaCast 50 using their computer, phone or tablet.The camera controller allows users to: Use Automatic zoom modes (Virtual Director or Intelligent Zoom). Set up and share the view of a whiteboard. Adjust the camera view using Pan, Tilt, Zoom controls. Adjust the image quality settings (e.g. brightness, saturation, etc.). Select and customize Presets to suit their individual requirements.28
Jabra Direct camera controllerJabra Sound camera controller29
9.2 Intelligent ZoomIntelligent Zoom is an Automatic zoom mode that dynamically frames all visiblepeople within 3.5 meters (11 feet).Users can access Intelligent Zoom by using the camera controller in Jabra Direct,Jabra Sound or by using the remote control. Only one Automatic zoom mode canbe active at a time.By default, Automatic zoom mode is set to Intelligent Zoom.9.3 Virtual DirectorVirtual Director is an Automatic zoom mode that features Speaker tracking,focusing on whomever is speaking in the camera view.Users can access Virtual Director using the camera controller in Jabra Direct orJabra Sound . Only one Automatic zoom mode can be active at a time.By default, Automatic zoom mode is set to Intelligent Zoom, but can be changedto Virtual Director.30
9.4 Safety capacity settingsUsing Jabra Direct, it is possible to set a safety capacity limit for a meeting room. Ifa safety capacity limit has been set, the Jabra PanaCast 50 will automatically detectif the limit is exceeded using PeopleCount technology and can alert people in themeeting room in real time. This anonymous PeopleCount data can be tracked andmanaged using Jabra Xpress.PeopleCount technology detects the heads and bodies of any brightly-lit visiblepeople within 1-4 meters of the camera (3-12 feet) with an accuracy rate of 75% .By default, Safety capacity notifications are set to Off. This setting can beconfigured using Jabra Direct, and the data can be tracked and managed usingJabra Xpress.31
9.5 Save Pan, Tilt, Zoom presetsPan, Tilt, Zoom presets allow users to adjust and save the camera view using thecamera controller on Jabra Direct, Jabra Sound or by using the remote control.Saved presets do not overwrite the default Pan, Tilt, Zoom settings. Users canselect saved presets when a new meeting starts.Editing permissions for presets can be locked using Jabra Direct.9.6 Image quality settingsThe image brightness, contrast, saturation, sharpness, and white balance can beadjusted using the camera controller in Jabra Direct.Additionally, Vivid HDR and Automatic white balance can be enabled. If Vivid HDRis enabled, contrast, saturation, and sharpness cannot be adjusted manually. IfAutomatic white balance is enabled, the white balance cannot be adjusted manually.32
9.7 Video flickerVideo flicker can occur if the Jabra PanaCast 50 is not set to the correct geographicalregion. To prevent video flicker, select Auto (50Hz/60Hz) for regions that supportNTSC format, or 50Hz for regions that support PAL format.By default, Video flicker is set to Auto. This setting can be configured usingJabra Direct.9.8 Field of viewThe angle of the camera can be optically adjusted for a wider or narrower view ofthe meeting room.By default, Field of view is set to 180 . This setting can be adjusted usingJabra Direct.33
9.9 Video stitchingTo create a 180 camera view, video stitching is used to join the overlapping areas ofthe video. Video stitching works best between 60 centimeters (24 inches) and 5meters (16 feet) from the camera.The Jabra PanaCast 50 has two methods for video stitching: Blend and Hybrid.9.10 Update firmwareFirmware updates improve performance or add new functionality to Jabra devices.Jabra Direct is required to update the firmware of the Jabra PanaCast 50.If a firmware update is available, you will be notified whenever the Jabra PanaCast50 is connected to a computer that has Jabra Direct installed.34
10. WhiteboardThe 180 field of view of the Jabra PanaCast 50 allows whiteboard content to beshared in real time, even if the whiteboard is angled sharply away from the camera.Intelligent software automatically corrects the perspective to ensure the best view,while improving the image in real time by reducing shine, gloss, and shadows, andenhancing color and contrast of marker strokes. A secondary content camerastream allows you to display both the whiteboard and those present in the meetingat the same time in dual streams.The recommended size of the whiteboard should be between 1.5-2.7 meters inwidth (5-9 feet), however whiteboards measuring between 1-3 meters in width(3-10 feet) are supported.35
10.1 Position the whiteboardIt is recommended that the whiteboard should be positioned within 3.6 meters(12 feet) of the Jabra PanaCast 50, and no closer than 1.5 meters (5 feet). Theoptimal viewing range is 3 meters (9 feet).It is important to note the Jabra PanaCast 50 camera consists of three separatelenses, arranged horizontally. The whiteboard MUST be positioned entirely withinthe view of one of these three lenses.It is recommended to use a standard whiteboard, rather than glass or highlyreflective surface. For the best clarity, use black or dark markers to write on thewhiteboard.36
10.2 Set up whiteboard viewBefore a whiteboard can be shared in a video conference, a whiteboard view mustbe set up using Jabra Direct.To set up a whiteboard view, go to Whiteboard view setup under the Camerasettings in Jabra Direct and then click Set up. Jabra Direct will guide you throughthe process of setting up a whiteboard view.37
10.3 Share the whiteboard in the main camera viewIf the Whiteboard sharing mode in Jabra Direct is set to Main camera view, togglingthe whiteboard view on/off using the camera controller in Jabra Direct or JabraSound or the remote control will switch between the view of the meeting and theview of the whiteboard.By default, the Whiteboard sharing mode in Jabra Direct is set to Main cameraview. This setting can be configured using Jabra Direct.38
10.4 Share a separate view of the whiteboard in Microsoft TeamsRoomsThe whiteboard view can be shared in Microsoft Teams Rooms as a separate contentcamera view, which will open a separate video stream of the whiteboard.1. Launch Jabra Direct on a separate laptop (not the Microsoft Teams Rooms unit)and ensure the Jabra PanaCast 50 device is selected.2. Select Settings to open the settings menu.3. Select the Camera tab.4. Set the Whiteboard sharing mode as In separate content camera view.5. Select Whiteboard view setup to create the boundaries of the whiteboard view.6. Launch Microsoft Teams Rooms on the Microsoft Teams Rooms unit.7. Select Settings to open the settings menu.8. Under Camera Defaults, select Jabra PanaCast 50 as the content camera, andensure that the Content enhancements option is selected.39
10.5 Share a separate view of the whiteboard in Zoom RoomsThe whiteboard view can be shared in Zoom Rooms as a separate content cameraview, which will open a separate video stream of the whiteboard.1. Launch Jabra Direct and ensure the Jabra PanaCast 50 device is selected.2. Select Settings to open the settings menu.3. Select the Camera tab.4. Set the Whiteboard sharing mode as In separate content camera view.5. Launch Zoom Rooms.6. Click your account profile icon in the top right corner of Zoom.7. Select Settings to open the settings menu.8. In the Video tab, select Jabra PanaCast 50 Content Camera as the contentcamera.40
11. Remote control (optional accessory)11.1 How to pair the remote control1. Press and hold the Bluetooth button on the back of the Jabra PanaCast 50 for 5seconds until the LED on the camera flashes blue and green. This LED notificationindicates that the Jabra PanaCast 50 is in pairing mode.2. Press and hold the Mute button on the remote control for 5 seconds until youhear an audio notification on the Jabra PanaCast 50. This audio notificationindicates that the remote control and the Jabra PanaCast 50 are paired.5 sec.5 sec.max. 30 cm (12 in)To pair, the remote control must be within 30 centimeters (12 inches) of the JabraPanaCast 50.41
11.2 How to use the remote controlThe range of the remote control is 10 meters (30 feet).Mute/unmute microphonePair with PanaCast 50 (hold)End callTurn Intelligent Zoom on/offZoom inTurn Whiteboard view on/offZoom outSelect Preset 1Save Preset 1 (hold)Volume upSelect Preset 2Save Preset 2 (hold)Volume downAdjust camera view42
12.Support12.1 FAQ and technical specificationsView the FAQ, certifications, and technical specifications at jabra.com/help/panacast5012.2 How to care for your Jabra device The Jabra PanaCast 50 is for indoor use only.Avoid direct sunlight and temperatures above 30 C/104 F or below 0 C/32 F.Do not expose the camera or cables to rain or other liquids.Do not position the camera near the vents of a monitor or TV as this may causethe camera to overheat and malfunction. Clean the cloth surface with a cloth dampened with a mild soap solution.43
12.3 How to factory resetResetting will restore the Jabra PanaCast 50 to its factory default settings.1. Press and hold the Reset button on the back of the Jabra PanaCast 50 for5 seconds until the LED flashes pink and you hear an audio notification.2. The Jabra PanaCast 50 will reboot and play another audio notification whenready for use. The reboot takes approx. 1 minute.44
3.In the Video and Audio tabs, select Jabra PanaCast 50 as the camera and speaker. For more help, refer to the Zoom help center. 7.7 Other compatible video conferencing applications When using the Jabra PanaCast 50 with other compatible video conferencing applications, ensure it has been manually set as the default video and audio device