Transcription
Carrier VoIPNortel IP Phone 2001 User Guide(CICM)Release: (I)SN10Document Revision: 07.03www.nortel.comNN10300-005.
Carrier VoIPRelease: (I)SN10Publication: NN10300-005Document status: StandardDocument release date: 7 March 2008Copyright 2007, 2008 Nortel NetworksAll Rights Reserved.Sourced in Canada, the United States of America, and the United KingdomThis document is protected by copyright laws and international treaties. All information, copyrights and any otherintellectual property rights contained in this document are the property of Nortel Networks. Except as expresslyauthorized in writing by Nortel Networks, the holder is granted no rights to use the information contained herein andthis document shall not be published, copied, produced or reproduced, modified, translated, compiled, distributed,displayed or transmitted, in whole or part, in any form or media.
3.ContentsNew in this releaseFeatures 7Other changes77Overview9Basic features 9Terminal display 10IP Phone 2001 menu systems11Call Services menu 13Settings menu 13Regional menu 13User menu 14Terminal menu 14Call menu 14Softkey Status 14Inbox 14Outbox 14Directory 14Connecting the IP Phone 2001 components15Logging on17Logging off19Making calls21Making a call using off-hook dialing 21Making a call using hands-free dialing 21Make a call using predial 22Editing a predialed number 22Answering a call25Terminating a call27Navigating the menu system29Navigating the Main menu 29Carrier VoIPNortel IP Phone 2001 User Guide (CICM)NN10300-005 07.03 Standard7 March 2008Copyright 2007, 2008 Nortel Networks.
4Navigating theNavigating theNavigating theNavigating theNavigating theNavigating theNavigating theNavigating theCall Services menu 30Settings menu 30Regional menu 31User menu 31Terminal menu 32Call menu 32Feature menu 33Directory menu 34Using the Call Services menu35Activating a feature from the menu 35Using a soft key to activate a feature 36Assigning a feature to a soft key 36Removing a feature assignment from a soft key 37Resetting soft keys to the default 37Viewing soft key assignments 38Displaying soft key labels while on a call 38Hiding soft key labels 39Viewing feature profiles 39Labeling soft keys 40Using the Regional menu41Selecting the language 41Selecting the time zone 42Enabling Daylight Saving time 42Disabling Daylight Saving time 43Defining the time format 44Defining the date format 45Resetting the default time 46Using the User menu47Viewing your user name 47Viewing your login type 47Viewing, disabling, or enabling Auto Login 48Changing your password 49Using the Terminal menu51Viewing and editing your audio profile 51Viewing and editing the default volume 52Adjusting the contrast level of the display 53Performing a firmware upgrade 54Viewing and editing the dialpad feedback 55Call menu57Accessing the Feature menu 57Resetting the Inbox or Outbox 57Resetting soft keys to the defaults 58Carrier VoIPNortel IP Phone 2001 User Guide (CICM)NN10300-005 07.03 Standard7 March 2008Copyright 2007, 2008 Nortel Networks.
5Using the Feature menu61Using the Assign menu 61Defining the Key type 62Enabling or disabling AutoScroll 63Resetting the feature keys to the defaults 63Labeling a feature 64Using the Options menu 65Enabling or disabling Auto Hide 65Defining your default feature 66Assigning the Outbox to a key 66Using the Directory menu69Adding an entry to the directory 69Editing a directory entry 70Deleting an entry from the directory 71Making a call using the directory 72Using the Inbox73Accessing the Inbox 73Viewing Inbox call information 74Storing a number from the Inbox 74Using the Inbox to make a call 75Using the Outbox77Accessing the Outbox 77Viewing Outbox call information 78Storing a number from the Outbox 78Using the Outbox to make a call 79Call Services81Call Services menu 81Feature profiles 81Soft key assignment 82Examples of feature to soft key mapping 83Mute feature87Inbox89Outbox91Using the dialpad to enter text93Use the IP Phone 2001 with the IP Softphone m635095Access Code summary97ProceduresCarrier VoIPNortel IP Phone 2001 User Guide (CICM)NN10300-005 07.03 Standard7 March 2008Copyright 2007, 2008 Nortel Networks.
6Carrier VoIPNortel IP Phone 2001 User Guide (CICM)NN10300-005 07.03 Standard7 March 2008Copyright 2007, 2008 Nortel Networks.
7.New in this releaseThe following sections detail what’s new in Nortel IP Phone 2001 UserGuide (CICM), (NN10300-005) for release (I)SN10. "Features" (page 7)"Other changes" (page 7)FeaturesThere are no feature changes.Other changesThe following two sections were added: "Viewing and editing the defaultvolume" (page 52) and "Viewing and editing the dialpad feedback" (page55).Carrier VoIPNortel IP Phone 2001 User Guide (CICM)NN10300-005 07.03 Standard7 March 2008Copyright 2007, 2008 Nortel Networks.
8 New in this releaseCarrier VoIPNortel IP Phone 2001 User Guide (CICM)NN10300-005 07.03 Standard7 March 2008Copyright 2007, 2008 Nortel Networks.
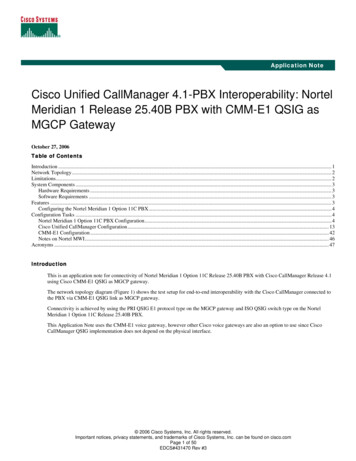
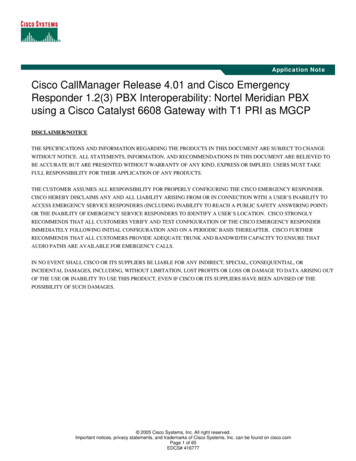
9.OverviewThe IP Phone 2001 brings voice and data to the desktop by connectingdirectly to a Local Area Network (LAN) through an Ethernet connection.Basic featuresThe IP Phone 2001 supports these features: four soft keysmultifield LCD screenspeaker for on-hook dialing or on-hook listeningvolume control bar for adjusting ringer, speaker and handset volumetwo specialized fixed keys:— Services— Inbox three Call processing fixed keys:— Line— Hold— Goodbye Automatic network configurationNot all features are available on all telephones. Consult your systemadministrator to verify which features are available to you.The IP Phone 2001 does not have a microphone for handsfree talking. Amute function is available through the Call Services Menu.Figure 1 "IP Phone 2001 " (page 10) , shows the location of the keys andthe components of the IP Phone 2001.Carrier VoIPNortel IP Phone 2001 User Guide (CICM)NN10300-005 07.03 Standard7 March 2008Copyright 2007, 2008 Nortel Networks.
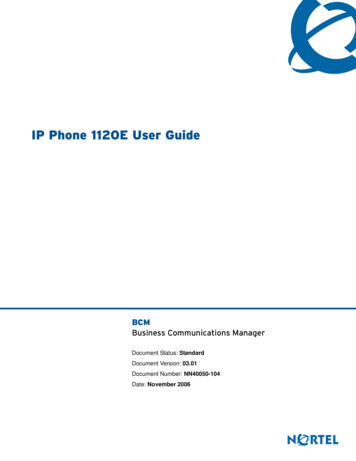
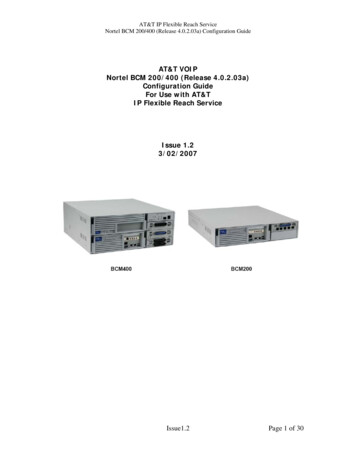
10 OverviewFigure 1IP Phone 2001Terminal displayFigure 2 "IP Phone 2001 display" (page 10) , describes the IP Phone 2001display areas.Figure 2IP Phone 2001 displayCarrier VoIPNortel IP Phone 2001 User Guide (CICM)NN10300-005 07.03 Standard7 March 2008Copyright 2007, 2008 Nortel Networks.
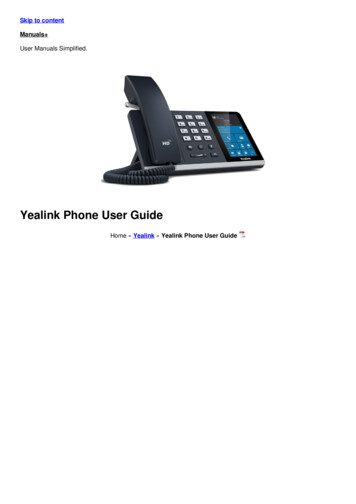
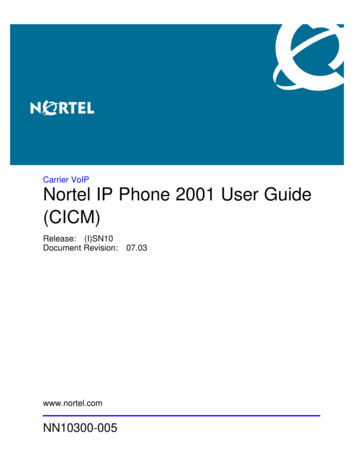
11.IP Phone 2001 menu systemsAfter you have successfully logged on to the IP Phone, the menu systemsare active and available. Menu items, the Inbox, the Outbox, and Directoryentries, are accessed through lists. An up or down arrow appears besidean item to indicate the navigation key you can press to scroll to the nextitem. Labels appear on the bottom row above the soft keys, in response toitems selected in the display.The IP Phone menu system provides access to these menus andsubmenus. LogoffCall ServicesSettings— Regional— User— Terminal— Call DirectoryInboxOutboxCarrier VoIPNortel IP Phone 2001 User Guide (CICM)NN10300-005 07.03 Standard7 March 2008Copyright 2007, 2008 Nortel Networks.
12 IP Phone 2001 menu systemsFigure 3IP Phone 2001 display menu hierarchyCarrier VoIPNortel IP Phone 2001 User Guide (CICM)NN10300-005 07.03 Standard7 March 2008Copyright 2007, 2008 Nortel Networks.
Settings menu13Call Services menuThe Call Services menu gives the IP Phone 2001 access to Centrexfeatures. The soft keys in the display provide an alternative to thededicated feature keys on an IP Phone 2004. Any changes made to the2001 feature key assignments, through the feature menu, apply only whenthe user is logged on to an IP Phone 2002 or 2004, which has dedicatedFeature Keys.The Call Services menu is available after you select a Centrex featurefrom the list and press OK. Use the Call Services menu to: Activate a featureDeactivate a featureAssign a Centrex feature to a soft keyRemove a feature from a soft keyReset the soft keys to the default settingsView the current soft key assignmentsView a feature profileChange the label associated with a soft keySettings menuThe Settings menu provides access to these submenus, which allow youto configure user preferences.Regional menuItems in the Regional menu allow you to select the your language, the timezone, and the time and date format the terminal uses; or to reset theseterminal settings to their defaults.Use the Regional menu to configure: Language preferenceTime format which allows you to configure the following:— Time zone— Enable or disable Daylight Saving Time— Select the format used to display the time— Select the format used to display the date— Reset the time to the defaultsCarrier VoIPNortel IP Phone 2001 User Guide (CICM)NN10300-005 07.03 Standard7 March 2008Copyright 2007, 2008 Nortel Networks.
14 IP Phone 2001 menu systemsUser menuUse the User menu to: View your user nameView your login typeEnable or disable auto login featureChange your passwordTerminal menuUse the Terminal menu to configure your: View your audio profileAdjust the contrast level of the displayPerforming a firmware upgradeCall menuThe Call menu allows you to access these menus: FeatureHistorySoftkeySoftkey StatusThis item allows you to view the Centrex features currently assigned tothe soft keys.InboxSee "Inbox" (page 89).OutboxTo use this feature you must assign the Outbox to a Directory Number(DN) key. See "Outbox" (page 91).DirectoryTo use this feature, you must assign the Directory to a DN key. After youassign a DN key to the Directory, use the Directory menu to: Add an entry to the directoryEdit a directory entryDelete an entry from the directoryMake a call using the directoryCarrier VoIPNortel IP Phone 2001 User Guide (CICM)NN10300-005 07.03 Standard7 March 2008Copyright 2007, 2008 Nortel Networks.
15.Connecting the IP Phone 2001componentsFollow this procedure to connect the handset to the terminal, and toconnect the terminal to the LAN, and to a power source.CAUTIONRisk of equipment damageDo not plug the IP Phone 2001 into a regular telephone jack. This causes severedamage to the terminal. Consult your system administrator to ensure that you plugyour telephone into a 10/100BaseT Ethernet jack.See Figure 4 "IP Phone 2001 connectors" (page 16) , for the location ofthe connectors.Procedure StepsStepAction1Connect one end of the handset cord to the handset jack(identified with a handset icon) on the underside of the terminal.2Connect the other end of the handset cord the jack on thehandset.3Connect one end of the CAT-5 line cable to the LAN Ethernetport (identified with a LAN icon), located on the underside of theterminal.4Plug the other end of the CAT-5 line cable into the IP network.5Contact your installation technician for the proper power option.The IP Phone 2001 can be powered by an AC adapter, or overa LAN.6Thread the cord around the strain relief, retaining hook andchannel provided for a secure power connection.7Secure the terminal footstand to the base.--End--Carrier VoIPNortel IP Phone 2001 User Guide (CICM)NN10300-005 07.03 Standard7 March 2008Copyright 2007, 2008 Nortel Networks.
16 Connecting the IP Phone 2001 componentsProcedure job aidThis figure shows the location of the connectors on the back of the IPPhone 2001 terminal.Figure 4IP Phone 2001 connectorsCarrier VoIPNortel IP Phone 2001 User Guide (CICM)NN10300-005 07.03 Standard7 March 2008Copyright 2007, 2008 Nortel Networks.
17.Logging onFollow this procedure to log on to an IP Phone 2001.If the Centrex IP Client Manager (CICM) is set up as part of a group ofCICMs, you can choose which CICM to connect to. After you select agateway, the terminal directs itself to that CICM and the Username screenappears.If a firmware upgrade for the IP Phone 2001 is available, the systemprompts you to upgrade when you log on. If the terminal is below theminimum level, the only option available is Yes. You cannot log on untilyou perform the upgrade. If the firmware level is between the minimumand maximum level set by the administrator, Yes and No options appearon the soft keys.To perform an upgrade, see "Performing a firmware upgrade" (page 54).Procedure StepsStepAction1If the Selective Gateway Login feature is configured on yoursystem, press the down navigation key to scroll through the listto select the gateway.2When the gateway you want appears, press Ok, or start enteringyour user name.If the Username Screen appears when you start to enter youruser name, the characters you already entered appear in theUsername field.3If you make a mistake entering your user name, press Clear toclear the field and re-enter your user name.If your user name is too long for the display (longer than 15characters), the digits scroll to the left and an ellipsis appears tothe left of the field.4Press Ok.Carrier VoIPNortel IP Phone 2001 User Guide (CICM)NN10300-005 07.03 Standard7 March 2008Copyright 2007, 2008 Nortel Networks.
18 Logging onThe password screen appears.5Enter your password. For security, the password characters aredisplayed as asterisks (*).6If you make an error, press Clear to clear the field, and thenenter your password.7Press Ok.You are logged on and the Menu screen appears.--End--Carrier VoIPNortel IP Phone 2001 User Guide (CICM)NN10300-005 07.03 Standard7 March 2008Copyright 2007, 2008 Nortel Networks.
19.Logging offFollow this procedure to log off from the network.PrerequisitesYou must be logged on.Procedure StepsStepAction1From the main menu, select Log Off.2Press Ok.A confirmation screen appears.3Press Yes.You are logged off from the network.--End--Carrier VoIPNortel IP Phone 2001 User Guide (CICM)NN10300-005 07.03 Standard7 March 2008Copyright 2007, 2008 Nortel Networks.
20 Logging offCarrier VoIPNortel IP Phone 2001 User Guide (CICM)NN10300-005 07.03 Standard7 March 2008Copyright 2007, 2008 Nortel Networks.
21.Making callsFollow these procedures to make calls.Navigation "Making a call using off-hook dialing" (page 21)"Making a call using hands-free dialing" (page 21)"Make a call using predial" (page 22)"Editing a predialed number" (page 22)Making a call using off-hook dialingFollow this procedure to make a call using off-hook dialing.PrerequisitesYou must be logged on.Procedure StepsStepAction1Pick up the handset.You hear a dial tone.2Use the dialpad to enter the number.3When the call is answered, lift the handset and speak into themouthpiece.--End--Making a call using hands-free dialingFollow this procedure to make a call using hands-free dialing. See Figure1 "IP Phone 2001 " (page 10) , for the location of the Line key.PrerequisitesYou must be logged on.Carrier VoIPNortel IP Phone 2001 User Guide (CICM)NN10300-005 07.03 Standard7 March 2008Copyright 2007, 2008 Nortel Networks.
22 Making callsProcedure StepsStepAction1With the handset in the cradle, press the Line key on theterminal.You hear a dial tone.2Use the dialpad to enter the number.3When the call is answered, lift the handset and speak into themouthpiece.--End--Make a call using predialFollow this procedure to use the predial feature to make a call.PrerequisitesYou must be logged on.Procedure StepsStepAction1Use the dialpad to enter the number before you lift the handset.Do not press the Line key.The number is entered into the terminal.When you want to make the call, press Ok.2The number is dialed.When the call is answered, lift the handset and speak into themouthpiece.3--End--Editing a predialed numberFollow this procedure to edit a number held in the predialed state.Prerequisites You must be logged on.A number must be predialed.Carrier VoIPNortel IP Phone 2001 User Guide (CICM)NN10300-005 07.03 Standard7 March 2008Copyright 2007, 2008 Nortel Networks.
Editing a predialed number23Procedure StepsStepAction1Perform one of these steps. To delete numbers that appear to the left of the cursor, pressBkspc. To delete numbers that appear to the right of the cursor,press Delete.2Use the dialpad to enter the new number.3Press Ok to dial the number.--End--Carrier VoIPNortel IP Phone 2001 User Guide (CICM)NN10300-005 07.03 Standard7 March 2008Copyright 2007, 2008 Nortel Networks.
24 Making callsCarrier VoIPNortel IP Phone 2001 User Guide (CICM)NN10300-005 07.03 Standard7 March 2008Copyright 2007, 2008 Nortel Networks.
25.Answering a callFollow this procedure to answer a call. Incoming calls cause the telephoneto ring and the Message Indicator lamp to flash.The IP Phone 2001 does not have a hands-free feature. You do not pressthe not press the Line key to answer a call. You can press the Line duringa call to continue to listen to the caller, but you must use the handset tospeak to the caller.PrerequisitesYou must be logged on.Procedure StepsStepAction1When the terminal rings, lift the handset.2Speak into the handset .--End--Carrier VoIPNortel IP Phone 2001 User Guide (CICM)NN10300-005 07.03 Standard7 March 2008Copyright 2007, 2008 Nortel Networks.
26 Answering a callCarrier VoIPNortel IP Phone 2001 User Guide (CICM)NN10300-005 07.03 Standard7 March 2008Copyright 2007, 2008 Nortel Networks.
27.Terminating a callFollow this procedure to terminate an active call.The Goodbye is useful for dropping out of a conference call or exitingvoice mail. See Figure 1 "IP Phone 2001 " (page 10) for the location ofthe key.Procedure StepsActionPerform one or these actions: Return the handset to the cradle.Press the Goodbye key.The call ends.Carrier VoIPNortel IP Phone 2001 User Guide (CICM)NN10300-005 07.03 Standard7 March 2008Copyright 2007, 2008 Nortel Networks.
28 Terminating a callCarrier VoIPNortel IP Phone 2001 User Guide (CICM)NN10300-005 07.03 Standard7 March 2008Copyright 2007, 2008 Nortel Networks.
29.Navigating the menu systemFollow the procedure in this section to access and use the menu system.Use the navigation keys to scroll through menus and screens.Navigation "Navigating the Main menu" (page 29)"Navigating the Call Services menu" (page 30)"Navigating the Settings menu" (page 30)"Navigating the Regional menu" (page 31)"Navigating the User menu" (page 31)"Navigating the Terminal menu" (page 32)"Navigating the Call menu" (page 32)"Navigating the Feature menu" (page 33)"Navigating the Directory menu" (page 34)Navigating the Main menuFollow this procedure to navigate the main menu system.Only menu items numbered 0 through 9 have a dialpad shortcut.PrerequisitesYou must be logged on.Procedure StepsStepAction1Press the Menu soft key.The main menu opens.2To select a menu item, perform one of these actions:Carrier VoIPNortel IP Phone 2001 User Guide (CICM)NN10300-005 07.03 Standard7 March 2008Copyright 2007, 2008 Nortel Networks.
30 Navigating the menu system Select the item in the menu, and press Ok.Press the number on the dialpad that corresponds to themenu item.The feature screen opens immediately.--End--Navigating the Call Services menuFollow this procedure to open the Call Services menu.PrerequisitesYou must be logged on.Procedure StepsStepAction1Press Menu.The main menu opens.2From the main menu, select Call Services.3Press Ok.The Call Services menu opens.4See "Using the Call Services menu" (page 35), for procedures.--End--Navigating the Settings menuFollow this procedure to open the Settings menu.PrerequisitesYou must be logged on.Procedure StepsStepAction1From the main menu, select Settings.2Press Ok.The Settings menu opens.3Perform one of these actions: To configure regional preferences, including the language,time, and time and date formats, select Regional, andCarrier VoIPNortel IP Phone 2001 User Guide (CICM)NN10300-005 07.03 Standard7 March 2008Copyright 2007, 2008 Nortel Networks.
Navigating the User menu31press Ok. The Regional menu opens. See "Navigating theRegional menu" (page 31), for more information. To configure user account preferences, including changingyour user name and password, select User, and pressOk.The User menu opens. See "Navigating the User menu"(page 31), for more information. To configure terminal preferences, including your audioprofile, and performing a firmware upgrade, select Terminal,and press Ok.The Terminal menu opens. See "Navigatingthe Terminal menu" (page 32), for more information. To access the Features menu, and the History menu, selectCall, and press Ok.The Call menu opens. See "Navigatingthe Call menu" (page 32), for more information.--End--Navigating the Regional menuFollow this procedure to open the Regional menu.PrerequisitesYou must be logged on.Procedure StepsStepAction1From the main menu, open the Settings menu.2Form the Settings menu, select Regional.3Press Ok.The Regional menu appears.4See "Using the Regional menu" (page 41), for procedures.--End--Navigating the User menuFollow this procedure to open the User menu.PrerequisitesYou must be logged on.Carrier VoIPNortel IP Phone 2001 User Guide (CICM)NN10300-005 07.03 Standard7 March 2008Copyright 2007, 2008 Nortel Networks.
32 Navigating the menu systemProcedure StepsStepAction1From the main menu, open the Settings menu.2From the Settings menu, select User.3Press Ok.The user menu opens.4See "Using the User menu" (page 47), for procedures.--End--Navigating the Terminal menuFollow this procedure to open the Terminal menu.PrerequisitesYou must be logged on.Procedure StepsStepAction1From the main menu, open the Settings menu.2From the Settings menu, select Terminal.3Press Ok.The Terminal menu opens.4See "Using the Terminal menu" (page 51), for procedures.--End--Navigating the Call menuFollow this procedure to open the Call menu.PrerequisitesYou must be logged on.Procedure StepsStepAction1From the main menu, open the Settings menu.2From the Settings menu, select Call.Carrier VoIPNortel IP Phone 2001 User Guide (CICM)NN10300-005 07.03 Standard7 March 2008Copyright 2007, 2008 Nortel Networks.
Navigating the Feature menu333Press Ok.The Call menu opens.4Perform one of these actions: Select Feature, then press Ok.The Feature menu opens.See "Using the Feature menu" (page 61), for procedures. Select History, then press Ok.The History screen appears.See "Resetting the Inbox or Outbox" (page 57), forprocedures. Select Softkey, then press Ok.See "Resetting soft keys tothe defaults" (page 58).--End--Navigating the Feature menuFollow this procedure to open the Feature menu.Beginning with release (I)SN09, the Call Services menu gives the IPPhone 2001 access to Centrex features; the soft keys in the displayprovide the functionality. Any changes the user makes to the 2001 soft keyassignments, through the 2001 Feature menu, apply only when the phoneis logged on to an IP Phone 2002, 2004, or 2007, which has dedicatedfeature keys. Some options contained in the Feature menu have relevanceon the IP Phone 2001, such as the Inbox key, but feature key functionalityis only present when the IP Phone 2001 is logged on to a IP Phone 2002,2004, or 2007.Relabel soft keys through the Call Service menu, only.Local features, such as Directory contacts, cannot be assigned to softkeys. Only Centrex features can be assigned to soft keys.Procedure StepsStepAction1From the main menu, open the Settings menu.2From the Settings menu, open the Call menu.3From the Call menu, select Feature.4Press Ok.The Feature menu opens.Carrier VoIPNortel IP Phone 2001 User Guide (CICM)NN10300-005 07.03 Standard7 March 2008Copyright 2007, 2008 Nortel Networks.
34 Navigating the menu systemPerform one of these actions:5 Select Assign, then press Ok. See "Using the Assign menu"(page 61), for procedures. Select Label, then press Ok. See "Labeling a feature" (page64), for this procedure. Select Options, then press Ok. See "Using the Optionsmenu" (page 65), for procedures. Select Reset, then press Ok. See "Resetting the feature keysto the defaults" (page 63) for this procedure.--End--Navigating the Directory menuFollow this procedure to open the Directory menu.Prerequisites You must be logged on.The directory must be assigned to a soft key.Procedure StepsStepAction1Press the soft key you assigned to the directory.The Directory menu opens.2See "Using the Directory menu" (page 69), for procedures.--End--Carrier VoIPNortel IP Phone 2001 User Guide (CICM)NN10300-005 07.03 Standard7 March 2008Copyright 2007, 2008 Nortel Networks.
35.Using the Call Services menuFollow procedures in this section to use the Call Services menu to managesoft key assignments.Navigation "Activating a feature from the menu" (page 35)"Using a soft key to activate a feature" (page 36)"Assigning a feature to a soft key" (page 36)"Removing a feature assignment from a soft key" (page 37)"Resetting soft keys to the default" (page 37)"Viewing soft key assignments" (page 38)"Displaying soft key labels while on a call" (page 38)"Hiding soft key labels" (page 39)"Viewing feature profiles" (page 39)"Labeling soft keys" (page 40)Activating a feature from the menuFollow this procedure to activate a Centrex feature through the CallServices menu.PrerequisitesYou must be logged on.Procedure StepsStepAction1From the main menu, open the Call Services menu.2From the Call Services menu, select the feature you want toactivate.3Press Ok.4Select Activate.Carrier VoIPNortel IP Phone 2001 User Guide (CICM)NN10300-005 07.03 Standard7 March 2008Copyright 2007, 2008 Nortel Networks.
36 Using the Call Services menu5Press Ok.The feature is activated. A text description appears in the displayidentifying the active feature, Forwarded, for example.An asterisk (*) appears next to the item in the menu, to indicatethat the feature is active.--End--Using a soft key to activate a featureFollow this procedure to activate a feature that is assigned to a soft key.PrerequisitesYou must be logged on.Procedure StepsActionPress the soft key associated with the feature you want to use.The feature is activated. A down arrow icon appears next to the item toindicate that the feature is active.Assigning a feature to a soft keyAn assigned feature appears in the display except when the terminal is inthe state specified by the profile: Hide when idle or Hide when active.If a feature is already assigned to the selected soft key, a message promptappears to ask if you want to replace the current assignment.PrerequisitesYou must be logged on.Procedure StepsStepAction1From the main menu, open the Call Services menu.2From the Call Services menu, select the feature you want toassign to a soft key.3From the Call Services menu, select Change Softkey.4Press Ok.The Select Key screen appears.5Press the soft key below the number of the key to which youwant to assign the feature.Carrier VoIPNortel IP Phone 2001 User Guide (CICM)NN10300-005 07.03 Standard7 March 2008Copyright 2007, 2008 Nortel Networks.
Resetting soft keys to the defaultThe confirmation screen appears.6Confirm the actionThe feature is assigned to the selected soft key.--End--Removing a feature assignment from a soft keyFollow this procedure to remove the feature assignment from a soft key.The feature is still available from the Call Services menu.PrerequisitesYou must be logged on.Procedure StepsStepAction1From the main menu, open the Call Services menu.2From the Call Services menu, select Unassign.3Press Ok.The confirmation screen appears.4Confirm the action.The feature assignment is removed from the soft key.--End--Resetting soft keys to the defaultFollow this procedure to reapply the default soft key assignments.PrerequisitesYou must be logged on.Procedure StepsStepAction1From the main menu, open the Call Services menu.2From the Call Services menu, select Softkey.3Press Ok.The Default confirmation screen appears.4Confirm the action.Carrier VoIPNortel IP Phone 2001 User Guide (CICM)NN10300-005 07.03 Standard7 March 2008Copyright 2007, 2008 Nortel Networks.37
38 Using the Call Services menu5Press Ok.The soft key assignments are reset to the default.--End--Viewing soft key assignmentsFollow this procedure to view a list of soft key assignments.PrerequisitesYou must be logged on.Procedure StepsStepAction1From the main menu, open the Call Services menu.2From the Call Services menu, select Softkey Status.3Press Ok.The Softkey screen appears, showing the current featureassignments.--End--Displaying soft key labels while on a callFollow this procedure to force the terminal to display the soft key labels.When an IP Phone is engaged in a call, the terminal clears the softkey labels so that other information can be displayed. When the labelsdisappear, a timer starts running. After 4 or 5 seconds, the labels reappearin the display.PrerequisitesYou must be logged on.Procedure StepsActionOn the terminal press the Services key. See figure Figure 1 "IP Phone2001 " (page 10) , for the location of the Services key.The soft key labels appear.Carrier VoIPNortel IP Phone 2001 User Guide (CICM)NN10300-005 07.03 Standard7 March 2008Copyright 2007, 2008 Nortel Networks.
Viewing feature profiles39Hiding soft key labelsFollow this procedure to manually hide the labels. The terminal temporarilyhides the soft key labels when it is engaged in a call.PrerequisitesYou must be logged on.Procedure StepsActionOn the terminal press the Services key. See figure Figure 1 "IP Phone2001 " (page 10) , for the location of the Services key.The soft key labels disappear.Viewing feature profilesFollow this procedure to view the profile for the selected feature.Before assigning a Centrex feature to a soft key, you should know if theprofile is defined as Hide when idle, Hide when active, or Never hide. Byknowing the feature profiles you can: increase the number of soft key assignments on your terminal byassigning a Hide when idle feature and a Hide when active feature tothe same key avoid losing a previously assigned feature by assigning a Never hidefeature to the same soft keyPrerequisitesYou must be logged on.Procedure StepsStepAction1From the main menu, open the Call Services menu.2From the Call Services menu, select Details.3Press Ok.The profile appears.--End--Carrier VoIPNortel IP Phone 2001 User Guide (CICM)NN10300-005 07.03 Standard7 March 2008Copyright
Nortel IP Phone 2001 User Guide (CICM) Release: (I)SN10 Document Revision: 07.03 www.nortel.com NN10300-005. Carrier VoIP Release: (I)SN10 Publication: NN10300-005 . Consult your system administrator to ensure that you plug your telephone into a 10/100BaseT Ethernet jack. See Figure 4 "IP Phone 2001 connectors" (page 16) , for the location of .