Transcription
DR49 Dirt BikeRead this manual carefully. It contains important safety information.OWNER’S MANUALNo one under the age of 16 should operate thisDirtbike without adult supervision. Parentsshould consider child’s age, size, maturity andability before allowing to ride.Rev. C030909Always wear a helmet; It could save your Life!Please obtain, review, and follow provincial / municipal government acts andregulations pertaining to owning and operating an off-road vehicle.
Congratulations on your purchase of the BAJA INC. DR49 Dirt Bike.Your bike is warranted to be free of manufacturing defects in materialand workmanship for a period of 90 days from the date of purchase.During the warranty period BAJA, INC. will at its option, repair,provide replacement parts or replace your BAJA INC. DR49 Dirt bikeat no charge. This warranty does not cover normal wear items ordamage caused by neglect or misuse of the product.Engine Warranty – 90 daysFrame Warranty – 90 daysWarranty is void if:Frame is bent or broken due to abuseWheels are bent or brokenFender bent or broken due to abuseAny sign of impact, accident, jumping, spin-outs or roll over.BAJA, INC. is not liable for any damage claim or liability claim personor otherwise resulting from the operation of this product in any way.Should you experience a problem with your vehicle, please call the BajaInc. customer service line toll free at 1-888-863-2252 between the hoursof 7am and 5pm Monday through Friday MST (Mountain Standard Time).MDT (Mountain Daylight Time) during the daylight saving time. You will beinstructed how to proceed.A COPY OF THE SALES RECEIPT IS REQUIRED.II
! WARNINGThis manual should be considered as apermanent part of the vehicle and shouldremain with the vehicle when resold orotherwise transferred to a new user oroperator. The manual contains importantsafety information and instructions whichshould be read carefully before operating thevehicle.! WARNINGThe engine exhaust from this product containschemicals known to the State of Californiato cause cancer, birth defects or otherreproductive harm.CALIFORNIA PROPOSITION 65III
Table of Contentssafe operation.3safety gear.4Location of WARNING labels. 5main data.6parts & subassemblies.7OPERAtion.9fuel Valve.9engine starting.10breaking in the engine.11switches on the right handlebar.12gear shifting.13check-ups, adjustment and maintenance.14changing the oil.15check-up of spark plug.16VALVE INSPECTION.17checking & cleaning the air filter.18Adjusting the throttle cable.19adjusting the carburetor.19ADJUSTMENT OF FRONT brake.20ADJUSTMENT OF REAR brake.20adjustment of chain.21greasing procedures to the driving chain.21EXHAUST.22Trouble Shooting.23vehicle washing.25instructions for storage.26resumption of service after storage.27table and torque of fasteners.27resumption of service.28Inspection and Maintenance.29serial number location.30electrical diagram.31emission control system warranty.321
Please read this manual and follow all instructions carefully. To emphasizespecial information, the symbol and the words WARNING or CAUTION havesome special meanings. Pay great attention to the messages.WARNINGIndicates a potential hazard that could result in death or injury.! CAUTIONIndicates a potential hazard that could result in vehicle damage.NOTE: Indicating special information which is to make maintenance easier orinstructions clearer.WARNING and CAUTION are arranged like this:WARNING-or-CAUTIONThe first part will identify a POTENTIAL HAZARD.The second part will describe WHAT COULD HAPPEN if you ignorethe WARNING or CAUTION.The third part will describe HOW TO AVOID THE HAZARD.This user’s manual contains important safety and maintenance information.Read it carefully before riding. Failing to follow the warnings contained in thismanual could result in INJURY or DEATH.It is important that this manual remain with the vehicle when you transfer it toanother user or owner.All information, illustrations, photographs and specifications contained inthis manual are based on the latest product information available at the timeof publication. Due to improvements or other changes, there will be somediscrepancies in this manual. We reserve the right to make product changesat any time, without notice and without incurring any obligation to make thesame or similar changes to the vehicle previously built or sold.2
SAFE OPERATIONRules for Safe OperationA pre-operation check must be conducted before starting the engine.This check will insure safety, prevent mishaps, and prevent damage tocomponents.It is strongly suggested that all operators take a certified motorcyclerider’s course prior to operating the vehicle.Full attention is required during driving; paying close attention to thefollowing points to avoid any injury to you by other motorized vehicles:·Do not drive too close to other vehicles.·Never carry a passenger. This dirt bike is for one operator only.·Never operate this dirt bike at night. Night is defined as the period oftime 30 minutes before sunset to 30 minutes after sunrise.·Driving at high speeds is the cause of many accidents; do not driveat a speed that the actual situation does not permit.·Always avoid operating this dirt bike on paved surfaces, including;sidewalks, paths, parking lots, driveways, streets, roads, and highways.Never operated this or any Off-Road Vehicle on a public street, road orhighway where motor vehicles are in operation.3
Pre-Ride ChecklistBefore Starting the Engine/Motor1. Engine oil levela) Check for leaksb) Tighten filler cap securely.c) Add oil if required.2. Fuel levela) Add fuel as necessary.b) Do not overfill (no fuel in the filler neck).c) Do not mix oil with gas.d) Replace cap tightly.e) Do not refuel a hot engine. Allow engine to cool before addingfuel.3. Warning decalsa) Make sure all warning decals are legible and securely attached.b) Replace as necessary.4. Tiresa) Ensure that both tires are in safe riding condition.b) Both tires must be inflated to the pressure indicated on the tiresidewalls.5. Drive chaina) Check condition and tension.b) Lubricate and adjust tension as necessary.6. Throttlea) Check for smooth operation. Make sure the throttle “snaps” backto idle.b) Check for frayed cable or damaged cable housing. Replacedamaged cable.c) Check for mud, debris and ice in the throttle cable/mechanism.Clean out any contamination.4
SAFETY GEARA DOT approved motorcycle helmet is the most important part of you safetygear. A DOT approved motorcycle helmet can help prevent a serious headinjury. Choose a helmet that fits snugly. Motorcycle dealers can help inselecting a good quality helmet which fits properly.WARNINGOperating this Dirt bike without wearing an approved DOTmotorcycle helmet, eye protection, and protective clothing could behazardous.Operating without an approved DOT motorcycle helmet or eyeprotection increases your chances of a severe head injury or deathin an accident. Operating without protective clothing also increasesyour chances of severe injury in an accident.Always wear an approved DOT motorcycle helmet which fitsproperly. Always wear eye protection (goggles or face shield). Youshould also wear gloves, boots, long sleeve shirt or jacket, and longpants.You should wear eye protection when you ride. If a rock or a branch hits youreyes, you could be severely injured. Wear goggles or a face shield.Wear proper clothing when you ride. The proper clothes can protect you frominjury. Wear a good pair of gloves, strong boots that are over the ankle, longpants, and a long sleeve shirt.5
LOCATION OF WARNING LABELSRead and follow all of the warnings labels on your Dirtbike. Make sure youunderstand all the labels. Keep the labels on the Dirtbike. Do not removethem for any reason. If a label comes off or becomes difficult to read, youshould get a replacement by contacting BAJA INC.11!WARNINGNo one under the age of 16 should operatethis vehicle without adult supervision.!2WARNING Study the owner’s manual carefully. Always wear a helemt, eye protection and protective gear. Never operate this vehicle while under the influence ofalcohol, drugs or medication of any kind.62
MAIN DATADESCRIPTIONDATADESCRIPTIONDATAOverall length1420mm(55.91 inches)Max torque3.2N.m/6500 r/minOverall width450mm(17.72 inches)Idle speed1500r/min 150r/minOverall height740mm(29.13 inches)Displacement ofcylinder49mLWheelbase1020mm(10.16 inches)Spark plugA7RTCDry weight60kg (132 lbs.)Front wheel2.50-10Payload75kg (165 lbs.)Rear wheel2.50-10Ground clearance250mm(9.84 inches)Ignition meansCDIMax speed 55km/h (34mph)1st gear3.273Transmission4 gear mesh2nd gear1.938Capacity of fueltank3.3L3rd gear1.350Cylinderbore x stroke39mm X 41.4mm4th gear1.043Compression ratio8.8:1Transmission ratioof sprocket2.929Max output2.5KW/8500rpm(3.3hp)Primarytransmission ratio3.7227
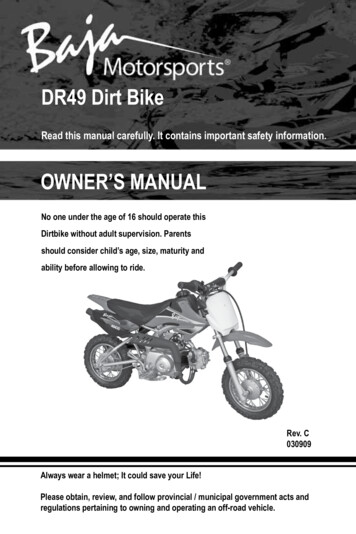
PARTS & SUBASSEMBLIESFront brake leverOn/Off switch Throttle twist gripFuel tank cover8
Gas CapFuel ValveFront WheelRear WheelCarburetorGear ShiftingPedal Side StandDrive ChainLEFTFront Brake LeverSeat CushionFront ShocksExhaust SilencerKick LeverOil CapChoke leveron CarburetorRear Brake pedalRIGHT9
OPERATIONFuel VALVEFuel fillingThe capacity of the fuel tank is 3.3L . Unscrew the gas cap by turning itcounter clockwise and carefully fill the tank with unleaded gasoline throughthe opening. DO NOT MIX GAS AND OIL TOGETHER, THIS IS A 4-STROKEENGINE. Replace the gas cap by carefully aligning the threads on the capand the tank and turning the cap clock wise. Wipe any spilled fuel from thedirt bike using a cloth and dispose of the cloth properly. DO NOT SMOKEOR REFUEL THE VEHICLE NEAR OPEN FLAMES OR NEAR HEATING UNITS.ONLY REFUEL THE VEHICLE IN OPEN AREAS TO REDUCE THE LIKELIHOODOF THE BUILD UP OF GASOLINE FUMES.Operation of the fuel valve (the valve under the fuel tank)ON: With the handle of the fuel valve at “ON” position, the fuel supply willflow to the carburetor.OFF: With the handle of the fuel valve at “OFF” position, the fuel supply willnot flow to the carburetor.RES: If fuel level in the fuel tank becomes too low for engine to stay runningwhile fuel valve is at “ON” position, turn fuel valve to “RESERVE”. Turningfuel valve to “RESERVE” will allow engine to begin using reserve fuel supply.You will need to re-fuel as soon as possible. There is approximately 1L of fuelleft in tank when fuel valve is placed at “RESERVE”. Once re-fueled, turn fuelvalve back to the “ON “ PositionFuel Valve ONFuel Valve OFFFuel Valve RESERVE10
Engine Starting! CAUTIONVerify oil level prior to starting (see page 15)Starting the engine with low or no oil will damage the engine.WARNINGNever start the engine in a closed place as the exhaustedgas from the vehicle contains toxic carbon monoxide.1.Set the key of the ignition switch to “2.Put the dirt bike in the neutral gear.3.Ensure that there is fuel in the tank.4.Set the fuel valve handle to “ON” or “RES” position.” position.CLOSEDTo start a cold engine:OPEN1.Pull up the choke lever of the carburetor(to close the choke).2.Start the engine with electric start or kick lever3.Slightly turn the throttle twist grip to increase the speed of the engine soas to warm up the engine.4.Turn the carburetor choke bar downward to fully open the choke whenthe engine is sufficiently warmed up.! CAUTIONUnnecessarily increasing RPM’s to a high level while the dirtbike is in neutral is harmful to the engine.Procedures for stopping the engine:1. Release the throttle twist grip to slow down the engine.2. Shift to the neutral position.3. Set the ignition switch key to “” position.4. Set the fuel valve handle to “OFF” position.11choke lever
Breaking in the EngineThe first 600 Miles of operation should be considered the “Break-in” periodand special attention shall be paid to the following points:1.Take special care not to increase the RPM’s of the engine while climbingsteep slopes. Never drive your dirt bike continuously for more than 30miles without increasing and decreasing the throttle.2.The engine shall be warmed up for 3-5 minutes prior to operation so allcomponents are lubricated sufficiently.3.The driving speed shall not be over 25 MPH maximum during the first 300miles of operation and not over 40 MPH maximum during the remaining300 miles of the “Break-In” period.12
Switches on Right HandlebarIgnition switchThe ignition switch is Located on the right handlebar.When the switch is turned to “ ” (off) position, the engine will not start. Ifthe engine is running and the Off button is pushed the engine will turn off.When the switch is turned to “the kick start lever.” (on) position, the engine can start by usingON buttonOFF button13
Gear ShiftingReduce throttle before shifting. Never increase the throttle while shiftinggears.Depress the gear shift pedal to place the gear in 1st, lift up the lever to shift to2nd, 3rd, 4th.Do not place your foot on the gear-shifting pedal while operating the dirt biketo avoid damaging the clutch caused by sudden gear shifting accidentally.Shifting sequenceShifting forward1Neutral1st gear2nd gear3rd gear4th gearN(N)(1)(2)(3)(4)23Shifting backward4Points for Attention during Drive1.Avoid unnecessary idling of the engine at a high speeds. Doing so willdamage the engine components seriously.2.Only shift to the low speed gears when you feel that there is insufficientpower to climb hills or continue forward.3.Do not use the front brake only or coast using the neutral gear especiallywhen descending or driving at a high speed.4.Decrease the throttle when braking.14
Check-ups, Adjustment and MaintenanceChecking the OilCheck the engine oil each time prior to operating the dirt bike.The oil level should be between the upper and lower lines of the oil fill cap/dipstick.1.Set the motorcycle on level ground. Remove the oil fill cap/dipstick, wipeit clean and then insert the dipstick into the crankcase again to check theoil level. There is no need to screw the oil fill cap/dipstick into its hole inthe crankcase.2.Add lubricating oil to upper line of oil fill cap/dipstick when needed, butdo not overfill.3.Finally screw on oil fill cap/dipstick tightly.! CAUTIONNever start the engine when there isinsufficient lubricating oil. Otherwise, itwill cause harm to the engine.Oil fill capand dip stickLubricating Oil RecommendedThe lubricating oil is an important factor affecting the performance andservice life of the engine. Please refer to the chart for the correct grade ofengine oil based on the environmental conditions in your area. Do not useany other type of oil other than what is recommended in the chart. DO NOTMIX OIL WITH THE GASOLINE.Lubricating oils of differentviscosity shall be employedin different regions and atdifferent temperatures.20W-505W-40 15W-50MACHINEOIL10W-40 10W-5010W-30 CTEMP. F15-30 -20 -10-22 -4-1401020304032506886104
Changing the Oil1.Remove the screw plug located at the bottom of the engine and let theoil drain into an approved collection container. DO NOT PERFORM THISPROCEDURE WHILE THE ENGINE IS HOT. SERIOUS BURNS COULDRESULT FROM CONTACT WITH HOT OIL.2.Dispose of the used oil properly. For proper disposal procedures,contact your local oil recycling center3.Clean and replace the screw plug tightly.4.Refill the engine with the proper amount of oil and recheck the amount ofoil in the engine by using the oil fill cap/dipstick.Screw plugCheck-up of Spark Plug1.Remove the cap of spark plug andscrew off the spark plug using the plugwrench.2.Clean the spark plug all around orreplace it if it is corroded or there is toomuch deposit on it.3.Regulate the gap of the spark plug to0.6-0.8mm.The spark plug of the designated typeshould be used. The applicable type ofspark plug: A7RTC160.6 0.8mm
VALVE INSPECTIONRefer to maintenance schedule in this owner’s manual forvalve adjustment inspection intervals.Valve clearance should be:Intake:0.002 inch (0.05 mm)Exhaust:0.003 inch (0.076 mm)The engine will make excess noise if the gap is too large in air valve. Ifgap is too small valve operation will be hindered which could result invalve malfunction and failure. Therefore, air valve gap must be checkedperiodically.If you have the proper tools and are mechanically proficient, instructions onadjusting the valve clearance are given in the service manual. If assistance isneeded please contact Baja Inc. to find your local service center.17
Checking & Cleaning the Air FilterAir filter is located under left side plastic cowling. Cowling will need to beremoved.Take the air filter out and check to see if it is dirty or torn.Tap the air filter clean. If necessary use compressed air to gently clean.Air filter! CAUTIONThe air filter element must be intact or the engine will suck in dust anddirt, resulting in a shorter service life of the engine.Water should be prevented from entering into the filter when washingthe vehicle.The filter element shall be cleaned gently without twisting to preventit from cracking. Never wash it with gasoline or any acid, alkaline ororganic volatile oil to avoid its aging, which will result in reducing theeffect of the air filter oil to catch particles before they enter the engine.Replace the filter element with a new one if it is broken or cracked.18
Adjusting the Throttle CableMake sure the throttle works properly.Check if the throttle twist grip has the required free operating movement.The required free operating movement: 2-6mm (.078” - .24”) If the grip cannotbe moved freely, turn the adjusting nut located on top of the throttle twist gripto ensure proper operating movement.After adjustment, start the engine and check for the operating movementagain. Repeat the adjustment if necessary until the desired operatingmovement is obtained.Adjusting nutAdjusting the CarburetorAdjusting procedures of idling speed:1.Support the vehicle by a stand.2.Adjust the idling speed by the throttle stop screw to 1500 150rpm.! CAUTIONDo not try to correct a malfunctioning carburetor by adjusting the idlingspeed. If the carburetor is not functioning properly, it should be repairedby a service center.Adjust idling speed only when the engine is warmed up or 10 minutes afteroperation.Idling speed adjusting screw19
ADJUSTMENT OF FRONT BRAKE10-20mmAdjusting nutThe front brake lever has a free operating movement of 10-20mm as shown.1. Turn the adjusting nut beneath the front hub, clockwise to increase andcounter clockwise to decrease the free operating movement.2. You can also adjust the nut on the handlebar; clockwise to increase andcounter clockwise to decrease the free operating movement.3. Be sure to tighten the lock nut when adjustment has been made.ADJUSTMENT OF REAR BRAKEBrake armPull rodBrake cableadjusting nut20-30mmRear brake pedalBrake arm pinVehicle should be properly supported before checking by kick stand.1. The rear brake pedal has a free operating movement of 20-30mm.2. To make adjustment, turn the rear adjusting nut clockwise to reduce andcounter clockwise to increase the free operating movement of the brakepedal.20
Adjustment of Chain1.2.3.4.When chain adjustment is needed, loosen rear axle nut .Turn the chain adjusting nuts on the left and right sides to adjust thetension of the chain and to align the marking of the chain adjuster withthe engraved lines in the similar position on both sides.Tighten rear axle bolt by a torque of 35-50Nm (25-37 ft.lb.).Repetitively check the tension of the chain.When the rear wheel is changed in position and the chain adjusted,the free operating movement of the brake pedal will be affected, which,therefore, should be checked thereafter and also adjusted if necessary.Rear axle nut15-20mm1/2” - 3/4”Adjustment marksLocated on each side ofDirt BikeChain adjusting nutsChain adjusting nutsGreasing procedures to the driving chain1.Shut off the engine2.Add light amounts of machine oil or chain grease to the driving chain.(Too much machine oil or chain grease may cause splattering to occur.)Attention:The chain should be replaced when the adjusting limit has reached it’smaximum.21
EXHAUSTWARNINGThe hot exhaust muffler could burn you.The muffler will be hot enough to burn you after stopping the engine.Wait until the exhaust muffler cools to remove it.WARNINGRunning the engine indoors or in a garage could be hazardous.Exhaust gas contains carbon monoxide that is colorless and odorless.It could cause serious injury or death.Only run the engine outdoors where there is fresh air.WARNINGBlowing out the accumulated hot carbon particles where there isflammable material could cause a fire.Exhausted hot carbon particles could catch fire.22
TROUBLESHOOTINGThis troubleshooting guide is provided to help you to find the cause of somecommon complaints.COMPLAINT: Engine is hard to start or does not start at all. Something isprobably wrong with the fuel system or ignition system.! CAUTIONFailing to troubleshoot a problem correctly would damage your Dirt Bike.Improper repairs or adjustments may damage the vehicle. Such damagemay not be covered under warranty. If you are not sure about the properaction, consult your authorized service center or BAJA INC. about theproblem.Fuel Supplying Check1.Make sure there is adequate fuel in the fuel tank.2.Check that the engine stop switch is in the “RUN “ position.3.Check that the fuel valve is in the “ON” position.4.Make sure there is enough fuel reaching the carburetor from the fuel tank.WARNINGDraining fuel from the carburetor could be hazardous.Fuel could catch fire if you do not handle it properly.When draining the carburetor, be sure to shut the engine off. Do notsmoke, and never drain or refuel in an area where there are openflames or sparks. Do not spill the fuel or you may create a fire hazard.Dispose of drained fuel properly.a.Loosen the drain screw which is located under the carburetor. Drain thefuel from the carburetor into a container.b.Tighten the drain screw.c.Run the engine for a few seconds. Shut off engine.d.Loosen the drain screw and check that the carburetor is filled back upwith fuel.e.If fuel is reaching the carburetor, the ignition system should be checkednext.23
Ignition System Check1.Remove the spark plug and reattach it to the spark plug lead.2.Turn engine switch to “ON”. Start the engine. If the ignition system isoperating properly, a blue spark should jump across the spark plug gap.If there is no spark, take your machine to your service center.WARNINGPerforming the spark test improperly could be hazardous.You could get a high voltage electrical shock if you are not familiar withthis procedure.Do not perform this check if you are not familiar with the procedure.Do not point the spark plug near the spark plug hole during this test.Do not do this test if you have a heart condition or wear a pacemaker.Do not perform this test is any near any open fuel containers for nearfuel which has spilled on the ground, on the engine, or any part ofthe ATV.COMPLAINT: Engine stalls1.Make sure there is enough fuel in the fuel tank.2.Check to see that the spark plug is not fouled. Remove the spark plugand clean it. Replace it, if necessary.3.Make sure the fuel valve is not clogged, and the fuel tank is not clogged,either.4.Check the idle speed. If necessary, adjust it using a tachometer. Thecorrect idle speed is 1400 1600 r/min.5. Make sure the air filter is clean.24
Vehicle WashingCleaning the vehicle regularly can slow down color fading. It will also make iteasier to check to see if there is any damage and/or any oil leakage.! CAUTIONWashing the motorcycle with over-pressurized water may causedamage to some of its components. Therefore, do use a pressurewasher to clean the vehicle. The following parts should be cleanedusing low pressure water:— Wheel hub— Exhaust pipe— Fuel tank and lower portion of cushion— Carburetor— Head lock and ignition switch— Meters1.After pre-wiping, the vehicle should be washed with clean water toremove dirty residues so as to prevent corrosion. Plastic subassembliesshould be cleaned by wiping with a cloth or foam soaked in neutraldetergent solution, followed by washing with clean water.2.After the cleaned vehicle is air dried, grease the chain and run the engineat idling speed for a few minutes.3.Prior to driving, carefully check the braking system repeatedly and repairor adjust it if necessary.25
Instructions for StorageIf the vehicle is not going to be used for a long period of time, for example,in winter time, some steps should be taken to prevent malfunction of anddamage to its components which might be caused by long storage. Beforestoring the vehicle for a long period , proper maintenance has to be carried incase maintenance is not completed when the vehicle is put back into use afterstorage.1. Change engine oil and clean oil filter.2. Drain off fuel from the fuel tank and carburetor, spray atomized anti-rustoil onto the inside wall of the tank and then close the tank. Dispose ofany drained fuel properly so as not to adversely affect the environment.Carburetor DrainscrewAttention:If the storage will last for more than one month, fuel in the carburetormust be fully drained. This will help ensure that the carburetor maintainsits normal performance after the storage.WARNINGGasoline is flammable and may cause fire and even an explosionunder certain conditions. Therefore, do not smoke, make a fire or haveany fire around while draining off fuel.3.Take out the spark plug, pour about 15-20ml (.5 - .68 oz.) of clean engineoil into the cylinder, step down on the kick lever repetitively several timesso as to have machine oil distributed all over the engine and finally fit thespark plug back on.Attention: The ignition switch must be set to “ ” (OFF) position beforestepping down on the kick lever. To protect the ignition system fromdamage, the spark plug should be inserted in its cap and grounded.4.Wash the vehicle clean, wipe it dry and apply an even coat of wax to thepainted surface and a coat of anti-rust oil on the chrome-plated surfaces.5.Inflate the tires as required and put the vehicle up on wooden blocks withthe two wheels clearing the ground.6.Put the vehicle in a shady and cool place free from humidity and directsunlight and cover it properly (not with plastic or other painted materials).If there is a garage, store it within.26
Resumption of Service after Storage1.Remove the covering and remove the wooden blocks used in storing thevehicle. Change the engine oil if the vehicle has been out of service forover 4 months.2.Drain off the remaining atomized anti-rust oil from the fuel tank, followedby filling it with fresh gasoline therein.3.Prior to driving, all the required check-ups must be made. It is betterto drive it at a low speed in an open area to test its performance beforenormal operation.Table and Torque of FastenersSer. No.FastenerTorque (Newton/m) (Foot/lb)1Front wheel axle nut35-45Nm (26-33 ft.lb.)2Rear wheel axle nut50-60Nm (37-44 ft.lb.)3Nut for tightening upperjoining plate of front forkwith vertical tube40-50Nm (30-37 ft.lb.)4Nut for fixing engine20-25Nm (15- 18 ft.lb.)5Rear arm nut35-50Nm (26-37 ft.lb.)6Bolt for tightening upperjoining plate of front forkwith shock absorber15-20Nm (11-15 ft.lb.)7Bolt for fixing footrest20-25Nm (15-18 ft.lb.)27
Resumption of Service1.Remove the covering and clean the vehicle. Change the lubricating oil ifthe vehicle has been off service for more than 4 months.2.Charge the battery, if applicable, and remount it.3.Drain off the anti-rust solution from the fuel tank, followed by filling fueltherein to the required level.4.Prior to driving, test the vehicle at a low speed in a safe place.Maint
Congratulations on your purchase of the BAJA INC. DR49 Dirt Bike. Your bike is warranted to be free of manufacturing defects in material and workmanship for a period of 90 days from the date of purchase. During the warranty period BAJA, INC. will at its option, repair, provide replacement parts or replace you