Transcription
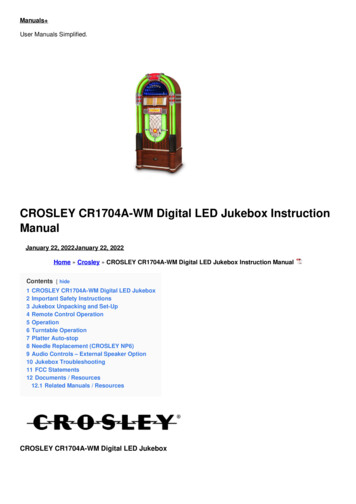
Manuals User Manuals Simplified.CROSLEY CR1704A-WM Digital LED Jukebox InstructionManualJanuary 22, 2022January 22, 2022Home » Crosley » CROSLEY CR1704A-WM Digital LED Jukebox Instruction ManualContents [ hide1 CROSLEY CR1704A-WM Digital LED Jukebox2 Important Safety Instructions3 Jukebox Unpacking and Set-Up4 Remote Control Operation5 Operation6 Turntable Operation7 Platter Auto-stop8 Needle Replacement (CROSLEY NP6)9 Audio Controls – External Speaker Option10 Jukebox Troubleshooting11 FCC Statements12 Documents / Resources12.1 Related Manuals / ResourcesCROSLEY CR1704A-WM Digital LED Jukebox
Important Safety Instructions1.2.3.4.5.6.7.8.9.10.11.Please read and keep these instructions handy.Please follow all instructions and heed all warnings.Do not use this jukebox in or near water. Jukebox is for indoor use only.Clean only with a dry cloth.Do not block any ventilation openings. Install in accordance with the manufacturer’s instructions.Do not install near any heat sources such as radiators, heat registers, stoves or other apparatus (includingamplifiers) that produce heat.Do not defeat the safety purpose of the polarized or grounding-type plug. A polarized plug has 2 blades withone wider than the other. A grounding type plug has two blades and a third grounding prong. The wide blade orthe third prong are provided for your safety. If the provided plug does not fit into your outlet, consult anelectrician for replacement of the obsolete outlet.Protect the power cord from being walked on or pinched particularly at plugs, convenience receptacles, and thepoint where they exit from the apparatus.Only use attachments/accessories specified by the manufacturer.Use only the stand, specified by the manufacturer. When a stand is used, do not attempt to move the jukeboxand stand together. Separate the jukebox from the stand prior to moving1. Unplug this apparatus during electrical storms or when unused for long periods of time.Refer all servicing to qualified service personnel. Servicing is required when the jukebox has been damaged inany way, such as if a power-supply cord or plug is damaged or the jukebox does not operate normally or hasbeen damaged.This jukebox contains high voltage parts. Do not attempt to carry out any work that is not specifically instructed in thismanual. If the jukebox fails to operate correctly, disconnect power source and read the troubleshooting instructions atI this manual before attempting to locate issue. DO NOT attempt to lift the jukebox with one person.This appliance must be connected to a main electrical socket with a protective grounded connection.WARNING: To reduce the risk of fire or electric shock, do not expose this apparatus to rain or moisture.Jukebox Unpacking and Set-UpRemove and save all packing materials from jukebox for warranty purposes.
Power Source and Initial Set-Up1. Remove the AC power adapter and cord from the packing material and connect the AC power cord to the ACadapter.2. Plug the small end of the adapter into the DC jack on the back of the jukebox.3. Connect the AC adapter cord into the wall socket.4. Push the toggle switch on the rear of the jukebox to “ON”. This toggle switch can remain activated in the “ON”position once the jukebox is in its final position.5. Ensure the SPEAKER switch is moved the to the INT (Internal) setting unless you intend to attach your own setof external speakers. See details contained in manual regarding the External Speaker Option if you intend toutilize external speakers.Antenna1. Unwind the FM Antenna supplied and connect it to the FM Antenna jack on the rear of the jukebox.2. Position the antenna where you can obtain optimum FM reception.Note: If you have trouble tuning into an FM station, you may have to re-position the antenna for better receptionuntil it is clear with no interference.Set-Up – Rear Panel Layout & ConnectionsJukebox Operation – Front Panel Layout & Controls
Basic Jukebox Audio & LED SettingsPress the front POWER button located on the right front panel behind the simulated title strips. The simulated titlestrip panel flips down to reveal all necessary jukebox controls.Volume Control: Press VOL (UP) or VOL – (DOWN) on the remote or on the front panel to adjust the volume.Select from each of the audio options using the “INPUT” button: Tuner (for AM/FM Radio) – CD – Bluetooth (BT) orAUX input by selecting the function displayed in the LED panel. The INPUT function button on the remote control willalso change the audio functions.When the jukebox is on, press the front POWER switch to turn the jukebox off. This will turn off both the LED lightingand audio controls. The red button located on the remote control also will turn the jukebox lighting and audio controlon or off.Press the LIGHT MODE button on the front panel or the remote control to change the external lighting pattern. Thereare 4 light sequences to choose from.Remote Control OperationNearly all the functions of the jukebox can be operated remotely. For best performance, the remote control should bepointed toward the jukebox and have a clear path for the signals to travel.Ensure the remote has two fresh AAA batteries. Batteries are included with the jukebox but must be installed prior to
initial use.OperationCD Playback OperationPlaying a CD1. Press the Input button on the remote or front panel to select the CD operation mode.2. Open the simulated title strip compartment and press the Open/Close button on the remote or on the front panel toopen the CD compartment.3. Insert a disc with the printed side facing up. Press the OPEN/CLOSE button on the remote or on the front panelagain to close the compartment, READING is displayed as the CD player scans the contents of the disc.4. Track No. 1 will be played automatically after it finishes the reading of CD contents.5. Press FF or FR on the remote once or repeatedly until the desired track number appears in display. Pressand hold either the FF or FR to advance or go back within a song or track.6. Press the STOP button on the remote or the front panel to stop playback completely.7. For repeat play of a single song or CD track, press REPEAT on the remote once. Press REPEAT twice to repeatthe entire CD8. Press the Play/Pause button on the remote to suspend playback. Press thePlay/Pause button to resume playback.CD-MP3 Disc PlaybackIf your MP3 CD is separated into folders, follow the steps below to access the folders.1. While the CD is stopped, press the Folder Up or the Folder Down buttons on the remote to advance forward orbackwards through the folders on your disc.2. Once the desired folder is reached, use the Forward Skip or the Backward Skip buttons to select the desiredtrack.3. Press the Play button to begin playback of the selected track.4. For repeat play of a single song or CD track, press the REPEAT once. Press REPEAT twice to repeat thecurrent folder. Press the “REPEAT” button three times to repeat all the folders on CD.Programming TracksYou may store up to 20 tracks in the desired sequence from any readable CD disc.1. Use the remote and press the STOP button using the remote press PROGRAM to start programming.2. Press PREV/CH or NEXT/CH- on the front panel or the remote press FF or FR once or relatedly until the
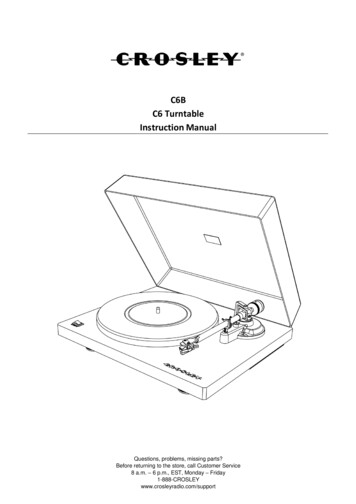
3.4.5.6.desired track number appears in the display.1. For MP3 use the remote and press the STOP button. Using the remote, press PROGRAM to startprogramming.2. Press PREV/CH or NEXT/CH- on the front panel or on the remote. Press FF or FR to select desiredfolder. Then press PROGRAM again to select the desired track. Press FF or FR once or repeatedlyuntil the desired track number appears in the display.Press PROGRAM to confirm, display shown stored track No. and next store position.Repeat steps to select and store all desired tracks. FULL is displayed if you attempt to program more than 20tracks.Press PLAY/PAUSE to play the programYou will erase the contents of the memory by: Pressing the POWER button, selecting another INPUT mode oropening closing the CD tray.Bluetooth Operation1. To pair the jukebox with the audio device of your choice, Select the BT INPUT mode by pressing the inputbutton on the front panel or remote control to select the BT INPUT mode.2. On your Bluetooth audio device, select the Bluetooth settings or functions and look for a connection labeled“CR-1215A”. The device should show the “CR-1215A” connection as available but “Not Connected”. Select the“CR-1215A” Bluetooth connection on the audio device to pair the connection to the jukebox.3. When successfully paired with the jukebox, you’ll hear an ascending tone when connected.4. Select an audio option from your connected Bluetooth device. Press play on the device to start the music.Ensure Bluetooth audio device has volume adjusted properly.5. Press the FF or FR on the remote to skip forward or backwards.6. Press the Play/Pause button on the remote to start and stop the playback of your music.FM Radio Operation1. Press the INPUT button on the front panel or the FM button on the remote to select the Tuner Mode.2. To Auto Scan stations and set them in memory, press the SCAN/PAUSE/PLAY button on the front panel orSCAN/PAIR on the remote.3. To manually scan a radio station, press PREV/CH- or PREV/CH on the front control or the FF or FR onthe remote, this will auto tune the next radio station available.4. To listen to a preset station: Press CH-/FOLD or CH /Fold on the remote or PREV/CH- or PREV/CH on thefront panel.Auxiliary (AUX) Audio OperationRCA input is located on the REAR CONTROL PANEL and can accept a variety of device inputs. No input cord issupplied with the jukebox. The user-supplied cable should match the output of the device attached to the jukebox andhave an “RCA” connection for input and connection with the jukebox. Ensure the audio device connected to the AUXconnection has a proper volume adjustment for output.Turntable Operation1. 45 RPM Adapter2. Tonearm Lift Lever3. Speed Switch4. Auto Stop Switch5. Hold Down Clip6. Tonearm Rest.
1.2.3.4.5.6.7.8.9.Press the INPUT button on the front panel or on the remote to select the Phono Mode.Set the Speed Switch accordingly.Place the record on the turntable. Use the 45 RPM Adapter if necessary.Remove the stylus protector from the stylus assembly.Note: To avoid stylus damage, make certain the included stylus guard is in place whenever the turntable isbeing moved or cleaned.Release the tonearm Hold Down Clip.Note: when the turntable is not in use, remember to lock back hold down clip.Use the Tonearm Lever to lift up the tonearm.Gently move the tonearm over the record where play is desired to begin. Set the Tonearm Lever back to thedown position, the tonearm will descend slowly onto the record and begin to playback.When the record is finished playing, use the Tonearm Lever again to raise the tonearm and then return it to theTonearm Rest. Release the lever to let the tonearm sit back at its rest. To suspend the playback, repeat thesame steps.Lock the Tonearm Clip to secure the tonearm.Platter Auto-stopIf the Auto-stop Switch is set to ON position, the platter will stop spinning automatically when the record plays to theend. In some rare occasion, if the turntable stops playing before the end of the record, set the switch to OFF positionthe turntable should overcome this issue.Needle Replacement (CROSLEY NP6)Removing Needle1. Gently pull down the front edge of the needle.2. Pull needle forward.3. Pull out and remove.Installing Needle1. Position the needle with its tip facing down.2. Line up the back of the needle with the cartridge.3. Insert the needle with its front end at a downward angle and gently lift the front of the needle upward until itsnaps into place.
Audio Controls – External Speaker OptionThe jukebox does not require the use of external speakers. If you intend to fill a large room or would like a largervolume, external speakers can be used either alone or in conjunction with the speakers built-in to the jukebox. If youelect not to use external speakers, be sure the SPEAKER switch is switched to INT. (Internal)The speaker jacks for external speakers are located on the rear of the jukebox. Located near the speaker jacks is aswitch labeled INT (Internal Speakers Only) EXT (External Speakers Only) and MIX. (Using both Internal andExternal Speakers) When using external speakers only, this switch must be switched to the EXT position. Doing thisturns off the internal speakers in the jukebox and redirects the sound to the external speakers only. The MIX positionwill play through both the internal jukebox speakers and external speakers at the same time and will produce thehighest volume sound available. The MIX position will result in lower volumes through the internal jukebox speaker ifno speakers are attached and jukebox is operated in MIX mode.Jukebox TroubleshootingNo PowerEnsure jukebox is plugged in to wall socket correctly.Verify the LED is glowing green on the AC adapter attached to the jukebox and wall socket.Ensure wall socket is working properly and not switched off.Ensure AC adapter has all connections tight from the wall socket to the jukebox.Remove the AC adapter from the back of jukebox and plug back and ensure the rear POWER switch is ON.No SoundCheck that the volume is turned up by pressing VOL button on the remote or front control panel. NOTE:Volume range on some units start at level 1 and ends at level 30 MAX.Make sure the SPEAKER INT.EXT.MIX. Slide switch on back panel of the jukebox is switched to the correctsetting. INT for internal speakers only, EXT for external speakers only, MIX for both internal and externalspeaker operation.Check to make sure POWER switch is turned on and jukebox is receiving power from the wall socket. EnsurePOWER switch on back on jukebox is switched to ON.If jukebox is operated in “AUX” input mode, ensure the device has a volume switch which is adjusted properly.CD does not playEnsure CD is inserted correctly, with label of CD facing up.Check to see that the surface of the CD is clean.Make sure the function switch is set to CD mode, with jukebox volume adjusted properly.If CD was not commercially produced, it may be an unsupported format if produced from a CD burner with audiofiles from a computer.Remote is not workingReplace batteries in remote.Be sure to point the remote towards the remote sensor when operating. Remote sensor is located near centerof jukebox, just above the “CROSLEY” name.Remove obstacles in the path of the remote and jukebox so the remote signal has a straight path to the sensorthat is on the front of the jukebox.FCC StatementsAny Changes or modifications not expressly approved by the party responsible for compliance could void the user’sauthority to operate the equipment.
This equipment has been tested and found to comply with the limits for a Class B digital device, pursuant to Part 15of the FCC Rules. These limits are designed to provide reasonable protection against harmful interference in aresidential installation. This equipment generates, uses, and can radiate radio frequency energy and, if not installedand used in accordance with the instructions, may cause harmful interference to radio communications. However,there is no guarantee that interference will not occur in a particular installation. If this equipment does cause harmfulinterference to radio or television reception, which can be determined by turning the equipment off and on, the user isencouraged to try to correct the interference by one or more of the following measures:Reorient or relocate the receiving antenna.Increase the separation between the equipment and receiver.Connect the equipment into a circuit different from that to which the receiver is connected.Consult the dealer or an experienced radio TV technician for help.This device complies with part 15 of the FCC Rules. Operation is subject to the following two conditions:(1) This device may not cause harmful interference, and (2) this device must accept any interference received,including interference that may cause undesired operation.This equipment complies with FCC radiation exposure limits set forth for an uncontrolled environment.This equipment should be installed and operated with minimum distance 20cm between the radiator &your body.Documents / ResourcesCROSLEY CR1704A-WM Digital LED Jukebox [pdf] Instruction ManualCR1704A, AUSCR1704A, CR1704A-WM, Digital LED Jukebox, CR1704A-WM Digital LED JukeboxRelated Manuals / Resourceselement Digital LED TV Instruction Manualelement Digital LED TV Instruction Manual - Download [optimized] elementDigital LED TV Instruction Manual - Downloadelement Digital Led Tv User Guideelement Digital Led Tv WHAT IS INCLUDED? INSTALLING THE STANDSDo not install the stands if you want CROSLEY CR1120A Diner Jukebox Radio Instruction ManualCR1120A Diner Jukebox Radio Instruction Manual Safety InstructionsRead and understand this entire manual before using this product. Crosley CR704C Instruction ManualCrosley CR704C Instruction Manual - Download [optimized]Crosley CR704C Instruction Manual - Download
Manuals ,homeprivacy
Manual January 22, 2022January 22, 2022 Home » Crosley » CROSLEY CR1704A-WM Digital LED Jukebox Instruction Manual Contents [ hide 1 CROSLEY CR1704A-WM Digital LED Jukebox 2 Important Safety Instructions 3 Jukebox Unpacking and Set-Up 4 Remote Control Operation 5 Operation 6 Turntable Operation 7 Platter Auto-stop 8 Needle Replacement .


![Amalfi 180 Led Otto [28.01.22]](/img/23/022e99f7-d57e-51b4-8c41-152437a0d633.jpg)